Audio Visual Furniture 411 Assembly And Setup Instructions

Type
Assembly And Setup Instructions

This manual is also suitable for

Assembly and Setup Instructions
Note:
If you cannot understand these instructions or are concerned about safety of the installation
Contact a qualified contractor or contact AVFI at 1-877-834-3876.
Confirm all hardware is included before you begin assembly.
Not all hardware supplied will be used depending on the manufacturer of your display/s.
Page 1
of 4
AUDIO VISUAL FURNITURE INTERNATIONAL
288 Don Hillock Drive, Aurora, Ontario L4G 0G9 www.video-furn.com
Toll Free: 1-877-834-3876 Fax: 1-905-751-1488 Local: 905-751-1459
411-Extension for
VC-TABLE and T324
version 0.0
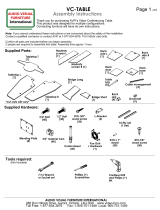
Cam Pin
(8)
5/16 x 1"
wooden dowel
(6)
10 x 5/8
wood screw
(6)
6 Hole mending
plate
(5)
10 x 1"
wood screw
(30)
#2 Phillips (+)
Screwdriver
7/16 Wrench
or Socket
Page 2
of 4
SUPPLIED PARTS
SUPPLIED HARDWARE
REQUIRED TOOLS (not included)
Cordless drill
w/ #2 Phillips (+)
bit
TABLE
LEGS
(6)
3/4" bolt
(24)
3/4" Cams
(8)
E-Table Tops
Right (1)
Left (1)
Modesty
Screen
Right (1)
Left (1)
CABLE
MANAGEMENT
(2)
3
4
3
9
4
12
Repeat Steps 1, 2 and 3 to complete extension section
3
(10- 5/8")
In order to
TIGHTEN
the cams, turn the
screwdriver and the cam
CLOCKWISE
In order to
LOOSEN
the cams, turn the
screwdriver and the cam
COUNTER CLOCKWISE
The xxxxxx Series table will require you to use this
type of operation throughout the assembly
process
Page 3
of 4
Direction of
pieces
Required to go under the
table
4
3
1
2
411 with VC-TABLE
26
411 with T324 Table
26
4
5
Page 4
of 4
Lift DO NOT drag
table sections
  • Page 1 1
  • Page 2 2
  • Page 3 3
  • Page 4 4

Audio Visual Furniture 411 Assembly And Setup Instructions

Type
Assembly And Setup Instructions
This manual is also suitable for

Ask a question and I''ll find the answer in the document

Finding information in a document is now easier with AI