Page is loading ...

Copyright © 2015 Omix-Ada®, Inc.
460 HORIZON DR. SUITE 400 | SUWANEE, GA 30024 | PHONE: 770-614-6101 | FAX: 770-614-6069 | [email protected]
Page 1/9
Part #11546.51
HD Hinge Casting PATENT PENDING
OMIX-ADA® TECHNICAL SUPPORT
FOR WARRANTY INFORMATION VISIT: www.Omix-Ada.com
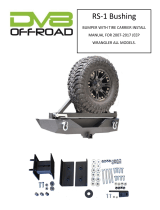
CONTENTS:
HD Hinge Casting
Spacer Plates (2 PCS)
Rev - 02/2015
TOOLS REQUIRED:
Socket Wrench
10” extension
13mm socket
3/4” deep socket
T-20, T-50 Torx bits
Red Thread Lock
Shims
Torque Wrench
5
4
3
2
1
Hex Bolt X 4 Washer X 4
Spacer
Plates
HARDWARE:
Hinge Casting

Copyright © 2015 Omix-Ada®, Inc.
460 HORIZON DR. SUITE 400 | SUWANEE, GA 30024 | PHONE: 770-614-6101 | FAX: 770-614-6069 | [email protected]
Important Safety Information
Your Rugged Ridge® Tire Carrier is intended to increase the utility and enjoyment of your
Jeep® by providing easy access to your rear cargo area and secure mounting of your off-
road spare tire. Before installation, please take a moment to review the following safety infor-
mation and installation instructions. Important safety information is generally preceded by one
of three signal words indicating the relative risk of injury. The signal words mean:
Installation Instructions
• Wear gloves and safety glasses during installation.
• Tire Carrier and spare tire/wheel are heavy. Use jack or seek assistance when lifting, fastening
parts, or installing wheel/tire to carrier.
• Tire Carrier is subject to vibration and shock loads from on and off road use. Regularly inspect
carrier and lug nuts fastening spare to carrier. Do not use and repair if damaged. Use thread
locker and keep lug nuts torqued to 80 ft./lbs.
A hazardous situation which, if not avoided, could result in serious
injury or death. You can be killed or seriously hurt if you do not follow
instructions.
A hazardous situation which, if not avoided, could result in minor or
moderate injury. You can be moderately hurt and may also suffer
property damage if you do not follow instructions.
To reduce risk of personal injury during assembly and use of this product:
Careful attention is required to this instruction or operation, but does
not generally relate to personal injury. Damage to your product or
other property may result if you do not follow instructions.
WARNING
!
CAUTION
!
NOTICE
Page 2/9
HD Hinge Casting PATENT PENDING

Copyright © 2015 Omix-Ada®, Inc.
460 HORIZON DR. SUITE 400 | SUWANEE, GA 30024 | PHONE: 770-614-6101 | FAX: 770-614-6069 | [email protected]
Page 3/9
2. Open the tailgate. Using a T-20 Torx bit, remove
4 torx head screws that attach light to factory tire
mount. Pull light away from tire mount.
3. Remove connector by pushing down on tab and
pulling. Set light aside, it will be used later during
installation. Place connector and wires off to side to
not interfere with Tire Carrier installation.
1. Take off spare tire by removing the 3 lug nuts
using a 3/4” deep socket.
Have another person help lift the tire
off of the carrier.
4. Twist and pull rubber bumper to remove from right
side of tailgate only.
CAUTION
!
HD Hinge Casting PATENT PENDING

Copyright © 2015 Omix-Ada®, Inc.
460 HORIZON DR. SUITE 400 | SUWANEE, GA 30024 | PHONE: 770-614-6101 | FAX: 770-614-6069 | [email protected]
Page 4/9
6. Remove plastic clips by pulling lower portion down
and away from vehicle.
7. Remove the stock tire carrier and brake light
holder by removing the 8 bolts indicated using a
13mm socket.
5. Remove plastic hinge covers. For the long hinge
covers, pull away from the vehicle and to the left.
HD Hinge Casting PATENT PENDING

Copyright © 2015 Omix-Ada®, Inc.
460 HORIZON DR. SUITE 400 | SUWANEE, GA 30024 | PHONE: 770-614-6101 | FAX: 770-614-6069 | [email protected]
Page 5/9
9. Using 13mm socket, remove tailgate hinges from
tailgate by removing the 4 bolts indicated on right.
10. Flip hinges to open position. Using a T-50 bit,
unscrew stock hinges from vehicle removing the
screws indicated at right. This may require using a 10-
inch extension with the T-50 bit in order to reach the
scews.
8. Ensure tailgate is fully closed and locked. On both
sides of tailgate, place shims between bumper and
tailgate to hold tailgate in position while removing
stock hinges.
Shims can be blocks of wood, wedged shims,
etc. that can be made to t snugly and securely
between bumper and tailgate.
Lock Tailgate. Do not open or move
tailgate while hinges are removed.
NOTICE
HD Hinge Casting PATENT PENDING

Copyright © 2015 Omix-Ada®, Inc.
460 HORIZON DR. SUITE 400 | SUWANEE, GA 30024 | PHONE: 770-614-6101 | FAX: 770-614-6069 | [email protected]
Page 6/9
12. Place HD Hinge Casting in position. Reusing 6
factory screws, fasten hinge brackets to vehicle
quarter panel. Attach outside screw rst, then swing
hinge open and install remaining four screws.
Do not fully tighten.
13. Re-using factory bolts and washers removed in
step 6, loosely attach right side of HD Hinge Casting.
11. Thoroughly clean any dirt, debree, and corrosion
from tailgate and quarter panel where HD Hinge
Casting and tire carrier will mount. Painting or
priming bare metal under stock hinges is optional,
but reccomended, especially if corrosion is present.
HD Hinge Casting PATENT PENDING

Copyright © 2015 Omix-Ada®, Inc.
460 HORIZON DR. SUITE 400 | SUWANEE, GA 30024 | PHONE: 770-614-6101 | FAX: 770-614-6069 | [email protected]
Page 7/9
5
4
3
2
1
16. If installing the Rugged Ridge HD Wheel Mount
(Part# 11546.52) with HD Hinge Hinge, stop here and
refer to Step 5 of HD Wheel Mount Instructions.
14. Fully tighten outside hinge bracket bolts.
15. Remove the 4 bolts/washers from Step 12. Swing
HD Hinge Casting open, making sure not to move
the tailgate. Tighten the 4 remaining Torx Head bolts
on hinge brackets. Return to closed position.
HD Hinge Casting PATENT PENDING

Copyright © 2015 Omix-Ada®, Inc.
460 HORIZON DR. SUITE 400 | SUWANEE, GA 30024 | PHONE: 770-614-6101 | FAX: 770-614-6069 | [email protected]
Page 8/9
19. Once all bolts are threaded, tighten the 8 bolts
around the tire carrier.
17. Align tire carrier with tailgate bolt holes and
begin threading the four factory bolts on the right
hand side of the OE tire carrier. Do not fully tighten.
18. Slide spacer plate between tailgate and top left
corner of the OE tire carrier. Loosely re-install factory
bolts and washers. Repeat for bottom left corner.
Some slight shifting of HD Hinge Casting may be
required to re-install all 8 tire carrier bolts.
HD Hinge Casting PATENT PENDING

Copyright © 2015 Omix-Ada®, Inc.
460 HORIZON DR. SUITE 400 | SUWANEE, GA 30024 | PHONE: 770-614-6101 | FAX: 770-614-6069 | [email protected]
Page 9/9
20. Using a 13mm socket, install the 4 supplied hex
bolts and washers to fasten the hinge body to
tailgate. Use red thread locker on bolt threads prior
to installation, and fully tighten bolts before thread
locker dries.
Shims can now be removed.
21. Feed the third brake light wire back through the
OE tire carrier and reinstall factory brake light.
CAUTION
!
22. Re-install spare tire and factory lug nuts. Use a
torque wrench with a 3/4” socket to tighten the lug
nuts to 80 lb/ft.
Have another person help lift the tire
onto the carrier.
Failure to tighten the lug nuts to
t h e p r o p e r t o r q u e s p e c i c a t i o n o f
80 lb/ft could result in serious injury
or property damage.
WARNING
!
HD Hinge Casting PATENT PENDING
/