Page is loading ...

Page 1 of 2 – 12/29/2011 – Rev 12/29/11
INSTALLATION INSTRUCTIONS
JEEP 2007-Current JK Hood Lock #292
Call (970) 564-1762 for Technical Support
Please read and fill out the enclosed warranty registration card to activate your warranty.
PARTS CHECKLIST
#1 Hood Lock
SHIPPING PACKAGE CHECKLIST
#3.1 - (2) 5/16-18 x 1/2”
THREAD CUTTING BOLTS #3.2 - (2) 5/16-18 x 1/2”
BOLTS
TOOLS NEEDED
• ½” socket and wrench
• Body Trim tool
ATTENTION:
• THIS HOOD LOCK WAS DESIGNED FOR A STOCK OEM VEHICLE, ANY MODIFICATIONS MADE TO
THE GRILLE, RADIATOR, ETC MAY AFFECT THE FIT.
PLEASE READ ALL INSTRUCTIONS THOROUGHLY BEFORE STARTING INSTALLATION.
1. IMPORTANT! Make sure the vehicle is parked on a flat surface, placed in park, and the emergency brake is
activated.
2. Raise the vehicle hood. Using a body trim tool, pry up the center head on each of the (6) OEM push-pin retainers
along the top of the #4.2 OEM plastic grille, and remove the (6) push-pin retainers. Pulling the grille carefully but
firmly forward, un-clip the (6) OEM metal spring clips along the bottom of the grille. **UNPLUG THE OEM TURN
SIGNAL/MARKER LIGHTS ON BOTH SIDES OF THE VEHICLE. Remove the grille from the vehicle. Refer to your
vehicles factory service manual for additional instructions on removing the OEM grille.
3. Using a body trim tool, pry the (2) push-pin retainers near the center of the radiator bar which are supporting the OEM
wire harness to the #4.1 OEM radiator support. This will facilitate the installation of the #1 Hood Lock.
4. Install the #3.1 Thread Cutting Bolts in the pre-existing (2) mounting holes along the top of the #4.1 OEM radiator
support. This will cut the threads for these holes. Remove the #3.1 Thread Cutting Bolts.
**NOTE: DO NOT OVER TIGHTEN THE BOLTS OR YOU MIGHT STRIP THE THREADS WHICH WERE CUT INTO
THE #4.1 RADIATOR SUPPORT.
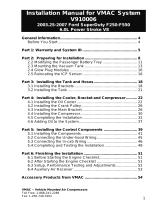
5. Install the #1 Hood Lock onto the #4.1 OEM radiator support and fasten at the front mounting holes with the #3.1
Thread Cutting Bolts. Tighten fasteners. (Figure 1)

Page 2 of 2 – 12/29/2011 – Rev 12/29/11
6. Install the #3.2 bolts into the top mounting holes in the #1 Hood Lock and the threaded holes in the #4.1 radiator
support. Tighten fasteners. (Figure 1) **BE SURE TO USE THE #3.2 BOLTS AT THE TOP OF THE RADIATOR
SUPPORT FOR CLEARANCE TO THE #4.2 OEM GRILLE.
7. With the #1 Hood Lock in the un-locked position (key turned counter-clockwise), lower the vehicle hood and allow the
#4.3 OEM hood latch to engage the #4.1 radiator support. Lock the #1 Hood Lock and test the lock has engaged the
#4.3 hood latch securely by pulling firmly up on the vehicle hood. You should not be able to lift the vehicle hood.
Unlock and raise the hood again.
**Note: It may be necessary to push the vehicle hood downward when locking the #1 Hood Lock in order for the lock
cam to align with the #4.3 hood latch.
8. Re-install the OEM wire harness by re-inserting the OEM push-pins removed in step 3.
9. Re-install the #4.2 OEM grille by fastening the lower spring clips and securing with the upper push-pin retainers.
Reconnect the wiring plugs for both turn signal/marker lights.
FIGURE 1
Call (970)564-1762 for Technical Support
/