The Artifactory
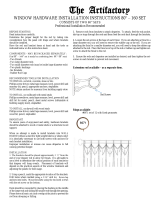
WINDOW HARDWARE INSTALLATION INSTRUCTIONS for 1” TELESCOPING 26” - 48” SET
Professional Installation Recommended
BEFORE STARTING
Read instructions carefully.
Determine the proper height for the rod by taking into
consideration how the panel will drape and where brackets should
be installed.
Have the rod and bracket items at hand and the tools as indicated
below on this instruction sheet
CONTENTS OF PACKAGE:
PLEASE NOTE THESE MAY BE PACKAGED SEPARATELY
-One large diameter rod
-One small diameter rod (may be packaged inside large diameter
rod)
-Two Finials
-One Plastic Bushing
-Two Metal Brackets
-Plastic Rod Caps
RECOMMENDED TOOLS FOR INSTALLATION
TO INSTALL on brick, concrete, stone or tile:
Phillips screw driver, metal tape measure, level, power drill and
masonry bit, pencil, appropriate anchors, stepladder.
NOTE obtain anchors for masonry from building supply store
TO INSTALL on wallboard with metal studs
Phillips screwdriver, metal tape measure, level, power drill and
drill bit for metal, pencil, sheet metal screws [obtainable at
building supply store], stepladder
TO INSTALL on drywall with wood studs
Phillips screw driver, metal tape measure, level, power drill and
wood bit, pencil, stepladder
IMPORTANT
To ensure years of enjoyment and safety, hardware brackets should
be attached to wood or metal studs or a structural wood support.
When an attempt is made to install brackets into WALL BOARD
without a stud [for light weight fabrics or sheers only] it is
absolutely necessary to use both screws with anchors for each
bracket installation.
Improper installation or misuse can cause draperies to fall causing
potential danger.
INSTALLATION
1. The brackets should be placed approximately 1 ½” from the end
of your drapery rod to allow for finials. It is advisable to use a
level to determine the vertical position of each bracket so that
drapery will hang evenly. Placement of brackets will depend on
the practical aspects of the window treatment and adjusting the
panels for best usage.
2. Using a pencil, mark the appropriate location of the brackets.
Drill holes where marked using a 3/16” drill bit. Screw/tap
anchors into holes. Mount brackets using the enclosed screws with
the set screw on the bottom.
Rods should be connected by placing the bushing in the middle of
the larger rod and sliding the smaller rod through the opening.
Please leave at least an eight inch overlap at the joint to prevent the
rod from drooping or falling.
3. Remove rods from brackets to attach draperies. To attach, feed
the rod pocket, tab-top or rings through the rod and then feed the rod
back through the brackets.
4. Loosen the set-screws at the base of each finial. If you are
attaching a finial to a large diameter rod, you will need to remove the
rubber cap on the rod.
When you are attaching the finial to a smaller diameter rod, you will
need to keep the rubber cap attached to the rod. Place the finial on
top of the rod or rubber cap and tighten set-screw to attach the finial
to the rod.
5. Ensure the rods and draperies are installed as desired, and then
tighten the set-screws in each bracket to prevent rod movement.
Extension rod available – as a separate item.
Rings available:
#8971-40 set of 12 Metal with fixed grommets