Page is loading ...

7428141
AUGUST 2012
CF SERIES
COMPRESSED AIR FILTERS
OPERATOR
MANUAL
CF12 CF16 CF20
CF24 CF28 CF32
CF36 CF40 CF44
CF48

Grade Identification
Filter grade can be identified by the third digit of the model number. In addition, elements with a foam outer sleeve
can be identified by color.
Grade
Description Type Outer foam color
11
Mechanical Separator Impaction type separator none
9 Separator/filter Mechanical separator and 3 micron coalescer none
7 General purpose air line filter 1 micron coalescer none
6 Dry Desiccant After-filter 1 micron after-filter for desiccant dryers none
5 High efficiency oil removal filter High efficiency (99.99+%) coalescer Red
3 Maximum efficiency oil removal filter Maximum efficiency (99.999+%) coalescer Blue
1 Oil vapor removal filter Activated carbon adsorber Green
Model Number Configuration
CF (1) - (2) - (3) - (4)
1. Filter Grade is indicated in space (1).
2. Housing Number is indicated in space (2).
3. Connection Size is indicated in space (3)
4. Features
D = Internal Automatic Drain Mechanism
P = Differential Pressure Slide Indicator
G = Differential Pressure Gauge Indicator
L = Liquid Level Indicator
S = Corrosion Proof Stainless Steel Element
X = External Drain Adapter
M = Filter Monitor
Example: A Grade 5 high efficiency oil removal filter with a capacity of 100 scfm
and 3/4” NPTF connections would be configured as: CF 5-24-6DGL
(1) Filter Grade
11 - Mechanical Separator
9 - Separator/Filter
7 - Air Line Filter
6 - Dry Desiccant After-filter
5 - High Efficiency Oil Removal Filter
3 - Maximum Efficiency Oil Removal Filter
1 - Oil Vapor Removal Filter
(2) Housing
Number Capacity
scfm (m
3
/hr)
@ 100 psig (7 kfg/cm
2
)
12
16
20
20 (35)
35 (60)
60 (105)
24
28
100 (170)
170 (290)
32
36
250 (425)
375 (640)
40
485 (825)
44
48
625 (1060)
780 (1325)
(3) Connection Sizes
3- 3/8" NPTF or
4- 1/2" NPTF
3B- 3/8" BSP or
4B- 1/2" BSP
6- 3/4" NPTF or
8- 1" NPTF
6B- 3/4" BSP or
8B- 1" BSP
8- 1" NPTF or
10- 1-1/4" NPTF or
12- 1-1/2" NPTF
8B- 1" BSP or
10B- 1-1/4" BSP or
12B- 1-1/2" BSP
16- 2" NPTF or
20- 2-1/2" NPTF
16B- 2" BSP or
20B- 2-1/2" BSP
20- 2-1/2" NPTF 20B- 2-1/2" BSP
(4) Features
D - Internal Automatic Drain Mechanism
P - Differential Pressure Slide Indicator
G - Differential Pressure Gauge Indicator
L - Liquid Level Indicator
S - Corrosion Proof Stainless Steel Element
X - External Drain Adapter
M - Filter Monitor

1
General Safety Information
1. Pressurized devices
• Donotexceedmaximumoperatingpressureindicated
on serial number tag.
• Makecertainlterisfullydepressurizedbeforeservicing.
2. Breathing Air
• Airtreatedbythisequipmentmaynotbesuitablefor
breathingwithoutfurtherpurication.RefertoOSHA
standard1910.134forbreathingairrequirements.
3. Flammable gases
Whilethematerialsofconstructionarecompatiblewith
manyammablegases,thefollowingapplicationlimita-
tions must be considered:
• Housingmaterialsareslightlyporous.Theproductmust
beusedinawellventilatedareaintheabsenceofsparks
orignition sources. Do notuse in Class1,Division 1,
GroupDenvironments.
• Thetypeofarea-forcedexhaustsystemused(i.e.,high
orlowlevel)wouldbedependentonthegasinvolved.
• Eachapplication(otherthanforairorinertgas)mustbe
reviewedtominimizereorexplosionhazard.
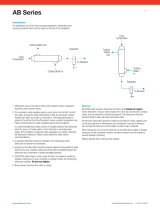
1.0 Installation
A. Where Used/Air Quality After Filtration
Grade Where used
Solid particle
removal (maximum
size in microns)
Liquid removal
efficiency (at rated
conditions)
Maximum inlet liquid
loading ppm w/w
Remaining oil
content ppm w/w
11
Separator - downstream of an aftercooler
Point-of-use - where no aftercooler is
installed upstream
— 95% of water
30,000
bulk liquids
—
9
Separator - downstream of an aftercooler
Point-of-use - where no aftercooler
is installed upstream or as prefilter to
refrigerated dryer
3 99+% of water
25,000
aerosols & bulk liquids
5
aerosols
7
Prefilter -
• Prelter to Grade 3 & Grade 5 high
efficiency filters
• Point-of-use - where aftercooler is
installed upstream
1 100% of water
2, 000
aerosols
1
aerosols
6
After-filter - downstream of a pressure-
swing (heatless) desiccant dryer
Downstream of an Activated Carbon or
Desiccant Tower
1
No liquid should be
present at inlet
No liquid should be
present at inlet
—
5
Prefilter - ahead of desiccant and membrane
dryers
After-filter
• Downstream of refrigerated dryer
• Downstream of pressure-swing
(heatless) desiccant dryers for finer
solid particle removal
• Oil removal at point-of-use
0.01 99.99+% of oil
1, 000
aerosols
0.008
aerosols
3
Prefilter - ahead of desiccant and membrane
dryers (use after Grade 7 to reduce liquid
and solids load, prolong element life and
ensure filtration efficiency)
After-filter - downstream of refrigerated
dryer
0.01 99.999+% of oil
100
aerosols
0.0008
aerosols
1
After-filter to Grade 3 & Grade 5 for true oil
free applications
0.01 Removes vapors only
No liquid should be
present
0.003
vapor
B. Mounting
1. Wallmountingbrackets-Mountbrackettolterhead:
(1) removefour(4)screwsholdingblackplastictopcapto
filter head
(2) placebracketonheadoverplasticcap
(3) installscrewssuppliedwithbracket.
2. DifferentialPressureGaugeMountingtoFilterhead
(1) makecertaino-ringsareinplaceonthebottomofthe
gauge body.
(2) connectthelowpressuretransmissionbolt(boltnext
totheREDbandongauge)tothegaugeportatthe
lteroutlet(downstreamsideoflter).
(3) connectthehighpressuretransmissionbolt(boltnext
toGREENbandongauge)tothegaugeportatthelter
inlet(upstreamsideofthelter).
(4) useacoinoraatheadscrewdrivertotighten/loosen
bolts. The tip width of the screwdrivershould be at
least3/8"inch(9.5mm).Torqueboltsto25+/-5inch
oz.DO NOT OVER TIGHTEN.

2
C. Piping
1. Beforeinstalling,blow outpipe lineto removescaleand
other foreign matter.
2. ThisunithasDRYSEALpipethreads;usepipecompoundor
tapesparinglytomalethreadsonly.
3. Mounting(Grades11,9,7,5,3)-mountsothatinletand
outlet connections are horizontal (lter bowl vertical) to
ensureproperliquiddrainage.
4. FlowDirection-installsothattheairowisinthedirection
of arrows on the filter head.
NOTE: Grade6ows fromoutside to insideof element.
Allother grades ow frominsideto outside of element.
Observeowarrowsoncap.
Figure1.2
5. Directlter-to-lter(modular)connection-Filterheadsmay
bejoinedwithoutusingapipenipple
a. Bayonettypeheads(seeFigure1.3)
Use two (2) modular connectors, o-ring, and four (4)
socketheadcapscrews(soldaskit)
Removeblackplastictopcap,applygenerousamount
of lubricant to o-ring, install o-ring in groove, and insert
connectors. Screw connectors to head using socket
headcapscrews.
b. Threadedheads(seeFigure1.4)
Use four carriage bolts, nuts and o-ring (sold as kit).
Removeblackplastictopcaps,applygenerousamount
of lubricant to o-ring, install o-ring in groove, and install
bolts and nuts.
Wall Mounting
Bracket
Top Cap
Figure 1.1
Figure 1.3
Figure 1.4
NOTE:Makecertainowdirectionthroughltersiscorrect
(observepinholeusedforaligningtopcaps).Grades11,
9,7,5,3,1-whenholeisonsideclosesttoyou,inletisto
left.Grade6-whenholeisonthesidefartherfromyou,
inlet is to left.
NOTE: Lubricate o-ring with generous amount of lubricant
before installation.
6. Isolation valves and by-pass piping - For ease of service,
isolation and by-pass valves are desirable. In critical
applications,twoltersinstalledinparallelmaybenecessary
toavoidinterruptionofairsupply.

3
D. Drainprovisions
1. InternalAutomaticDrains-Drainline
Thebottomofinternalautomaticdrainsareprovidedwith
1/8"(insidethreads)forconnectionofadrainlineifdesired.
2. ExternalAutoDrains-Externalautodrainsmaybeadded
as follows:
Models12through28-removeinternaldrainandinstall
adapter(availablefromfactory).Adapteroutletconnection
is1/8"(insidethreads).
Discharge is at system pressure; anchor
drain line.
Models 32 through 48 - Remove adapter tting from
bottomofbowl;1/2"(insidethreads)portisavailablefor
externaldrainconnection.
2.0 Operation
Do not operate filter at pressures in
excess of Maximum Working Pressureindicated on Serial
NumberTag.
NOTE:MaximumOperatingTemperature-150°F,66°C.Liquid
ltrationabove120°F,49°Cisnotrecommendedsincethereis
typicallyoilpresentinavaporstatewhichpassesthroughthe
filter and condenses downstream.
NOTE:Grade1-Ifoperatedabove100°F,38°Cmayexperience
lessthan1000hoursoflifebecauseofgreateroilvaporcontent.
A. Liquid Draining - Grades 11, 9, 7, 5, 3
NOTE: Collected liquids must be removed to ensure proper
operation.
NOTE:Depressurizeslowly,toavoidlterelementdamage.
1. ManualDrain-Turntoyourright(clockwise)toopenand
toyourleft(counterclockwise)toclose.
2. AutomaticDrain-Liquidswillautomaticallydischargewhen
sufficient accumulation occurs.
a. Internally Mounted Auto Drains
-These drains may be manually
drained by turning to your right
(clockwise)toopenandtoyour
left(counterclockwise)toclose.
NOTE:Manuallydraininternalautodrains
daily to verify drain function.
B. Operational Checkpoints
All Grades
Checkow,pressure,andtemperaturetomakecertainlter
isbeingoperatedwithindesignconditions.
Grades 11, 9, 7, 6, 5, 3
Checkpressuredropacrossthelter
1. Pressure differential in excess of 6 psi (0.42 kgf/cm
2
) -
pressureindicator in red area - indicates that the lter
sleeveorelementshouldbereplaced.Referencepage5,
Figure3.2forgaugescaledetail.
NOTE:Elementshouldbechangedannuallyorwhenindicator
changes to red, whichever occurs first.
NOTE:
Pressuredropshouldneverexceed15psi(1.0kgf/cm
2
).
OPEN ( TO RIGHT )
2. Check for sudden reduction in pressure drop.
Thismightindicate:
a. Possibleleakacrosselemento-ringseal
b. Leakthroughtheelementduetophysicaldamage
Grades 11, 9, 7, 5, 3
1. Checktoseethatlterisinstalledleveltoinsureproper
drainage.
2. Checkthatmanualdrainsaredrainedperiodicallyorthat
automatic drains are functioning.
3. OnmodelswithLiquidLevelSightglass-Checkthatliquid
levelisbelowtopofSightglass.
Grade 1
1. Checkforanoilysmellbyopeningthemanualvalve.Ifan
oilysmellexists,thefollowingshouldbechecked:
a. Filterelementadsorptioncapacityexhausted
b. Leakacrosselemento-ringseal
c. Leakthroughelementduetophysicaldamage
d. Presenceofliquidsbecauseoflackoforfailureofpre-
filters
e. Flow, pressure and temperatures outside design
conditions
f. Presence of gaseous impurities which cannot be
adsorbed
Methane,carbonmonoxide,carbondioxideand
various inorganic gases cannot be removed by an activated
carbon filter.
C. Flow Capacity
Maximum air ow for the various lters at 100 psig (7 kgf/
cm
2
)isindicatedinTable1.Todeterminemaximumairows
at inlet pressures other than 100 psig (7 kgf/cm
2
), multiply
owfromTable1byairowcorrectionfactorfromTable2
thatcorrespondstotheminimumoperatingpressureatthe
inlet of the filter.
NOTE:Filtersshouldnotbeselectedbypipesize.Selectusing
owrateandoperatingpressureonly.
Table 1 - Maximum Flow @100 psig [7 kgf/cm
2
]
Housing scfm [m
3
/hr]
CF12
20 [35]
CF16
35 [60]
CF20
60 [105]
CF24
100 [170]
CF28
170 [290]
CF32
250 [425]
CF36
375 [640]
CF40
485 [825]
CF44
625 [1060]
CF48
780 [1325]
Table 2 - Air Flow Correction Factor
Maximum
Inlet
Pressure
psig 20 30 40 60 80 100 120 150 200 250 300
kgf/cm
2
1.4 2.1 2.8 4.2 5.6 7.0 8.4 10.6 14.1 17.6 21.1
Correction Factor 0.30 0.39 0.48 0.65 0.82 1.00 1.17 1.43 1.87 2.31 2.74

4
3.0 Maintenance
A. When to Replace Filter Element
NOTE: Grades 7, 6, 5, 3, 1, -complete element isreplaced;
Grade9-unlessseparatorcoreisdamagedoutersleeveonly
isreplaced.
1. Grade6(drydesiccantafter-lter)
Initialdrop:1psi(0.07kgf/cm
2
).Pressuredropincreasesas
elementloadswithsolidparticles.Replacewhenpressure
dropreaches6psi(0.42kgf/cm
2
)(indicatorinyellowarea)
or annually, whichever occurs rst. Reference page 5,
Figure3.2forgaugescaledetail.
2. Grade11(mechanicalseparator)
Elementshouldnotrequirereplacementunlessphysically
damaged. If sludge accumulates, element can be removed
andcleanedwithsoapandwater.
3. Grades9,7,5,3
a. Initial(dry)pressuredrop:1psi(0.07kgf/cm
2
)to2psi
(0.14kgf/cm
2
)
b. Operating pressure drop: As lter becomes liquid
loaded(wetted), pressuredropwillincreaseto2 to
4psi(0.14to0.28kgf/cm
2
).Furtherpressuredrop
occursaselementloadswithsolidparticles.
c. FOR MAXIMUM FILTRATION EFFICIENCY, REPLACE
ELEMENTWHENPRESSUREDROPREACHES6PSI(0.42
KGF/CM
2
)(INDICATORINYELLOWAREA)ORANNUALLY,
WHICHEVEROCCURSFIRST.Referencepage5,Figure
3.2forgaugescaledetail.
NOTE:Pressuredrop maytemporarilyincrease whenowis
resumedafterowstoppage.Pressuredropshouldreturnto
normal within one hour.
NOTE:Grades5and3-Duringnormaloperation bottomof
foamsleevewillhaveabandofoil.Spottingabovetheband
indicatesthatliquidsareaccumulatingfasterthantheycanbe
drainedandthatpreltrationisrequired.
4. Grade1(activatedcarbonlters)
a. Adsorption capacity - 1000 hours at rated capacity.
Elementlifeisexhaustedwhenodorcanbedetected
downstream of the filter.
B. Procedure for Element Replacement
THISFILTERISAPRESSURECONTAININGDEVICE.
DEPRESSURIZE BEFORE SERVICING. If filter has not been
depressurizedbeforedisassembly,anaudiblealarmwillsound
when the bowl begins to be removed from the head. If this
occurs,stopdisassembly,isolateandcompletelydepressurize
lterbeforeproceeding.
1. Isolate lter (close inlet and outlet valves if installed) or
shutoffairsupply.
2. Depressurizelterbyslowlyopeningmanualdrainvalve.
3. Removebowl
a. For models12 through28 -bayonet mount- push
bowlup, turnbowl1/8thturnto yourleft, and pull
bowl straight down
b. Formodels32through48-threadedbowls-unscrew
bowlfromheadusinghand,strapwrenchorCspanner.
4. Cleanlterbowl
5. Replaceelement
a. Replacingcompleteelement
1)Pulloffoldelementanddiscard.
2) Make certain o-ring inside top of replacement
element is in place and push element onto lter
head.ForHousingsizes40to48,placeelementin
bowl and secure with centering device.
NOTE:Grades5,3,and1-Donothandleelementsbyoutside
foamcover.Handlebybottomendcaponly.
b. Grade9-replacingsleeveonly
1) Pullelementstraightdowntoremove.
2) Removeboltandbottomcapandremovedispos-
able filter sleeve.
3) Cleanseparatorcorewithsoapandwaterifneces-
sary.
4) Slidenewltersleeveoverseparatorcoreandre-
placebottomcapandhandtightenbolt.
5) Makecertaino-ringinsidetopofelementisinplace
andpushelementontolterhead.
6. Aftermakingcertainthato-ringinsidetopofbowl(and
on bayonet mount heads, wave spring) are in place,
reassemble bowl to head.
NOTE:Makecertaino-ringisgenerouslylubricated.
NOTE:Wavespringendsshouldbepointeddowntoprevent
thewavespringfrominterferingwithreassembly.
NOTE:Threadedbowltoheadconnection,generouslylubricate
threads with a high grade/temperature lubricant good for
150°F,66°C.
Separator Core
Replacement Sleeve
Bottom Cap
Bolt
Bowl o-ring
Element O-ring
Element
Bowl o-ring
Element O-ring
Grade 9 - Sleeve Replacement
All Grades - Element Replacement
Wave Spring
Models 12-28
Figure 3.1
C. Auto Drain Mechanism
Itisrecommendedthatdrainmechanismbereplaced
annually.

5
Dimensions and Weights
Filter Type CF(Grade)- 12 16 20 24 28 32 36 40 44 48
Replacement Element CE(Grade)- 12 or 12S 16 or 16S 20 or 20S 24 or 24S 28 or 28S 32 or 32S 36 or 36S 40 or 40S 44 or 44S 48 or 48S
Nominal Air Flow
scfm @100 psig (m
3
/hr @ 7.0 bar)
20 (35) 35 (60) 60 (105) 100 (170) 170 (290) 250 (425) 375 (640) 485 (825) 625 (1060) 780 (1325)
In/Out Connection NPT or BSP 3/8, 1/2 3/8, 1/2 3/8, 1/2 3/4, 1 3/4, 1 1, 1-1/4, 1-1/2 1, 1-1/4, 1-1/2 2, 2-1/2 2-1/2 2-1/2
"A" in. (mm) 4.13 (105) 4.13 (105) 4.13 (105) 5.25 (133) 5.25 (133) 6.44 (164) 6.44 (164) 7.63 (194) 7.63 (194) 7.63 (194)
"B" in. (mm) 8.15 (207) 10.05 (255) 12.40 (316) 13.32 (338) 17.57 (446) 20.80 (528) 25.29 (642) 29.08 (739) 34.83 (885) 40.96 (1040)
"C" in. (mm) 6.40 (163) 8.59 (224) 10.97 (285) 11.74 (298) 15.99 (406) 18.98 (482) 23.47 (596) 26.83 (681) 32.58 (827) 38.71 (983)
"D" in. (mm) 3.00 (76) 3.00 (76) 3.00 (76) 3.50 (89) 3.50 (89) 4.00 (102) 4.00 (102) 4.00 (102) 4.00 (102) 4.00 (102)
Weight lb. (kg) 4.14 (1.88) 4.5 (2.04) 4.7 (2.13) 6.3 (2.9) 6.9 (3.1) 10.2 (4.63) 11.3 (5.13) 28 (12.70) 33 (14.97) 38 (17.24)
Maximum Working Pressure
Housing - 300 psig, 21.1 kgf/cm
2
Models with Internal Drain or
Liquid level indicator - 250 psig, 17.6 kgf/cm
2
Housing - 300 psig, 21.1 kgf/cm
2
Models with Internal Drain or
Liquid level indicator - 250 psig, 17.6 kgf/cm
2
Maximum Operating Temperature 150°F, 66°C 150°F, 66°C
Head Material Aluminum Aluminum
Bowl Material Aluminum Aluminum
Liquid Level Indicator Material Isoplast Isoplast
NOTE:DimensionsandWeightsareforreferenceonly.Requestcertieddrawingsforconstructionpurposes.
OUTLET
CLEARANCE
FOR SERVICING
CLEARANCE
FOR SERVICING
INLET
OUTLET
INLET
"A"
"C"
"B"
"D"
1" (26mm)
"A"
"C"
"B"
"D"
2.3" (58.4mm)
OUTLETINLET
INLET OUTLET
CLEARANCE
FOR SERVICING
"A"
"C"
"B"
"D"
2.3" (58.4mm)
CLEARANCE
FOR SERVICING
"A"
"C"
"B"
"D"
2.3" (58.4mm)
HEX WRENCH
3.00 ACROSS FLATS
Sizes CF(Grade) 12, 16, 20 Sizes CF(Grade) 24, 28
Sizes CF(Grade) 32, 36
Sizes CF(Grade) 40, 44, 48
Figure 3.3
DifferentialPressure
Gauge
Figure3.2

WARRANTY
Themanufacturerwarrantstheproductmanufacturedbyit,whenproperlyinstalled,operated,applied,andmaintainedinaccordancewithproceduresand
recommendationsoutlinedinmanufacturer’sinstructionmanuals,tobefreefromdefectsinmaterialandworkmanshipforaperiodofone(1)yearfromdate
shipmenttothebuyerbythemanufacturerormanufacturer’sauthorizeddistributorprovidedsuchdefectisdiscoveredandbroughttothemanufacturer’s
attentionwithintheaforesaidwarrantyperiod.
Themanufacturerwillrepairorreplaceanyproductorpartdeterminedtobedefectivebythemanufacturerwithinthewarrantyperiod,providedsuch
defectoccurredinnormalserviceandnotasaresultofmisuse,abuse,neglectoraccident.Normalmaintenanceitemsrequiringroutinereplacementarenot
warranted.Thewarrantycoverspartsandlaborforthewarrantyperiod.Repairorreplacementshallbemadeatthefactoryortheinstallationsite,atthesole
optionofthemanufacturer.Anyserviceperformedontheproductbyanyoneotherthanthemanufacturermustrstbeauthorizedbythemanufacturer.
Unauthorizedservicevoidsthewarrantyandanyresultingchargeorsubsequentclaimwillnotbepaid.
Productsrepairedorreplacedunderwarrantyshallbewarrantedfortheunexpiredportionofthewarrantyapplyingtotheoriginalproduct.
Theforegoingistheexclusiveremedyofanybuyerofthemanufacturer’sproduct.Themaximumdamagesliabilityofthemanufactureristheoriginal
purchasepriceoftheproductorpart.
THEFOREGOINGWARRANTYISEXCLUSIVEANDINLIEUOFALLOTHERWARRANTIES,WHETHERWRITTEN,ORAL,ORSTATUTORY,ANDISEXPRESSEDINLIEUOFTHE
IMPLIEDWARRANTYOFMERCHANTABILITYANDTHEIMPLIEDWARRANTYOFFITNESSFORAPARTICULARPURPOSE.THEMANUFACTURERSHALLNOTBELIABLEFOR
LOSSORDAMAGEBYREASONOFSTRICTLIABILITYINTORTORITSNEGLIGENCEINWHATEVERMANNERINCLUDINGDESIGN,MANUFACTUREORINSPECTIONOFTHE
EQUIPMENTORITSFAILURETODISCOVER,REPORT,REPAIR,ORMODIFYLATENTDEFECTSINHERENTTHEREIN.
THEMANUFACTURER,HISREPRESENTATIVEORDISTRIBUTORSHALLNOTBELIABLEFORLOSSOFUSEOFTHEPRODUCTOROTHERINCIDENTALORCONSEQUENTIAL
COSTS,EXPENSES,ORDAMAGESINCURREDBYTHEBUYER,WHETHERARISINGFROMBREACHOFWARRANTY,NEGLIGENCEORSTRICTLIABILITYINTORT.
Themanufacturerdoesnotwarrantanyproduct,part,material,component,oraccessorymanufacturedbyothersandsoldorsuppliedinconnectionwiththe
saleofmanufacturer’sproducts.
AUTHORIZATION FROM THE SERVICE DEPARTMENT IS NECESSARY BEFORE MATERIAL IS
RETURNED TO THE FACTORY OR IN-WARRANTY REPAIRS ARE MADE.
SERVICE DEPARTMENT: (724) 746-1100
SERVICE DEPARTMENT: (724) 746-1100
CURTIS-TOLEDO
®
, INC.
1905 KIENLEN AVENUE | ST. LOUIS, MO 63133
314-383-1300 OR 800-925-5431
WWW.FSCURTIS.COM | [email protected]
/