Page is loading ...

Owner’s Manual
M35bt / M65bt

WARNING
TO PREVENT THE RISK OF SHOCK OR FIRE. DO NOT USE THIS CORD WITH AN EXTENSION, RECEPTACLE OR ANY OTHER OUTLET UNLESS THE BLADES
CAN BE FULLY CUT. PLEASE MATCH THE WIDE BLADE WITH THE WIDE SOCKET OPENING. TO PREVENT THE RISK OF SHOCK OR FIRE. DO NOT
EXPOSE THIS APPLIANCE TO RAIN OR MOISTURE.
The lightning bolt with the arrow symbol
within an equilateral triangle is intended
to alert the user to the presence of
"dangerous voltage" within the
product's enclosure and may be of
sufficient magnitude to constitute a risk
of electric shock .
CAUTION: To reduce the risk of electric
shock, do not remove cover. No user
serviceable parts. Refer servicing to a
qualified service technician.
The exclamation mark within an
equilateral triangle is intended to alert
the user to the presence of important
operating and maintenance information
in the literature accompanying this
device.
IMPORTANT SAFETY INSTRUCTIONS
1. Please read all instructions before using the device.
2. Keep these instructions for future reference.
3. Read all safety instructions carefully.
4. Follow the manufacturer's instructions.
5. Do not use this device near a liquid source or in a humid place.
6. Only clean the device with a damp cloth.
7. Please do not obstruct the slots provided for the ventilation of the device. Install the device according to the
manufacturer's instructions.
8. Do not install near a heat source (radiators, etc.) or any equipment likely to generate heat (power amplifiers for
example).
9. Do not remove the ground from the power cord or wall outlet. Canadian plugs with polarization (with a wider blade)
should not be modified. If your wall outlet does not match the model provided, consult your electrician.
10. Protect the power cord against all possible damage (pinching, tension, twisting, etc.). Make sure that the power cord
is free, in particular when it comes out of the box.
11. Disconnect the device from the mains in the presence of a storm or during prolonged periods of non-use.
12. Consult a qualified repair service center for any malfunction (damage to the power cord, drop in performance,
exposure to rain, liquid splashing into the device, introduction of an object into the case, etc.).

M35bt / M65bt
Table of Contents
Introduction ............................................................................................................................................................................ 2
Features .................................................................................................................................................................................. 3
Controls ................................................................................................................................................................................... 4
Installation .............................................................................................................................................................................. 6
Wiring Guide ........................................................................................................................................................................... 9
Operations ............................................................................................................................................................................ 12
Music on Hold (MoH) .......................................................................................................................................................... 13
Media Module ..................................................................................................................................................................... 15
Block Diagram ....................................................................................................................................................................... 17
Specifications ........................................................................................................................................................................ 18
21000 Transcanadienne
Baie d’Urfé, Québec, H9X 4B7
Phone: 1-877-374-5266
Fax: 888-918-2244
www.eriksoncommercial.com
Copyright © 2022 Exertis | Jam. Tous droits réservés 1

M35bt / M65bt
Introduction
M35bt / M65bt
Welcome!
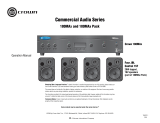
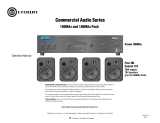
Thank you for choosing this Quest Commercial M-Series Mixer Amplifier!
Quest Commercial Mixing Amplifiers are the ultimate solution for sound distribution systems in small to medium sized commercial
premises, delivering the best and highest quality audio at an affordable price. These models have a constant voltage power amplifier
allowing use at 25/70V or at low impedance of 4 or 8 Ohms. The M35bt can deliver a power of 35 Watts, and the M65bt a power of
65 Watts. They offer three input channels (terminal block/RCA and 3.5mm on the front panel) with independent level controls to
facilitate the connection of sound sources. A music-on-hold feature is also available for businesses wishing to enhance their
customers' telephone experience. So when you connect these mixers to a telecommunications system, customers can listen to
music or pre-recorded messages while they wait.
These models are equipped with Bluetooth, an FM receiver and a Media player on USB port or SD/SDHC cards.
With proper maintenance and sufficient ventilation, your product will give you satisfaction for many, many years. Record the serial
number below for future reference:
Serial Number : _______________________________
Date of Purchase : _____________________________
Unpacking and installation
Although your Quest Commercial amplifier is not complicated to install or difficult to operate, it will take a few minutes of your time
to read this manual to get the installation wired correctly and to familiarize yourself with its features and how to use them.
Connect your device to the system components as described on the following pages.
2

M35bt / M65bt
Features
The M35bt, and M65bt mixer amplifiers are complete all-in-one mixer amplifier solutions for commercial and
industrial applications. These low-cost units offer all the necessary features in a simple format.
• Three (3) microphone inputs and two (2) line inputs (terminal block, RCA and 3.5mm on the front panel).
• Rated power output: 35 Watts for the M35bt, and 65 Watts for the M65bt.
• A 2-band tone control helps correct the overall sonic response of the PA system.
• Acceptable wide-range input level (up to 44 dB)
• Terminal block telephone paging input with volume and attenuation level controls.
• Two (2) layer priority muting.
• Bluetooth, MP3 Media player on USB or SD-SDHC card, FM Tuner, with remote control.
• Music on hold (M.O.H.) output used to connect the mixer to the telephone system to play music or pre-recorded
messages. This output can also be used to supply a line level signal to a power amplifier.
• Microphone inputs 1 with phantom power for connecting condenser microphones.
• Low distortion and low noise level.
• To ensure long-term reliability, M-Series mixers are equipped with a sophisticated protection circuit with
current limiting to avoid problems associated with overloading and overheating.
• Compact size makes it easy to install on a work desk or in a standard 48.3 cm (19 in) rack using optional
brackets.
• An ideal solution for commercial and industrial applications.
• An extended three-year warranty.
3

M35bt / M65bt
M-Series – Front Panel Presentation
[Figure 1.1 Front panel diagram]
1. Input Channel Volume – These three knobs determine the level of the sound sources connected to the
inputs.
2. Tone Control – These two knobs adjust the overall frequency response of the system. They allow up to 10dB
of cut/boost on the 100Hz and 10kHz bands.
3. Master Volume Control – This knob determines the overall volume of the system.
4. Indicators (3) – The “Protect” indicator lights when the protection circuit is activated. The outputs are then
deactivated. The “Signal, -20dB and Clip” LEDs indicate the output level. The “Power” indicator lights up
when the device is powered on and ready for use.
5. POWER switch - This switch turns the device on/off. The POWER indicator lights up when the power is on.
6. Bluetooth/FM Receiver and MP3 Player – This module includes Bluetooth, an FM receiver with memories
and an MP3 player on SD/SDHC card and USB port. The M35bt, and M65bt are shipped with an
infrared remote control.
7. AUX input
4

M35bt / M65bt
M-Series – Back Panel Presentation
[Figure 1.2 Rear panel diagram]
1. Power Cable.
2. Speaker output connector – This 5-contact terminal block connector allows the use of 25V or 70V constant voltage
loudspeakers, as well as low impedance loudspeakers of 4 or 8 ohms.
3. MoH (Music on Hold) terminal - This 3-contact terminal block connector allows the mixer to be linked to a
commercial
telephone system to provide a music source when a call is put on hold. This output can also be used to supply the line
level signal to a power amplifier.
4. Gain Controls for variable input level. – These knobs are used to adjust the input sensitivity of each channel.
5. Mic/Line input connectors – Channel 1 is equipped with a terminal block connector and channels 2 and 3 are
equipped with RCA connector and terminal block connectors allowing the connection of microphone or line signals.
6. Phantom Power ON/OFF switch – This switch activates phantom power on microphone input 1.
7. Ducking Depth Control – Allows you to adjust the attenuation level of sources when a priority signal is detected.
8. TELE PAGING (connector) with volume and attenuation level with MoH level adjustment– This 3-contact terminal
Block connector allows the mixer-amplifier to be connected to a company's telecommunications system, so that you
can make announcements from a telephone handset. The MoH level adjustment is to adjust the volume of the MoH
output.
9. FM Antenna – 75-ohm coaxial connector for connecting the included FM antenna.
5

M35bt / M65bt
Installation
CAUTION: Before you begin, make sure your mixer amplifier is unplugged from the power source, the power switch is in
the "OFF" position, and all volume controls are set to minimum level (turned counterclockwise).
Location:
Take the unit out of its packaging (keep it for any return to the workshop). The M35bt, and M65bt mixing amplifiers can
be installed in a standard 19” equipment rack or on a shelf. To install the unit in a standard 19” equipment rack, the
optional RK-M3565 Rack Bracket Kit must be ordered at time of purchase. If a table or shelf installation is the chosen
route, be sure to choose a flat surface, with enough space around the unit to allow good ventilation, and that is free of
liquids or other such hazards.
To select an appropriate location for your equipment, you must consider the distance between the mixer amplifier and
the speakers, the need to access the equipment to change the source or adjust the volume, the proximity of the sockets
electrical, etc. You must determine the length of the cables used to connect your equipment to the speakers. Depending
on the type of loudspeakers and the length of the cables, you can choose to route the signals to the loudspeakers in low
impedance or in constant voltage.
If you are using low impedance speakers, you must connect them to one of the low impedance outputs (4 ohms or 8
ohms) of the mixer amplifier with speaker cables. However, pay attention to the diameter and length of the cables.
The other type of installation is using enclosures with built-in 70V transformers, often referred to as constant voltage
systems. The advantage of these systems is that they allow the use of long cables to connect several loudspeakers to the
same amplifier. You can also adjust the level of each speaker by changing the configuration of the transformer. The M-
Series mixer amplifiers are ideal for this type of application as they are equipped with 25/70V output transformers.
Speaker selection
When selecting loudspeakers, you must consider a few important factors, such as the location of the mixer amplifier, the
type of loudspeakers and the need to use a 70V distribution system. The following sections explain how to connect
loudspeakers or a constant voltage system in a typical installation.
Using passive speakers
Before using low impedance speakers (4 or 8 ohms), you must first determine the location of your mixer amplifier. If the
speakers are less than 30 meters away, you can connect the amplifier directly to the speakers in low impedance mode.
Be sure to check the impedance of the speakers. The 4 Ohms output allows you to connect a 4 Ohms speaker or two 8
Ohms speakers in parallel. The 8 Ohms output allows you to connect an 8 Ohms speaker or 2 4 Ohms speakers in series.
If the speakers are more than 30 meters away (approximately), it is best to use a constant voltage system.
Using a constant voltage system
If your setup has many loudspeakers and long cables, you might consider using a 25 or 70V constant voltage system. This
type of system became standard in the field of installations in the middle of the 20th century because it offered an
efficient solution for the use of multiple enclosures and long cables. It is inspired by long distance electrical networks
which use increased voltage and reduced current to carry very high power over long distances with more affordable and
relatively small diameter cables. The voltage is then reduced and then routed to the consumer on a short, large-
diameter cable.
6

M35bt / M65bt
Installation
Using a constant voltage system – continued
The same principle applies to constant voltage audio systems. A transformer connected to the output of the amplifier
increases the voltage and reduces the output current, allowing the use of long, smaller-diameter cables to link multiple
speakers with step-down transformers. For economy, the 70V standard was adopted in the United States because
electrical conduit is required on lines with voltages greater than 100V peak-to-peak. Commercial sound systems, such as
those installed in schools, office buildings and restaurants, often use a constant voltage distribution system when
multiple loudspeakers are connected in different areas.
Many loudspeakers with transformers are produced by various manufacturers. Most of these loudspeakers provide tap
points on the transformer to allow power to be distributed to the loudspeakers and their levels to be adjusted
separately. Quest Commercial mixer amplifiers have a built-in transformer to step up the output voltage and step down
the current so that multiple speakers (with transformers) can be connected using long cables. Constant tension systems
allow the use of cables from 1 to 1.6 mm in diameter, depending on their length (long cables must be larger in
diameter).
A simple way to represent a constant voltage is to divide the power in Watts of the amplifier by the number of
loudspeakers used. For example, to connect ten loudspeakers to the output of an M65bt amplifier, use a loudspeaker
whose transformer provides a tap point of approximately 5.5 Watts. 65 Watts divided by 10 speakers gives 6.5 Watts per
loudspeaker, but we must always keep a cushion of about 15 to 20% of the power of the amp to make sure not to
overload the amp.
Connecting speakers
Connect the speakers to the terminal block output connectors on the rear. Never turn on the amplifier when the
speakers are not connected to the outputs. When using the 4 Ohm output, you must connect speakers with a minimum
impedance of 4 Ohms (4 Ohms or more).
For 70V operation, connect the speaker's positive input to the 70V terminal, and the negative input to the COM (ground)
terminal. Then connect the other speakers one after the other in parallel.
7

M35bt / M65bt
Installation
Connecting sound sources
Then connect the sound source to the terminal block input connectors on the back. If your console has balanced
outputs, use balanced three-conductor connections and connectors (you can use unbalanced connections, but you'll get
better sound quality and less noise if you use balanced connections).
Set all input level controls (on the front) to minimum (“-MIN“). Then connect the mains lead to an earthed mains socket.
[Figure 1.3 Connection example]
8

M35bt / M65bt
Wiring Guide
Wiring plans
Choose the input connector and the appropriate cable for each source.
We recommend the use of pre-assembled or professionally assembled 22-to-24-gauge balanced cables.
Figure 2.1 shows the connection diagrams for the different connectors. RCA input connectors can also be used as
unbalanced inputs.
Balanced Line Unbalanced Line
Source Vers Destination
Mixer amplifier input Output
Balanced Line Unbalanced Line
Source Vers Destination
(This connection reduces the signal level by 6 dB)
Mixer amplifier input Output
Unbalanced ¼’’ Connector Balanced ¼’’ Connector
[Figure 2.1 Input cables and connectors]
INPUT: Connect microphones or balanced line-level sources to the balanced inputs of the mixer amplifier. Adjust the
Gain accordingly. Connect unbalanced line-level signals to RCA connectors. 9

M35bt / M65bt
Wiring Guide
Wiring plans – Continued
Choose the output connector and the appropriate cable for each source.
For the amplifier output connectors, we recommend the use of pre-assembled or professionally assembled speaker
cables of high quality and of sufficient gauge. You can use pluggable terminal blocks for your output connectors.
To prevent the possibility of shorting, wrap or insulate exposed speaker connectors.
Using the guidelines below, select the speaker wire gauge based on the distance between the amplifier and the
speakers. Wire gauges apply to 4-ohm output.
Distance Recommended Gauge
Up to 25 ft. 16 AWG
26 ~ 40 ft. 14 AWG
41 ~ 60 ft. 12 AWG
61 ~ 100 ft. 10 AWH
101ft ~ 150 ft. 8 AWG
151 ~ 200 ft. 6 AWG
NOTE: Custom wiring should be performed by qualified personnel only. Class 2 wiring is required.
CAUTION: Never use shielded cable for speaker output.
Maintain correct polarity on output connectors.
For each output channel, connect the output terminal block connector to the speakers.
Use terminals marked COM and 4Ω / 8Ω for low impedance speakers, or use terminals marked 25V or 70V, and COM for
high impedance speakers.
Connect the COM terminal to the negative (-) terminal of the speaker; connect one of the other terminals to the positive
(+) terminal of the speaker.
Output impedance and voltage are as shown in Table 2.1
M35bt
4Ω / 11.8V
8Ω /16.7V
140Ω / 70V
17.8Ω / 25V
M65bt
4Ω / 16V
8Ω / 22.8V
75Ω / 70V
9.6Ω / 25V
[Table 2.1 Output voltage and impedance]
NOTE: The impedances listed in Table 2.1 represent the total impedance of all speakers connected.
10

M35bt / M65bt
Wiring Guide
Speaker connections are shown in Figure 2.2
[Figure 2.2 How to connect speakers]
WARNING: Never use the low impedance (4Ω / 8Ω) and high impedance (25V, 70V) outputs simultaneously.
[Figure 2.3 Wrong connection]
11

M35bt / M65bt
Operations
Power On
Press the power switch on the front to turn on the device. The Power indicator lights up, as well as the Protection
indicator. The Protection indicator turns off after approximately five seconds (a click is then heard).
Apply an input signal of approximately +4 dBu. Then set the input level control to the center position
While the signal is audible, gradually increase the master level control (Master Volume) to obtain the desired sound
level.
The SIGNAL and CLIP LEDs tell you the output power of the amp. To achieve the best signal-to-noise ratio, the Master
Volume knob should normally be set near maximum (“MAX”) and the CLIP indicator should light occasionally (but not
frequently) on signal spikes. You can use the input level controls to attenuate the signal to the desired level.
Telephone Paging
The TELE-PAGING connector allows the device to be connected to a commercial telephone system to broadcast
announcements from a telephone. Telephone systems normally have a dedicated output for playing announcements
using an extension number. For details, refer to the instruction manual supplied with the telephone system.
[Telephone interface/ PBX]
[Figure 3.1 Telephone paging connections]
12

M35bt / M65bt
Operations
Input Signals Gain Control.
The Quest Commercial Mixer Amplifier can accept wide range and variable input signals thanks to the gain adjustment
potentiometers.
Adjust the gain potentiometer within a range of 44dB to accommodate different external equipment. Figure 3.2 shows
the detail of input sensitivity.
[Figure 3.2 Acceptable input sensitivity per channel]
Priority Control
The Quest Commercial Mixer Amplifier has a two-level priority mute function. When the higher level source is activated,
other input signals are automatically cut off except for input signals of the same priority level.
CH2, CH3, AUX > CH1 > Telephone Paging.
Using Music on Hold (MoH)
Quest Commercial mixer amplifiers offer music-on-hold functionality for linking to a commercial telephone system. With
this feature, when customer calls are put on hold, they can listen to background music from an external or internal
sound source. You can also use this function to play pre-recorded messages while waiting.
To determine the volume of the music on hold function, use the MOH Level control located just next to the MOH
connector.
13

M35bt / M65bt
Operations
Using the Music on Hold (MoH) output to power a 2nd zone
For use for 2 or more zones, the example below illustrates the installation that can be done when the unit is used in
conjunction with a 2nd unit. The MOH connector of the first is used to power the second and so on.
14

M35bt / M65bt
Media Module with Bluetooth o
1- Display screen
2- USB Connector
Insert a USB flash drive to play MP3 files automatically.
3- SD card slot
Insert SD/SDHC card to play MP3 files automatically.
4- MODE key
Short press to select the source: FM, USB, SD card, or Bluetooth. Press and hold to turn the Media module
power on and off.
5- REC key
Short press to save current audio output to USB or SD card.
6- MUTE key
Short press to mute and release audio output.
7- VOL + / VOL - keys
Short press to increase or decrease the output volume. Press and hold to quickly increase or decrease output
volume.
8- NEXT / PREVIOUS keys
Short press to select previous or next FM frequency for tuner, to select previous frequency or next track for USB,
SD card.
Press and hold to automatically seek previous or next FM frequency for tuner, fast forward or rewind within
current track for USB, SD card.
9- PLAY / PAUSE key
Short press to move stored FM frequency for tuner, to toggle play and pause current track for USB, SD card.
Press and hold to automatically search and store audible FM frequency for tuner, stop to play current track for
USB, SD card.
10- IR Sensor
To receive the control signals from the I.R. remote control. 15

M35bt / M65bt
Media Module with Bluetooth o
Using the Tuner
1. Press MODE key until the display shows Radio
2. Press PLAY / PAUSE key to select radio
3. Press and hold NEXT or PREVIOUS key to automatically seek the previous or next available FM station
4. Press NEXT or PREVIOUS key to select a station in memory, or type directly the frequency using the
numerical buttons on the remote control to jump to a station directly; for example, pressing 9-2-5 will make the
tune jump to 92.5 MHz.
Using Bluetooth
1. Press MODE key until the display shows Bluetooth.
2. Press PLAY / PAUSE key to select Bluetooth
3. Activate Bluetooth on your personal device and select MEDIA1 in the available Bluetooth devices. You
will see “connected” on the LCD screen and hear an audible beep to confirm that the pairing is successful.
4. Start streaming your music.
Using the Media Player
1. Press MODE key until the display shows Music.
2. Press PLAY / PAUSE key to select Music
3. Insert a USB flash drive or an SD Card in the unit.
4. Use NEXT / PREVIOUS keys to navigate through the files on the USB flash drive or SD Card.
5. Use PLAY / PAUSE key to play the selected file
Please note that you can use the buttons on the remote control or on the unit to perform those actions.
16

M35bt / M65bt
Block Diagram
17

M35bt / M65bt
Specifications
Performance
M35bt
M65bt
Input Sensitivity for full output at maximum gain
Balanced Microphone inputs
-50dB ± 3dB
Unbalanced & AUX inputs
-30dB ± 3dB
Telephone Paging
-21dB ± 3dB
Frequency Response
at 1watt from speaker out tap, 80Hz ~18kHz
+1.5/-3dB
Tone Controls
100Hz,10kHz
±12dB ±3dB
Signal to Noise Ratio at rated power output
Less than 90dB
Crosstalk at all control maximum
-70dB at 1kHz
Rated Output Power at THD 0.5%
35 Watts
65 Watts
Total Harmonic Distortion (THD) at 1kHz rated power
Less than 0.5%
Power Band Width at 1kHz from speaker out tap
80Hz~18kHz with less than 0.5% THD
DC Output Offset
Less than ±3mV
Operating Temperature/Humidity at non-condensing
0°~40°C at 95% humidity
Output Voltage and Impedance
4Ω
11.8V
16V
8Ω
16.7V
22.8V
25V
17.8Ω
9.6Ω
70V
140Ω
75Ω
Lecteur Média
Bluetooth 4.2 / Récepteur FM / Carte SD et
Interface USB 1.1 format MP3 et WMA (jusqu’à 16GB/FAT32).
Construction
Cooling
Convection Cooled
Dimensions (Width/Height/Depth)
10.63’’ x 3’’ x 9.06’’ (270 X 76 X 230 mm)
Net Weight
7.08 lbs. 3.21 kg
7.91 lbs. (3.59 kg)
“The Bluetooth® word mark and logos are registered trademarks owned by Bluetooth SIG Inc. and any use of such marks
by Quest Commercial is under license. Other trademarks and trade names are those of their respective owners.”
* Necessary changes are made without notice.
18
/