Heath Zenith SL-4290 Series User manual
- Category
- Work lights
- Type
- User manual
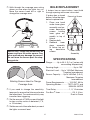
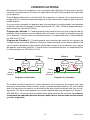
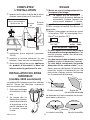
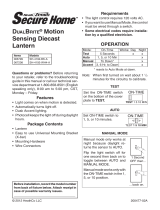
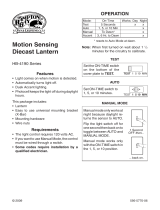
Heath Zenith SL-4290 Series is a motion-sensing lantern that provides dusk accent lighting and automatically turns on when motion is detected. It features adjustable on-times, a built-in photocell for daylight shut-off, and the ability to control up to 360 watts of additional lighting. With its 150-degree sensing angle and up to 30-foot range, it's ideal for illuminating entryways, patios, and other outdoor areas.
Heath Zenith SL-4290 Series is a motion-sensing lantern that provides dusk accent lighting and automatically turns on when motion is detected. It features adjustable on-times, a built-in photocell for daylight shut-off, and the ability to control up to 360 watts of additional lighting. With its 150-degree sensing angle and up to 30-foot range, it's ideal for illuminating entryways, patios, and other outdoor areas.


-
 1
1
-
 2
2
-
 3
3
-
 4
4
-
 5
5
-
 6
6
-
 7
7
-
 8
8
-
 9
9
-
 10
10
-
 11
11
-
 12
12
-
 13
13
-
 14
14
-
 15
15
-
 16
16
-
 17
17
-
 18
18
-
 19
19
-
 20
20
-
 21
21
-
 22
22
-
 23
23
-
 24
24


Heath Zenith SL-4290 Series User manual
- Category
- Work lights
- Type
- User manual
Heath Zenith SL-4290 Series is a motion-sensing lantern that provides dusk accent lighting and automatically turns on when motion is detected. It features adjustable on-times, a built-in photocell for daylight shut-off, and the ability to control up to 360 watts of additional lighting. With its 150-degree sensing angle and up to 30-foot range, it's ideal for illuminating entryways, patios, and other outdoor areas.
Ask a question and I''ll find the answer in the document
Finding information in a document is now easier with AI
in other languages
Related papers
-
HeathZenith HZ-4192-BK User manual
-
Heath Zenith PF-4291-BK User manual
-
-
-
-
Heath Zenith HZ-4265-OR Installation guide
-
-
-
-
Hampton Bay SL-4133-OR User manual
Other documents
-
 Secure Home SH-4192-BK-A User manual
-
Defiant DFI-5936-WH FAQ
-
HeathZenith SL-4541-BK-A DualBrite Motion Sensing Coach Light User manual
-
-
 Health Zenith DualBrite 4700 Installation And Operating Instructions Manual
-
-
Desa 4291 User manual
-
 Hampton Bay HBI-4197-WH Operating instructions
-
 Hampton Bay HBI-4192-WH Installation guide
-
ACE 3209996 User manual


