Page is loading ...

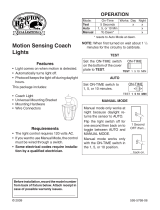
Motion Sensing
Diecast Lantern
HB-4190 Series
Features
• Lightcomesonwhenmotionisdetected.
• Automaticallyturnslightoff.
• DuskAccentlighting.
• Photocellkeepsthelightoffduringdaylight
hours.
Requirements
• Thelightcontrolrequires120voltsAC.
• IfyouwanttouseManualMode,thecontrol
mustbewiredthroughaswitch.
• Some codes require installation by a
qualified electrician.
©2009 595-5770-06
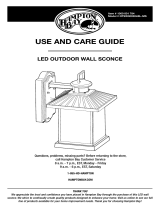
OPERATION
*resetstoAutoModeatdawn.
SettheON-TIMEswitch
on the bottom of the
coverplatetoTEST.
TEST 1 510 MIN
SetON-TIMEswitchto
1,5,or10minutes.
1Second
OFFthen...
Manualmodeonlyworksat
nightbecausedaylightre-
turnsthesensortoAUTO.
Flipthelightswitchofffor
onesecondthenbackonto
togglebetweenAUTOand
MANUALMODE.
Manual mode works only
withtheON-TIMEswitchin
the1,5,or10position.
...backon.
Thispackageincludes:
• Lantern
• Easy to use universal mounting bracket
(X-Bar)
• Mountinghardware
• Wirenuts
Note:Whenrstturnedonwaitabout1
1
/
2
minutesforthecircuitrytocalibrate.
TEST
AUTO
MANUAL MODE
TEST 1 5 10 MIN
Mode: On-Time Works: Day Night
Test 5Seconds x x
Auto 1,5,or10Min x
Manual ToDawn* x
Accent 3,6Hr,toDawn x

2
595-5770-06
INSTALLATION
Forbestperformance,mountthextureabout
6feet(1.8m)abovetheground.
1.Remove
twonuts.
2.Remove
X-Bar.
Junction
Box
5.AttachX-Barto
junctionbox
Duetothesizeandweightofthexture,you
mayndithelpfultohaveanassistantholdthe
xtureinplacewhileconnectingthewires.
MAX
MIN
3.Tightenscrews
ngertight.
SENSITIVITY
4.Setsensitivityon
xturebacktothe
mid-position.
ON-TIME Switch at 1,
5, or 10 minutes
Mode Switching Summary
Flip light
switch off for
one second
then back on*
MANUAL MODE
AUTO
TEST
* Ifyougetconfusedwhileswitchingmodes,
turnthepoweroffforoneminute,thenback
on.Afterthecalibrationtimethecontrolwill
beintheAUTOmode.
Du a l Br i t e
®
Dimmer Control
Lightcomesonhalfbrightforselectedtimeaf-
terdusk(Off,3hr.,6hr.,untildawn).Selecting
OFFdisablesthisfeature.Themotionsensing
featureswillcontinuetoworkasdescribed
inthismanual.Ifmotionissensed,thelight
turnsonfullbrightfortheON-TIME(1,5,or
10minutes)thenreturnstodimmode.
WARNING: Turn power off at circuit
breaker or fuse.

3
595-5770-06
Recommended Grounding Method
Useagreenground“pigtail”(notprovided)and
twistoneendtogetherwiththebarexturewire
andtheboxgroundwire.Securewithawire
connector.Securetheotherendofthe“pigtail”
withtheGNDscrewontheX-bar.
Blacktoblack
Whitetowhite
WIRING
One Motion Light
❒ Twist the junction box wires and the
xturewirestogetherasshownbelow.
Securewithwireconnectors.Ifyouhave
ametaljunctionbox,youmaynotneed
thegreen“pigtail”.Ifyouareunsureabout
thegroundingmethod,consultyourlocal
buildingcode.
Two Motion Lights
Black
White
Green
orBare
Light
Fixture
Black
White
Green
orBare
Light
Fixture
Light
Fixture
CAUTION: DO NOT connect the RED
wire unless you want to control other
lights from the motion sensor.
Note:Allwiringshouldberuninaccordance
with the National Electrical Code through
conduit or another acceptable means.
Contact a qualified electrician if there is
any question as to the suitability of the
system.
Connectthexturewirestothewiresinthe
junction box. Twist the wires together and
securewithwireconnectors.

4
595-5770-06
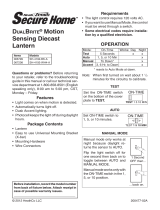
OPTIONAL WIRING
Thisxtureisprovidedwithasensorratedfor360Watts.Sincethextureisonlyrated100
Watts,260Wattsofadditionalloadmaybecontrolledbythissensor.
Whendeterminingwhataxtureisratedfor,donotsimplylookattheratingonthelight
bulbinthexture.Lookatthemarkingwhichspeciesthemaximumbulbwattageforwhich
thextureissuitable.
Onceyouhaveselectedthexturestobeconnectedanddeterminedtheirmaximumrat-
ings,addtheseratingsup.Forinstance,ifyouhave3xturesrated100Watts,150Watts,
and75Wattsrespectively,youhaveatotalloadof325Watts.
Wiring Diagram 1 – When wiring to control a standard light fixture:Stripthemotion
sensor’sredwireandconnecttothestandardlight’sblackwire.Connectallwhitewires
together.Totalxtureratingsmustnotexceed360Watts(3.0A).
Wiring Diagram 2 – When wiring to control another motion sensing light fixture (Mas-
ter / Slave):Striptheredwireinbothlightxtures.Connecttheredwireofthecontrolling
(master)xturetotheredandblackwiresofthecontrolled(slave)xture.Connectallwhite
wirestogether.Totalxtureratingsmustnotexceed360Watts(3.0A).
Wiring Diagram 3 – When wiring so either motion light turns on both motion lights
(Master / Master):Striptheredwireinbothlightxtures.Connecttheredwireofonexture
totheredwireofthesecondxture.Note:Inmostinstallations,anadditionalwire(same
gaugeasexistinghousewire)willhavetobeinstalledinthehousetoconnectthetwox-
turesasmaster/master.Connectallwhitewirestogetherandallblackwirestogether.Total
xtureratingsmustnotexceed360Watts(3.0A).
Black
White
Green
orBare
Light
Fixture
Light
Fixture
(Standard)
Master Slave
Black
White
Green
orBare
Light
Fixture
Light
Fixture
Red
Red
Wiring Diagram 1 Wiring Diagram 2
Wiring Diagram 3
Master Master
Black
White
Red
Green
orBare
Light
Fixture
Light
Fixture

5
595-5770-06
COMPLETE THE INSTALLATION
❒ Stuffthewiresintothejunctionbox.Make
surenoneofthewiresgetpinched.
Slidethextureontothe
mountingscrewsand
tightennuts.
❒ Installone 100 Wattmaximumlightbulb,or
three 60 Wattbulbsincandelabrastyle.
❒ Install the fixture top. Secure with
decorativescrews.
❒ Aftercompletingthetestsonpage6,caulk
fixture mounting surfacewithsilicone
weathersealant.
Junction
Box
Model 4193 Glass Installation
❒ Model 4193 only: install the six pieces
ofglassbyslidingthemdownasshown.
The glass panels should rest upon the
cornerguidesoneachside,andagainst
therubberbumpersatthebottom.
Note:Aswithanyglass,handlewithcare.
Corner
Guides
RubberBumpers

6
595-5770-06
TESTING
❒ Turn on the circuit breaker and light
switch.
NOTE: Sensorhasa1
1
/
2
minutewarmuppe-
riodbeforeitwilldetectmotion.When
rstturnedon,wait1
1
/
2
minutes.
❒ Switchtheon-timetoTESTpositionand
Du a l Br i t e
®
switchtotheOFFposition.
Thedetectorislesssensitivetomotiondi-
rectlytowardsitandmoresensitivetoacross
motion.
Sensor
Motion
Least Sensitive Most Sensitive
❒ Walkthroughthe coverage areanoting
whereyouarewhenthelightsturnon.
❒ If you need to change the sensitivity,
temporarilyremovethextureandmake
theadjustment.Toomuchsensitivitymay
increasefalsetriggering.
❒ SettheamountofTIMEyouwantthelight
tostayonaftermotionisdetected.(1,5,
or10minutes).
❒ Settheamountoftimeafterduskyouwant
thelightsonaccentlevel.
TEST1510MIN
ON-TIME
OFF 3 6 DUSK TO
HOUR DAWN
Avoid aiming the control at:
•Objectsthatchangetemperaturerapidly,
suchasheating vents and air condition-
ers.Theseheatsourcescouldcausefalse
triggering.
•Areaswherepets or trafficmaytrigger
thecontrol.
•Nearby large, light-colored objects
reecting light may trigger the shut-off
feature. Do not point other lights at the
sensor.
30ft.
(9.1m)
Maximum Range Maximum
Coverage Angle
6ft.
(1.8m)
180°
Motion

7
595-5770-06
SPECIFICATIONS
Range........... Up to 30 ft. (9.1 m)
[varieswithsurrounding
temperature]
SensingAngle..... Upto180°
ElectricalLoad..... See rating on xture
formaximumwattage
SensorCapacity ... Upto360Watts(3.0A.)
Maximum Tungsten
Incandescent
PowerRequirements 120VAC,60Hz
OperatingModes... TEST, AUTO, and
MANUALMODE
TimeDelay ....... 1,5,10minutes
Du a l Br i t e
®
Timer... Off,3,6hours,dusk-to
dawn
TheHamptonBayLightingCompanyreserves
the right to discontinue products and to
change specications at any time without
incurringanyobligationtoincorporatenew
featuresinproductspreviouslysold.

8
595-5770-06
SYMPTOM
Light stays on
continuously.
Light flashes
on and off.
POSSIBLE CAUSE
1. Thesensorispointedtoward
a heat source like an air
vent, dryer vent, or brightly-
paintedheat-reectivesurface.
(Reduce sensitivity.)
2. LightcontrolisinManualMode.
(Switch to Auto.)
3. Light control isin Du a l Br i t e
®
mode.
4. Sensitivityissettoohigh.(Re-
duce sensitivity.)
1. Light control is in the Test
mode and warming up.
(Flashing is normal under
these conditions).
2. Heatbeingreectedfromother
objects may be affecting the
sensor.(Reduce sensitivity.)
POSSIBLE CAUSE
1. Lightswitchisturnedoff.
2. Bulbislooseorburnedout.
3. Fuseisblownorcircuitbreaker
isturnedoff.
4. Daylight turn-off is in effect
(recheck after dark).
5. Incorrectcircuitwiring,ifthisis
anewinstallation.
1. Lightcontrolmaybeinstalled
inarelativelydarklocation.
2. Light control is in Test. (Set
control switch to an ON-TIME
position.)
1. Light control may be sensing
smallanimalsorautomobiletrafc
(Reduce sensitivity).
2. Sensitivityissettoohigh.(Re-
duce sensitivity.)
SYMPTOM
Light will not
come on.
Light comes on
in daylight.
Light comes on
for no apparent
reason.
TROUBLESHOOTING GUIDE
Ifyouexperienceaproblem,followthisguide.
No Service Parts Available for this Product

24
595-5770-06
CAUSE POSSIBLE
1. Ledétecteurdelacommande
d’éclairage pointe vers une
source de chaleur comme un
évent d’aération, un éventde
sécheuseouunesurfacepeinte
decouleurviverééchissantla
chaleur.(Réduisez la portée).
2. Lacommanded’éclairageesten
modeManuel(faites-la passer
au mode Auto).
3. La commande d’éclairageest
enmodeDu a l Br i t e
MD
.
4. Leréglage deportéeesttrop
élevé.(Réduisez la portée).
1. Lacommanded’éclairageesten
modeessaietseréchauffe.(Le
clignotement est normal dans
ces deux cas).
2.
La chaleur qui est rééchie par
d’autres objets peut affecter la
commanded’éclairage.
(Réduisez
la portée).
SYMPTÔME
La lampe
reste allumées
continuelle-
ment.
La lampe
clignote.
CAUSE POSSIBLE
1. L’interrupteurd’éclairageesten
positionhorscircuit.
2. L’ampouleauquartzestdesser-
réeougrillée.
3. Lefusibleducircuitasautéoule
disjoncteurestenpositionhors
circuit.
4. Lafonctiondemisehorscircuit
àlalumièredujourestengagée.
(Revérifier quand il fait nuit).
5. Mauvaiscâblage,s’ils’agitd’une
nouvelleinstallation.
1. La commande d’éclairage est
installéedansunendroitrelati-
vementsombre.
2. La commande d’éclairage est
enmode essai.(Placer l’inter-
rupteur ON-TIME à 1, 5 ou 10
minutes.)
1. Lacommanded’éclairagepeut
détecterdepetitsanimaux,des
arbresagitésparleventoula
circulationautomobile.(Rédui-
sez la portée).
2. Le réglage de portée est trop
élevé.(Réduisez la portée).
SYMPTÔME
La lampe ne
s’allume pas.
La lampe
s’allume le
jour.
La lampe
s’allume
sans raison
apparente.
GUIDE DE DÉPANNAGE
Sivouséprouvezdesdifcultés,suivreceguide.
Aucune pièce de rechange n’est disponible pour ce produit.
/