Page is loading ...

FP12K-K
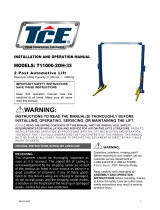
Flat
Deck Four-Post Lift
12,000 lb Capacity
ASSEMBLY & OPERATION
INSTRUCTION MANUAL
REV A-083013


12,000 LB.
F
OUR POST
CABLE LIFT
Cable driven four post lift provides 12,000 lb. lifting capacity.
No power beam; Cylinder stowed under single piece diamond
plate track. Simple, lever release system and redundant
safety locks.
Features:
✦ 12,000 lb. lifting capacity
✦ Cable driven
✦ 19” runways
✦ Powder coated paint finish
✦ Non-skid diamond
plate runways
SPECIFICATIONS: FP12K-K
Lifting capacity 12,000 lbs.
Total width (to outside base plates) 123”
Width between posts 105”
Width between tracks 36
1
⁄2”
Ramp length 36”
Track length (without ramp) 191
1
⁄2”
Track outside width 78”
Track width 19”
Base plate dimensions 11” x 11”
Overall length (to outside base plates) 195”
Lifting height to top of track 67
1
⁄2”
Maximum clearance under track 63
1
⁄4”
Overall height 87”
Length between posts 177”
FP12K-K
12,000 lb. capacity
Four post cable lift

1905 N Main St Suite C, Cleburne, TX 76033
Ph 817-558-9337 Fax 817-558-9740
TUXEDO DISTRIBUTORS LIMITED WARRANTY
Structural Warranty:
The following parts and structural components carry a five year warranty:
Columns Top Rail Beam Uprights Arms Swivel Pins
Legs Carriages Tracks Overhead Beam Cross Rails
Limited One-Year Warranty:
Tuxedo Distributors, LLC (“Tuxedo”) offers a limited one-year warranty to the original purchaser of
Tuxedo lifts and Wheel Service in the United States and Canada. Tuxedo will replace, without charge, any
part found defective in materials or workmanship under normal use, for a period of one year after purchase.
The purchaser is responsible for all shipping charges. This warranty does not apply to equipment that has
been improperly installed or altered or that has not been operated or maintained according to specifications.
Other Limitations:
This warranty does not cover:
1. Parts needed for normal maintena
nce
2. Wear
parts, including but not limited to cables, slider blocks, chains, rubber pads and pulleys
3. Replacement of lift and tire changer cylinders after the first 30 days. A seal
kit and installation
in
structions will be sent for repairs therea
fter.
4. On-site labor
Upon receipt, t
he customer must visually inspect the equipment for any potential freight damage before
signing clear on the shipping receipt. Freight damage is not considered a warranty issue and therefore must
be noted for any potential recovery with the shipping company.
The customer is required to notify Tuxedo of any missing parts within 72 hours. Timely notification must
be received to be covered under warranty.
Tuxedo will replace any defective part under warranty at no charge as soon as such parts become available
from the manufacturer. No guarantee is given as to the immediate availability of replacement parts.
Tuxedo reserves the right to make improvements and/or design changes to its lifts without any obligation
to previously sold, assembled or fabricated equipment.
There is no other express warranty on the Tuxedo lifts and this warranty is exclusive of and in lieu of all
other warranties, expressed or implied, including all warranties of merchantability and fitness for a
particular purpose.
To the fullest extent allowed by law, Tuxedo shall not be liable for loss of use, cost of cover, lost profits,
inconvenience, lost time, commercial loss or other incidental or consequential damages.
This Limited Warranty is granted to the original purchaser only and is not transferable or
assignable.
Some states do not allow exclusion or limitation of consequential damages or how long an
implied warranty lasts, so the above limitations and exclusions may not apply. This warranty
gives you specific legal rights and you may have other rights, which may vary from state to state.

TABLE OF CONTENTS
Important Note--------------------------------------------------------------------------------Page 3
Definition---------------------------------------------------------------------------------------Page 4
Preparation and General Information---------------------------------------------------Page 5
Important Concrete and Anchoring Information---
---------
--------------------------Page 6
Installation and Basic Operation Instruction------------------------------------------Page 7
Safety Procedures--------------------------------------------------------------------------Page 11
Maintenance Schedule--------------------------------------------------------------------Page 12
Troubleshooting-----------------------------------------------------------------------------Page 14
Owners Responsibilities------------------------------------------------------------------Page 15
Packing list ----------------------------------------------------------------------------------Page 16
Installation specification (Fig 2)---------------------------------------------------------Page 17
Prepare area (Fig 3)-----------------------------------------------------------------------Page 18
Cable wiring (Fig 20)----------------------------------------------------------------------Page 19
Parts code (Fig 21 )------------------------------------------------------------------------Page 20
IMPORTANT NOTES
● Do not install this lift on any surface other than concrete confirming to minimum specifications.
● Do not install this lift over expansion joints or cracks. Check with building architect.
● Do not install this lift on a second floor with a basement beneath without written authorization from
building architect.
● Do not install this lift outdoors unless special consideration has been made to protect the power
unit from inclemency weather conditions.
● A good level floor is recommended for proper installation and operation. Concrete should be a
minimum of 4” thickness and 3,000 psi tensile strength with steel or fiber mesh reinforcement.
● The lift is intended to raise the entire body of the vehicle. Do not attempt to lift only part of the
vehicle. Improper use of this equipment could result in damage to the lift, yourself or other property.
●
The lift is intended to lift
vehicles o
nly. It is not designed to lift any person or equipment
cont
aining people.
2
REV A-083013

REV A-083013

PREPARATION
The installation of this lift is relatively simple and can be accomplished by 2 men in a few hours. The
following tools and equipment are needed:
AW 32,46 Non-Detergent Non-Foaming Anti-Wear Hydraulic Oil SAE-10 (12 quarts)
Chalk line and 12’ Tape Measure, Transit and a 4’ Level
Rotary Hammer Drill with 3/4” Masonry Drill Bit. Core Drill Rebar Cutter, Hammer and
Hex-Key / Allen Wrench Set
Sockets and Open Wrench set, 1/2” thru 1-1/2”(1-1/8” for 5/8” Anchors)
Medium Crescent Wrench and Medium Pipe Wrench
Crow Bar for Shim Installation, Medium Flat
Screwdriver and Cross Screwdriver.
V
ise Grips and Needle Nose Pliers
GENERAL INFORMATION
1. Carefully remove the crating and packing materials. CAUTION! Be careful when
cutting steel banding material as items may become loose and fall causing personal
harm or injury.
2. Identify the components and check for damage or shortages. If damage or shortages
are discovered, contact distributor immediately. Save the shipping bolts for use in the
installation.
Packing:
*
The lift is pack
ed into one heavy rack and one carton box on it.
*
Ev
ery rack has two runways, four columns with covers, two cross bars, two ramps, two
front stops, one long lock linkage rod, and a accessory box.
3. Lift location - check with building owner and / or architect’s building plans when applicable. The lift
should be located on a relatively level floor with concrete sufficiently cured.
Suggestion:
(1) The floor be flat and without gradients (maximum of 10mm tolerance between the two base
plate of the columns)
(2) There are no cracks within 38” and n
o seams within 6” of the base plate.
(3) The concrete is recommended with following dimens
ion: 157.5”L * 39.5”W * 7.75”H.
Remember any structure is only as strong as the foundation on which it is lo
cated.
4. Check for ceiling clearance.
Suggestion:
At least 5” left between the top of a car on the lift and the ceiling.
Check for clearance in the front and rear of vehicle when on lift - will the garage door open
and
close properly.
Suggestion:
At least 24” space left between the edge of the column and the wall.
At least 144” space left between the central line of the columns and the wall.
( At least 36” space for walking left between the front or the rear of the vehicle and the
wall.
)
4
REV A-083013

REV A-083013

REV A-083013

5. Double check all dimensions and make sure that the layout is perfectly square.
6. Before continuing with the installation it is help
ful to stand the posts up at their respective locations
and get a visual of the shop, aisles and other clearances. Also, this is a good time to drive a vehicle
into position and check for adequate clearance.
7.
NOTE
All models MUST be installed on 3000PSI concrete only confirming to the minimum require
ments. New
concrete must be adequately cured by at least 28 days minimum.
STEP 4
: (Installing the Columns with cross bars)
1. Before proceeding, double check measurements and make certain that the bases of each column
are squar
e and aligned with the chalk line.
2. Locate the columns at their respective locations according to the chalk line layout. (See Fig.3) Pay
attention to the power
-side column. DO NOT BOLT columns at this moment. Use caution to
prevent columns from falling over.
3. Unbolt the safety rack at the bottom inside the column.( See Fig. 4)
Fig.4 Fig.5 Fig.6
4. Insert the end of cross bar into every column. ( See Fig. 5) To be sure that the end with lock
release handle of front cross bar is inside the power-side column. Handle faces out (front). The
rear cross bar should be placed as a mirror image of the power-side one. ( The side with a tiny bar
link two ends face back)
5. Insert the safety rack into the cross bar end as shown in Fig. 6.
6. Hold down the safety rack then raise up the cross bar ends to
rest on the first (lowest) p
osition.
( See Fig. 7)
7. Tighten up the bolt of every safety rack at the bottom. (See Fig. 8)
7
REV A-083013

REV A-083013

Fig. 13 Fig.14 Fig.15
2. Using bolts provided, bolt the right-rear end of the off-side runway on the rear cross bar. The other
end is free.
3. Before locating the power-side runway on the cross bars, pull out the cables underneath and put
them over the pulleys. The shorter one is for the power-side column. The longer one is for the
offside column.
4.
Take off the stop plate of the big pulley shaft on one end of cross bar. (See Fig.14) Take out the
big pulley in order to let the cable go through it. (See Fig. 15) Then reinstall the big pulley and fasten
the stop plate. Be sure that the cable is against the small roller so that the emergency locking latch
is off the rack.
5. Tighten all the bolts on the power-side runway with supplied bolts, nut
s, and spring washes.
6. Bolt the threaded end of the cable on the top of the column. (See Fig. 16)
Do the same for other
cables and columns.
Fig. 16 Fig.17 Fig. 18
SUGGESTION
Pull out the ram of the cylinder underneath the power-side runway as longer
as possible, to make the
cables reach the column top easily.
STEP 6: (Mounting the POWER UNIT)
1. Attach the power unit to the POWER-SIDE COLUMN using bolts, nuts and washers supplied.
(See Fig. 17)
2. Fill the reservoir with hydraulic oil. Make sure the funnel used to fill the power unit is clean.
Suggestion: Use AW 32,46 Non-Detergent Non-Foaming Anti-Wear Hydraulic Oil
SAE-10
3. Connect the oil hose from the power-side runway to the power unit.
4.
Have a certified electrician run the 220V/60Hz single phase power supply to the motor. Be sure
9
REV A-083013

to size the wire for a 25 amp circuit.
STEP 7: (Routing the CABLES)
1.
Check again that all the cables are on the pulleys both of the columns and underneath the
power-side runway.
2. Make sure that the current of the power supply is enoug
h for the motor.
3.
Press
the start button on the motor to raise the runways a little. Make sure that the safety latches
are not resting on the racks.
4.
Screw the nut up or down on the column top to level the cross bar and runway.
The cables should be checked weekly for equal tension. Failure to do this will cause uneven lifting. The
cables should always be adjusted so that they are equal tension when the cross bars are resting on the
safety locks.
IMPORTANT NOTE
STEP 8: (Mounting on accessories)
1.
Mount the front stops. (See fig. 18)
2.
Connect the long linkage rod from Front cross bar to rear cross bar. Make sure the safety locks
are working
correctly.
3. Route the hydraulic hose underneath the pow
er-side runway.
4. Mount on the approaching ramps.
5. Put the column covers on the column.
STEP 9: (Lift start up)
1. Do not place any vehicle on the lift at this time!
2.
Cycle the lift up and down several times to insure latch click together and all ai
r is removed from the
system.
3.
To lower the lift, the latch releases must be manually released while the lowering handle of the
pump
is pressed. Latches will automatically reset once the lift ascends approximately 17" from
the base.
OPERATION
RAISE-LIFT
1. Press button on power unit
The latch mechanism will ‘trip over’ when the lift
raises and drop into each latch stop. But, to lock the lift
you must press the lowering handle to relieve the hydraulic pressure and let the latch set tight in a lock
position.
Always lock the lift before going under the vehicle. Never allow anyone to go under the lift when
raising or lowering. Read the safety procedures in the manual.
10
REV A-083013

REV A-083013

REV A-083013

REV A-083013

REV A-083013

No Description Qty Note
1 Power-side runway 1 with cylinder ,hose and cables
2 Off-side runway 1
3 Front cross bar 1 With lock release handle
4 Rear cross bar 1
5 Power-side column 1 With mounting holes for pump
6 Off-side column 3
7 Column cover 4
8 Front stop 2
9 Approaching ramp 2
10 Long lock linkage rod 1
11 Beam cover 4
12 Accessory box 1 Anchors and shims
13 Electro-hydraulic pump 1
14
15
16
17
18
19
20
21
22
INSTALLATION INSTRUCTION Fig 2
For FP12K
15
Packing List
REV A-083013

ITEM MODEL 165972
Overall Width A 3120mm
Inside Columns B 2660mm
Inside Soleplate of columns C 2560mm
Between Runways D 928mm
Length of Ramp E 910mm
Length of Runway F 4860mm
Width of Outside runway G 1980mm
Width of runway H 482mm
Size of Soleplate I 280*280mm
Overall Length J 4960mm
Lifting Height K 1760mm
Overall Height L 2225mm
Length between Columns M 4500mm
Lifting Capacity 12000lbs
NetGross Weight 10001050kg
16
REV A-083013

INSTALLATION INSTRUCTION Fig 3
(These data are suggestion not min. requirement)
17
REV A-083013
/