Page is loading ...

LAUNCH TECH USA INC.
Installation, Operation & Maintenance Manual
Two Post Surface Mounted Lifts
10,000 lb. Capacity 10,000 lb. Capacity 10,000 lb. Capacity 11,000 lb. Capacity
2,500 lbs. per Arm 2,500 lbs. per Arm 2,500 lbs. per Arm 2,750 lbs. per Arm
IMPORTANT:
READ THIS MANUAL COMPLETELY BEFORE
www.launchtechequipment.com
LAUNCH
TLT210-A TLT210-AS TLT210-XT TLT211-AS
INSTALLING OR OPERATING YOUR LIFT
1820 S Milliken Ave. Ontario, California 91761 Telephone: 562 463-1580 Fax: 562 463-1590
Model
TLT210
-
AS
pictured

2
OWNER / EMPLOYER OBLIGATIONS
1. The Owner/Employer shall ensure that lift operators are qualified and that
they are trained in the safe use and operation of the lift using the
manufacturer’s operating instructions; ALI/SM 93-1,
ALI Lifting it Right
safety manual
; ALI/ST-90
ALI S
afety Tips card
; ANSI/ALI ALOIM-2008,
American National Standard for Automotive Lifts - Safety
Requirements for Operation, Inspection and Maintenance; ALI/WL
Series, ALI Uniform Warning Label Decals/Placards
; and in the case of
frame engaging lifts, ALI/LP-GUIDE,
Vehicle Lifting Points/Quick
Reference Guide for Frame Engaging Lifts.
2. The Owner/Employer shall establish procedures to periodically inspect the
lift in accordance with the lift manufacturer’s instructions or ANSI/ALI
ALOIM-2008,
American National Standard for Automotive Lifts
-
Safety Requirements for Operation, Inspection and Maintenance
; and
the Employer shall ensure that the lift inspectors are qualified and that
they are adequately trained in the inspection of the lift.
3. The Owner/Employer shall establish procedures to periodically maintain
the lift in accordance with the lift manufacturer’s instructions or ANSI/ALI
ALOIM-2008,
American National Standard for Automotive Lifts
-
Safety Requirements for Operation, Inspection and Maintenance
; and
the Employer shall ensure that the lift maintenance personnel are qualified
and that they are adequately trained in the maintenance of the lift.
4. The Owner/Employer shall maintain the periodic inspection and
maintenance records recommended by the lift manufacturer’s instructions
or ANSI/ALI ALOIM-2008,
American National Standard for Automotive
Lifts - Safety Requirements for Operation, Inspection and
Maintenance.
5. The Owner/Employer shall display the lift manufacturer’s operating
instructions; ALI/SM 93-1,
ALI Lifting it Right safety manual
; ALI/ST-90
ALI Safety Tips card
; ANSI/ALI ALOIM-2008,
American National
Standard for Automotive Lifts - Safety Requirements for Operation,
Inspection and Maintenance
; ALI/WL Series,
ALI Uniform Warning
Label Decals/Placards
; and in the case of frame engaging lifts, ALI/LP-
GUIDE,
Vehicle Lifting Points/Quick Reference Guide for Frame
Engaging Lifts
in a conspicuous location in the lift area convenient to the
operator.
6. The Owner/Operator shall provide necessary lockout/tagout means for
energy sources per ANSI Z244.1-1982 (R1993),
Safety Requirements
for the Lockout/Tagout of Energy Sources
, before beginning any lift
repairs and maintenance.

3
7. The Owner/Employer shall not modify the lift in any manner without the
prior written consent of the manufacturer.
IMPORTANT SAFETY INSTRUCTIONS
1. When using this lift, basic safety precautions should always be
followed, including the following:
2. Read all instructions in this manual and on the lift thoroughly before
installing, operating, servicing or maintaining the lift.
3. Care must be taken as burns can occur from touching hot parts.
4. Do not operate equipment with a damaged cord or if the equipment has
been dropped or damaged – until it has been examined by a qualified
service person.
5. Do not let a cord hang over the edge of the table, bench, or counter or
come in contact with hot manifolds or moving fan blades.
6. If an extension cord is necessary, a cord with a current rating equal to or
more than that of the equipment should be used. Cords rated for less
current than the equipment may overheat. Care should be taken to
arrange the cord so that it will not be tripped over or pulled.
7. Always unplug equipment from electrical outlet when not in use. Never
use the cord to pull the plug from the outlet. Grasp plug and pull to
disconnect.
8. Let equipment cool completely before putting away. Loop cord loosely
around equipment when storing.
9. To reduce the risk of fire, do not operate equipment in the vicinity of open
containers of flammable liquids (gasoline).
10. Adequate ventilation should be provided when working on operating
internal combustion engines.
11. Keep hair, loose clothing, fingers, and all parts of body away from moving
parts.
12. To reduce the risk of electric shock, do not use on wet surfaces or expose
to rain.

4
13. Use only as described in this manual. Use only manufacturer’s
recommended attachments.
14.
ALWAYS WEAR SAFETY GLASSES.
Everyday eyeglasses only have
impact resistant lenses, they are not safety glasses.
15. Inspect lift daily. Do not operate if it malfunctions or problems have been
encountered.
16. Never attempt to overload the lift. The manufacturer’s rated capacity is
shown on the identification label on the power side column. Do not
override the operating controls or the warranty will be void.
17. Before driving vehicle between the towers, position the arms to the drive-
through position to ensure unobstructed clearance. Do not hit or run over
arms as this could damage the lift and/or vehicle.
18. Only trained and authorized personnel should operate the lift. Do not allow
customers or bystanders to operate the lift or be in the lift area.
19. Position the lift support pads to contact the vehicle manufacturers
recommended lifting points. Raise the lift until the pads contact the
vehicle. Check pads for secure contact with the vehicle. Check all arm
restraints and insure they are properly engaged. Raise the lift to the
desired working height.
20. Some pickup trucks may require an optional truck adapter to clear running
boards or other accessories.
21.
NOTE:
Always use all 4 arms to raise and support vehicle.
22.
Caution!
Never work under the lift unless the mechanical safety locks are
engaged.
23. Note that the removal or installation of some vehicle parts may cause a
critical load shift in the center of gravity and may cause the vehicle to
become unstable. Refer to the vehicle manufacturer’s service manual for
recommended procedures.
24. Always keep the lift area free of obstruction and debris. Grease and oil
spills should always be cleaned up immediately.
25. Never raise vehicle with passengers inside.
26. Before lowering check area for any obstructions.
27. Before removing the vehicle from the lift area, position the arms to the
drive-thru position to prevent damage to the lift and /or vehicle.

5
28. Do not remove hydraulic fittings while under pressure.
WARNING!
Failure by purchaser to
provide the recommended mounting surface
could result in unsatisfactory lift performance, property damage, or personal injury.
LOCATION
This lift has been evaluated for indoor use only with an operating ambient temp. range of 5 - 40°C (41-
104°F)
For additional safety instructions regarding lifting, lift types, warning labels,
preparing to lift, vehicle spotting, vehicle lifting, maintaining load stability,
emergency procedures, vehicle lowering, lift limitations, lift maintenance,
good shop practices, installation, operator training and owner/employer
responsibilities, please refer to “Lifting It Right” (ALI/SM) and “Safety Tips”
(ALI/ST) and vehicle lift points for service garage lifting SAE J2184.
For additional instruction on general requirements for lift operation, please
refer to “Automotive Lift-Safety Requirements for Operation, Inspection and
Maintenance” (ANSI/ALI ALOIM).
Installation shall be performed in accordance with ANSO/ALI ALIS, Safety
Requirements for Installation and Service of Automotive Lifts.
ATTENTION!
This lift is intended for indoor installation only. It is
prohibited to install this product outdoors. Operating environment
temperature range should be 41 – 104 °F (5 – 40 °C).
Failure to
adhere will result in decertification, loss of warranty, and
possible damage to the equipment.

6
SAFETY AWARENESS
REFERENCE: AUTOMOTIVE LIFT INSTITUTE (ALI)
SAVE THESE INSTRUCTIONS
Note: Some images in this manual are generic and may not resemble
the lift you have purchased.

7
SPECIFICATIONS
LAUNCH TECH USA
TLT Series Specifications
Figure 1
Rise height measured with footpads in the highest position.
Lift capacity rating is based on loads equally distributed on all four arms.
Lifting and lowering speeds may vary depending on the weight of the vehicle.
TLT211- AS 11,000 lb. Capacity TLT210- AS / XT 10,000 lb. Capacity TLT-210- A / XT 10,000 lb. Capacity
A. Maximum Lifting Height
75.6" (1920mm) 76.4" (1940mm) 76.4" (1940mm)
B. Minimum Column Height
143" (3634mm) 143" (3634mm) 143" (3634mm)
C. Cylinder Full Height
145.2" (3688mm) 145.2" (3688mm) 145.2" (3688mm)
D. Total Width
137.8" (3500mm) 136.6" (3470mm) 137.9" (3502mm)
E. Drive-Thru Clearance
96" (2438mm) 98.4" (2500mm) 88" (2235mm)
F. Floor to Overhead Switch
140" (3556mm) 140" (3556mm) 140" (3556mm)
G. Front Arm Reach (min / max)
23.6"(600mm) / 39.4" (1000mm) 23.6"(600mm) / 43.5" (1105mm) 23.6"(600mm) / 43.5" (1105mm)
H. Rear Arm Reach (min / max)
38.6" (980mm) / 61.8" (1570mm) 38.6" (980mm) / 61.8" (1570mm) 38.6" (980mm) / 61.8" (1570mm)
I. Screw Pad Height
4.3" (110mm) to 7.5" (190mm) 4.3" (110mm) to 7.5" (190mm) 4.3" (110mm) to 7.5" (190mm)
J. Inside Column Width
108" (2742mm) 110.2" (2800mm) 101.9" (2588mm)
Electric Hydraulic Power Unit
2 HP 2 HP 2 HP
Voltage
208-230Volt/60hz./Single Phase 208-230Volt/60hz./Single Phase 208-230Volt/60hz./Single Phase
Rise Speed
54 Seconds 54 Seconds 54 Seconds
Max. Load Per Arm
2750 Lbs. (1247 Kilos) 2500 Lbs. (1134 Kilos) 2500 Lbs. (1134 Kilos)
Minimum Ceiling Height Required
143.9" (3655mm) 143.5" (3644mm) 143.5" (3644mm)
Narrow Bay Setting
Non-Adjustable Deduct 5.9" (149mm) Deduct 5.9" (149mm)
Maximum Column Height
149" (3784mm) 149" (3784mm) 149" (3784mm)
Power Unit Operating Pressure
2750 PSI 2700 PSI 2750 PSI

8
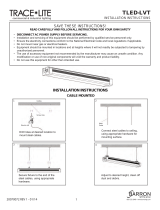
PACKING LIST
The complete lift is contained in two (2) packages:
1.
The main structural components and parts
are packed in a steel frame.
2. Power Unit Box including Shutoff Switch and all Documents
Main Structural Components and Parts
1pc. - Power side tower and carriage assembly
1pc. - Slave side tower and carriage assembly
1pc. - Overhead Beam
1pc. - Actuator Bar w/ foam
1pc. - Power side column extension
1pc. - Slave side column extension
2pc. - Two front arm assembles (Three piece design)
2pc. - Two rear arm assembles (Two piece design)
2pcs. - Safety Covers w/Decals
1pc. - Hardware Package w/Packing List
1pc. - Actuator Extension
1pc. - Actuator Mounting Bracket
1pc. - Safety Release Cable
2pc. - Hydraulic Hose (Long)
2pc. - Hydraulic hose (Short)
2pcs. - Equalizing Cable w/Hex Nuts
1pc. - ALI manual “Lifting It Right”
1pc. - Automotive Lift Safety Tips
1pc. - Automotive Lift, Operation, Inspection and Maintenance Manual
1pc. - ALI” Quick Reference Guide
1pc. - Owner’s manual
1pc. - Warranty Statement and Warranty Registration Instructions
1pc. - Power Unit Box with Microswitch and Document Package

9
INSTALLATION REQUIREMENTS AND TOOLS
FOUNDATION
IMPORTANT:
It is the user’s responsibility to provide a satisfactory installation
area for the lift. Lifts should only be installed on level concrete floors with a
minimum thickness of four inches (4") or 102 mm. Concrete must have a minimum
strength of 3500 psi should be aged thirty (30) days prior to installation. Please
consult the architect, contractor or engineer if doubt exists as to the strength and
feasibility of the floor to enable proper lift installation and operation.
A qualified person should be consulted to address seismic loads and other local
or state requirements.
It is the user’s responsibility to provide all wiring for electrical hook-up prior to
installation and to insure that the electrical installation conforms to local building
codes. Where required, it is the user’s responsibility to provide an electrical
isolation switch located in close proximity to the lift that will enable emergency
stop capability and isolate electrical power from the lift for any servicing
requirements.
TOOLS
a. 16ft. Measuring Tape
b. Chalk Line
c. Rotary Hammer Drill
d. 3/4” diameter or 19mm diameter Masonry Drill Bit
e. Hammer
f. SAE Wrenches and Ratchet Set
g. Metric Wrenches and Ratchet Set
h. 2ft. Level
i. 4ft. Level
j. Pry Bar
k. 12ft. Step Ladder
l. Side Cutters
m. Screwdrivers
n. 4” x 4” Wooden Blocks (for unpacking)
o. 4 gal. ISO 32 Hydraulic Fluid
p. Torque Wrench
q. Hydraulic Fitting Sealant Compound ( DO NOT USE TEFLON TAPE) Launch
*Tech USA recommends Permatex brand part number 54540
OR Loctite brand 545 thread sealant

10
INSTALLATION INSTRUCTIONS
When the lift arrives on site:
Read the owner’s manual and make sure the installation instructions are
fully understood.
Check for any freight damages.
The shipment should be thoroughly
inspected as soon as it is received. The signed bill of lading is
acknowledgement by the carrier of receipt in good condition of shipment
covered by our invoice .If any of the goods called for on your bill of lading
are shorted or damaged, do not accept them until the carrier makes a
notation on the freight bill of the missing or damaged goods. Do this for
your own protection. Check the contents of the accessory and hardware
boxes to make sure no parts are missing.
NOTE:
IT IS DIFFICULT TO COLLECT FOR LOSS OR DAMAGE AFTER
YOU HAVE GIVEN THE CARRIER A CLEAR RECEIPT. THE LIFT
MANUFACTURER IS NOT RESPONSIBLE FOR ANY FREIGHT DAMAGE.
UNPACKING PROCEDURE
Important! Place the main structural components on wooden blocks so
that the steel shipping frames can be removed.
Remove Power Unit Box.
Remove the plastic wrapping.
Remove the cross member, and the actuator bar.
Remove the arms and parts boxes
Unbolt the steel shipping frames.
Lay each tower on the floor with the carriage side up.
Check the installation area for obstructions. (Lights, Heating Ducts,
Ceiling, Floor Drains, etc.)

11
BAY LAYOUT
IMPORTANT:
Always wear PPE (Personal Protection Equipment) when
installing or servicing a vehicle lift.
Prepare the bay by selecting the location of the lift relative to the walls.
Clear the installation area of all packaging materials to avoid trip
hazards.
Measure midpoint of door.
Using measuring tape, scribe
two arcs, equal distance from
the midpoint.
The centerline of the lift occurs
between the intersection of the
arcs and the midpoint of the door.
Note: Leave any additional room for any
desired aisle or work area.
Recommended minimum clearance
around lift is three feet (3 ft.) and
above lift is four inches (4”).
Ensure clearance conforms to local
building and fire codes.
Figure 2
Measure the specified distance to draw a second chalk line at 90° for locating the
lift towers. Refer to Figure 3 and Figure 4 and Figure 5 below for correct
measurements.
The lift is centered between the door and the walls of the area.
Mark chalk lines at the exact position of each baseplate to show that when
installing the columns each baseplate will be position properly.
All the dimensions are based on the external border of the base plate.
The lift layout is very important. If not done properly, problems may
occur during the final assembly and operation
Important Notice: For narrow bay installation, deduct
5.9” (150 mm) from
the width layouts.

12
Figure 3
TLT210-AS or TLT210-XT Bay Layout
Deduct
150mm/5.9 in. from the width dimensions for the narrow installation

13
Figure 4
TLT210-A or TLT210-XT Bay Layout
Deduct
150mm/5.9 in. from the width dimensions for the narrow installation

14
Figure 5
TLT211-AS Bay Layout
Note: There is no narrow bay setting on the TLT211-AS

15
COLUMN ASSEMBLE
Assemble the column extensions and the positive carriage stop brackets to each
column using 12 sets of 12x35 hex bolts, flat washers, lock washers and nuts.
Repeat for opposite column and extension. Determine if the lift will be in the tallest
or lowest position at this time. Note that the TLT211-AS column extensions are
already assembled and may be preassembled at either the short or tallest position.
It is recommended that the TLT211
-AS lift be installed at the tallest position to
accommodate large and taller vehicles. Recheck the bolt tightness on the TLT211-
AS the bolts may
have loosened from shipping and handling. See illustration
below for reference. (Tallest position shown below)
INSTALLING THE COLUMNS
Raise the completed power side column upright to the chalked location. Align
the baseplate of column with the chalk line layout. Using the baseplate as a
template, drill holes into the concrete slab and use the five concrete anchor
bolts to attach the column to the floor. (Note: the TLT211-AS lift uses six (6)
anchor bolts) During the drilling process, do not allow any movement of the
column from the chalk line.
Note: Power side column should always be installed first. After the
power side column is installed the slave column is raised into
position
but not anchored to the floor. Installing the overhead beam must be
completed before the slave side column is anchored to the floor.
Use a four foot level on both sides of the column and use shims under
baseplate to level the column in both directions. Ensure that the base plate is
completely supported by shims including near the center where it does not
contact the floor.
Note: If theTLT-211AS lift is
installed at the tallest position,
this carriage stop bracket is
not to be used.

16
Refer to Bay Layout Figures about to ensure that the column is still in the
proper position before the anchor bolts are installed
Prior to installing anchors, assemble the nut and washer onto anchors. A
minimum of six threads must be visible below the surface of the nut. Refer to
the figure below while reading through the following instructions.
Using a ¾” concrete drill bit and rotary hammer drill, drill ¾” holes for the
anchor bolts on the power side column. Drill through the concrete floor. (In
case longer anchors are required, supplied anchors can be hammered
through concrete).
Clean out the drilling dust from the holes and place anchor bolts into the
hole. Add the washers and nut to the so that the top of the anchor bolt and
top of the nut are flush with each other then hammer in the anchor bolts
until they make contact with the baseplate.
Hand tighten all anchor bolts.
Check that the column is level front to rear and side to side. Adjust
shims as required.
Torque all anchor bolts to
125 ft.
-
lbs.
continually checking that the
column is level as you proceed.
USE ONLY A TORQUE WRENCH TO TIGHTEN THE ANCHOR BOLTS DO
NOT USE AN IMPACT GUN TO INSTALL OR TIGHTEN THE ANCHOR
BOLTS.
If anchor bolts do not tighten to 125 ft.-lbs. OR project more than 2 ¼”
above the concrete surface due to floor slope, the concrete should be
replaced by an appropriate concrete pad. (Consult Product Manufacturer
Supplier for further details).
At this time the slave column should be raised into position and aligned with chalk
marks on the floor. DO NOT ANCHOR THE SLAVE COLUMN AT THIS TIME. Use
caution to not move the slave column as is may tip over.

17
INSTALLING THE OVERHEAD BEAM
After positioning the slave column at the designated chalk location; assemble the
overhead beam on the shop floor to either the narrow or widest lift width hole
positions as determined by the chalk line measurements. See the photo below for
illustration.
While the overhead beam is still on the shop floor install the provided 4 pulleys
(sheaves). Two (2) pulleys on each side of the overhead beam using the parts
shown below. Note: Asymmetric installation (rotated column position as shown in
figure 5) requires the pulleys to be installed offset to each other using two (2)
axles and related parts. Symmetric installation (as shown in figure 4) requires the
pulleys to be installed on a common axle using the related parts. See related
photos below.
Note:
Some TLT210 series models may already
have the pulleys installed. The TLT211-AS model has
the pulleys pre-installed at the factory. If this is case,
disregard the instructions below and proceed to the
next phase of installation.
Photo below shows the overhead
beam assembled at the widest
(most common) position.

18
ASYMMETRIC PULLEY INSTALLATION
Use the 4 pulleys (sheaves) located in the parts packaging combined with the
parts in the packet marked “Asymmetric Installation” to install the pulleys for an
Asymmetric configuration. Below is what is contained in the asymmetric parts
packet.
No.
Name and Specs
Part Number
Qty.
Picture
1
Asymmetric shaft
103200966
4
2
Spacer Ⅱ
(Wide)
201011257
2
3
Spacer Ⅰ
(Narrow)
201011258
2
4 Retainer Ring 25
103050035
8

19
Asymmetric Pulley Configuration Continued….
The photo below illustrated the proper alignment and placement of the pulleys into
the overhead beam. Note that the outer pulley is positioned on the overhead
beam in the outer most axle holes and that it is closest to the front of the lift. The
inner pulley is positioned in the inner most axles holes and is mounted toward the
rearward area of the lift. When installing the opposite set of pulleys they must
correspond exactly as the first set of pulleys that you installed.
Symmetric Pulley Assemble shown on the following page
Note: Inner pulley is
facing to the rear of the lift
Note: Outer pulley is
facing to front of the lift

20
SYMETRIC PULLEY INSTALLTION
Use the 4 pulleys (sheaves) located in the parts packaging combined with the
parts in the packet marked “Symmetric Installation” to install the pulleys for a
Symmetric configuration. Below is what is contained in the symmetric parts
packet.
No.
Name and Specs
Part Number
Qty.
Picture
1
Symmetric shaft
103200967
2
2
Spacer Ⅱ
(Wide)
201011257
2
3
Spacer Ⅰ
(Narrow)
201011258
2
4
Cotter Pin 5x40
103060349
4
5 Retainer Ring #25 103050035 4
/