Keystone Premium PVC Fabric Installation guide

Type
Installation guide

Keystone Premium PVC Fabric is a durable and versatile material that can be used for a wide range of applications, including awnings, canopies, boat covers, and truck tarps. It is water-resistant, UV-resistant, and mildew-resistant, making it ideal for outdoor use. The fabric is also flame retardant and meets all applicable fire codes. With a variety of colors and styles to choose from, Keystone Premium PVC Fabric is a great choice for any project.

Keystone Premium PVC Fabric is a durable and versatile material that can be used for a wide range of applications, including awnings, canopies, boat covers, and truck tarps. It is water-resistant, UV-resistant, and mildew-resistant, making it ideal for outdoor use. The fabric is also flame retardant and meets all applicable fire codes. With a variety of colors and styles to choose from, Keystone Premium PVC Fabric is a great choice for any project.

Motor Operated Interior Sun Shade
Bottom Tube Plug
(14BTP) x 2
Valance Bracket
(VB13) x 3
Large Screw
(14S) x 6
Note: some parts may be slightly different than shown in this manual.
Part # Description Qty Location
14VA Valance 1 Pre-installed
14SC Shade Cloth 1 Pre-installed
14BT Bottom Tube 1 Pre-installed
14LVC Left Valance Cover 1 Pre-installed
14RVC Right Valance Cover 1 Pre-installed
14PD Plug Disc 1 Pre-installed
14P Plug with Pin 1 Pre-installed
14IM Motor 1 Pre-installed
14MD Motor Disc 1 Pre-installed
14BTP Bottom Tube Plug 2 Pre-installed
VB13 Valance Bracket 3 Hardware Box
14S Large Screw 6 Hardware Box
14RCHB Holder Bracket 1 Hardware Box
14RCH Holder 1 Hardware Box
14SSA Anchors 2 Hardware Box
14SS Small Screws 2 Hardware Box
14ACC AC Charger 1 Hardware Box
14IRC Remote Control 1 Hardware Box
14ACCEX AC Charger Extension 1 Hardware Box
CR2430 Battery
Battery for Remote Control 1 Hardware Box
(Exploded view)
(Exploded view)
Plug Disc
(14PD) x 1
Left Valance Cover
(14LVC) x 1
Plug (with pin)
(14P) x 1
Right Valance Cover
(14RVC) x 1
Motor
(14IM) x 1
Motor Disc
(14MD) x 1
AC Charger
(14ACC) x 1
Remote Control
(14IRC) x 1
Holder
(14RCH) x 1
0.75 inch Anchor
(14SSA) x 2
Holder Bracket
(14RCHB) x 1
Small Screws
(14SS) x 2
1
AC Charger Extension
(14ACCEX) x 1
CR2430 Battery
(RCS-BATRC12) x 1
IMPORTANT:
Do not cut antenna
Step 1: Install the Valance Brackets (please read entire step prior to installation)
BEFORE YOU START
Determine your type of installation. Your
sun shade can be hung from a wall or a
ceiling. Figure A demonstrates a wall
installation. Figure B demonstrates a ceiling
installation.
Fig A
Fig B
Fig D
Fig F
It is very important that your brackets are perfectly aligned with each other (your shade will not install correctly unless your
brackets are perfectly aligned with each other). We recommend using a laser level or the provided template to align the screw
holes.
For wall installations, you need to allow at least one
(1) inch (2.54 cm) above the bracket to allow the shade
to hook onto the bracket (only if there is a ceiling that
overhangs the shade). See Figure C.
For a wall installation, make sure the plastic tabs on
your Valance Brackets are pointing towards the ground
(Fig D).
Fig E
For ceiling installations, you need to allow at least one (1) inch
(2.54 cm) behind the bracket to allow the shade to hook onto the
bracket (only if there is a wall behind the shade). See Figure E.
For a ceiling installation, make sure the plastic tabs on your
Valance Brackets are pointing out, towards you (Fig F).
WALL INSTALLATION CEILING INSTALLATION
WALL INSTALLATION
CEILING INSTALLATION
Your shade includes a paper template. Use of the template is optional, but recommended. The template is designed to help you
align your pilot holes for your Valance Brackets. To use your template, temporarily adhere the template (using tape, staples, etc.)
to the installation surface. Make sure the template is level, at and unwrinkled before adhering it to your surface. The template
is the full width of your shade; so if the template ts in your installation area, your shade will t as well. Before drilling the pilot
holes, please consider the following:
Your shade includes three (3) Valance Brackets, you must install at least two of them.
Install one (1) Valance Bracket near each end of the shade and one (1) Valance Bracket in the middle of the shade. Note: the
Valance Brackets cannot be installed on the extreme edges of the shade, you will need to allow at least one (1) inch (2.54 cm)
at the ends of each side. We recommend installing the brackets on the closest stud to each end of the shade, remembering to
allow at least one (1) inch (2.54 cm) from each end.
Install the Valance Brackets into wood studs. If wood studs are not available, you will need to use anchors (not included).
See your local hardware store for more information.
1.
2.
3.
at least 1 inch (2.54 cm)
from back wall
at least 1 inch (2.54 cm)
above the bracket
Fig C
2
1 inch
1 inch
Complete Video Instructions Available Online at www.shadeinfo.com
*
Step 2: Install the shade
Step 3: Install the Battery in the Remote Control
Your Remote Control requires a CR 2430
(3V) lithium battery (included). To install the
Battery, slide the battery cover off the Remote
Control and insert the battery with positive (+)
side of the battery (up) facing the backside of
the remote (Fig K).
Fig K
For wall installations, rst hook
the back of the Valance on the top
of Valance Brackets (Fig G), then
rotate the shade down and click into
place (Fig H).
Note: you may need to push the
plastic tabs on the Valance Brackets
to help the shade click into place.
Fig H
Fig G
Fig I
Fig J
For ceiling installations, rst hook
the back of the Valance on the back
of the Valance Brackets (Fig I),
then rotate the Valance upwards and
click it into place (Fig J).
Note: you may need to push the
plastic tabs on the Valance Brackets
to help the shade click into place.
CEILING INSTALLATION
WALL INSTALLATION
Step 4: Mount Remote Control to Wall (optional step)
Your shade includes a Remote Control Holder that allows
you to mount your Remote Control to a wall/beam. To
install, place the Holder Bracket against the installation
surface with the narrow side against the wall/beam and
install it using the two Small Screws (Fig L).
Next, slide the Holder onto the Holder Bracket
(Fig M).
Fig L Fig M
3
Fabric Up Button
Fabric Stop Button
Fabric Down Button
Channel Lights
(top light is channel 1, next one
down is channel 2, etc. Active
channel will be illuminated when
any button is pressed)
Front of Remote
Back of Remote
Battery Compartment
(Remote battery included in
package, installation required)
P2 Button
*we suggest using a paper clip to
push this recessed button on the
back of the remote
Step 5: Program Your Shade(s)
FAMILIARIZE YOURSELF WITH THE REMOTE CONTROL
PUT YOUR SHADE INTO “LIMIT SETTING MODE”
When rolling your shade up or down, you have the option of stopping the fabric at any position by pushing the “stop
button on your Remote Control. Your shade is pre-programmed with a “Top Fabric Limit” and a “Bottom Fabric
Limit. ese are the points where the fabric will stop rolling without you pushing the “stop” button. e default
Top Fabric Limit” is approximately 2’’ below the valance. e default “Bottom Fabric Limit” is approximately 72’
below the Valance. If you are satised with these pre-programmed limits, you can skip to Step 6.
If you want to change these default fabric limits, please see the instructions below. Please note: if you decide to alter
your limits, you must change both the top and bottom limits.
Please also note: your Remote Control is already programmed to work with your shade on channel one (1). Make
sure your remote is set to channel one (1) before you proceed. You can change the channel on your remote by pressing
the channel increase or channel decrease button until channel one (1) is illuminated (see Fig N). Important: several
of the steps listed in this manual require that you are able to hear your motor “beep. Please program your shade at a
time when noise is at a minimum. If the fabric does not jog or beep when it should, press the necessary button again.
GENERAL PROGRAMMING INFORMATION
Before you can set your Top Fabric Limit, you need to put your shade in “limit setting mode. is process will delete
the factory preset upper and lower limits. To enter “limit setting mode, follow these steps: (remember, your shade
must be on channel one (1) before you proceed). Note: e three (3) buttons listed below must all be pressed within
ten (10) seconds of each other (if this is not done, the motor will go back into normal operation mode).
1. Press the “P2 Button” on the back of the Remote Control
(motor will beep and fabric will jog)
2. Press the “Up Button” on the front of the Remote Control
(motor will beep)
3. Press the “P2 Button” on the back on the Remote Control
(motor will beep three times and the fabric will jog)
4. You are now in “limit setting mode
Channel
decrease
Channel
increase
Fig N
4
Disregard these buttons
SET YOUR TOP AND BOTTOM FABRIC LIMITS
Important: if you are adjusting your fabric limits, you must set both the top and bottom fabric limits.
To set your Top Fabric Limit, follow these steps:
1. Using the up/down button, position the fabric where you want the Top Fabric Limit to be located
(we recommend leaving at least one (1) inch of fabric unrolled)
2. Press and hold the “stop” button until the fabric jogs (you should hear the motor beep several times when
you are holding down the “stop button”).
To set your Bottom Fabric Limit, follow these steps:
1. Using the up/down button, position the fabric where you want the Bottom Fabric Limit to be located.
2. Press and hold the “stop” button until the fabric jogs (you should hear the motor beep several times when
you are holding down the “stop button”).
Your shade should now have top and bottom fabric limits set on channel one (1). Aer setting your bottom limit,
the shade will exit limit setting mode automatically. Test your shade to make sure it stops in the locations you set.
Remember, you must set both top and bottom fabric limits to exit limit setting mode.
If you purchased more than one (1) shade, we recommend setting the top and bottom fabric limits for each shade with
its original Remote Control.
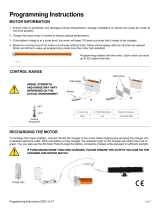
Step 6: Using One (1) Remote To Operate Multiple Shades (optional)
If you have not already done so, remember to set the top and bottom fabric limits for
each shade you purchased (with its original remote, see step ve (5)).
Your remote control has ve (5) usable channels. Each channel can operate one (1)
shade. All shades come programmed to operate on channel one (1) of their original
remote. If you purchased multiple shades, you have the option of controlling up to
ve (5) shades with one (1) Remote Control.
Before you program one (1) remote control to operate multiple shades, make sure
you know which remote goes with each shade. You must have all remote controls
present to complete this step. Decide which shade you want to operate on channel
one (1), this will be your primary shade. e remote that goes with this shade will be
your primary remote. Your other shades will operate on channels 2-5 of the primary
remote.
1. Put your primary remote on channel two (2) by pressing the “channel increase” or “channel decrease
button until channel two (2) is illuminated (remember, channel one (1) is already programmed to operate
your primary shade).
2. Next, determine which shade you want to operate on channel two (2) (on the primary remote). is is
your secondary shade. Make sure the remote for the secondary shade is on channel one (1). Using the
remote for the secondary shade, press the P2 button once(you will hear a “beep”). en press the P2
button again (you will hear another beep).
3. Using your primary remote, press the P2 button once (you will hear 5 “beeps”).
4. Your secondary shade now works on channel two (2) of your primary remote.
5. To add additional shades, set your primary remote on channel 3,4 or 5, and repeat this process with the
remote for your 3rd, 4th or 5th shade.
Channel 1
Channel 2
Channel 3
Channel 4
Channel 5
Fig P
All buttons must be pressed within 10 seconds of each other or the motor will return to normal operation mode.
You can control each shade individually by selecting their channel on your primary remote or you can control all
shades at the same time on the primary remote by lighting all ve (5) channels. Press the “channel increase” or
channel decrease” buttons until all ve (5) channels are illuminated.
5
Channel
increase
Channel
decrease
Need help with programming?
HOW TO ERASE TOP AND BOTTOM FABRIC LIMITS FROM YOUR SHADE
If your top and bottom fabric limits programming did not work properly and you need to start over, see the
following instructions.
Before you begin this step, make sure your remote is on the correct channel for that shade. We strongly recommend
that you use the original remote for your shade when erasing or changing limits.
1. Press P2 button one time (motor will beep and fabric will jog).
2. Press the “down” button one time.
3. Press the P2 button one time (motor will beep). Fabric will jog, followed by two (2) “beeps. Your top and bottom
limits have been erased and you can now re-set them.
Remember, all three buttons, P2, down, and P2 must be pressed within ten seconds, or the motor will return to normal
operation mode.
To set new upper and lower fabric limits, see step 5 for instructions (page 4).
HOW TO ERASE FREQUENCIES ON THE REMOTE AND SHADE (and re-establish a connection)
If your remote and or shade are not working properly, you can reset the remote and shade. is process will clear the
frequency of the shade and remote for the channel selected on the remote.. It will also erase any top and bottom fabric
limits you may have set.
(If your shade motor does not respond to your remote during this step, skip to the
step B. Before you begin, make sure your remote is on the channel you wish to erase
(usually channel 1).
1. Press P2 button one time (motor will beep and fabric will jog).
2. Press the stop button one time (the motor will beep).
3. Press P2 button one time (motor will beep several times and fabric will jog). If
this process worked correctly, your remote will no longer work.
Before you begin this step, make sure your remote is set to the channel you wish to
program for your shade (usually channel 1).
1. To reprogram your shade you will need to press the reset button (found
next to the antenna-see green circle in Fig Q) for one second, (you may
need a narrow object such as a paper clip and a ashlight to identify the
black reset button inside the hole).
2. Once you release the button, the motor will beep and the fabric will jog.
3. Press the P2 button two (2) times (the motor will beep aer each button press)
4. Press the “down” button. e motor will beep several times and the fabric will
roll down conrming the reprogramming process has worked. Your remote
control is now programmed with your shade. Now you can set your upper and
lower limits. See step 5 for these instructions.
Step A: Delete shade/remote connection and fabric limits
Step B: Re-establish shade/remote connection
Fig Q
Charging your shade
Your shade comes charged and ready to use. e battery (when fully charged) should last approximately 4-6
months (depending on frequency of use). When you need to recharge your shade, simply plug in the included
AC adapter in the shade AC adapter plug (see red circle on Figure Q). It will take approximately 6 hours to
recharge your shade. Aer recharging your shade, store the AC adapter in a cool dry place.
6
Reset button (in green circle)
AC Adapter plug (in red circle)
To clean your shade fabric, simply rinse with water and soap and scrub with a soft brush. Remember to unplug your shade
before cleaning. Do not allow the motor to get wet. Note: using bleach or an abrasive cleaner will void your warranty. Roll
the shade down to air dry.
303.652.6164 (phone)
Maintenance
Don’t forget to send us your warranty/registration card.
www.shadeinfo .com
Additional information
An instructional video is available on our website (www.shadeinfo.com) if you need additional help installing or programming
your shade.
M1012-E
Problem Possible Reasons Solution Process
Remote does not work
Remote control battery is dead
or has not been installed
Remote/shade have lost
connection
Shades rechargable battery is
depleted
Battery not installed correctly
Install battery or replace battery
(1 battery included in package)
Re-program remote
Recharge battery
Install battery correctly
see installation instructions
(step 3)
See “help with programming”
(follow instructions: how to
erase all frequencies...)
Use included AC adapter and
charge shade
Remove battery, and reinstall
with correct polarity
Shade is moving up and down
in small increments
Shade is in “small adjustment
mode”
Deactivate small adjustment
mode
Push “P2” (on back of remote),
up buttonthen
down button
Up and down functions
reversed on remote
Remote needs to be
reprogrammed
Shade has been unrolled all
the way down (without a lower
limit) and continued back up
the other side.
Reprogram remote
Roll shade down until fabric
rolls up other side of shade.
Push reset button on shade,
Push P2 button on back of
remote twice,
Push the “down” button.
Push “up” button on shade
(shade should roll down).
Allow shade to roll all the way
down and continue back up.
Press “stop” when fabric nears
the top of the shade. Set upper
and lower limits (see step 5)
Shade moves down, but not up. Shade battery does not have
sucient power
Recharge battery Plug in shade using included
AC adapter into the AC adapter
plug (see g Q on page 6)
Top and bottom fabric limits
did not save correctly
Remote signals not successfully
received
Delete upper and lower limits
and start over.
See “help with programming”
(follow instructions: how to
reset upper and lower limits)
Troubleshooting
7
  • Page 1 1
  • Page 2 2
  • Page 3 3
  • Page 4 4
  • Page 5 5
  • Page 6 6
  • Page 7 7

Keystone Premium PVC Fabric Installation guide

Type
Installation guide

Keystone Premium PVC Fabric is a durable and versatile material that can be used for a wide range of applications, including awnings, canopies, boat covers, and truck tarps. It is water-resistant, UV-resistant, and mildew-resistant, making it ideal for outdoor use. The fabric is also flame retardant and meets all applicable fire codes. With a variety of colors and styles to choose from, Keystone Premium PVC Fabric is a great choice for any project.

Ask a question and I''ll find the answer in the document

Finding information in a document is now easier with AI