Multiple Shade
User and Installation Manual
February 2019 version

Multiple Awnings inc. – 1505A rue de l’Industrie, Beloeil QC, J3G 0S5 CANADA
2
Multiple Shade EN V01.3 04 2019
Table of content
1. Table of content
2. READ ME!
3. Getting ready
3.1. Tools and help you will need
3.2. Requirements overview
3.3. Unpacking your solar shade
3.4. Parts list
4. Overview and anchors
4.1. Siding wall made of wood, vinyl
or aluminum
4.1.1. Choosing the position
4.1.2. Brackets Installation wall
and soffit
4.2. Masonry
4.2.1. Choosing the position
4.2.2. Installation on bricks
5. Casing installation
5.1. Hanging the casing on its
brackets
5.2. Cable guide set-up
5.3. Testing the strength and
opening position of the Solar
Shade
5.4. Installing the rubber bumpers
on the bottom charge bar
5.5. Connect the motor to the AC
outlet and operate your
solar shade.
5.6. Remote handset and
Support
5.7. Adjustment and finishing touch
6. MultipleShade equipped with Solar
Panel
6.1 Solar Panel installed on Multiple
Shade housing
6.2 Solar Panel installed on a wall or
similar surface
6.3 Programming the limits of the
Solar Powered MultipleShade
7. Safety and advice
7.1. Solar Shade and maintenance
7.2. Maintenance of the electric
motor and remote
8. Appendices
8.A. Motor and remote resetting
and synchronisation
8.B. Memorizing a new remote
Handset
8.C. Remote buttons direction
change
9. Programming the limits of your Solar
Shade
9.A. Programming the close limit
and open limits
10. Removing the Multiple Shade
from the brackets
11. Troubleshooting guide

Multiple Awnings inc. – 1505A rue de l’Industrie, Beloeil QC, J3G 0S5 CANADA
3
Multiple Shade EN V01.3 04 2019
2. READ ME!
This section contains IMPORTANT WARNINGS concerning YOUR SAFETY and the
INTEGRITY OF YOUR MULTIPLE SHADE AND INSTALLATION.
IMPORTANT SAFETY NOTICE: IT IS MANDATORY TO FOLLOW ALL INSTALLATION
INSTRUCTIONS, FAILURE TO DO SO MAY RESULT IN BODILY INJURIES, MATERIAL
DAMAGE AND VOID THE WARRANTY.
NOTE: BEFORE INSTALLING YOUR MULTIPLE SHADE, CHECK YOUR INSTALLATION
SURFACE TO IDENTIFY ANY POTENTIAL OBSTRUCTIONS THAT COULD INTERFERE WITH
THE SOLAR SHADE DURING OPENING SUCH AS FIXTURES, DOOR HANDLES ETC.
WARNING: Your Multiple Shade is not made to support high winds and accumulation of
snow or ice. This can severely damage your Multiple Shade or make it fall and cause
corporal and material damage and subsequently void the warranty.
3. Getting ready
3.1. Tools and help you will need
Security knife for unpacking
2 ladders or step ladders
Chalk line
Measuring tape
Pencil (Ink marker or carpenter’s pencil)
Ratchet and Socket (5/16’’)
Philips screwdriver to open the tube
3 mm, 4 mm and 5 mm Allen key
Drill
Level
To install in wooden structures: 3/32’’ bit
To install in masonry structures: 3/16’’ Masonry bit
Optional:
Stud finder
Masking tape
Caulking
You will need help to perform the installation. It takes two persons to safely install a
Multiple Shade.

Multiple Awnings inc. – 1505A rue de l’Industrie, Beloeil QC, J3G 0S5 CANADA
4
Multiple Shade EN V01.3 04 2019
3.2. Requirements overview
Properly evaluate the required space to install the Solar Shade by following the steps
explained from section 4.1.1 to 4.2.2 included. We supply wood or masonry screws in
order to adapt to your surface installation.
3.3. Unpacking your solar shade
Remove all 12 drywall screws: the 4 screws at each end of the tube and the 4 screws of
the hardware section and keep them. Make sure all screws are removed as they may
scratch or damage the housing or fabric if they are left on the tube.
Use a hammer and a large screwdriver to hit the wooden cap near the wall of the tube to
un-wedge it. Remove the wooden caps. Pull the solar shade out of the tube. Two persons
are needed to safely pull out the Solar Shade from the tube.
Put the casing on easels or on 2 stable chairs. Put the manual crank aside. Remove the
plastic wrapping with caution using a safety cutter. DO NOT USE a regular knife or an
exacto, doing so could damage the casing.
3.4. Parts list
Wrapped on the casing:
1 Manual crank (manual version
only)
In the hardware bag:
1 remote handset (motorized
version)
1 solar panel and accessories
(solar powered units only)
2 cable guide supports
2 brackets for casings less than 6
feet (or)
3 brackets for casings greater
than 6 feet
M6 setting screws (1mm x
15mm) with bolt, one for each
bracket
3 #8 wood screws per bracket (1
3/4’’) plus 2 #8 wooden screws
per cable guide support
3 masonry screws per bracket
(1/4’’ x 1 3/4’’) plus 2 masonry
screws per cable guide support

Multiple Awnings inc. – 1505A rue de l’Industrie, Beloeil QC, J3G 0S5 CANADA
5
Multiple Shade V01.3 04 2019

Multiple Awnings inc. – 1505A rue de l’Industrie, Beloeil QC, J3G 0S5 CANADA
6
Multiple Shade V01.3 04 2019
4. Overview and anchors
In this section, we will be examining the installation procedure. Installation of the anchors can
be done by one person, but you will need at least one other person to install the Solar Shade
onto its anchors. The installation of the anchors is the crucial portion of work that requires
the most time and attention to details.
IMPORTANT SAFETY NOTICE: IT IS MANDATORY TO FOLLOW ALL INSTALLATION
INSTRUCTIONS, FAILURE TO DO SO MAY RESULT IN BODILY INJURIES, MATERIAL DAMAGE
AND VOIDING THE WARRANTY. PLEASE MAKE SURE TO READ THE INSTRUCTIONS ENTIRELY
BEFORE STARTING THE INSTALLATION.
NOTE: BEFORE INSTALLING YOUR MULTIPLE SHADE, CHECK YOUR INSTALLATION SURFACE TO
IDENTIFY ANY POTENTIAL OBSTRUCTIONS WHICH COULD INTERFERE WITH THE SOLAR SHADE
DURING OPENING SUCH AS FIXTURES, DOOR HANDLES ETC.
4.1. Siding walls made of wood, vinyl or aluminum
For all wood structure buildings, there is often a header board above the door or the window
that will be protected by your Solar Shade. Wood screws must be fixed to this type of structure.
For any other type of structure such as gazebos or balconies, it is necessary to assess the
horizontal support between columns. Make sure there is a solid wooden base or metallic
support on which the brackets will be anchored. In such instances, the Solar Shade’s casing will
be installed on a soffit mode. All our casings are designed to accommodate a soffit installation.
4.1.1. Choosing the position
INSTRUCTIONS ARE IDENTICAL WHETHER YOU ARE INSTALLING ON A SOFFIT OR WALL MODE.
You will find 2 grooves on the casing (See figure 2). One groove is on top for a soffit installation,
and the other is on the back for a wall installation.
Your Solar Shade can accommodate heights up to a 10’ (See figure 1). It is important to choose a
position to maximize your required protection while considering the length of the cable guides
on each side of your shade. If your window or door to be protected is shorter than 10’, you will
have to cut the cable guides as per the desired height. However, this cutting should be
performed at the end of the installation. While the Solar Shade may be too long for your
requirement, you can stop the opening of the Solar Shade at any position.
Figure 1 Figure 2

Multiple Awnings inc. – 1505A rue de l’Industrie, Beloeil QC, J3G 0S5 CANADA
7
Multiple Shade V01.3 04 2019
4.1.2. Brackets installation wall and soffit
Using the supplied brackets (see figure 3), position the bottom of each bracket 1 1/4" above the
bottom of the casing while understanding that the casing has a 5’’ height when installed on the
wall. Trace an horizontal chalk line at this height. Make sure that the chalk line is level and also
validate that the frame of your window or door is perfectly parallel to your chalk line,
otherwise, you may need to make a small adjustment to your chalk line. Trace the ends of this
line to make sure the casing will be centered on your window or door.
Now, you must position each bracket to insure maximum support. Position each bracket between
6” and 12” from each extremity of the casing. For casings wider than 6’, you will need to position
a third bracket approximately in the center of your chalk line. Position each bracket with the
two holes on top (if you are installing under the eaves, choose the side that is easier for you)
and trace the location of each hole (see figure 4).
FOR WALL INSTALLATION, THE SCREW MUST FACE DOWN, BUT FOR SOFFIT INSTALLATION, THE
SCREW MUST FACE BACK.
Use a 3/32" drill bit to drill the holes through your siding and one inch deep into the header
board.
Using a Philips screwdriver, install your brackets with the #8 X 1 3/4" wood screws. While
tightening the screws with your brackets, maintain them level (use a level). Do not over tighten
the wood screws before adjusting the level since you may need to do some readjustments.
Figure 3 Figure 4

Multiple Awnings inc. – 1505A rue de l’Industrie, Beloeil QC, J3G 0S5 CANADA
8
Multiple Shade V01.3 04 2019
4.2. Masonry
This installation method is meant for solid brick walls (THIS EXCLUDES ALL TYPES OF
DECORATIVE BRICK) where the masonry brick anchors/ties are in perfect order.
YOU WILL NEED TO INSTALL SHIMS IF THE BRICK SURFACE IS UNEVEN.
4.2.1. Choosing the position
Similarly to wood based frames, choose a position which will accommodate the length of the
cable guides on each side of your shade. If your window or door to be protected is shorter than
10’, you will have to cut the cable guides as per the height desired. However, this cutting should
be performed at the end of the installation. While the shade may be too long for your
requirement, you can stop the opening of the shade at any position.
4.2.2. Installation on bricks
Please note that it is more important to ensure a good anchoring than to follow the placement
as seen on the drawing below (See figure 5).
Figure 4 Figure 5
Using the supplied brackets (See figure 4), position the bottom of each bracket 1 1/4’’above the
bottom of the casing while understanding that the casing has a height of 5’’when installed on
the wall. Please make sure that screws will be positioned at least 1/2’’ from the border of each
brick, this criteria being more important than the height desired for your installation.
Trace a horizontal chalk line at this height. Make sure this chalk line is level. You may need to
review the frame of your window or door, to make sure it is perfectly parallel to your chalk line.
Otherwise, you may need to make a small adjustment to your chalk line. Trace the two sides of
this line to identify the width extremities of the casing while making sure the casing will be
centered on your window or door.
WARNING: The provided masonry fasteners cannot be used in the joint between two bricks.
Install them in the brick body, at least 0,5” from the edge of the brick (see Figure 5). The
fasteners are also not designed for hollow surfaces like hollow cement blocs. Visit a hardware
store for the proper fasteners to be used for your type of installation. DO NOT USE THE
SUPPLIED MASONRY FASTENERS ON STUCCO WALLS.

Multiple Awnings inc. – 1505A rue de l’Industrie, Beloeil QC, J3G 0S5 CANADA
9
Multiple Shade V01.3 04 2019
Now, you must position each bracket between 6’’ and 12” from each extremity of the casing to
insure maximum support. For casings greater than 6’, you will need to position a third bracket
approximately in the center of your chalk line. While making certain that it is level, position the
first bracket at the required position (while referring to the bottom chalk line). Position each
bracket with the two holes on top and mark the positions of the 3 holes where the screws will be
holding the bracket. Repeat the same procedure for the other brackets (See figure 4).
Use a 3/16‘’masonry drill bit to drill the holes 1 3/4’’ deep into the masonry.
Using a 5/16’’ ratchet socket, install the brackets with the 1/4’’ X 1 3/4’’masonry screws. While
tightening the screws with your brackets, maintain them at level. Do not over tighten, before
adjusting your level.
WARNING: YOU MUST MAKE SURE THAT MASONRY SCREWS ARE WELL ANCHORED IN THE
HOLES. IF NOT THE CASE, PLEASE CONSULT YOUR LOCAL HARDWARE DEALER TO OBTAIN THE
PROPER SIZE OF FASTENERS.
5. Casing installation
5.1. Hanging the casing on its brackets
Carefully remove all packaging material from the Solar Shade’s housing. Make sure the two cable
guides are unrolled.
You will need the help of at least one other person at this stage, to lift the housing. While using
2 ladders, raise the housing and push the groove of the housing into the holders (lips) of the
brackets (see figure 2). A bit of pressure might be necessary.
Figure 2
As a next step, tighten the M6 set-up screws with a 5 mm Allen key on each bracket. Tighten
these screws well to prevent the housing from sliding. These screws should be visible under the
casing on a mural installation, and on the front or back for a soffit installation.

Multiple Awnings inc. – 1505A rue de l’Industrie, Beloeil QC, J3G 0S5 CANADA
10
Multiple Shade V01.3 04 2019
5.2. Cable guides set-up
At each end of the Solar Shade’s housing, you will find a cable guide covered in vinyl. Unroll each
cable, and let them hang flat on the mounting surface.
Insert each cable into their respective holes at the two extremities of the bottom charge bar.
Then define the maximum height to which the Solar Shade will be extended (maximum 114’’
from the housing). At the bottom of each extremity, trace a horizontal line on the wall where you
want the support to be installed. Using the cables as a guide, make sure they are straight and
vertical. Then trace a vertical line that crosses the previous horizontal line. (See figure 1).
Figure 1
Localize the cable guide supports and decide if you will install them on the floor or the wall
(frame). The choice of installation may be dictated by the type of material in which the holes
will be drilled (wood or masonry). The cable guide supports can accommodate each position
and you may adjust this position with a 4 mm Allen key. (See figures 6 and 7). At the locations
identified on the previous paragraph, set some marks to designate the holes where the support
will be installed. Drill the holes with a proper drill bit, and then screw the supports in place very
tightly.
Figure 6 Figure 7 Figure 8
You will note that the support has a top screw with a hole on top. You should introduce the
cable guide in this hole while checking that the set-up screw is sufficiently retracted to let the
cable through (Allen key - 3mm required). Make sure you do not lose this little screw. (See figure
8).
When the wire is properly straightened and tight, you will need to solidly tighten the side screw
with a 3mm Allen key. At this point, do not cut the excess wire. You can adjust the tension of
the wire with the 2 bolts located on each side of the screw holding the cable guide.
If you have a motorized unit, use the remote handset for the next adjustments and
temporarily connect the motor. If you are using a non motorized model, use the manual crank
to open your solar shade.

Multiple Awnings inc. – 1505A rue de l’Industrie, Beloeil QC, J3G 0S5 CANADA
11
Multiple Shade V01.3 04 2019
5.3. Testing the strength and opening position of the Solar Shade
To test the solidity of your Solar Shade, open it to its lowest position. If you need to re-adjust
the open position of the motor, both the open and close limits will need to be reprogrammed;
refer to section 8.A. (6.3 for the Solar Panel version) at all times. You can stop the opening of
the Solar Shade by pushing the STOP (middle button) button of the remote. While the shade is
totally opened, move the lower bar to make sure the cables are sufficiently tight to avoid any
knocking on your window or door. If you need to adjust the tension of the wires, please do this
with the 2 bolts located on each side of the screw holding the cable guide. If you judge the cable
guide is sufficiently tight, it is now acceptable to cut the excess cable underneath the holding
screw. Otherwise, it is always possible to adjust the tension of the cable guide while working
with the small screw that holds the cable guide.
ATTENTION: The opening and closing limits of your motor have been programmed and tested
in our factory. Out of the factory, the shade opens to 5’. If you need to change the open limit,
follow and perform completely the instructions in section 8.A. Programming the close (up) limit
and the open (down) limit. Both limits need to be reprogrammed.
5.4. Installing the rubber bumpers on the bottom charge bar
Install the 3 small rubber bumpers on the front or back of the bottom charge bar where there
could be contact with your window or other structure where your Multiple Shade is installed,
please refer to figure 9.
Figure 9 Figure 10
5.5. Connect the motor to the AC outlet and operate your solar shade
Connect the AC electrical cord of the motor to an AC (GFI) outlet, while maintaining a loop
underneath the plug to avoid water seepage into the AC outlet. (See figure 10). We also
recommend using an AC outlet protection cover, which can be found at most Hardware Stores.

Multiple Awnings inc. – 1505A rue de l’Industrie, Beloeil QC, J3G 0S5 CANADA
12
Multiple Shade V01.3 04 2019
5.6. Remote Handset and support
We supply a wall support for your Remote Handset. It is recommended to fix that support at the
desired position inside your house, mark the location of the hole, and screw it in place.
CAUTION: Avoid exposing your Remote Handset to water and rain or snow since this will
damage it. Always keep the remote handset inside the house.
5.7. Channels of your remote handset
When using your remote handset, do make certain that you have previously selected the proper
functional channel. When your solar shade left our factory, channel #1 was the one that was
programmed. Therefore this is the one that you need to select to operate your solar shade.
This leaves you with 5 additional channels with which you can program/operate other Multiple
Shades or Awning equipped with a Dooya Motor. Channel #6 is functional when all 5 LEDs are
‘on’.
5.8. Adjustment and finishing touch
Test your Multiple Shade by pressing the open (down) and close (up) buttons on your remote
(see figure 11).
The opening and closing limits of your motor have been programmed and tested in our factory.
Out of the factory, the shade opens to 5’. If you need to change the open limit, follow and
perform completely the instructions in section 9. (6.3 for a Solar Powered MutlpleShade)
Programming the close (up) limit and the open (down) limit. Both limits need to be
reprogrammed with the AC powered MultipleShade.
Figure 11

Multiple Awnings inc. – 1505A rue de l’Industrie, Beloeil QC, J3G 0S5 CANADA
13
Multiple Shade V01.3 04 2019
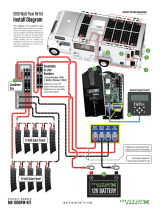
6. MultipleShade equipped with Solar Panel
Solar Panel equipped MultipleShades have a different motor which is powered by a Solar Panel
(see figure 15). The solar panel integrates an internal 24V battery that powers the 24V motor
supplied with the Solar Powered MultipleShade. The Solar Panel can be installed in the top
groove of the MultipleShade’s housing when your Multiple Shade is on a wall type installation.
For soffit type installations, 2 wall brackets are included with the solar panel. The solar panel
needs to be oriented so that the top surface is exposed to sunlight for proper charging of the
solar panel in question.
Figure 15
6.1 Solar panel installed on MultipleShade housing
This procedure implies that your MultipleShade is being installed on a wall or similar
surface using the rear groove of the housing to fix it on the brackets.
1- Insert the housing bracket (already installed at the back of the solar panel) into the
top groove of the MultipleShade’s housing, insert the large lip first and snap in the
other lip (see figure 16).
2- Tighten the M6 set-up hex screws with a 5 mm Allen key to secure the solar panel to
the MultipleShade’s housing (see figure 16).
3- Align, connect and secure the Solar Panel’s connector to the motor connector.
Make sure to screw in the protective cap attached to the solar panel connector tightly
(see figure 17).
Figure 16
Figure 17

Multiple Awnings inc. – 1505A rue de l’Industrie, Beloeil QC, J3G 0S5 CANADA
14
Multiple Shade V01.3 04 2019
6.2 Solar panel installed on a wall or similar surface
This procedure implies that your MultipleShade is installed in soffit type mode using the
top groove of the housing to fix it on the brackets. 2 persons are needed to properly
install the solar panel to a wall or similar surface. The solar panel needs to be oriented
so that the top surface is exposed to sunlight for proper charging of the battery within
the Solar Panel in question.
1- You first need to find a surface onto which the 2 Solar Panel wall brackets can be
screwed in securely . The Solar Panel weights 3 pounds (1.5 kilo), there is often a
header board above the door or the window that will be protected by your Solar
Shade. Wood screws must be used to fix the solar panel‘s brackets to this type of
structure.
2- Install the Solar Panel’s wall brackets on the bracket receptacles at the rear of the
Solar Panel in question with the supplied screws, the holes in the Solar Panel’s wall
brackets are threaded. The screw will enter the receptacles on the open side. Do not
tighten them too tightly at this point since you will need to move the solar panel
during the installation. Furthermore, do not tighten the screws that block the
receptacles to the solar panel at this point since you might have to move them
during the installation.
3- Using the Solar Panel’s wall brackets (already attached to the solar panel), mark the
place and holes positions where the 2 solar panel brackets will be installed,
afterwards, drill small pilot hole (smaller than the actual wall screws) at the 4
screw positions.
4- Have your helper hold the solar panel with the wall brackets directly over the pilot
holes and secure these solar panel wall brackets into the structure with the supplied
screws. Test the solidity of this installation.
5- Tighten the screws that block the receptacles to the solar panel (see figure 18 on the
next page).
6- Adjust the angle of the Solar Panel so that it receives proper sunlight and tighten
the screws on both wall brackets/bracket receptacles at the rear of the solar panel
to secure the angle adjustment (see figure 18 on the next page).
7- Align, connect and secure the solar panel’s connector to the motor connector.
Make sure to screw in the protective cap attached to the solar panel connector tightly
(see figure 17).
Figure 17

Multiple Awnings inc. – 1505A rue de l’Industrie, Beloeil QC, J3G 0S5 CANADA
15
Multiple Shade V01.3 04 2019
Figure 18
NOTE: The other steps (installation of the MultipleShade) are similar to the regular AC
motorized Multiple Shade.

Multiple Awnings inc. – 1505A rue de l’Industrie, Beloeil QC, J3G 0S5 CANADA
16
Multiple Shade V01.3 04 2019
6.3. Programming the limits of the SOLAR POWERED MULTIPLE SHADE
PLEASE NOTE that the motor is always installed on the left (when facing the solar shade from
the front).
You will need the green plastic adjustment tool included with your MultipleShade.
PROGRAMMING THE CLOSE LIMIT (Solar powered only)
1. Make sure that the Solar Panel is connected to your motor.
2. Using you remote handset’s open (down) button, open the MultipleShade
about halfway.
3. Press the close (up) button of the remote handset and let it go; if the motor is
still running after the MultipleShade is fully closed, stop it by pressing the stop
(middle button) on the remote.
4. Regardless of the arrows directions shown besides the adjustment, the
endless screw which is to the rear of the MultipleShade controls the CLOSE
limit.
5. Turn the endless screw which is at the rear of the MultipleShade clockwise
to change the close limit of your MultipleShade (to close more), turning
counter clockwise will back off the close limit if the motor kept running after
you had pressed the close button (see step 3). If the MultipleShade does not
move, continue turning the screw until the MultipleShade moves.
6. Once the limit is properly set, cease any adjustment and press the middle
button on your remote handset.

Multiple Awnings inc. – 1505A rue de l’Industrie, Beloeil QC, J3G 0S5 CANADA
17
Multiple Shade V01.3 04 2019
PROGRAMMING THE OPEN LIMIT (Solar powered only)
1. Make sure that the Solar Panel is connected to your motor.
2. Using you remote handset’s open (down) button, open the MultipleShade
about halfway.
3. Press the open (down) button of the remote handset and let it go; if the motor
is still running after the MultipleShade has reached the desired open limit, stop
it by pressing the stop (middle button) on the remote.
4. Regardless of the arrows directions shown besides the adjustment, the
endless screw which is to the front of the MultipleShade controls the OPEN
limit.
5. Turn the endless screw which is at the front of the MultipleShade counter
clockwise to change the open limit of your MultipleShade (to open more),
turning clockwise will back off the open limit if the motor kept running after
you had pressed the close button (see step 3). If the MultipleShade does not
move, continue turning the screw until the MultipleShade moves.
6. Once the limit is properly set, cease any adjustment and press the middle
button on your remote handset.
BOTH THE CLOSE AND OPEN LIMITS ARE NOW SET, PRESS THE CLOSE (UP)
BUTTON 1 TIME AND VERIFY THAT THE SOLAR SHADE CLOSES CORRECTLY AS
PER YOUR SETTING. THEN PRESS THE OPEN (DOWN) BUTTON 1 TIME TO
CONFIRM THAT THE SOLAR SHADE OPEN CORRECTLY AS PER YOUR SETTING.
NOTE: All motorized MultipleShade‘s fabric comes out from the front of the casing.
Manual MultipleShades have the fabric coming from the rear of the casing to accommodate
the manual crank.

Multiple Awnings inc. – 1505A rue de l’Industrie, Beloeil QC, J3G 0S5 CANADA
18
Multiple Shade V01.3 04 2019
7. Safety and advice
WARNING: PRIOR TO OPERATING YOUR SOLAR SHADE, BE SURE THAT NO OBJECT OR
PERSONS CAN COME IN CONTACT WITH IT AS IT OPENS AND CLOSES. KEEP CHILDREN AWAY
FROM ANY MOVING PARTS OF THE SOLAR SHADE AS IT OPERATES. FAILURE TO DO SO
COULD RESULT IN PERSONAL INJURY.
CAUTION: Never hang items from any part of the Solar Shade, except those accessories that
are supplied by the manufacturer.
WARNING: NEVER attempt to repair or disassemble any part of the Solar Shade without
following replacement part procedures supplied by the manufacturers. TRYING to do so
without proper instructions can result in PERSONAL INJURIES, CAUSE YOUR SOLAR SHADE
TO MALFUNCTION AND SUBSEQUENTLY VOID THE WARRANTY.
CAUTION: DAMAGES to the Solar Shade`s fabric and Mechanism CAUSED BY WATER,
SNOW, ICE ACCUMULATIONS OR HIGH WINDS are NOT COVERED BY THE
MANUFACTURER’S WARRANTY. Always retract your Solar Shade during periods of snow,
ice pellets, rain or high winds. Never leave your Solar Shade opened and unattended during
periods of heavy winds.
WARNING: ACCUMULATION OF SNOW OR ICE COULD RESULT IN DAMAGE TO, OR THE
COLLAPSE OF THE SOLAR SHADE AND CAUSE PERSONAL INJURIES. YOU MUST ROLL UP
YOUR SOLAR SHADE TO AVOID ICE OR SNOW ACCUMULATION. MAKE SURE TO RE OPEN
YOUR SOLAR SHADE TO DRY OUT THE FABRIC AS SOON AS IT IS POSSIBLE IF THE FABRIC IS
NOT DRY WHEN IT WAS ROLLED UP.
For long-term storage or non-use of your motorized Solar Shade, the Motor manufacturer
suggests running the motor every few months to maintain the mobility of the internal
components.
7.1. Solar Shade maintenance
The fabric is made of 74% PVC and 26% polyester and has a special finish, which delays the
formation and the accumulation of dirt. To preserve the fabric, you must respect the
following cleaning instructions:
Standard maintenance: Thoroughly remove the dust from the dry Solar Shade fabric
by vacuum cleaning, or by gently brushing. NEVER USE A PRESSURE WASHER as this
will remove the mold and mildew protective coating and cut the threads.
Then clean with lukewarm water and mild soap while gently brushing or rubbing.
Rinse thoroughly to remove all traces of soap.
WARNING: If your Solar Shade is retracted while wet, open it as quickly as possible and
allow the fabric to dry. Although the fabric is mold, mildew and rot resistant, this
procedure is necessary since atmospheric pollution deposits on the surface of the fabric
can cause mold and mildew under damp conditions.

Multiple Awnings inc. – 1505A rue de l’Industrie, Beloeil QC, J3G 0S5 CANADA
19
Multiple Shade V01.3 04 2019
7.2 Maintenance of the electric motor and remote handset
Outdoor Electric Motor:
The electric Motor is equipped with an automatic overheat shutoff system. If you run your
Solar Shade several times continuously, the motor will stop its operation before it overheats.
The motor will resume normal operation after 20 minutes of cooling down.
Preparing your Solar Shade for winter:
Disconnect the Motor’s power cord from the AC (GFI) Wall Outlet and cover the AC outlet
with a “Weatherproof Cover” to prevent rain and moisture from entering the outlet; this
will interfere with the Motor’s operation in the spring. Before rolling up your Solar Shade
for the last time of the season, make sure the Fabric is clean and dry to prevent mold and
mildew from forming over the winter.
Replacing the battery in your remote handset:
Note that you may have to replace the remote handset battery after 3 years or if it stops
working.
Test the remote handset by holding down a button (see figure 11). The LED indicator
should flash for at least 5 seconds.
You should find this type of lithium battery (3V, CR2430) at any hardware store.
To replace the battery, you will need to push and slide out the battery cover the back
of the remote handset (see figure 12). Remove the battery cover; check the
orientation of the old battery: this will indicate you the correct polarity, remove the
old battery and put in place the new battery while making certain to respect the
polarity. Re-install the battery cover.
Figure 11
Figure 12

Multiple Awnings inc. – 1505A rue de l’Industrie, Beloeil QC, J3G 0S5 CANADA
20
Multiple Shade V01.3 04 2019
8. Appendices
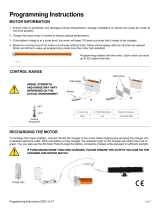
8.A. Motor and remote resetting and synchronisation
Note: This procedure describes the steps necessary to restore communication between the
motor and the remote handset unit supplied with your motorized Multiple Shade. This
procedure must be performed only if the remote handset does not operate the motorized
Multiple Shade. Review the steps below to familiarize yourself with the procedure before
attempting to complete it. PLEASE ALSO NOTE THAT THE TIME BETWEEN 2 OPERATIONS HAS
TO BE SHORTER THAN 4 SECONDS OTHERWISE YOU WILL NEED TO RE-START THE PROCESS
COMPLETELY FROM THE BEGINNING. Also make sure to select and note the remote channel
you will be using.
01. Make sure that the red LED (previously set to the channel you will be using) on the front of the
remote handset is lighting up when you are pressing an holding a button. If the red LED does
not light up at all or flashes for less than 5 seconds, you will need to replace the battery (see
section 7.2).
02. Disconnect the power cord (120V AC) for 10 seconds.
03. Reconnect the power cord the motor will beep 3 times.
04. Press and hold the motor setting button located underneath the solar shade on the motor
side (see figures 13 and 14) until the motor emits 1 beep and jogs 2 times.
05. Use a paper clip or pencil and press the P2 button (see figure 12) the motor will again
emit a beep and jog twice. Press the P2 button once more and the motor will emit another
beep and jog twice again.
06. Press the UP (close) button 1 time, the motor will emit 3 beeps and jog twice. Verify that the
motor runs correctly in the appropriate directions . If the direction of the buttons are reversed,
see section 8.C. to change the directions.
Figure 11 Figure 12
Figure 13 Figure 14
Page is loading ...
Page is loading ...
Page is loading ...
Page is loading ...
Page is loading ...
Page is loading ...
/