

2
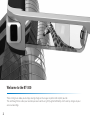
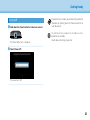
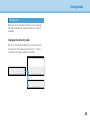
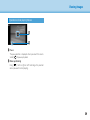
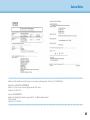
Welcome to the BT-300
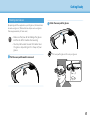
These smart glasses allow you to enjoy viewing images and use apps anywhere and anytime you like.
The see-through lenses allow you to create your own world using AR (Augmented Reality) which overlays images on your
actual surroundings.

3
INTERNET
USB
cable
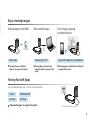
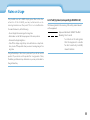
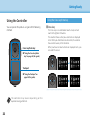
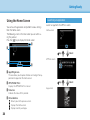
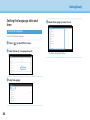
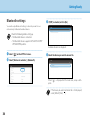
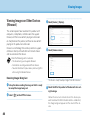
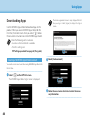
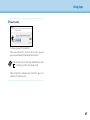
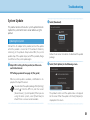
Enjoy viewing images
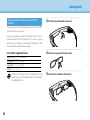
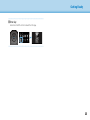
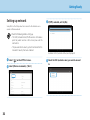
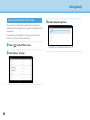
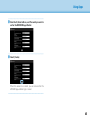
Having Fun with Apps
You can download apps and use them with your product.
Games Entertainment
Business Life Style
"Downloading Apps" on page 44 (this guide)
Download the apps you want
View saved images
Save easily by USB
"Viewing Movies Copied from a
Computer (Gallery)" on page 38 (this
guide)
View images on the Web
Movie sites
"Viewing Movies on a Website
(Browser)" on page 37 (this guide)
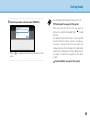
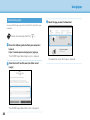
View images playing
on other devices
Sync with images on a smartphone
"Viewing Images on Other Devices (Miracast)"
on page 40 (this guide)

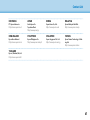
4
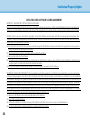
Contents
Safety Instructions ...............................6
Notes on Usage .................................11
Getting Ready ..................................12
Part Names and Functions ...............................12
Charging ................................................14
Wearing the Headset ....................................16
Turning On and O .....................................20
Using the Controller .....................................22
Using the Home Screen .................................26
Setting the language, date and time .....................30
Setting up network ......................................32
Bluetooth settings ......................................34
Adjusting the Screen ....................................35
Viewing Images .................................37
Viewing Movies on a Website (Browser) ..................37
Viewing Movies Copied from a Computer (Gallery) ......38
Viewing Images on Other Devices (Miracast) ............40
Using Apps .....................................42
Shooting a Movie (Camera) ..............................42
Downloading Apps .....................................44
Troubleshooting ................................48
System Update ..........................................51
Specications ...................................53
Intellectual Property Rights. . . . . . . . . . . . . . . . . . . . . .55
General Notes ..................................60
Contact List .....................................64

5
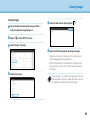
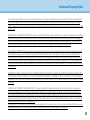
User's Guide Organization
User's Guide (this guide)
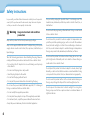
This guide provides information on safely using this product, basic operating methods, and troubleshoot-
ing. Make sure you read this guide before using the product.
Start Guide
This guide provides information on using this product for the rst time.
Symbols Used in this Guide
Safety symbols
Warning
This symbol indicates information that, if ignored,
could possibly result in serious personal injury or even
death due to incorrect handling.
Caution
This symbol indicates information that, if
ignored, could possibly result in personal
injury or physical damage due to incorrect
handling.
General information symbols
Indicates procedures which may result in damage or
injury if sucient care is not taken.
Indicates additional information and points
which may be useful to know regarding a
topic.
[ ]
Indicates icons, menu items, and controller key names
displayed on the screen.
Indicates a reference to related topics.

6
01_Chapter title
01_Head A
02__lead
6
For your safety, unplug the product when it is not being used. The
insulation may deteriorate, which may result in electric shock, re, or
malfunction.
Do not touch the plug during a thunderstorm. Doing so could result
in re or electric shock.
Do not leave this product in locations subject to temperatures be-
yond the specied operating range, such as cars with the windows
closed, in direct sunlight, or in front of air-conditioning or heater out-
lets. Also, avoid locations subject to sudden changes in temperature.
Doing so may result in re, breakdown, malfunction, or failure.
Do not use the product in locations where it may get wet or is sub-
ject to high levels of humidity such as in a bath or shower. Doing so
could result in re or electric shock.
Do not place this product in locations subject to smoke, steam, high
humidity, or dust such as kitchen counters or near humidiers. Doing
so may result in re, electric shock, or deterioration in image quality.
Do not cover this product with a cloth or similar material during use.
Doing so may change the shape of the case through heat, or re.
Do not expose the camera lens to direct sunlight for a long time.
Doing so may result in re or explosion due to condensed beams of
light from the lens.
For your safety, read the attached documents carefully to use the product
correctly. After you have read the documents, keep them in a safe place
so that you can refer to them quickly at a later date.
Warning
Usage environment and condition
precautions
Only use this product at the stated power-supply voltage.
Only use the supplied USB cable and AC adapter. Using other power
supply devices could result in heat, fire, explosion, malfunction, or
liquid leakage.
Take the following precautions when handling the plug. Failure to
comply with these precautions could result in re or electric shock.
• Do not plug the AC adapter into an outlet being used by many
other devices.
• Do not insert the plug into a dusty outlet.
• Insert the plug rmly into the outlet.
• Do not hold the plug with wet hands.
• Do not pull the power cable when disconnecting the plug.
Do not use the power cable (USB cable supplied) if it is damaged.
Doing so could result in re or electric shock.
• Do not modify the supplied power cable.
• Do not place heavy objects on top of the supplied power cable.
• Do not bend, twist, or pull the power cable with excessive force.
• Keep the power cable away from hot electrical appliances.
Safety Instructions

7
01_Chapter title
01_Head A
02__lead
Safety Instructions
7
Do not throw the product into a re and do not heat the product. Do
not place objects with naked ames, such as candles, on this product.
Doing so may result in heat, re, or explosion.
Warning
Viewing image precautions
Do not wear this product while driving a car, riding a motor bike or
bicycle, or performing any other dangerous tasks. Doing so may result
in accident or injury.
Do not use this product in unstable locations such as stairs or at alti-
tude. Also, do not use the product while walking in dangerous loca-
tions such as near machinery or equipment that might get caught on
the cables, where there is a lot of trac, or where it is dark. Doing so
may result in accident or injury.
When walking while viewing images on the product, be aware of
your surroundings. If you are too focused on the image, it could result
in accidents, falling down, and colliding with other people.
When viewing in dark locations, it is dicult to see your surroundings
due to the brightness of the image. Be aware of your surroundings.
When using this product in small locations, be aware of your sur-
roundings.
When wearing this product, do not look directly at the sun or other
light sources even if you are using the shade. This could cause serious
injury to your eyes or loss of eyesight.
Warning
Product usage precautions
Do not start using this product at a high volume. Doing so
may result in hearing impairment. Lower the volume before
turning o the product, and gradually increase the volume
after turning on the product. To prevent possible hearing
damage, do not listen at high volume for prolonged periods
of time.
Do not allow any conductive foreign objects to touch the charg-
ing connector, external device connector, or earphone microphone
socket, and do not put any conductive foreign objects into the con-
nection ports. Doing so may cause a short circuit and result in re or
electric shock.
Do not allow solvents such as alcohol, benzene, or thinner to touch
the product. Also, do not clean this product with a wet cloth or sol-
vents. Doing so may warp or crack the product housing and may
result in electric shock, malfunction, or re.
The product housing should only be opened by qualified service
personnel unless you are explicitly instructed to do so in the User’s
Guide. Also, do not disassemble or remodel the product (including
consumable items). Many of the parts inside the product carry a high
voltage and could cause re, electric shock, accident, or poisoning.
Do not subject the lens of the product to strong shocks or knock
it against hard objects. If the lens is damaged, it could splinter and
cause serious injuries to the eyes and face.

8
01_Chapter title
01_Head A
02__lead
Safety Instructions
8
function, disable it before turning o the product. The electromag-
netic waves may cause electromagnetic interference with medical
equipment or cause the equipment to malfunction.
Note the following points when using the Bluetooth or wireless LAN
function in medical institutions.
• Do not bring this product into operating rooms, Intensive Care
Units (ICUs), or Cardiac Care Units (CCUs).
• When in wards, turn o this product or stop the electromagnetic
waves.
• Even when not in wards, turn o this product or stop the electro-
magnetic waves if there is any electronic medical equipment in the
area.
• Follow any rules stipulated by medical institutions that prohibit the
use of devices emitting electromagnetic waves, or that prohibit en-
try to certain areas with such devices.
• If the product has an auto power on function, disable it before turn-
ing o the product.
If you have an implanted pacemaker or implanted debrillator, make
sure you keep a distance of at least 22 cm between this product and
the implanted device when using the Bluetooth or the wireless LAN
function. The electromagnetic waves may inuence the operation of
implanted pacemakers or implanted debrillators. Turn o this prod-
uct or stop the electromagnetic waves if you are in a location where
someone near you may have a pacemaker, such as a crowded train.
Make sure the cable does not catch on anything in the surrounding
area while wearing the product. Also, make sure the cable does not
wind around your neck. Doing so may result in accident or injury.
Make sure the cable does not get damaged. Otherwise, it may result
in re or electric shock.
• Do not damage the cable.
• Do not place heavy objects on top of the cable.
• Do not bend, twist, or pull the cable with excessive force.
• Keep the power cable away from hot electrical appliances.
Warning
Product abnormality precautions
In the following situations, turn o this product immediately, unplug
the power plug, and contact your local dealer or the Epson service
call center. Continuing to use under these conditions may result in
re or electric shock. Do not try to repair this product yourself.
• If you see smoke, or notice any strange odors or noises.
• If any water, beverages, or foreign objects get into the product.
• If the product was dropped or the case was damaged.
Warning
Wireless function precautions
When taking this product into areas in which the use of electromag-
netic waves is prohibited, such as in an aircraft or in hospitals, follow
the instructions in the area and turn o this product or disable the
Bluetooth or wireless LAN function. Do not use the Bluetooth or
wireless LAN function near automatically controlled devices such as
automatic doors or re alarms. If the product has an auto power on

9
01_Chapter title
01_Head A
02__lead
Safety Instructions
9
sult in itching or a rash.
Hold the controller securely or place it on a stable surface and make
sure the cables are not pulled with undue force. Dropping the head-
set due to the weight of the controller may result in injury or mal-
function.
Dispose of this product in accordance with your local laws and regu-
lations.
Caution
Viewing image precautions
Always take periodic breaks when viewing images using this product.
Long periods of viewing images may result in eye fatigue. If you feel
fatigued or uncomfortable even after taking a break, stop viewing im-
mediately.
Do not drop this product or treat it with unnecessary force. Also, if the
product breaks due to an impact such as a fall, stop using the prod-
uct. Continuing to use this product may result in injury due to glass
fragments.
When wearing this product, be aware of the edges of the frame. Also,
do not place your nger between the moving parts of this product,
such as the hinges. Doing so may result in injury.
Make sure you are wearing this product correctly. Incorrect usage
could make you feel nauseous.
This product should only be used for the purposes stated in the
manuals. Using it for anything else may result in injury.
Caution
Usage environment and condition
precautions
Do not place the product in locations subjected to vibrations or
shocks.
While using the product to view images, play games, or listen to mu-
sic, make sure you confirm the safety of your surroundings and do
not leave any fragile items in your immediate vicinity. The images you
are viewing may cause you to move your body involuntarily, resulting
in damage to nearby items or personal injury.
Do not place this product near high-voltage lines or magnetized
items. Doing so may result in breakdown, malfunction, or failure.
When performing maintenance, make sure you turn o the product,
unplug the power plug and the power connector and disconnect all
wires. Otherwise, it may result in electric shock.
Stop charging the battery if the charging does not end in the stated
period of time. Continuing the charge may result in liquid leakage,
heat, explosion, or re.
Caution
Product usage precautions
Stop using this product if the skin that touches the product (face and
so on) feels itchy when wearing the product, or any unusual rashes
occur, and consult your local dermatologist.
If you sweat while using the product, wipe the sweat from your face
and the product. Continuing to use under these conditions may re-

10
01_Chapter title
01_Head A
02__lead
Safety Instructions
10
If a problem or malfunction occurs, stop using this product imme-
diately. Continuing to use this product may result in injury or could
make you feel nauseous.
Stop using this product if your skin feels unusual when wearing this
product and consult your local dermatologist. Sometimes allergies
may occur due to the coating or material of the product.
How a 3D image is perceived varies depending on the individual.
Stop using the 3D function if you feel strange or cannot see in 3D.
Continuing to view the 3D images could make you feel nauseous.
This product must not be used by children under the age of six as
their eyesight is still developing.
If a child of seven years or older uses the product, make sure they are
supervised at all times and that they do not wear the product for ex-
tended periods. Pay close attention to the child's physical condition
and make sure they are not suering from eye strain.
Do not use this product if you are sensitive to light, or feel nauseous.
Doing so may aggravate your pre-existing conditions.
Do not use this product if you have prior eye conditions. Doing so
may aggravate the symptoms such as strabismus, amblyopia, or an-
isometropia.
Caution
Product abnormality precautions
Contact an authorized Epson dealer when replacing batteries.
Data such as video, images, or music stored on the product may be
lost or damaged when the product malfunctions, is repaired, or un-
dergoes other services. Epson shall not be responsible for the loss of
any data, damage to data, or loss of prots that occurs at such a time.
You can recycle used lithium-ion batteries. When the prod-
uct's internal battery reaches the end of its service life, con-
tact a service center for information on recycling.

11
01_Chapter title
01_Head A
02__lead
11
Notes on Usage
This product uses an Si-OLED display panel. Due to the char-
acteristics of the Si-OLED, you may notice burn-in or de-
creasing luminance on the panel. This is not a malfunction.
To reduce the burn-in, do the following.
• Do not display the same image for a long time.
• Hide markers or text that always appear in the same position.
• Decrease the display brightness.
• Turn o the display using the tap to mute function or sleep func-
tion, or turn o the product when you are not viewing images for a
long time.
Charge the battery at least once a year even if you do not use the
product. If you do not use the product for a long period of time,
the battery performance may deteriorate or you may not be able to
charge the battery.
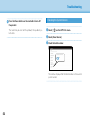
List of Safety Symbols (corresponding to IEC60950-1 A2)
The following table lists the meaning of the safety symbols labeled
on the equipment.
Approved standards: IEC60417 No.5031
Meaning: Direct current
To indicate on the rating plate
that the equipment is suitable
for direct current only; to identify
relevant terminals.

1212
Getting Ready
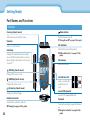
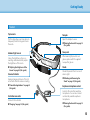
Part Names and Functions
Controller
Power button
Turns the power on or o.
"Turning On and O" on page 20 (this guide)
HOME key (touch sensor)
Displays the Home screen.
History key (touch sensor)
Displays recently used apps.
Trackpad
Touch with your nger to operate the prod-
uct.
"Using the Controller" on page 22 (this
guide)
Headset connector
Connects the controller connector.
"Charging" on page 14 (this guide)
Switch key
Changes the adjustment items to bright-
ness or 2D/3D mode. (Use the cross-key to
adjust settings.) Hold down to turn key lock
on and o.
Enter key
Selects or conrms items.
Cross-key (touch sensor)
Selects items and scrolls the screen.
LED indicator
Indicates the status of the product.
"LED indicator status" on page 15 (this
guide)
microSD card slot
Insert a commercially
available microSD
card.
micro-USB connector
Connects the supplied USB cable.
BACK key (touch sensor)
Displays the previous screen.
Volume keys
Adjusts the volume.

13
01_Chapter title
01_Head A
02__lead
Getting Ready
13
Headset
Nose pads
When wearing the product over
glasses, replace with the supplied
nose pad for glasses.
Temples
Open the temples to wear.
"Wearing the Headset" on page 16
(this guide)
Earphone microphone socket
Connects the socket for earphone
microphones. You can also connect
commercially available earphone
microphones.
"Wearing the Headset" on page 16
(this guide)
Camera/Indicator
Captures images and movies. The indi-
cators ash while the camera is starting.
"Preinstalled applications" on page 28
(this guide)
Tap to mute
This function allows you to tap twice to
temporarily hide the image and mute
the audio.
Controller connector
Connects the controller.
"Charging" on page 14 (this guide)
Shade
Shades the product from too much
exterior light.
"Attaching and Removing the
Shade" on page 19 (this guide)
Ambient light sensor
Senses the brightness of your sur-
roundings and automatically adjusts
the brightness of the screen.
"Adjusting the Brightness of the
Screen" on page 36 (this guide)

14
01_Chapter title
01_Head A
02__lead
Getting Ready
14
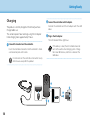
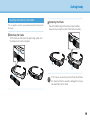
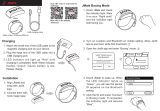
Charging
The product is not fully charged at the time of purchase.
Charge before use.
This section explains how to charge using the AC adapter.
Initial charging takes approximately 5 hours.
A
Connect the headset and the controller.
Insert the controller connector into the controller's head-
set connection port until it clicks.
Do not connect the controller connector to any
other devices except for the product.
B
Connect the controller and AC adapter.
Connect the controller and the AC adapter with the USB
cable.
C
Plug in the AC adapter.
The LED indicator ashes light blue.
If the battery is dead, the LED indicator does not
turn on for a while when charging starts. Charge
for at least 30 minutes, and then re-connect the
USB cable.

15
01_Chapter title
01_Head A
02__lead
Getting Ready
15
When the battery is charged 90% or higher, the LED indicator
stops ashing and remains on. The LED indicator turns o when
the battery is fully charged. (The LED indicator provides a rough
indication of the amount of remaining battery.)
Disconnect the AC adapter and the USB cable.
Battery life is approximately six hours. Battery life may vary de-
pending on application and environmental usage conditions.
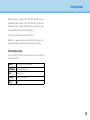
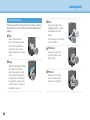
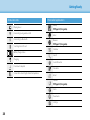
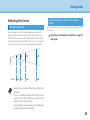
LED indicator status
You can check the status of the product from the colors and the
lit status of the LED.
Green
Starting up or Shutting down
Light blue
Charging/Operating
Blue
Sleep mode
Orange
Battery running low
Pink
Error

16
01_Chapter title
01_Head A
02__lead
Getting Ready
16
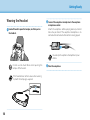
B
Connect the earphone microphone to the earphone
microphone socket.
Attach the earphones before playing back any content.
Noise may be heard if the earphone microphone is dis-
connected or connected while content is being played.
You can clip the earphone microphone to your
clothes.
C
Wear the earphones.
Wearing the Headset
A
Use both hands to open the temples, and then put on
the headset.
Do not use too much force when opening the
temples of the headset.
If the headset does not feel secure when wearing
it, attach the temple grip supplied.

17
01_Chapter title
01_Head A
02__lead
Getting Ready
17
B
Attach the nose pad for glasses.
The nose pad for glasses ts over your glasses.
Wearing over Glasses
By replacing with the supplied nose pad for glasses, the headset can
be worn over glasses. (The headset can only be worn over glasses
that are approximately 147 mm wide.)
• Make sure that you do not damage the glasses
and the lens of the headset when wearing.
• You may not be able to wear the headset over
the glasses depending on the shape of your
glasses.
A
Pull the nose pad forward to remove it.

18
01_Chapter title
01_Head A
02__lead
Getting Ready
18
A
Pull the nose pad forward to remove it.
B
Attach the nose pad to the lens holder.
C
Attach the lens holder to the headset.
Attaching the lens holder and wearing the
headset
If you wear glasses, the lens holder allows you to wear the head-
set without wearing your glasses.
Visit your local opticians and have them install lenses in the lens
holder and attach them to the headset. (The customer is respon-
sible for the cost of the lenses. Depending on the opticians, they
may not be able to perform this procedure.)
Lens holder supported lenses
Lens (W x H) 50 x 24 mm
Nose pads 20 mm
Frame PD 70 mm
Curve 4
You may not be able to view images when using
special lenses such as colored lenses, mirrored lenses,
and polarized lenses.

19
01_Chapter title
01_Head A
02__lead
Getting Ready
19
Removing the Shade
Raise the bottom edge of the shade and pull carefully
down while pressing the center of the shade to remove.
If the shade is pushed or pulled with too much force,
the shade and the lens could be damaged. Do not use
too much force on the shade.
Attaching and Removing the Shade
If it is too bright to view the screen when wearing the headset, attach
the shade.
Attaching the Shade
Tilt the shade, and then push the protruding section into
the headset until it clicks into place.

20
01_Chapter title
01_Head A
02__lead
Getting Ready
20
• See the following for information on using the
controller.
"Using the Controller" on page 22 (this guide)
• Turning off the screen while the product is on
(Sleep mode)
When you press the Power button briefly, the
product enters Sleep mode and the LED indicator
turns blue. Press the Power button briey again to
wake the product from Sleep mode.
• Disabling controller operations (Key lock)
When you hold down the Switch key, the key lock
turns on. When you hold down the Switch key
again, the key lock turns o.
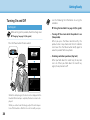
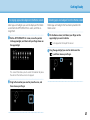
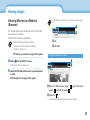
Turning On and O
Turning on
Before turning on the product, check the charge level.
"Charging" on page 14 (this guide)
Press the Power button for one second.
MOVERIO
When the startup begins, the start screen is displayed in the
headset. When startup is complete, the Home screen is dis-
played.
When you cannot view the images, adjust the vertical posi-
tion of the headset so that the lens is in line with your eyes.
Page is loading ...
Page is loading ...
Page is loading ...
Page is loading ...
Page is loading ...
Page is loading ...
Page is loading ...
Page is loading ...
Page is loading ...
Page is loading ...
Page is loading ...
Page is loading ...
Page is loading ...
Page is loading ...
Page is loading ...
Page is loading ...
Page is loading ...
Page is loading ...
Page is loading ...
Page is loading ...
Page is loading ...
Page is loading ...
Page is loading ...
Page is loading ...
Page is loading ...
Page is loading ...
Page is loading ...
Page is loading ...
Page is loading ...
Page is loading ...
Page is loading ...
Page is loading ...
Page is loading ...
Page is loading ...
Page is loading ...
Page is loading ...
Page is loading ...
Page is loading ...
Page is loading ...
Page is loading ...
Page is loading ...
Page is loading ...
Page is loading ...
Page is loading ...
Page is loading ...
Page is loading ...
Page is loading ...
-
 1
1
-
 2
2
-
 3
3
-
 4
4
-
 5
5
-
 6
6
-
 7
7
-
 8
8
-
 9
9
-
 10
10
-
 11
11
-
 12
12
-
 13
13
-
 14
14
-
 15
15
-
 16
16
-
 17
17
-
 18
18
-
 19
19
-
 20
20
-
 21
21
-
 22
22
-
 23
23
-
 24
24
-
 25
25
-
 26
26
-
 27
27
-
 28
28
-
 29
29
-
 30
30
-
 31
31
-
 32
32
-
 33
33
-
 34
34
-
 35
35
-
 36
36
-
 37
37
-
 38
38
-
 39
39
-
 40
40
-
 41
41
-
 42
42
-
 43
43
-
 44
44
-
 45
45
-
 46
46
-
 47
47
-
 48
48
-
 49
49
-
 50
50
-
 51
51
-
 52
52
-
 53
53
-
 54
54
-
 55
55
-
 56
56
-
 57
57
-
 58
58
-
 59
59
-
 60
60
-
 61
61
-
 62
62
-
 63
63
-
 64
64
-
 65
65
-
 66
66
-
 67
67


Epson BT-300 User guide
- Type
- User guide
- This manual is also suitable for
Ask a question and I''ll find the answer in the document
Finding information in a document is now easier with AI
Related papers
-
Epson BT-300 User guide
-
-
-
-
Epson Moverio BT-350 User guide
-
-
-
-
-
Other documents
-
Monoprice 43452 Horizon ANC Truewireless Earphone User manual
-
JRC GKP2794 Operating instructions
-
 Chinavision CVABL-E307 User manual
-
Global Sources GL-TLM030W User manual
-
Sharp AN-3DG20-B Specification
-
 Atlasonix VR Headset Compatible User manual
-
-
 Jacfit JMate Strap User manual
-
 pico neo 2 A New Reality Virtual Reality All-In-One Headset User guide
-
SHOKZ ROADWAVE User manual


