Page is loading ...

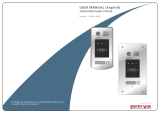
VT596(F)/KP USER MANUAL(EN)
VT596/KP VT596F/KP
4 Wire Video Intercom System
Read this manual carefully before using the product, and keep it well for future use.

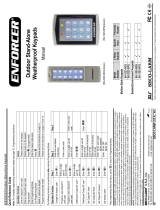
1. Parts and Functions
2. Terminal Descriptions
-1-
Rainy Cover
VT596/KP
VT596F/KP Side View Mounting box
1
4 5 6
98
0 #
7
*
2 3 1
4 5 6
98
0 #
7
*
2 3
Camera Lens
Touch Sensitive
Digital Keypad
Speaker
Indicator(red)
Indicator(blue)
Nameplate
Call Button
Microphone
90 mm
28 mm
176 mm
220 mm
119 mm
1
4 5 6
98
0 #
7
*
2 3
1
4 5 6
98
0 #
7
*
2 3
Camera Lens
Touch Sensitive
Digital Keypad
Speaker
Nameplate
Call Button
Screws for panel
mounting
Microphone
Indicator(red)
Indicator(blue)
1 2 3 4
ON DIP
MIC adjustment
Lock Control Jumper
JP/LK
DIP Switches
RS485 Connect Port
Main Connect Port
1 2 3
SPK adjustment
S-
S+
PL
1R
2W
4B
3Y
DC+
DC-

3. Door Station Mounting
JP/LK(Lock Control Jumper):
DIP Switches:
RS485:
MIC
SPK
Main Connect Port:
•
adjust camera angle
1 2
43
Drill holes in the wall to match the size of
screws and attach the rainy cover to the wall.
Attach the panel to the rainy cover Use the screwdriver and the screw
to fix the panel
Connect the cable correctly and adjust
right angle for camera
PS
4 core cable
VT596/KP Mounting
-2-

VT596F/KP Mounting
1
90mm
174mm
52mm
2
43
Drill a hole in the wall to match the size of the
mounting box and attach to the wall.
Attach the panel to the mounting box and
use screws supplied to fix the panel
Place name label
Connect the cable correctly and adjust
right angle for camera
adjust camera angle
PS
4 core cable
-3-
Placing Name Label
1
4 5 6
98
0 #
7
*
2 3

4. System Wiring and Electric Lock Connection
White
Red
Yellow
Black
1R
2W
3Y
4B
1R
2W
3Y
4B
TO Monitor
JS/OS1
Shielding Layer of the RVVP Cable
1
4 5 6
98
0 #
7
*
2 3
S-
S+
PL
1R
2W
4B
3Y
DC+
DC-
AC ~
Basic Connection
Electric Lock Connection
1R 2W 3Y 4B
Connect to Monitor
Black
Red
White
VT596(F)
+
+
--
S-
S+
PL
1R
2W
4B
3Y
DC+
DC-
LOCK
POWER
SUPPLY
Take off JP/LK Jumper
AC ~
-4-

1R 2W 3Y 4B
Connect to Monitor
JP/LK Jumper position in
Unlock mode:0
2-3
1 2 3
VT596(F)
S-
S+
PL
1R
2W
4B
3Y
DC+
DC-
Black
Red
White
+
-
LOCK
AC ~
-5-
5. Functions Setting Up

1
4 5 6
98
0 #
7
*
2 3 blue
red
About Functions Setting steps
Order Setting items Setting range Default value Setting code
-6-

Input the master code.
(Default: [ ] +[#] )
- All settings will restore to their
default value.
-
When power on or activate
the reset all setting item,the
keypad checking will carry out,
during this time,the key
illumination will blink and the
touching operation is forbidden,
after finish checking,the key
illumination will stop blinking
and sent out a long sound of beep
- The master code is allowed 1~12
digits,the same code cannot be set
for both the user code and the
master code,it is recommended
that you modify the default master
code.
- The unlock time is the time that
use keypad access to unlock.
(red)
ON
(blue)
OFF
Beep+, Beep
(red)
ON
(blue)
ON
Beep+, Beep
(red)
ON
(blue)
ON
Beep+, Beep
(red)
ON
(blue)
ON
Beep+, Beep
(red)
ON
(blue)
ON
Beep+, Beep
(red)
ON
(blue)
OFF
Beep+
(red)
ON
(blue)
OFF
Beep+
(red)
ON
(blue)
OFF
Beep+
(red)
ON
(blue)
OFF
Beep+
(red)
OFF
(blue)
OFF
Beep, Beep+
Inputting of code (ex.: 10)
range:00 or 10~99
Inputting of code (ex.: 09)
range:01~99
3.Setting the key
illumination time
4.Setting the
unlock time
2.Setting the master code
(Default 1234) (Default 10s) (Default 1s)
Inputting of new master code
(ex.: 4321)(1~12 digits)
Input the setting code.
Inputting of code
Input the setting code.
1.Reset all settings
00+#
1234+# 4321+#
01+#
10+# 09+#
Input the setting code.
02+#
Input the setting code.
03+#
-
When the “ cancel” key is pressed, the LED lights off, the buzzer beeps, and the system exits the setting mode
-
When there isn’t any operation in 10s, the LED lights off, the buzzer beeps, and the system exits the setting mode
*
- If the key illumination time is set
to 00,the key illumination will light
up all the time when power on.
- If the key illumination time is set to
10~99,the key illumination will light
up for 10~99 seconds.At this mode,
the key illumination lights off in
standby mode, touching any digital
key can illuminate,but this is the
invalid digital.
Setting items
Step 1
Step 2
Step 3
Step 1
Step 2
Step 3
Step 1
Step 2
Step 3
Step 1
Step 2
Step 3
-7-

Input the master code.
(Default: [ ] +[#])
(red)
ON
(blue)
OFF
Beep+, Beep
(red)
ON
(blue)
ON
Beep+, Beep
(red)
ON
(blue)
ON
Beep+, Beep
(red)
ON
(blue)
ON
Beep+, Beep
(red)
ON
(blue)
ON
Beep+, Beep
(red)
ON
(blue)
OFF
Beep+
(red)
ON
(blue)
OFF
Beep+
(red)
ON
(blue)
OFF
Beep+
(red)
ON
(blue)
OFF
Beep+
Input the setting code.
Inputting of code
Input the setting code.
04+# 05+#
range:0:(open)/1:(close)
1+#
0/1 0/1 0/1
1+# 1+#1234+#
Input the setting code.
06+#
Input the setting code.
07+#
(ex.: 1)
Inputting of code Inputting of code Inputting of code
range:0:(on)/1:(off)
(ex.: 1)
range:0:(normal)/1:(reverse)
(ex.: 1)
7.Reset code setting 8. &# function setting 6.Setting operation tone
(Default ON) (Default Normal)(Default 0(opened))
5.Setting the unlock mode *
(red)
OFF
(blue)
OFF
Beep, Beep+
-
When the “ cancel” key is pressed, the LED lights off, the buzzer beeps, and the system exits the setting mode
-
When there isn’t any operation in 10s, the LED lights off, the buzzer beeps, and the system exits the setting mode
*
*
*
- The unlock mode is used to
match the type of lock,If it’s set
to 0,unlock mode is power-on-to
unlock,and must use electric lock.
If it’s set to 1,unlock mode is
power-off-to-unlock,and must use
electromagnetic lock.
- When the operation tone is
set to 0,pressing the digital
keypad will sent out a sound
of beep.
- When the operation tone is
set to 1,pressing the digital
keypad will blink one time.
- Cancel all the passwords except
the master code.
- Restore the master code to
default value(1,2,3,4)
- When the item is set to 0,press
the button to cancel the input,
and press the # button to confirm
the input.
- When the item is set to 1,press
the # button to cancel the input,
and press the button to confirm
the input .
Setting items
Step 1
Step 2
Step 3
Step 1
Step 2
Step 3
Step 1
Step 2
Step 3
Step 1
Step 2
Step 3
-8-

Input the master code.
(Default: [ ]+[#] )
(red)
ON
(blue)
OFF
Beep+, Beep
(red)
ON
(blue)
ON
Beep+, Beep
(red)
ON
(blue)
ON
Beep+, Beep
(red)
ON
(blue)
ON
Beep+, Beep
(red)
ON
(blue)
OFF
Beep+
(red)
ON
(blue)
OFF
Beep+
(red)
ON
(blue)
OFF
Beep+
Inputting of code (ex.: 2011)
1~12 digits
14.Setting the code
for user
13.Setting the code
forTemporary2
Input the setting code. Input the setting code.
12.Setting the code
forTemporary1
18+# 19+# 21+#
2011+#
Inputting of code (ex.: 1006)
1~12 digits
1006+#
Inputting of code (ex.: 2011)
1~12 digits
2011+#
Input the setting code.
(ex.:21)
20~99
-
When the “ cancel” key is pressed, the LED lights off, the buzzer beeps, and the system exits the setting mode
-
When there isn’t any operation in 10s, the LED lights off, the buzzer beeps, and the system exits the setting mode
(red)
OFF
(blue)
OFF
Beep, Beep+
*
- When input the correct temporary password to release the door,
the system will clear the temporary password after 60 seconds
automatically.But you should know that the password is valid within
60 seconds after inputing the correct temporary password
- If the password length exceeds 12 digits, the system will sent out
the sound of “beep,beep,beep,beep”,and the digitals you input
before will be cleared at the same time.
- The temporary code can not be set the same as the master code
and user code.
- The user code is used to release
the lock,80 group passwords can
be supported.
- If the password length exceeds
12 digits, the system will sent out
the sound of “beep,beep,beep,beep”,
and the digitals you input before
will be cleared at the same time.
- The user code can not be set the
same as the master code and
temporary code.
10.Interference resistant
grade setting
(Default 2)
(blue)
ON
Beep+, Beep
(blue)
OFF
Beep+
Input the setting code.
09+#
Inputting of code (ex.: 3)
range:0~5
3+#
Setting items
Step 1
Step 2
Step 3
Step 1
Step 2
Step 3
Step 1
Step 2
Step 3
Step 1
Step 2
Step 3
- The larger you set the interference
resistant grade,the stronger it will be,
but the sensitivity of the keypad will
be more lower.
- The interference resistant grade
setting also will activatethe keypad
checking.
-9-

6. Unlock Operations
(red)
ON
(blue)
OFF
Beep+
Red LED lights up
(during relay1 operation)
Unlock code=2011
Unlocking of user code
-10-

7. Precaustions
8. Specications
-11-
/