Page is loading ...

Assembly Instructions: 1157-4P/6P (Payton)
IMPORTANT:
• ALL INSTALLATION WORK SHOULD BE DONE BY ACCREDITED PROFESSIONAL.
• SHUT OFF POWER SUPPLY AT FUSE OR CIRCUIT BREAKER!
• USE ONLY THE SPECIFIED BULBS. DO NOT EXCEED THE MAXIMUM WATTAGE!
PREPARING FOR INSTALLATION
Removeallofthecontentsfromthecarton.Seetheimportantnotesabove.Removetheoldxturefromtheceiling,includingtheold
mountingstrap.
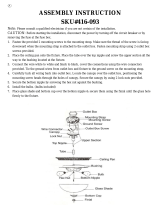
1.Takethemountingstrap(A)assemblyfromthepartsbag.Oneendofnipple(F)shouldbeattachedtomountingstrap(A)withwasher
andhexnut(CandD)inplace.Theotherendshouldhavecanopyloop(H)attached.
2.Useascrewdriverandmountingscrews(B)toattachmountingstrap(A)tothejunctionbox.(Note:Whenmountingstrap(A)isproperly
installed,abouthalfoftheexteriorthreadsofnipple(F)areexposed,allowingcanopyloop(H)totsnuglyontonipple(F).Youmaywant
totesttoensurethat,withcanopy(G)inplace,canopyloop(I)tsontonipple(F).Aftertesting,removecanopyloopcollar(I),canopy(G)
and canopy loop (H) from the nipple and place aside for later.
CLEANING TIPS
Treat the xture gently! Regular cleaning will reduce the need for deep cleaning. For regular cleaning, turn off the light and wipe down the
xture with a clean lint-free cotton or microber cloth. Never spray cleaner directly onto the xture.
For Customer Service, contact
the place of purchase.
FINISHING THE INSTALLATION
9.Pushcanopy(G)uptotheceilingandslidecanopyloopcollar(I)upbeneaththecanopy.
Tightlythreadcanopyloopcollar(I)ontocanopyloop(H)tosecurecanopy(G)inplace.
10.Reachthroughthebottomopeningtoinstallbulbs(notincluded)inaccordancewiththe
xture’sspecications.Yourinstallationisnowcomplete.Turnonthepowerandtestthexture.
4.Threadcenterrod(P)intothelampbodyatcenterpost(O).Pullthewiresuntiltautandthread
frame top (Q) into center rod (P).
5.Createtheframe.Sliderubberwashers(W)ontothethreadsofballnuts(S).Insertballnuts(S)
throughoneofrings(T)andintothebottomofverticalsupportbars(N).Fromthetop,slideglass
panels(U)intothetopofthenewframe.Placetheholesofremainingring(T)overthetopofposts
(R).Placerubberwashers(W)ontotheexposedposts(R).
5.Gentlyplacetheassembledlampbodyintotheglasscage.Lineuptheholesonframetop(Q)
withposts(R).Covertheexposedposts(R)withrubberwashers(W)beforescrewingdecorative
balls (X) into place.
6.Toploop(L)isonthexture’swires.Pullthewiresuntiltaut.Threadtoploop(L)ontothethreads
offrametop(Q).Bymeasuring,determinethecorrectnumberofchainlinksneededforproper
hangingheight.Ifnecessary,useapairofplierstoopenandremoveanyexcesschain(J).Attach
onechainconnector(K)toeachendofchain(J).
7. Connect one of chain connectors (K) to top loop (L) and close the chain connector. Feed the
xture’swiresupthroughthechain(everythreelinksorso),pullingthewiresuntiltaut.Usethefree
chainconnector(K)toattachchain(J)tocanopyloop(H).Untwistcanopyloopcollar(I)toallow
canopy(G)todropdownontothechain/wire.
CONNECTING THE WIRES
8.Haveanassistantsupportthexture’sweight
whilecompletingthewiring.Cutawaythe
excesswires.Threadthexture’swiresthrough
thecanopyloopandnipple.Refertothewiring
diagramandattachthexture’swirestothe
powersupplywiresfromthejunctionbox.
How to Identify the Fixture’s Wires
Hot Neutral Ground
Smooth
Ribbed
Bare Metal,
Green, or
Green Inner
Thread
Black
White
Black Inner
Thread
White Inner
Thread
House Wires
Fixture Wires
Hot
ConnectHottoHot,NeutraltoNeutral,and
GroundtoGround.Twisttheendsofthewirepairs
together,andthentwistonawireconnector.Make
surealltwistsareinthesamedirection.Ifthereis
nohousegroundwirecomingfromthejunction
box,locategroundscrew(E)onthemounting
bracket/mountingstrapandwrapthexture’s
groundwirearoundthegroundscrew.Usea
screwdrivertotightenthetopofgroundscrew
(E)ontothewiresandintothemountingbracket/
mountingstrap.Tuckthewiresintothejunction
box.
GND
B
C
G
I
J
K
A
E
D
F
H
JUNCTION
BOX
K
L
X
W
P
Q
W
T
O
R
U
N
V
W
S
W
T
M
ASSEMBLING THE FIXTURE
Note: Glass edges may be sharp. Wear gloves for installation to avoid injury. Have an assistant help assemble.
/