Page is loading ...

MARIELLE 5+2 CHANDELIER (SKU#579441)
ASSEMBLY / INSTALLATION INSTRUCTIONS
Please read carefully and save these instructions, as you may need them at a later date.
CAUTION
Turn off the main power at the circuit breaker before installing the fixture, in order to prevent possible shock.
GENERAL
All electrical connections must be in accordance with local and National Electrical Code (N.E.C.) standards.
If you are unfamiliar with proper electrical wiring connections obtain the services of a
qualified electrician. Remove the fixture and the mounting package from the box and make
sure that no parts are missing by referencing the illustrations on the installation instructions.
Tools are required when install this fixture.
REQUIRED TOOLS
Philips screwdriver
ASSEMBLY AND INSTALLATION
Turn off the power at fuse or circuit breaker
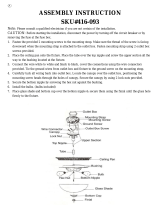
1. Adjust ARMS on fixture body evenly.
2. Attach the TOP COVER onto the top of fixture and put the TOP TUBE over the THREADED ROD A.
Then screw LOOP onto BUSHING A of fixture. Unscrew RING from SCREW COLLAR LOOP.
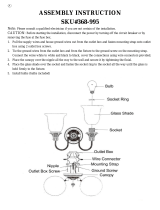
3. Attach the MOUNTING STRAP to the OUTLET BOX using 2 OUTLET BOX SCREWS (provided).
4. Thread wires through NIPPLE and the MOUNTING STRAP and pull through until the wires and CHAIN are
at your desired length. Use a pair of pliers to open the end of the link on the CHAIN. Attach one end of CHAIN
to the LOOP at the top of the fixture, and the other end to SCREW COLLAR LOOP. Close the links.
5. Tie ground wire from OUTLET BOX and from fixture to the GROUND SCREW on the MOUNTING STRAP.
Connect white wire from fixture to white wire (neutral wire) from supply circuit. Connect black wire from
fixture to black wire (live wire) from supply circuit. Cover connections using provided WIRE CONNECTORS.
6. Raise the CANOPY against the ceiling and fasten RING onto the SCREW COLLAR LOOP to secure CANOPY.
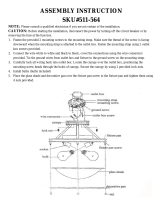
7. Place the SMALL SHADES onto the SOCKETS and secure with SOCKET RINGS.
8. Install the BULBS (Not included).
9. Screw the THREADED ROD B onto the BUSHING B on fixture.
10. Remove the BALL from the PULL CHAIN by opening the clip at the end of the PULL CHAIN.
11. Install the STEEL WASHER, PLASTIC WASHER, DECORATIVE PAN and the LARGE SHADE over
the THREADED ROD B, secure with GASKET and FINIAL.
12. Install the BALL onto the PULL CHAIN by pinching the clip at your desired length of the PULL CHAIN.
Turn on the power at fuse or circuit breaker.
Customer Service: 1-800-558-8700
IF IN DOUBT ABOUT ELECTRICAL INSTALLATION,
CONSULT A LICENSED ELECTRICIAN.
ITEM#579441
/