Page is loading ...

Product Manual
ABB i-bus
®
EIB / KNX
Application Unit Time
ABZ/S 2.1
Intelligent Installation Systems
ABB

This manual describes the function of the Application Unit Time ABZ/S 2.1.
Subject to changes and errors excepted.
Exclusion of liability:
Despite checking that the contents of this document match the hardware
and software, exclusions cannot be completely excluded. We therefore
cannot accept any liability for this.
A
ny necessary corrections will be inserted in new versions of the manual.
Please inform us of any suggested improvements.
E-mail: [email protected]

ABZ/S, Application Unit Time
© 2006 ABB STOTZ-KONTAKT GmbH 3
ABB i-bus
®
EIB / KNX
Contents
Page
1
General 6
1.1 Product and functional description........................................................7
2 Device technology 8
2.1 Technical data.......................................................................................8
2.2 Circuit diagram......................................................................................9
2.3 Dimension drawing.............................................................................10
2.4 Assembly and installation...................................................................10
3 Commissioning 12
3.1 Overview.............................................................................................12
3.2 Parameterisation software (PZM 2.0).................................................13
3.3 Interface..............................................................................................15
3.3.1 ABB – Times Groups/2 ....................................................................15
3.3.2 Title bar ............................................................................................15
3.3.3 Menu bar..........................................................................................15
3.3.4 Status bar.........................................................................................15
3.3.5 File menu..........................................................................................16
3.3.5.1 Save...............................................................................................16
3.3.5.2 Export ............................................................................................17
3.3.5.3 Import.............................................................................................18
3.3.5.4 Print ...............................................................................................18
3.3.5.5 View page......................................................................................19
3.3.5.6 Filter print data...............................................................................20
3.3.5.7 Printer setup ..................................................................................21
3.3.5.8 Close..............................................................................................21
3.3.6 Edit menu.........................................................................................22
3.3.6.1 New day routine.............................................................................22
3.3.6.2 Copy ..............................................................................................22
3.3.6.3 Insert..............................................................................................22
3.3.6.4 Delete ............................................................................................22
3.3.6.5 Usage ............................................................................................22
3.3.7 Online menu.....................................................................................23
3.3.7.1 Set date/time..................................................................................24
3.3.7.2 Show status...................................................................................26
3.3.8 Window menu...................................................................................27
3.3.8.1 Split horizontal...............................................................................27
3.3.8.2 Toolbar...........................................................................................27
3.3.8.3 Status bar ......................................................................................27
3.3.9 Help menu........................................................................................28
3.3.9.1 Help for device...............................................................................28
3.3.9.2 Help for application software.........................................................28
3.3.9.3 About... ..........................................................................................28
3.3.10 Toolbar.............................................................................................29
3.3.10.1 Copy ..............................................................................................29
3.3.10.2 Paste..............................................................................................29
3.3.10.3 Print ...............................................................................................29
3.3.10.4 Save...............................................................................................30
3.3.10.5 Help ...............................................................................................30
3.3.10.6 Close..............................................................................................30

ABZ/S, Application Unit Time
© 2006 ABB STOTZ-KONTAKT GmbH 4
ABB i-bus
®
EIB / KNX
3.3.10.7 Hotkey selection ............................................................................30
3.4 Parameters .........................................................................................31
3.4.1 General.............................................................................................31
3.4.1.1 Operating mode of clock................................................................36
3.4.2 Time switch program........................................................................44
3.4.3 Day routines - General.....................................................................45
3.4.3.1 Insert new day routines .................................................................46
3.4.3.2 Edit day routines............................................................................52
3.4.3.3 Delete day routines........................................................................56
3.4.4 Switching time - General..................................................................58
3.4.4.1 Insert new switching time ..............................................................59
3.4.4.2 Edit switching time.........................................................................73
3.4.4.3 Delete switching time.....................................................................86
3.4.4.4 Copy/insert switching time.............................................................89
3.4.5 Week routine - General....................................................................93
3.4.5.1 Insert new week routine.................................................................94
3.4.5.2 Edit week routine...........................................................................96
3.4.5.3 Delete week routine.......................................................................98
3.4.6 Daylight saving times - General.....................................................100
3.4.6.1 Insert new daylight saving time ...................................................101
3.4.6.2 Edit daylight saving time..............................................................105
3.4.6.3 Delete daylight saving time..........................................................107
3.4.7 Special days - General...................................................................109
3.4.7.1 Insert new special day.................................................................110
3.4.7.2 Edit special day............................................................................113
3.4.7.3 Delete special day .......................................................................115
3.4.7.4 Overlapping of periods ................................................................117
3.4.8 Overview - General ........................................................................118
3.4.8.1 Display overview..........................................................................119
3.4.9 Group - General.............................................................................122
3.4.9.1 Insert new group..........................................................................123
3.4.9.2 Edit group ....................................................................................140
3.4.9.3 Modify group................................................................................157
3.4.10 Group trigger - General..................................................................174
3.4.10.1 Insert new group trigger...............................................................175
3.4.10.2 Edit group trigger.........................................................................180
3.4.10.3 Delete group trigger.....................................................................184
3.4.11 Group members - General.............................................................186
3.4.11.1 Insert new group member............................................................187
3.4.11.2 Edit group members....................................................................200
3.4.11.3 Delete group members................................................................212
3.4.12 Group addresses - General............................................................215
3.4.12.1 Insert new group address............................................................216
3.4.12.2 Edit group address.......................................................................222
3.4.12.3 Delete group address..................................................................229
3.4.12.4 Rename group address...............................................................233
3.4.12.5 Assign group address..................................................................235
3.4.13 Utilisation........................................................................................242
3.5 Communication objects 250 to 253 ..................................................243
4 Planning and application 244
4.1 Context-sensitive “Help” file..............................................................244
4.2 Behaviour on bus voltage failure ......................................................245
4.3 Behaviour after bus voltage recovery...............................................245
Appendix VII
A.1 Scope of supply ................................................................................. VII

ABZ/S, Application Unit Time
© 2006 ABB STOTZ-KONTAKT GmbH 5
ABB i-bus
®
EIB / KNX
A.2 List of diagrams................................................................................. VIII
A.3 List of tables....................................................................................... XII
A.4 List of key words............................................................................... XIII
A.5 Ordering information.........................................................................XIV
A.6 Notes..................................................................................................XV

General
© 2006 ABB STOTZ-KONTAKT GmbH 6
ABB i-bus
®
EIB / KNX
1 General
Complex timer operations and time controllers are becoming increasingly
important in modern buildings with ABB i-bus
®
EIB / KNX. Time-controlled
day or week routines e.g. of lighting installations should be implemented in
buildings, factories or hotels. In schools, the lighting should e.g. be switched
off at the weekend for energy reasons or the heating system should be
lowered to a minimum using time control. In hotels, it should be possible to
set different lighting or ventilation sequences for different events. In
underground car parks for example, different time sequences should apply
on different days of the week. Even year time switch programs and group
formation should be implemented in continually recurring processes.
All the previously described applications can be parameterised using the
Application Unit Time.
This manual provides you with detailed technical information about the
Application Unit Time including its installation and programming and explains
its application using examples.
The manual is divided into the following chapters:
• Chapter 1 General
• Chapter 2 Device technology
• Chapter 3 Commissioning
• Chapter 4 Planning and application
• Appendix

General
© 2006 ABB STOTZ-KONTAKT GmbH 7
ABB i-bus
®
EIB / KNX
1.1 Product and functional
description
The Application Unit Time ABZ/S 2.1 is a DIN rail mounted device for
insertion in the distribution board. The connection to the bus is carried out
via a bus connecting terminal at the front of the device. Both the assignment
of the physical address and the setting of parameters are carried out with
ETS3 from version V1.0.
The device is supplied via the ABB i-bus
®
and does not require an additional
power supply.
The processing is carried out in the application program Times Groups/2.
The device is characterised by its comprehensive and clear functionality
which enables its use in a wide variety of applications. The following list
provides an overview:
• Multi-channel time switch with
- year time switch program, week routine and day routine
- input of daylight saving times and special days
• Recording of groups

Device technology
© 2006 ABB STOTZ-KONTAKT GmbH 8
ABB i-bus
®
EIB / KNX
2 Device technology
The Application Unit Time is a DIN rail mounted device for insertion in the
distribution board. The device contains a year time switch program with the
option of defining day routines and week routines individually. Complex
group formations are also possible.
The device is ready for operation after connecting the bus voltage. The
Application Unit Time is parameterised via ETS3. The connection to the bus
is established via the bus connecting terminal at the front of the device.
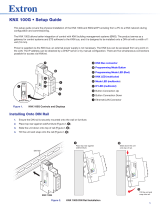
Fig. 1: ABZ/S 2.1
2.1 Technical data
Power supply - Bus voltage 21 … 32V DC
- Power consumption, bus < 12mA
- Leakage loss, bus Max. 250mW
Connections - EIB / KNX Via bus connecting terminal
Operating and display elements - Programming LED (3) For assignment of the physical address
- Programming button (2) For assignment of the physical address
Type of protection - IP 20 In accordance with DIN EN 60 529
Protection class - II In accordance with DIN EN 61 140
Insulation category Overvoltage category III in accordance with DIN EN 60 664-1
Degree of pollution 2 in accordance with DIN EN 60 664-1
EIB / KNX safety extra-low voltage SELV 24 V DC
Temperature range
- Operation
- Storage
- Transport
- 5°C...+45°C
-25°C...+ 55°C
-25°C...+ 70°C
Ambient conditions - Maximum air humidity 93%, moisture condensation not permitted
Design - DIN rail mounted device (MDRC) Modular installation device, ProM
- Dimensions 90 x 36 x 64.5mm (H x W x D)
- Mounting width in modules 2.2 modules at 18mm
- Mounting depth 64.5mm
Installation - On 35mm mounting rail In accordance with DIN EN 60 715
Mounting position - As required
Weight - 0.1kg
Housing/colour - Plastic housing, grey
Certification - EIB / KNX in accordance with EN 50 090-1, -2 Certificate
CE norm - In accordance with the EMC and low voltage
guidelines
Table 1: Technical data
2CDC071280F0005

Device technology
© 2006 ABB STOTZ-KONTAKT GmbH 9
ABB i-bus
®
EIB / KNX
Application program Max. number of
communication objects
Max. number of
group addresses
Max. number of
associations
Times Groups/2 250 250 254
Table 2: Application program
Note: ETS3 is required for programming. A file of type “.VD3” must be
imported. The application program is stored in ETS3 under
ABB/Controller/Controller.
2.2 Circuit diagram
2CDC 072 053 F0005
Fig. 2: Circuit diagram
1 Label carrier
2 Programming button
3 Programming LED
4 Bus connecting terminal

Device technology
© 2006 ABB STOTZ-KONTAKT GmbH 10
ABB i-bus
®
EIB / KNX
2.3 Dimension drawing
2CDC 072 051 F0006
Fig. 3: Dimension drawing
2.4 Assembly and installation
The Application Unit Time is a DIN rail mounted device for insertion in
distribution boards for snap-on mounting on 35mm mounting rails, in
accordance with DIN EN 60 715.
The connection to the bus is carried out via the bus connecting terminal
supplied.
The device is ready for operation once the bus voltage has been applied.
The accessibility of the devices for operation, testing, inspection,
maintenance and repair must be ensured (according to DIN VDE 0100-520).
Commissioning requirements
To put the Application Unit Time into operation, a PC with ETS3 and an
interface connection to the ABB i-bus
®
, e.g. via an RS232 interface or a USB
interface are required.
The device is ready for operation once the bus voltage has been applied.
The installation and commissioning may only be carried out by specialist
electricians. When planning and setting up electrical installations, the
relevant norms, guidelines, standards and specifications must be observed.
- Protect the device against damp, dirt and damage during transportation,
storage and operation.
- Only operate the device within the specified technical data!
- Only operate the device in an enclosed housing (distribution board)!

Device technology
© 2006 ABB STOTZ-KONTAKT GmbH 11
ABB i-bus
®
EIB / KNX
Supplied state
The Application Unit Time is supplied with the physical address 15.15.255.
The application program is pre-loaded. During the commissioning stage,
only group addresses and parameters need to be loaded. If required, the
complete application program can be reloaded. When changing the
application program or after unloading, a longer download process may
occur.
Download behaviour
Due to the complexity of the device, it can take up to 1.5 min. during a
download until the progress bar appears, depending on the computer being
used.
Assignment of the physical address
The assignment and programming of the physical address, group address
and parameters is carried out in ETS.
Cleaning
Dirty devices can be cleaned with a dry cloth. If this is not sufficient, a cloth
that has been moistened with soap may be used. Corrosive cleaning agents
or solvents may not be used in any event.
Maintenance
The device is maintenance-free. In the event of damage (e.g. during
transportation, storage), repairs may not be carried out by a third party. The
right to claim under guarantee expires when the device is opened.

Commissioning
© 2006 ABB STOTZ-KONTAKT GmbH 12
ABB i-bus
®
EIB / KNX
3 Commissioning
3.1 Overview
The application program “Times Groups/2” is available for the Application
Unit Time. Programming requires ETS3. A maximum of 250 communication
objects, 250 group addresses and 254 associations can be linked.
The following functions are available:
Time switch program Defines when telegrams with specific group addresses and values
are sent on the bus.
Day routines Contains the time program of a day from 00:00 to 23:59. Day
routines can be activated and deactivated by the time switch
program and by telegrams. There are 15 day routines available.
Switching times Up to 800 switching times can be assigned to the day routines.
Week routine Defines the assignment of day routines to the days of the week.
There is one week routine available.
Special days Special days denote individual days or time intervals which
deviate from the standard week routine. There are 100 special
days available.
Daylight saving times Automatic calculation of the daylight saving times. A total of 10
consecutive years can be calculated.
Group A combination of group addresses which are sent at the same
time. There are 30 groups available.
Group members Group addresses which belong to a group. There are 300 group
members available.
Group triggers Group addresses which trigger a group. The type and value of the
group address determine the triggering of the group e.g.:
“0” switches ON,
“1” switches OFF,
“Value < 230” switches ON,
“Value > 250” switches OFF.
Table 3: Functions of the application program

Commissioning
© 2006 ABB STOTZ-KONTAKT GmbH 13
ABB i-bus
®
EIB / KNX
3.2 Parameterisation software
(PZM 2.0)
The parameterisation software “PZM 2.0” is used by the system operator
and offers the following options:
- loading the installation configuration which has been created in ETS into
the ABZ/S 2.1.
- modifying the time switch program and then downloading the program to
the ABZ/S 2.1
- saving of the modified time switch program
- reading out and setting the time and date of the ABZ/S 2.1
- reading out the status information of the ABZ/S 2.1.
Note: The parameterisation software PZM 2.0 has its own manual
which can be downloaded from the Internet.

Commissioning
© 2006 ABB STOTZ-KONTAKT GmbH 14
ABB i-bus
®
EIB / KNX
Parameterising the ABZ/S 2.1 with ETS
A comment for the system operator should be entered in the “Description”
field in the ETS3 “Properties” window e.g. project name, function of the
Application Unit Time in the installation and the date.
Fig. 4: ETS3 “General” dialog window
Note: This information is displayed in the table area of the
parameterisation software PZM 2.0 as “Comment of the
installer” after loading the time switch program.

Commissioning
© 2006 ABB STOTZ-KONTAKT GmbH 15
ABB i-bus
®
EIB / KNX
3.3 Interface
3.3.1 ABB – Times Groups/2
Fig. 5: “Times Groups/2” screen
3.3.2 Title bar
Fig. 6: “Title bar” screen
The title bar contains information about the manufacturer, the name of the
application program, the physical address as well as the type and the name
of the device.
3.3.3 Menu bar
Fig. 7: “Menu bar” screen
The File, Edit, Online, Window and Help menus are visible in the menu bar.
3.3.4 Status bar
Fig. 8: “Status bar” screen
The status bar can be activated or deactivated in the Window menu, under
the Status bar menu item.
If it is activated, it always forms the lower border of the parameter window. It
indicates for the current selection in the table area the number of available
elements for further entries.

Commissioning
© 2006 ABB STOTZ-KONTAKT GmbH 16
ABB i-bus
®
EIB / KNX
3.3.5 File menu
Fig. 9: “File” menu
Some menu items are context-sensitive and are only activated for specific
configurations. Inactive menu items are greyed out.
3.3.5.1 Save
The parameter data is stored in the ETS3 database by selecting the Save
menu item.

Commissioning
© 2006 ABB STOTZ-KONTAKT GmbH 17
ABB i-bus
®
EIB / KNX
3.3.5.2 Export
Fig. 10: “Export” screen
By selecting the Export menu item, the time switch program is saved as a
Times Groups (*.zm2) file or in CSV format (*.csv).
Note: Files with the ending .zm2 can be imported in the
parameterisation software PZM2 and edited.
Files with the ending .csv can be imported in other programs
e.g. data processing programs or spreadsheets and edited
further.

Commissioning
© 2006 ABB STOTZ-KONTAKT GmbH 18
ABB i-bus
®
EIB / KNX
3.3.5.3 Import
Fig. 11: “Import” screen
By selecting the Import menu item, the time switch program which has been
exported from the application program or the parameterisation software PZM2
is read in as a .zm2 file.
Note: Older .zm1 files can be imported in the Application Unit Time
ABZ/S 2.1 and edited.
When importing a zm2 file into an existing ETS3 project, the parameters that
were saved in the edited project are overwritten.
When importing the .zm2 file, note that changes have possibly been carried
out to the time switch program since exporting the file.
It is strongly recommended that you back up the data in the ETS3 project
before each import.
3.3.5.4 Print
By selecting the Print menu item, parameter settings are printed out in tabular
form.

Commissioning
© 2006 ABB STOTZ-KONTAKT GmbH 19
ABB i-bus
®
EIB / KNX
3.3.5.5 View page
Fig. 12: “View page” screen
By selecting the View page menu item, the parameter assignment that is to be
printed out is shown on the screen.

Commissioning
© 2006 ABB STOTZ-KONTAKT GmbH 20
ABB i-bus
®
EIB / KNX
3.3.5.6 Filter print data
Fig. 13: “Filter print data” screen
By selecting the menu item Filter print data, those parts of the parameter
assignment which should be printed out are selected.
Type
Options: All
/
Selection
Option All = The entire configuration is printed out.
Option Selection = Only certain parts of the configuration are printed out.
Select the entries which should be printed out with the left mouse button, while
holding down the Control button [Ctrl].
“OK” button
When the “OK” button is pressed, the settings are adopted and the parameter
window closes.
“Cancel” button
When the “Cancel” button is pressed, the function is aborted and the
parameter window closes.
“Help” button
The “Help” file can be opened directly via the “Help” button and a further
parameter window Help for application program… is opened.
/