Page is loading ...

Installation Instructions for:
2012 + Jeep Wrangler 3.6L V-6
INTERCOOLED SUPERCHARGER SYSTEM
PREMIUM GASOLINE FUEL REQUIRED
PREMIUM GASOLINE FUEL REQUIRED
89-89-61-036 Rev.J
ATTENTION!
Your MAGNUSON SUPERCHARGER kit
is sensitive to corrosion!
Use only the vehicle manufacturer
recommended coolant for your engine
in the intercooler system as well.
Magnuson Superchargers
1990 Knoll Drive, Bldg A, Ventura, CA 93003
(805) 642-8833
magnusonsuperchargers.com

Magnuson Supercharger Kit
JEEP Wrangler 3.6L V-6 Engine
Please take a few moments to review this manual thoroughly before you begin work: Make a quick parts check to
make certain your kit is complete (see shipper parts list in this package). If you discover shipping damage or short-
age, please call your dealer immediately. Take a look at exactly what you are going to need in terms of tools, time,
and experience. Review our limited warranty with care. When unpacking the supercharger kit
DO NOT
DO NOT lift the
supercharger assembly by the black plastic bypass actuator. This is pre-set from the factory and can be altered if
used as a lifting point!
Caution: Relieve the fuel system pressure before servicing fuel system components in order to reduce the risk of
fi re and personal injury. After relieving the system pressure, a small amount of fuel may be released when servicing
the fuel lines or connections. In order to reduce the risk of personal injury, cover the regulator and fuel line fi ttings
with a shop towel before disconnecting. This will catch any fuel that may leak out. Place the towel in an approved
container when the job is complete.
Use only premium gasoline fuel, 91 octane or better.
Use only premium gasoline fuel, 91 octane or better.
Magnuson Superchargers recommend that you run a minimum of one (1) tank of premium fuel through your vehicle
prior to installation of the system to prevent any possible damage that may occur due to running the supercharged
engine on lower octane fuel.
Magnuson Superchargers systems are designed for engines and vehicles in “GOOD” mechanical condition. Mag-
nuson Superchargers recommend that a basic engine system “Health Check” be performed prior to the installation
of this supercharger system. Be sure to check for any pending or actual OBDII codes and fi x/repair any of the stock
systems/components causing these codes. If there are codes prior to the installation they will be there after the
installation.
Magnuson Superchargers also recommend the following services to be performed on your vehicle before starting
and running the vehicle post supercharger system installation:
• Fuel Filter change
• Engine oil and oil fi lter change using brand name oil (organic or synthetic) and fi lter
NOTE: 2012-2013 Model year kits come with cleanable 2-stage oil fi lter elements.
NOTE: 2012-2013 Model year kits come with cleanable 2-stage oil fi lter elements.
Note: It is VERY IMPORTANT to use the factory specifi ed oil viscosity. The original equipment manufacturer has
selected this grade of oil to work with your other engine systems such as hydraulic chain tensioners and variable
cam controls. Deviation from this specifi cation may cause these systems to fail or not function properly. Please refer
to your owner’s manual for the recommended oil viscosity for your engine and application.
• On newer vehicles not requiring new spark plugs it is important to verify the spark plug air gap.
On older vehicles Magnuson Superchargers recommend these additional services to be performed:
• New stock spark plugs with the air gap set at the factory specifi cations OR new specifi cations if required by
the installation manual.
• Coolant system pressure test, fl ush and refi ll.
NOTE: YOU MUST USE JEEP SPECIFIED COOLANT MIX-
NOTE: YOU MUST USE JEEP SPECIFIED COOLANT MIX-
TURE!
TURE!
WARNING:
WARNING: Non “Magnuson Approved” calibrations or “tuning” will Void ALL warranties and CARB certifi cation.
Safety glasses
Stock spark plugs and stock plug gap is recommended
Drive belt = Gates K061120
NOTE: High altitude kits come with smaller pulley and Gates K06115 belt.
NOTE: High altitude kits come with smaller pulley and Gates K06115 belt.
Tools Required:
Metric wrench set
¼” - 3/8” and ½” drive metric socket set (Standard & Deep)
3/8”and ½” drive Foot pound and inch pound torque wrenches
Phillips and fl at head screwdrivers
Hose cutters, Tree Clip Removal Tool
Hose Clamp pliers, Telescoping Magnet
Metric Allen socket set 3/8” drive
Shop vacuum cleaner
Blue Loctite 242


1.
Prior to beginning the installation
Prior to beginning the installation
of your supercharger system we
of your supercharger system we
recommend that you schedule
recommend that you schedule
your vehicle at the dealership
your vehicle at the dealership
to have the most recent stock
to have the most recent stock
calibration loaded. This
calibration loaded. This
MUST
MUST
be done before proceeding any
be done before proceeding any
further.
further.
3.
Your supercharger system is
Your supercharger system is
sensitive to corrosion. Use only
sensitive to corrosion. Use only
the OEM recommended coolant
the OEM recommended coolant
mixture for your supercharger
mixture for your supercharger
system as well as your engine.
system as well as your engine.
NOTES: For the purpose of
NOTES: For the purpose of
these instructions, all refer-
these instructions, all refer-
ences to left hand side or
ences to left hand side or
right hand side shall be inter-
right hand side shall be inter-
preted as if being seated in
preted as if being seated in
the driver seat of the vehicle.
the driver seat of the vehicle.
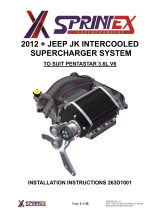
2. Open up the supplied
programmer package and
follow the instructions for
programming the vehicle prior
to disconnecting the battery
and beginning the installation
of the supercharger system.
This
This
MUST
MUST
be done before
be done before
proceeding any further to insure
proceeding any further to insure
that you have all the benefi ts
that you have all the benefi ts
of the latest level of updated
of the latest level of updated
software from the manufacturer.
software from the manufacturer.
The handheld tuner may not
look like the one shown.
2012 + Jeep Wrangler 3.6L V-6
4/7
4
www.magnusonsuperchargers.com

4.
It is IMPORTANT to utilize 91
It is IMPORTANT to utilize 91
Octane gasoline or better with
Octane gasoline or better with
your supercharger system.
your supercharger system.
Before starting this installation,
Before starting this installation,
on an empty tank, fi ll your tank
on an empty tank, fi ll your tank
to full with 91 Octane gasoline
to full with 91 Octane gasoline
or better.
or better.
Never add Octane
Never add Octane
booster to your fuel. If you have
booster to your fuel. If you have
used Octane Booster in the past,
used Octane Booster in the past,
replace your spark plugs and
replace your spark plugs and
check your O2 sensor before
check your O2 sensor before
completing your supercharger
completing your supercharger
install.
install.
5. Remove the gas cap to relieve
gas tank pressure.
6. Locate the fuse box in the engine
bay.
2012 + Jeep Wrangler 3.6L V-6
4/7
5
www.magnusonsuperchargers.com

7. Remove the # 37 - 10A fuse
labeled “ABS, Fuel Pump
Relay, Sway Bar” using the fuse
removal tool in the fuse box.
8. Start your vehicle to bleed off
any residual pressure in your
fuel line, run the vehicle until it
dies, then try to start a couple
more times just to be sure there
is no more pressure in the fuel
line.
9. Remove the negative battery
terminal using a 10mm wrench.
Slide the battery cable out of the
way and apply some insulation
material like tape to it so that it
cannot make accidental contact
with the battery terminal.
2012 + Jeep Wrangler 3.6L V-6
4/7
6
www.magnusonsuperchargers.com

10. Pull up on the engine cover to
remove from the vehicle. This
will not be reused but you
may want to have these parts
available to return to factory
condition.
11.
NOTE: For model years 2012-
NOTE: For model years 2012-
2013 follow the next 6 oil fi lter
2013 follow the next 6 oil fi lter
steps. For model years 2014+
steps. For model years 2014+
skip these steps.
skip these steps. Use a 24mm
socket to loosen the oil fi lter
casing lid. This is spring loaded,
and loosening the cap allows the
oil to drain down into the engine
from the fi lter.
NOTE: Model
NOTE: Model
years 2012-13 see additional
years 2012-13 see additional
note at end of instructions.
note at end of instructions.
12. After a couple of minutes, pull
up on the casing and remove
the existing fi lter element which
will be snapped into the cap.
2012 + Jeep Wrangler 3.6L V-6
4/7
7
www.magnusonsuperchargers.com

13. Pull the cap off the OEM fi lter
element.
14. This shows the provided new two
piece fi lter element orientation.
Notice that the element with
Notice that the element with
no extrusion has an attached
no extrusion has an attached
rubber gasket.
rubber gasket. This gasket
points up and rests between the
two halves of the split fi lter. The
other element has the extrusion
pointed up.
15. Place a thin fi lm of new oil on
the lower fi lter element gasket
and slide into the oil fi lter casing
on the engine with the gasket
pointing up.
2012 + Jeep Wrangler 3.6L V-6
4/7
8
www.magnusonsuperchargers.com

16. The upper fi lter element with
the extrusion gets pressed into
the oil fi lter casing cap with
the extrusion going into the
cap. This will “snap” into place
holding the element to the cap.
17. Replace the oil fi lter casing
cap onto the fi lter housing and
torque to 18 ft-lbs using a 24mm
socket.
18. Use a tree clip removal tool to
remove the two tree connectors
that hold the manifold insulation
to the back of the upper intake
manifold.
2012 + Jeep Wrangler 3.6L V-6
4/7
9
www.magnusonsuperchargers.com

19. Use a 10mm wrench to remove
the two plastic fasteners and
brackets below the manifold
insulation at the back of the
upper intake manifold. Remove
these brackets.
20. Pull the insulation away from
the manifold.
21. Disconnect the windshield
washer tube from its connector
on the left side of the fi rewall
2012 + Jeep Wrangler 3.6L V-6
4/7
10
www.magnusonsuperchargers.com

22. We found it easiest to install
the supercharger with the
hood resting against the roof.
Carefully lift the hood back
against the top of the window
frame Using the insulation
removed two steps ago as a
buff er between the hood and
the roof as shown
23. Pull the radiator overfl ow hose
from the clamps at the front
of the air intake tube. Use a
10mm socket to remove the two
air box mounting fasteners.
24. Use an 8mm socket to loosen
the throttle body mounting
clamp at the air tube to throttle
body connection.
2012 + Jeep Wrangler 3.6L V-6
4/7
11
www.magnusonsuperchargers.com

25. Use an 8mm socket to loosen
the air tube mounting clamp at
the air box.
26. Disconnect the IAT electrical
connection leaving the OEM
IAT sensor in place.
IAT Sensor
IAT Sensor
IAT Plug
IAT Plug
27. Carefully pull the air tube off the
throttle body and air box. Set
aside for later reinstall.
2012 + Jeep Wrangler 3.6L V-6
4/7
12
www.magnusonsuperchargers.com

28. Pull the vacuum hose from the
side wall hose barb on the air
box.
29. Pull up on the air box to remove
the assembly from the vehicle.
Set aside for later reinstall.
30. Disconnect the harness clip
from the tab/boss on the throttle
body. Pull out on the red throttle
body control locking pin, and
then press down on the exposed
end to release the plug from the
throttle body.
T.B. Plug
T.B. Plug
Clip mount
Clip mount
2012 + Jeep Wrangler 3.6L V-6
4/7
13
www.magnusonsuperchargers.com

31. Use an 8mm socket to remove
the four throttle body mounting
bolts. Carefully wipe the throttle
body clean and store in a safe
place for reinstallation later
during the supercharger the
install.
32. Use a tree clip removal tool
to remove the tree connector
holding the wire harness to the
left side-upper intake manifold
connector near the throttle body
mounting location.
33. Disconnect the Manifold
Absolute Pressure (MAP)
sensor from the left side upper
intake manifold, near the
throttle body mounting location
by pressing the release tab and
pulling free.
2012 + Jeep Wrangler 3.6L V-6
4/7
14
www.magnusonsuperchargers.com

34. Remove the harness mounting
“tree” clip from the forward,
upper intake manifold mounting
bracket.
35. Remove the harness mounting
“tree” clip from the back of the
upper intake manifold mounting
bracket.
36. Use a 10mm wrench to remove
the four upper intake manifold
mounting bracket fasteners from
the left hand side of the engine.
Two are at the forward bracket
and two at the rear bracket.
2012 + Jeep Wrangler 3.6L V-6
4/7
15
www.magnusonsuperchargers.com

37. Use a 10mm socket to remove
the two bolts holding the
mounting bracket to the front
of the engine on the left hand
side. Pull the bracket out of the
engine and set aside, this will
not be reused. Again put this
part aside if you intend to ever
return your vehicle to factory
condition.
38. Pull the EVAP hose and the
PCV hose off the hose barbs on
the front-right side of the upper
intake manifold.
39. Pull the brake booster vacuum
hose from the front-left side of
the upper intake manifold.
2012 + Jeep Wrangler 3.6L V-6
4/7
16
www.magnusonsuperchargers.com

40. Disconnect the vacuum tubes
on the right side of the upper
intake manifold from their
molded retaining slots.
41. Remove the PCV vacuum tubes
connected to the back of the
valve covers from the vehicle.
The left hand side PCV tube
will be reused and components
of the right hand side PCV tube
will be reused. If it’s diffi cult at
this time to remove the tubes
completely, it’s helpful to tuck
the tubes up out of the way by
securing to the cross deck wiring
harness using the provided zip
ties.
42. Using the tree clip removal tool
carefully pry up on the base of
the right hand side main wiring
harness connector to release
the two mounting tree clips from
the bracket below.
2012 + Jeep Wrangler 3.6L V-6
4/7
17
www.magnusonsuperchargers.com

43. Use a 10mm socket to remove
the fasteners holding the right
hand side heater tube/wiring
harness bracket to the engine.
Two bolts are closest to the
intake manifold, two nuts are
holding the heater tubes to the
bracket, and two other nuts are
near the base of the valve cover,
between the battery-box and
where the bracket bends down
toward the exhaust manifold.
(see next step)
44. This picture shows the engine
out of a vehicle for clarity and
illustrates the location of the two
lowest bracket mounting nuts.
45. Carefully remove the tree clip
from the rear of the bracket
using a tree clip removal tool.
2012 + Jeep Wrangler 3.6L V-6
4/7
18
www.magnusonsuperchargers.com

46. Carefully remove the tree clip
from the front edge of the bracket
using a tree clip removal tool.
47. Lift up on the heater lines, slide
the bracket down toward the
exhaust manifold and remove
the bracket from the vehicle.
This bracket will not be reused,
store it in a safe place if you
intend to return the vehicle to
stock at a later date.
48. Place the provided mounting
bracket down toward the
exhaust manifold and slide it
up and under the heater lines.
Reconnect the bracket to the
studs near the base of the valve
cover and secure with a 10mm
socket.
DO NOT reconnect the
DO NOT reconnect the
heater hard-lines to the studs
heater hard-lines to the studs
on the new mounting bracket
on the new mounting bracket
with the OEM nuts at this
with the OEM nuts at this
time.
time. Reconnect the two tree
connectors to the holes on the
new bracket. Install the provided
1/2”OD x 1/4”ID x 3/16” spacers
over the studs shown with red
arrows.
2012 + Jeep Wrangler 3.6L V-6
4/7
19
www.magnusonsuperchargers.com

49. Carefully use a tree clip removal
tool to disconnect the two tree
connectors holding the main
wiring harness to the back,
right-hand side upper intake
manifold.
50. Use an 8mm socket to remove
the seven intake manifold
mounting fasteners. Three are
on the top, and four are at the
base of the intake manifold. Pull
up and twist the upper mounting
bolts counter-clockwise to have
the bolts held in the extended
position.
51. Lift up on the right hand side
of the upper intake manifold
then slide the assembly to the
right while lifting to remove the
assembly from the vehicle.
2012 + Jeep Wrangler 3.6L V-6
4/7
20
www.magnusonsuperchargers.com
/