Page is loading ...

1333 KIPP ROAD NANAIMO B.C.
Installation Manual
System #V900070
Ford 2003.25 – 2004
6.0L Power Stroke Diesel
Without Dual Alternators
V9X 1R3
TEL: (250)-740-3200
FAX: (250)-740-3201
www. .comunderhoodair
Visit us at...
TM

Installation Manual – Document Number: 1930008
VR70 Underhood Air Compressor: System Number V900070
Application:
Ford 2003.25 - 2004
6.0L Power Stroke Diesel
F250 – F550 Super Duty without dual alternators
Publication Date:
December 30, 2003
Registered Trademarks:
VR70 and VMAC are registered trademarks of VMAC.
Loctite, Kleen N’ Prime, 242 and PST are registered trademarks of Loctite
Corporation.
Nylok is a registered trademark of Nylok Fastener Corporation.
Notice:
Manuals and products are subject to change without notice.
Copyright 2004
The contents of this manual may not be reproduced in any form without the express written
permission of VMAC
Printed in Canada

Contents
General Information............................................................................................................3
Introduction........................................................................................................................5
Terms and Symbols ...........................................................................................................5
Installation Notes ...............................................................................................................5
Torque Specifications ........................................................................................................6
Hose Coding ......................................................................................................................6
Ordering parts ....................................................................................................................6
Warranty ............................................................................................................................7
System Identification Number Plate..................................................................................7
Tool Requirements.............................................................................................................7
Special Installation Notes ..................................................................................................8
Part 1 Preparing for Installation.......................................................................................9
1.1 Preparing for installation .............................................................................................10
Part 2 Installing the Tank and Lines ...............................................................................15
2.1 Installing the oil/air separator tank and brackets .........................................................16
2.2 Connecting the hoses to the tank .................................................................................20
Part 3 Installing the Compressor and Oil Cooler ..........................................................21
3.1 Installing the crank pulley............................................................................................22
3.2 Installing the oil cooler ................................................................................................22
3.3 Connecting the cooler hoses ........................................................................................23
3.4 Installing the main bracket...........................................................................................25
3.5 Installing the compressor.............................................................................................27
3.6 Completing the installation..........................................................................................31
3.7 Adding oil to the system ..............................................................................................35
Part 4 Installing the Control Components........................................................................37
4.1 Installing the control panel ..........................................................................................39
4.2 Installing the throttle control........................................................................................40
4.3 Connecting the wiring..................................................................................................40
4.5 Connecting the safety circuit .......................................................................................42
4.6 Completing and testing the installation .......................................................................46
Appendix A – Soldering ....................................................................................................47
Part 6 Illustrated Parts List ...............................................................................................49
Warranty Registration ........................................................................................................53
1

2

General Information
SYSTEM V900070
FORD 2003.25 – 2004
6.0L POWERSTROKE DIESEL
F250 – F550 SUPERDUTY
without DUAL ALTERNATORS
UNDERHOOD AIR COMPRESSOR
3

4

Introduction
This book provides installation instructions for the VR70 Underhood Air Compressor.
The information in this book should be read completely before attempting installation.
Terms and Symbols
This manual uses the following terms and symbols:
• DDC - Drive Disable Circuit
• ft.-lbs - Foot Pounds (torque)
• OEM - Original Equipment Manufacturer
• Hex - Hexagon (six sided)
This symbol indicates that there is a possibility of personal injury or damage to
the equipment if the indicated warning is not followed.
!
This symbol indicates that there is additional information or special emphasis
on a specific procedure.
Installation Notes
It is important that you complete all the installation steps before operating the system.
Follow all safety precautions for underhood mechanical work.
Use Loctite 242 or equivalent on all engine-mounted fasteners.
All hoses, tubes and wires which are rerouted or moved during installation must be
secured so that they do not contact excessively hot areas or sharp edges. Where possible,
follow the routing suggestions in this manual.
These installation instructions are intended as a general guide. In some instances, due to
variations in vehicle manufacture or if prior modifications have been made to the vehicle,
it may be necessary to carry out grinding, bending or rearranging operations for correct
fit. These operations MUST follow sound, standard shop practices.
Left and right definitions in this manual are determined when sitting in the driver’s seat,
facing forward.
All fasteners must be of the correct size and torqued according to the specifications
shown in the following tables. Always use manufacturers torque values for OEM
fasteners.
5

Torque Specifications
Torque values are applicable when Loctite is applied, unless otherwise specified.
STANDARD GRADE 8 NATIONAL COARSE THREAD
Size 1/4 5/16 3/8 7/16 1/2 9/16 5/8 3/4
Foot-pounds (ft-lb) 9 18 35 55 80 110 170 280
Newton meter (N•m) 12 24 47 74 108 149 230 379
STANDARD GRADE 8 NATIONAL FINE THREAD
Size 3/8 7/16 1/2 5/8 3/4
Foot-pounds (ft-lb) 40 60 90 180 320
Newton meter (N•m) 54 81 122 244 434
METRIC CLASS 10.9
Size M8 M10 M12 M14 M16
Foot-pounds (ft-lb) 19 41 69 104 174
Newton meter (N•m) 25 55 93 141 236
Hose Coding
Different frame designations will affect the tank mounting position. You may have to
move the tank rearward from the standard position on your application, so the lines may
be too short. If this is the case, measure the hose shortfall and order a Hose Extender
Kit.
The following table shows the color code used by VMAC to define the different hose
diameters.
Hose Diameter Color-Coded Label
1/4 inch
5/16 inch
1/2 inch
5/8 inch
3/4 inch
1 inch
Yellow
Orange
Blue
Blue
Green
Green
Ordering parts
To order parts, contact your VMAC dealer. Please quote the VMAC part number, the
description and the quantity.
6

Warranty
The VMAC warranty form is located at the back of this manual. This warranty form
must be completed and mailed or faxed to VMAC at the time of installation for any
subsequent warranty claim to be considered valid.
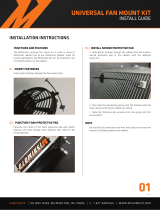
System Identification Number Plate
The enclosed System Identification Number Plate must be attached to the vehicle at the
time of installation. This plate provides information which allows VMAC to assist in
customer inquiries and the ordering of parts. Use the plate as a template to drill two 7/64
inch holes. Secure the plate with two supplied #6 pan head self-tapping screws (Figure 1).
Figure 1 System identification number plate
Tool Requirements
The following tools are required for compressor installation:
• metric socket set, 1/2 inch drive
• SAE socket set, 1/2 inch drive
• metric wrench set, 8 to 24 mm
• SAE wrench set, 7/16 to 7/8 inch
• Allen key sets, metric and SAE
• assorted screwdrivers
• nut drivers, 5/16 and 3/8 inch
• drill, 1/2 inch, with assorted bits up to 1/2 inch
• hacksaw or zip wheel suitable for cutting metal
• OEM fan wrench tool
• VMAC pipe bending tool part #5900083
The following tools are required for throttle component installation:
• small soldering gun or soldering pen
• wire cutters
7

• wire strippers
• crimping tool
• digital multi-meter
• small screwdriver set for adjustment of the throttle control
Special Installation Notes
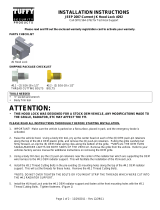
If you intend to use an auxiliary air receiver with this system you must observe the
following installation procedure as shown below.
Failure to observe this procedure will result in damage to the system.
!
The line from the VR70 tank to the auxiliary air receiver must have a one-way check
valve installed to prevent blow back from the auxiliary tank to stop moisture from
entering the VR70 tank.
The line to the auxiliary tank must not be installed in the bottom of the tank, but must be
installed as high as possible to prevent water from entering the line (Figure 2).
Install the line as high as
possible, NOT on the
bottom of the auxiliary tank
VR Tank
One-way check valve
A
uxiliary Tank
Figure 2 Proper line placement
8

Part 1
Preparing for Installation
SYSTEM #V900070
FORD 2003.25 - 2004
6.0L POWER STROKE DIESEL
F250 – F550 SUPERDUTY
WITHOUT DUAL ALTERNATORS
UNDERHOOD AIR COMPRESSOR
9

1.1 Preparing for installation
1. Disconnect the negative terminals on both batteries, then the positive terminals.
2. Remove the plastic cover on the driver side battery and white cable anchor, then
remove both batteries from the vehicle.
3. Remove the air filter assembly and the rear air filter to turbo connecting pipe at
the same time. Pull the front section of the air cleaner forward and disconnect the
air flow sensor connection.
4. Remove the air deflector from the upper section of the fan shroud. Keep this part
if the vehicle will returned to original condition.
5. Drain the engine coolant.
6. Remove the upper radiator hose.
7. Disconnect the coolant tank expansion hose from the top of the radiator.
8. Remove the lower radiator hose.
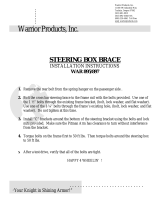
9. Locate the molded lines on both sides of the upper fan shroud, about 6 inches
down from the top. Using a saber saw or hack saw blade, cut the plastic shroud
between these lines to separate the upper and lower fan shrouds (Figure 2.1).
Rubber insulator seal
Figure 2.1
10

10. Remove the upper section of the fan shroud by levering the shroud backwards to
clear the front radiator upper section. When lifting out the upper section of the fan
shroud the passenger side comes up with the rubber insulator seal. Remove the
Power Stroke decal.
11. Remove the lower fan shroud section.
12. Locate and remove the five M10 bolts securing the rear fan stator (large plastic
section with cooling fins behind the fan) to the front of the engine. Remove the
two bottom bolts from under the vehicle. Leave the fan stator in place. Keep one
of the bolts.
Place a thin sheet of cardboard against the radiator to protect the cooling fins.
13. Remove the plastic section holding the fan clutch wiring harness on the fan
shroud and disconnect the wiring plug connector.
14. Using the recommended fan wrench tool, remove the fan (right hand thread).
15. Lift out the fan and stator together. Keep the stator if the vehicle will be returned
to original condition.
16. Remove the 8-rib serpentine belt and the belt tensioner.
17. Remove the intercooler tube from the passenger side and keep all of the 2-1/2
inch clamps. Discard the intercooler tube, silicone 3-1/4 inch ID intercooler
connecting tube from the radiator and the two larger T-bolt clamps.
18. Disconnect the two glow plug relay connectors on the passengers side valve cover
and remove the glow plugs relay module with its mounting bracket from the valve
cover.
19. Remove the module nuts that secure the glow plug relays to the mounting bracket,
remove the relay module and discard the bracket.
20. Undo the M6 bolt locating the steel heater return pipe to the front of the engine
and remove the pipe complete with rubber O-ring. Keep the O-ring, disconnect
the steel pipe from the rubber hose and discard the pipe.
21. Carefully bend the 3/4 inch forward-facing air conditioning aluminum pipe out
towards the passenger side fender until the pipe is 9-3/4 inches from the inside lip
of the fender rain channel (Figure 2.2). This operation is not necessary on 2004.5
MY vehicles on.
11

Figure 2.2
To prevent crimping or fracture of the pipe, use a pipe bending tool or bend the
pipe in very small increments. A pipe bending tool is available from VMAC
(Figure 2.3). Do not allow the base of the pipe to twist in the canister.
!
Figure 2.3
22. Move the lower aluminum air conditioning line (with the recharge valve) that runs
to the air conditioning condenser 1 inch towards the inner fender liner (Figure
2.4). Move both metal air conditioning lines on each side of the rubber section of
the line.
12

23. Bend the horizontal tab on the passenger side battery tray, upward to the vertical
position to provide clearance for the new intercooler tube rubber elbow under the
front of the vehicle (Figure 2.4).
Bend the battery tab up
Bend the air conditioning line
Figure 2.4
24. Remove the combined bolt/stud on the front of the valve cover just below and
slightly back from the passenger side of the alternator. Cut off the threaded upper
section and install the modified bolt.
25. Remove the padded sound proofing liner on the underside of the engine hood. Cut
an oval shaped section out of the liner (Figure 2.5) to provide clearance for the
intercooler tube. In 2004.5 MY vehicles on in some instances the hood liner has
been removed.
13

Cut out this section
Figure 2.5
26. Remove the cross-member under the radiator immediately behind the front air
dam and keep the cross-member.
14

Part 2
Installing the Tank and Lines
SYSTEM # V900070
FORD 2003.25 - 2004
6.0L POWER STROKE DIESEL
F250 – F550 SUPERDUTY
WITHOUT DUAL ALTERNATORS
UNDERHOOD AIR COMPRESSOR
15

2.1 Installing the oil/air separator tank and brackets
1. Clean the passenger side of the frame between the two body-mounts so that the
brackets will mount correctly.
2. Remove the pinch bolts from the C-clamps and expand the clamps just enough so
that you can slide them over the front of the tank.
3. Set the flat edges of the C-clamps on a workbench and rotate the tank so that the
flat mounting surfaces are on the right side of the tank, as viewed from the front
of the tank (Figure 2.2).
Figure 2.2
4. Insert the pinch bolt from the top, then install the washer and nut on the bottom,
but do not tighten.
5. Thread the fittings on the 1/4 and 5/16 inch steel tubes into the matching fittings
on the rear of the tank. Tighten the fittings by hand, but leave them loose enough
so that the tubes can move in the fittings.
6. Place the two small insulated double-tube clips (P-clips) over the tubes with the
flat side facing away from the tank and the end with the hole hanging down.
Position the 1/4 inch steel tube above the 5/16 inch tube.
7. Place an L-shaped tank bracket (Figure 2.5) against one of the C-clamps on the
tank with the short arm of the “L” at the top of the tank, facing away from the
tank. Apply Loctite and install a 5/16 x 1/2 inch hex head bolt with flat washer
into the bottom hole on the bracket. Do not tighten.
16

L-bracket
Frame mount U-clip
Spacer (F250-F350 only)
5/16” nuts
Wire Cable
C-clamp
mounting screws
Tube Clamp
Figure 2.5
8. Apply Loctite and install the second hex head bolt through one of the small
insulated P-clips and install it through the top hole in the C-clamp and into the top
hole on the L-bracket. Do not tighten. Repeat this procedure with the second L-
bracket, C-clamp and P-clip.
9. Make sure that the tubes are parallel to the tank and fit properly in the clips
(Figure 2.6).
Figure 2.6
17

10. Insert the cable straps through the tube of the upper frame locating clips then pass
the cable between the cab body and the frame from the inside, behind the
transmission cross-member, with the cable on the outside of the frame. Remove
some of the insulation between the frame rail and the floor panel to allow a good
fit for the front clip.
A wider U-clip is provided to accommodate vehicles where the tank must be
mounted on a double frame section.
11. Support the tank and L-bracket assembly in place on the outside of the frame,
with the short part of the L-bracket positioned over the top of the frame and pass
each cable strap around the L-bracket, between the C-clamp and the tank (Figure
2.7). Make sure that the cable rests in the grooves on the L-bracket.
Figure 2.7
12. Insert the threaded end of each cable strap through the tubes on the lower frame
locating U-clips.
13. Install the appropriate spacers and tighten the nuts enough to hold the tank in
position:
• F250 & F350 – 1/8 inch thick 5/16 × 3/4 inch washers, the 1/2 x 2 inch
spacer and the 5/16 inch nuts
• F450 & F550 – 1/8 inch thick 5/16 x 3/4 inch washers and the 5/16 inch
nuts. Discard the 1/2 x 2 inch spacer.
13. Refer to the frame application diagram (Figure 2.8) to position the tank correctly.
18
/