3M DBI-SALA® ExoFit NEX™ Rope Access/Rescue Harness Operating instructions

Type
Operating instructions
Figure 1 - ExoFit NEX™ Full Body Suspension Harness
A
B
B
C
C
D
D
E
D
D
A. Shoulder Strap w/Hybrid Padding B. Duo-Lok™ Quick Connect Buckle C. Tech-Lite™ Side, Front and Pelvic D-Rings
D. Leg [Suspension] Strap E. Tech-Lite™ Dorsal D-Ring
© Copyright 2012, DB Industries, Inc.
ExoFit NEx™ Full Body SuSpENSioN HarNESS
uSEr iNStructioN SupplEmENt
Form: 5903428 Rev:D
Approved by the
National Fire Protection Association
Use this Supplemental Instruction with the
ExoFit NEX User Instruction Manual 5903027.
This supplement includes information for the
following sections: 1.0 Application, 2.0 System
Limitations and Requirements, 3.0 Donning
and Use, 7.0 Specications, and 8.0 Labels.
ExoFit NEX™
Full Body Suspension Harness
Model Numbers:
1113283 1113283C
1113284 1113284C
1113289 1113289C
1113304 1113304C
1113348 1113348C
1113370 1113370C
1113371 1113371C
1113372 1113372C
1113373 1113373C
1113557 1113557C
1113558 1113558C
1113559 1113559C
1113560 1113560C
1113561 1113561C
1113562 1113562C
1113563 1113563C
1113564 1113564C
1113565 1113565C
1113566 1113566C
1113567 1113567C
1113568 1113568C
1113569 1113569C
1113570 1113570C
1113571 1113571C
1113572 1113572C
1113573 1113573C
1113574 1113574C
1113575 1113575C
1113576 1113576C
1113577 1113577C
1113578 1113578C
1113579 1113579C
1113580 1113580C
1113590 1113590C
1113591 1113591C
1113644 1113644C
1113645 1113645C
1113646 1113646C
1113647 1113647C
1113648 1113648C
1113649 1113649C
1113650 1113650C
1113651 1113651C
1113652 1113652C
1113653 1113653C
1113654 1113654C
1113655 1113655C
1113656 1113656C
1113657 1113657C
1113658 1113658C
1113659 1113659C
1113660 1113660C
1113661 1113661C
1113662 1113662C
1113663 1113663C
1113664 1113664C
1113665 1113665C
1113666 1113666C
1113667 1113667C
1113668 1113668C
1113669 1113669C
1113699C 1113700C
1113701C 1113702C
1114000 1114000H
1114001 1114001H
1114002 1114002H
1114003 1114003H
1114004 1114004H
1114005 1114005H
1114006 1114006H
1114007 1114007H
1114008 1114008H
1114009 1114009H
1114010 1114010H
1114011 1114011H
1114012 1114012H
1114013 1114013H
1114014 1114014H
1114030 1114031
1114032 1114033
1114034 1114035
1114036 1114037
The Ultimate in Fall Protection
Permanently retain this Supplemental
Instruction and the ExoFit NEX User
Instruction Manual 5903027. Keep a copy of
both Instructions with the ExoFit NEX harness.
2
1.0 application
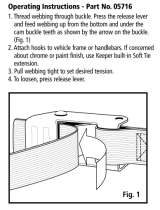
1.1.1 PURPOSE: Suspension harness used for Fall
Arrest (D-Ring connections A, Figure 2) and Work
Positioning (D-Ring connections B, Figure 2).
1.2.1 STANDARDS: Refer to life safety harness
information found in NFPA 1500, Standard on
Fire Department Occupational Safety and Health
Program, and NFPA 1983, Standard on Life Safety
Rope and Equipment for Emergency Services.
Figure 2 - Applications
A
A
B
2.0 system limitations & RequiRments
2.7.1 ENVIRONMENTAL HAZARDS: Do not expose the harness to flame or high temperature. Such exposure
could cause the harness to melt or burn and fail during use. Harnesses that meet the optional flame
resistance requirements specified in NFPA 1983 are designed for use in environments where exposure to
flame or high temperature could occur.
3.0 Donning anD use
3.9 DONNING AND FITTING THE SUSPENSION HARNESS: The ExoFit NEX™ Suspension Harness includes
leg straps for work positioning. Don the Full Body Suspension Harness using the following steps and the
corresponding images in Figure 3.
Step 1. Locate the front of the harness. The front has two D-rings. Lift up the harness and hold by the
shoulder straps. Ensure all straps are not twisted.
Step 2. With the front of the harness facing forward, step through the right side of the harness with
your right leg. Then, step through the left side of the harness with your left leg.
Grasp the right
shoulder strap and place it on the top of your right shoulder. Ensure that the straps are not
tangled and hang freely.
Step 3. Grasp the left shoulder strap and place it over your left shoulder.
The two D-rings will be
positioned on the front of your body if the harness has been donned properly.
Step 4. Grasp the tab of the buckle located at the bottom of the strap that you placed over your left
shoulder. Insert the tab into the receptor of the quick connect buckle on the left side of the
harness. You will hear a click when the tab engages properly.
note: Locking and unlocking the webbing lock prevents or allows the strap to slide
between the sliding bar and slot on the female end of the quick connect buckle. It does
not control engagement or disengagement of the buckle ends and will not affect the buckle
connection in the event of a fall.
Step 5. Grasp the waist-level strap ends on right and left sides of the harness. Pull both ends forward
until all slack is removed from the waist strap and the strap is comfortably tight around your
waist. Insert strap ends into the waist strap keeper loops on the right and left sides of the
harness.
Step 6. Reach between your legs and grasp the leg strap on your right side. Bring the strap up and
insert the tab of the buckle into the receptor of the buckle on the right side. You will hear a click
when the tab engages properly.
Step 7. Connect the right leg strap using the same procedure as in Step 6. To adjust the leg straps,
unlock
the webbing lock on the quick connect buckle and pull on the strap. A plastic end
keeper on the end of the strap will stop it from pulling completely out of the buckle. When the
strap is properly adjusted, lock
the webbing lock.
To release the buckle, press the silver-colored
tabs on the buckle towards each other with one hand, while pulling on the tab portion of the
buckle with the other hand.
Step 8. Adjustshoulderstrapstoasnugtusingthestrapadjustmentproceduredescribedbetween
Steps 4 and Step 5 on the following page. Left and right sides of the shoulder straps should be
adjusted to the same length and the upper front D-ring should be centered on your lower chest.
The back D-ring should be centered between your shoulder blades. Adjust the leg straps to a
snugt.Atleast3in.(8cm)ofwebbingmustextendpastthebuckleonthelegstraps.Adjust
thewaistbeltagainasnecessaryforasecure,comfortablet.
3
Figure 3 - Donning Suspension Harness
Step 1
Step 2
Step 3
Step 4
Duo-Lok™ Quick Connect Buckles
Connection: Connect buckle ends by inserting
the tab into the receptor until a click is heard.
Strap Adjustment: Rotate Webbing Lock
to unlocked position . Pull strap to adjust.
Rotate Webbing Lock to locked position .
note: The Webbing Lock does not control
engagement or disengagement of the buckle ends.
Step 5
Step 6 Step 7 Step 8
4
3.10 DONNING AND FITTING THE FIRE AND RESCUE HARNESS. The Fire and Rescue Harness can be used
for work positioning or for rescue worker applications. The Class II harness assembly must be donned
appropriatelyforthespecicapplication.AftertheClassIIharnesshasbeendonnedforworkpositioning
or for rescue, the Class III portion of the harness can be donned. See Section 3.11 for work positioning,
Section 3.12 for rescue and 3.13 for the shoulder straps.
waRning: The Fire and Rescue Harness meets the requirements of NFPA 1983, Standard on Life
Safety Rope and Equipment for Emergency Services, 2012 Editions, and the Optional Flame Resistance
Requirements of NFPA 1983, Class II. When used in conjunction with DBI/SALA part numbers 1114000,
1114000H, 1114001, 1114001H 1114002, or 1114002H, the Fire and Rescue Harness meets the
requirements of Class III but IS NOT FLAME RESISTANT. See Harness labels 5909121 and 5909122.
3.11 FIRE AND RESCUE CLASS II HARNESS DONNING FOR WORK POSITIONING: The ExoFit NEX™ Fire
and Rescue Harness includes leg straps that permit the harness to be used for work positioning. To configure
the harness for work positioning, follow Figure 4, Steps 1 through 5, to fit the leg straps to the user. Follow
the steps in Figure 6 to convert the harness to Class III.
Figure 4 - Fire And Rescue Harness Belt Donning For Work Positioning
Work Positioning, Step 1
Work Positioning, Step 2
Work Positioning, Step 3
Work Positioning, Step 4 Work Positioning, Step 5
Proceed to Figure 6, steps 1 - 6
Figure 4
Step 1. Suspend the harness by holding each end. D-Rings and the carabiner should be facing forward.
Ensure all straps are not twisted.
Step 2. Grasp the quick connect buckle at the end of the web belt and bring it around your waist so that
the buckle is just behind your left hip
.
Lock the tab located at the opposite end of the web belt
into the quick connect buckle. You will hear a click when the tab engages properly.
Step 3. Grasp the quick connect buckle located at the bottom of the strap that is hanging nearest your
left leg. Bring that quick connect buckle around the back of your left leg. Lock the tab located
at the end of the short web strap on your left hip into the quick connect buckle. You will hear a
click when the tab engages properly.
Step 4. Grasp the quick connect buckle located at the bottom of the strap that is hanging nearest your
right leg. Bring that quick connect buckle around the back of your right leg. Lock
the tab
located at the end of the short web strap on your right hip into the quick connect buckle. You
will hear a click when the tab engages properly.
note: Locking and unlocking the webbing lock prevents or allows the strap to slide
between the sliding bar and slot on the female end of the quick connect buckle. It does
not control engagement or disengagement of the buckle ends and will not affect the
buckle connection in the event of a fall.
5
Step 5. Grasp the waist-level strap ends on right and left sides of the harness. Pull both ends forward
until all slack is removed from the waist strap and the strap is comfortably tight around your
waist. Insert strap ends into the waist strap keeper loops on the right and left sides of the
harness.
3.12 FIRE AND RESCUE CLASS II HARNESS DONNING FOR RESCUE: The ExoFit NEX™ Fire and Rescue
Harness includes leg straps that permit the harness to be used for rescue work. To configure the harness for
rescue, follow Figure 5, Steps 1 through 5, to fit the leg straps to the user. Follow the steps in Figure 6 to
convert the harness to Class III.
Figure 5 - Fire And Rescue Harness Belt Donning For Rescue
Rescue, Step 1
Rescue, Step 2 Rescue, Step 3
Rescue, Step 4
Rescue, Step 5
Proceed to Figure 6, steps 1 - 6
Figure 5
Step 1. Suspend the harness by holding each end. D-Rings and the carabiner should be facing forward.
Ensure all straps are not twisted.
Step 2. Grasp the quick connect buckle at the end of the web belt and bring it around your waist so that
the buckle is just behind your left hip
.
Lock the tab located at the opposite end of the web belt
into the quick connect buckle. You will hear a click when the tab engages properly.
Step 3. Reach between your legs and grasp the leg strap on your left side. Bring the strap up around the
back of your left leg. Insert the tab on the strap handing from the left side of the belt into the
quick connect buckle of the strap. You will hear a click when the tab engages properly.
Step 4. Reach between your legs and grasp the leg strap on your right side. Bring the strap up around
the back of your right leg. Insert the tab on the strap handing from the right side of the belt into
the quick connect buckle of the strap. You will hear a click when the tab engages properly.
To adjust the leg straps, unlock
the webbing lock on the quick connect buckle and pull on the
strap. A plastic end keeper on the end of the strap will stop it from pulling completely out of
the buckle. When the strap is properly adjusted, lock
the webbing lock.
To release the buckle,
press the silver-colored tabs on the buckle towards each other with one hand, while pulling on the
tab portion of the buckle with the other hand.
Step 5. Grasp the waist-level strap ends on right and left sides of the harness. Pull both ends forward
until all slack is removed from the waist strap and the strap is comfortably tight around your
waist. Insert strap ends into the waist strap keeper loops on the right and left sides of the
harness.
waRning: The Fire and Rescue Harness meets the requirements of NFPA 1983, Standard on Life
Safety Rope and Equipment for Emergency Services, 2012 Editions, and the Optional Flame Resistance
Requirements of NFPA 1983, Class II. When used in conjunction with DBI/SALA part numbers 1114000,
1114000H, 1114001, 1114001H 1114002, or 1114002H, the Fire and Rescue Harness meets the
requirements of Class III but IS NOT FLAME RESISTANT. See Harness labels 5909121 and 5909122.
6
3.13 SHOULDER STRAPS: Complete donning of the ExoFit NEX™ Fire Rescue Class III harness by following
Figure 6, Steps 1 through 6.
Figure 6 - Fire And Rescue Harness Shoulder Strap Donning
Step 1
Step 2
Step 3
Step 4
Step 5
A
B
Step 6
Figure 6
Step 1. Suspend the shoulder harness. The D-Ring and Yoke should be facing forward. Ensure all straps
are not twisted. Place the opening in the Yoke over your head and rest the straps on your
shoulders.
Step 2. Open the carabiner at the bottom of the Yoke. Insert the carabiner through the strap that holds
the D-Ring on the harness belt. Close the carabiner. The gate of the carabiner must not be
inside the D-Ring loop.
Step 3. Bring the strap on the right side of your back around to your right hip. Open the carabiner and
insert it through the red loop on the top of the belt. The carabiner gate must not be inside the
belt loops.
Step 4. Bring the strap on the left side of your back around to your left hip. Open the carabiner and
insert it through the blue loop on the top of the belt. The carabiner gate must not be inside the
beltloops.Orientthecarabinersasshowninthegures.Thecarabinergatemustnotbeinside
the belt loop.
Step 5. Conrmthatthefrontstrapissecuredbythecarabinerandthatthestrapslieatonyour
chest. Left and right sides of the shoulder straps should be adjusted to the same length and the
upper front D-ring should be centered on your lower chest, facing outward and free to swivel up
and down.
7
Step 6. Conrmthatthebackstrapsaresecuredbythecarabiners(A - blue strap end secured by
carabiner to blue loop; B - red strap end end secured by carabiner to red loop) and that the
strapslieatacrossyourback.TheD-Ringatthecenteroftheharnesspaddingbetweenyour
shoulders must be facing outward and free to swivel up and down. Adjust shoulder straps to a
snugt.
Beforeuse,adjusttheharnesslegstrapstoasnugt.Atleast3in.(8cm)ofwebbingmustextendpastthe
buckleonthelegstraps.Adjustthewaistbeltagainasnecessaryforasecure,comfortablet.
7.0 speciFications
7.3.1 STANDARDS: When installed and used per the requirements and recommendations in the manual,
the ExoFit NEX™ Full Body Suspension Harness meets the requirements of the National Fire Protection
Association 1983 Standard on Life Safety Rope and Equipment for Emergency Services, 2012 Edition.
8.0 labeling. The following labels must be securely attached and fully legible:
ExoFit NEX™ Full Body Suspension Harness
ExoFit NEX™ Fire And Rescue Harness, Class II, Nomex/Kevlar Web Models
ExoFit NEX™ Fire And Rescue Harness, Class II and III, Nylon Web Models
E
NYLON
ISO
9001
USA
3833 SALA Way
Red Wing, MN 55066-5005
Toll Free: 800.328.6146
Phone: 651.388.8282
Fax: 651.388.5065
solutions@capitalsafety.com
Brazil
Rua Anne Frank, 2621
Boqueirão Curitiba PR
81650-020
Brazil
Phone: 0800-942-2300
brasil@capitalsafety.com
Mexico
Calle Norte 35, 895-E
Col. Industrial Vallejo
C.P. 02300 Azcapotzalco
Mexico D.F.
Phone: (55) 57194820
mexico@capitalsafety.com
Colombia
Compañía Latinoamericana de Seguridad S.A.S.
Carrera 106 #15-25 Interior 105 Manzana 15
Zona Franca - Bogotá, Colombia
Phone: 57 1 6014777
servicioalcliente@capitalsafety.com
Canada
260 Export Boulevard
Mississauga, ON L5S 1Y9
Phone: 905.795.9333
Toll-Free: 800.387.7484
Fax: 888.387.7484
info.ca@capitalsafety.com
EMEA (Europe, Middle East, Africa)
EMEA Headquarters:
5a Merse Road
North Moons Moat
Redditch, Worcestershire
B98 9HL UK
Phone: + 44 (0)1527 548 000
Fax: + 44 (0)1527 591 000
csgne@capitalsafety.com
France:
Le Broc Center
Z.I. 1re Avenue - BP15
06511 Carros Le Broc Cedex
France
Phone: + 33 04 97 10 00 10
Fax: + 33 04 93 08 79 70
information@capitalsafety.com
Australia & New Zealand
95 Derby Street
Silverwater
Sydney NSW 2128
Australia
Phone: +(61) 2 8753 7600
Toll-Free : 1800 245 002 (AUS)
Toll-Free : 0800 212 505 (NZ)
Fax: +(61) 2 8753 7603
sales@capitalsafety.com.au
Asia
Singapore:
69, Ubi Road 1, #05-20
Oxley Bizhub
Singapore 408731
Phone: +65 - 65587758
Fax: +65 - 65587058
inquiry@capitalsafety.com
Shanghai:
Rm 1406, China Venturetech Plaza
819 Nan Jing Xi Rd,
Shanghai 200041, P R China
Phone: +86 21 62539050
Fax: +86 21 62539060
inquiry@capitalsafety.cn
www.capitalsafety.com
  • Page 1 1
  • Page 2 2
  • Page 3 3
  • Page 4 4
  • Page 5 5
  • Page 6 6
  • Page 7 7
  • Page 8 8

3M DBI-SALA® ExoFit NEX™ Rope Access/Rescue Harness Operating instructions

Type
Operating instructions

Ask a question and I''ll find the answer in the document

Finding information in a document is now easier with AI