SeaSun SST.30.6 User manual

Type
User manual
Pole Operated Exterior Sun Sade (with Valance)
PARTS THAT ARE PRE-INSTALLED
Valance (VA10) x 1
Shade Cloth (SC) x 1
Bottom Tube (BT09) x 1
Bottom tube plug
(BTP09) x2
Exploded View
Exploded View
PARTS THAT IN THE HARDWARE BOX
Valance Bracket (VB09) x 3
Bungee System (BUN09) x 2 Screw (S09) x 8
PARTS THAT IN THE POLE PACKAGE
Pole Handle Piece (PHP12) x 1
Pole-Mid Piece (PMP12) x 1
Pole-Long Piece (PLP12) x 1
Ring (R12) x 1
Lock Washers
(PLW12) x 3
Pole Screw
(PS12) x 2
RingScrew
(RS12) x 1
Le Valance Cover
(LVC09) x1
Plug Bracket
(PB10) x1
Plug with pin
(P10) x1
Right Valance Cover
(RVC09) x1
Crank Bracket
(CB12) x1
CrankPlug
(CP12) x1
Note: some parts may be slightly dierent than shown in this manual. We recommend two (2) people install this shade.
To view installation video, please visit https://shadeinfo.com/video-tutorials/
Install Ring
Before you install your Valance Brackets, you will
need to install the ring onto the Crank Bracket.
Using the Ring Screw provided in the pole package,
attach the Ring to the Crank Bracket. See Fig A.
Be sure to tighten this screw completely.
Fig A
Step 1: Install Valance Brackets
Determine your type of installation. Your solar shade can
be hung from a wall or a ceiling. See Figures B and C.
Your shade is shipped with a protective lm to prevent
scratching during shipping. Remove this lm prior to
installation.
Wall Installation
Fig B Fig C
Ceiling Installation
Your shade includes three (3) Valance Brackets, you must install at least two (2) of them. Install one (1) Valance
Bracket near each end of the shade. Note: the Valance Brackets cannot be installed on the extreme edges of the
shade, you will need to allow at least 2 inches (5.08 cm) at the ends of each side. We recommend installing the
brackets on the closet stud to each end of the shade, remembering to allow at least 2 inches (5.08 cm) from each
end. If you are installing a third bracket, install it near the center of the shade (ideally on a wood stud). Install
the Valance Brackets into wood studs. If wood studs are not available, you will need to use anchors (not includ-
ed). See your local hardware store for more information.
Some shade models include a paper template to help align your pilot holes. If your shade includes a template,
temporarily adhere it to your installation area, making sure it is straight and level, then mark and drill your pilot
holes. Remove the paper template before installing your Valance Brackets.
Wall Installation
Ceiling Installation
For wall installations,
you need to allow at least
1 inch (2.54 cm) above
the bracket to allow the
valance to hook onto the
bracket (only if there is a
ceiling that overhangs the
shade). See Figure D
For ceiling installations, you
need to allow at least 1 inch
(2.54 cm) behind the brack-
et to allow the valance to
hook onto the bracket (only
if there is a wall behind the
shade). See Figure E.
Fig F
Fig D
Fig E
Wall Installation
Ceiling Installation
For a wall installation,
make sure the plastic tabs
on your Valance Brackets
are pointing towards the
ground (Fig F). Use the
screws from your hard-
ware box to install these
brackets.
Fig G
For ceiling installation,
make sure the plastic tabs
on your Valance Brackets
are pointing out, towards
you (Fig G). Use the
screws from your hard-
ware box to install these
brackets.
It is very important that your brackets are perfectly aligned with each other (your shade will not install correctly
unless your brackets are perfectly aligned with each other). We recommend using a laser level to align the screw
holes.
Step 2: Install the shade
For wall installations, rst hook the back of
the Valance on the top of Valance Brackets
(Fig H), then rotate the shade down and
click into place (Fig I).
Note: you may need to push the plastic tabs
on the Valance Brackets to help the shade
click into place.
Fig H Fig I
Wall Installation
Ceiling Installation
For ceiling installations, rst hook the back
of the Valance on the back of the Valance
Brackets (Fig J), then rotate the Valance
upwards and click it into place (Fig K).
Note: you may need to push the plastic tabs
on the Valance Brackets to help the shade
click into place.
Fig J Fig K
Step 3: Assemble Pole
To assemble your pole, slide the Pole-Mid
Piece onto the Pole-Long Piece, making sure
the holes are pointing towards the handle
(see Fig L). en slide the Pole-Handle
Piece into the Pole-Mid Piece.
Place the Pole Lock Washers onto the Pole
Screws. Note: the Washers may already be
on the screws. Insert the Pole Screws into
the Pole-Mid Piece. Tighten with phillips
head screw driver. Note: Not all of the Pole-
Long Piece is shown in Fig L.
To use the pole simply place the hook into
the ring on the Crank Bracket, and turn the
Pole-Handle Piece.
Fig L
Pole-Mid Piece (PMP12)
Pole-Long Piece (PLP12)
Pole-Handle Piece (PHP12)
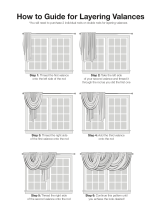
Install bungee system
Your shade includes two (2) Bungee and Hooks to secure the bottom of your
shade. To install the Bungee System, start by feeding the Bungee through the
Bottom Tube Plugs located at the end of your Bottom Tube (Fig M). en
insert the Bungee into the Hook and drill the Hook into a wall/post using one
(1) screw (Fig N) from your hardware box. Important: Your shade should be
rolled up during windy conditions. e Bungee System is only eective in
light wind.
Fig NFig M
Reversing the roll direction of your shade (optional)
Note: if you do this step, you will need to ip the gear on the Crank Bracket to prevent the fabric from interfer-
ing with the ring. Please see the section below called “Flipping the Gear” for more information.
If you want to reverse the roll of your fabric, simply roll the shade down completely. Aer the fabric is completely
lowered, continue rolling the shade…it will roll itself back up in the opposite direction. .
Switching Crank Bracket to the Le Side of the Shade (optional)
Note: if you do this step, you will need to ip the gear on the Crank Bracket to prevent the fabric from interfer-
ing with the ring. Please see the section below called “Flipping the Gear” for more information.
1. Remove both Valance Covers (RVC09 and LVC09). Aer you have removed the Valance Covers, switch their
positions (move the le cover to the right side of the shade, and move the right cover to the le side of the shade).
2. Next, remove the Plug Bracket and the Crank Bracket by loosening the screws and set the Plug Bracket and Crank
Bracket on the ground. It is not necessary to completely remove the screws, you only need to loosen the screws. DO
NOT reverse the Plug Bracket and Crank Bracket positions.
3. Remove the Valance (leaving the shade on the ground) and reverse (ip around) the Valance . You do not need to
reverse the shade fabric or the Valance Covers.
4. Replace the Plug Bracket and Crank Bracket as well as both Valance Covers. IMPORTANT: When replacing
the Plug Bracket and Crank Bracket, be sure to push them in completely before tightening the screws. e screws
should align with the threaded screw holes.
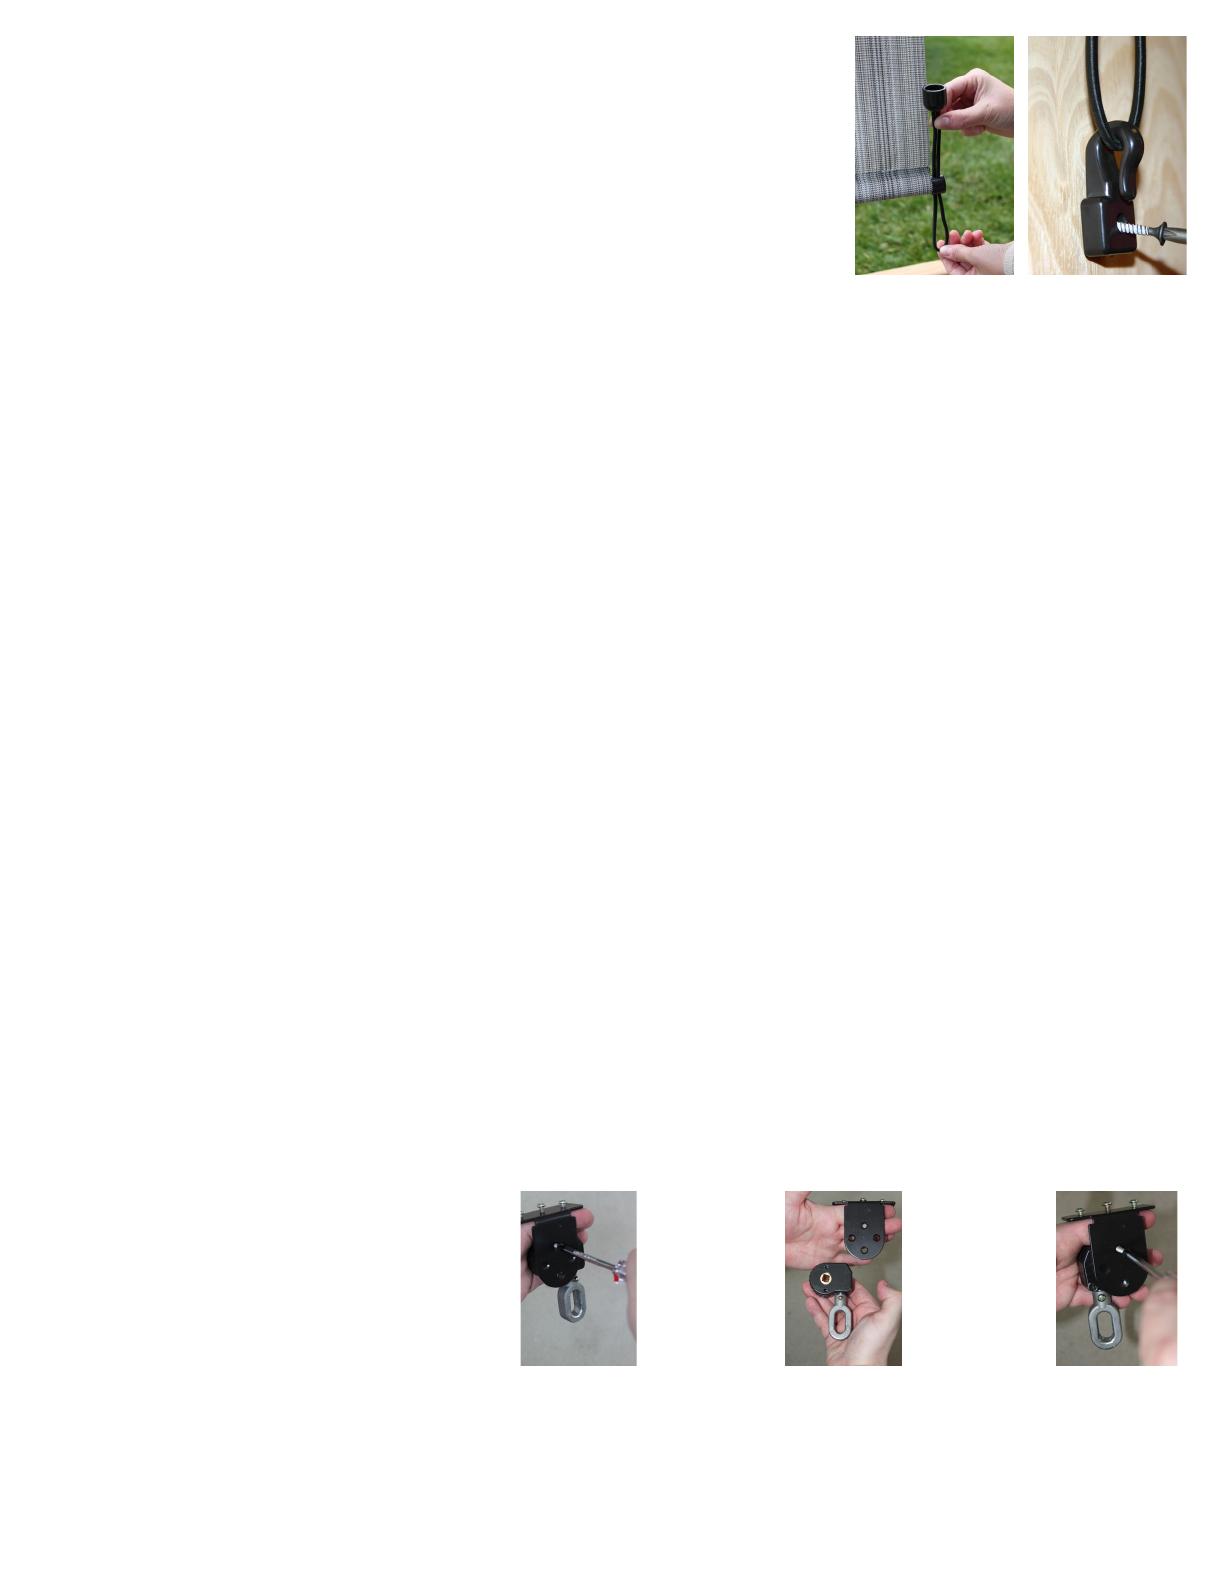
Flipping the Gear (optional)
If you changed the roll direction of your shade, or you moved your Crank Bracket to the le side of your shade, you
will need to ip the gear portion of your Crank Bracket to prevent the ring portion of the Crank Bracket from inter-
fering with your fabric.
Remove the Valance Covers from the shade.
Next, remove the Crank Bracket from the
shade by loosening the three (3) screws that
secure the Crank Bracket to the Valance.
en remove the two (2) screws on the out-
side of the Crank Bracket (See Fig O).
Separate the
two (2) pieces
of the Crank
Bracket (See
Fig P).
Flip the gear
portion and
reattach with
the two (2)
screws (See
Fig Q).
Maintainance
To clean your shade, simply rinse with water and soap and scrub with a so brush. Note: Using bleach or an abra-
sive cleaner will void your warranty. Roll the shade down to air dry. Your shade should be rolled up during high
wind conditions.
www.shadeinfo.com 1010 Carbon Court, Unit D, Erie, CO 80516 303.652.6164 (phone) M1017-E
Fig O Fig P Fig Q
  • Page 1 1
  • Page 2 2
  • Page 3 3
  • Page 4 4

SeaSun SST.30.6 User manual

Type
User manual

Ask a question and I''ll find the answer in the document

Finding information in a document is now easier with AI