Page is loading ...

MasterConsole® Digital DUAL
DUAL Display Cat5 KVM switches
User Guide
v1.0
Copyright © 2021 Raritan, Inc.
MCD
-DUAL-UserGuide-0B-v1.0
M
arch 2021
255-20-0011-00

This document contains proprietary information that is protected by copyright. All rights reserved. No part of
this document may be photocopied, reproduced, or translated into another language without express prior
written consent of Raritan, Inc.
© Copyright 2021 Raritan, Inc. All third-party software and hardware mentioned in this document are
registered trademarks or trademarks of and are the property of their respective holders.
FCC Information
This equipment has been tested and found to comply with the limits for a Class A digital device, pursuant to
Part 15 of the FCC Rules. These limits are designed to provide reasonable protection against harmful
interference in a commercial installation. This equipment generates, uses, and can radiate radio frequency
energy and if not installed and used in accordance with the instructions, may cause harmful interference to
radio communications. Operation of this equipment in a residential environment may cause harmful
interference.
VCCI Information (Japan)
Raritan is not responsible for damage to this product resulting from accident, disaster, misuse, abuse,
non-Raritan modification of the product, or other events outside of Raritan's reasonable control or not arising
under normal operating conditions.
If a power cable is included with this product, it must be used exclusively for this product.

iii
Contents
Chapter 1
Introduction 1
Overview ...................................................................................................................................................... 1
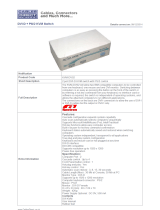
Features ........................................................................................................................................................ 2
Package Contents ......................................................................................................................................... 2
Specifications ................................................................................................................................................ 2
Front View .................................................................................................................................................... 4
Rear View ..................................................................................................................................................... 4
Installation 6
Console Connection ...................................................................................................................................... 6
Select Proper MDCIMs or MDUTPs .............................................................................................................. 7
Computer Connection .................................................................................................................................. 8
Hotkeys 11
Hotkey Summary Table .............................................................................................................................. 11
On-Screen Display Interface 13
Login Screen ............................................................................................................................................... 14
Selection Menu .......................................................................................................................................... 14
2nd-tier Selection Menu ................................................................................................................. 15
Setup .......................................................................................................................................................... 16
User Configuration .......................................................................................................................... 18
Port Access Setup ............................................................................................................................ 19

Contents
iv
Viewing Firmware Version ......................................................................................................................... 20
Port Configuration ...................................................................................................................................... 20
Video Adjustment ....................................................................................................................................... 20
Borderless Mouse Switching 21
Setup .......................................................................................................................................................... 21
Enable Borderless Mouse Switching .......................................................................................................... 23
Using Mouse Switching .............................................................................................................................. 24
KVM Extension 25
Console Extension ...................................................................................................................................... 25
PC/Server Extension ................................................................................................................................... 27
Maintenance 29
Firmware Upgrade Procedures .................................................................................................................. 29
Resetting to Factory Defaults ..................................................................................................................... 33
Frequently Asked Questions (FAQs) 34
MASTERCONSOLE® DIGITAL DUAL KVM Switch ......................................................................................... 34
Supported VGA and DVI Resolutions of MCD-DUAL .................................................................................. 38
Disclaimer 40
FCC Statement ............................................................................................................................................ 40
Index 41

1
In This Chapter
Overview ............................................................................................................... 1
Features ................................................................................................................ 2
Package Contents ................................................................................................. 2
Specifications ........................................................................................................ 2
Front View ............................................................................................................ 4
Rear View .............................................................................................................. 4
Overview
MCD-DUAL switch MCD-104-DUAL and MCD-108-DUAL is a series of KVM
(keyboard/video/mouse) switch that enables you to control multiple
computers from a single set of keyboard, mouse, and dual-monitor. Connect
the keyboard, mouse, monitor, and all computers to an MCD-DUAL switch and
you will be able to switch among computers connected to the MCD-DUAL
switch. If cascading MCD-DUAL switches to form a two-tier MCD-DUAL system,
the number of accessible computers can be expanded up to a maximum of 16
(MCD-104-DUAL)/64 (MCD-108-DUAL) computers. MCD-DUAL switch features
the use of standard Category 5 (Cat5) unshielded twisted-pair (UTP) cables for
connecting computers. In terms of operation, it provides a friendly OSD
(On-Screen Display) interface for simple system configuration.
Chapter 1
Introduction

Chapter 1: Introduction
2
Features
• Console : dual DVI-I (analog & digital) + 2x USB Type-A
• Support high video resolution up to 1920 x 1200@60Hz (Analog), 1920 x
1080@60Hz (Digital)
• Channel select: 4/8 port two colors of LEDs to indicator each port
operation status (Green-PC select/White-Online)
• Support 2 tiers cascade to access max. 16/64 computers
• Borderless Mouse Switching function to easily switch channels by moving
mouse cursor
• User privileges allow one administrator to set different channel access
rights to maximum of 15 user accounts
• Power switch with lighting: Inter socket
• CAT5 Connector: 8/16 RJ45 ports
• Supports MDCIMs: DVI / HDMI / DP (CAT5 distance max. 45 meter/150
feet)
• Supports MDUTP Cables: VGA + Audio (2/4/6/15 meter)
• Operate with hotkeys on-screen-display menus
• Auto-Skip function to bypass inactive channels; Auto-Scan computers at
variable rates
• Firmware upgradeable
• Rack-mountable
• Backward compatibility with all type of CIMs:
MDCIM-DVI/HDMI/DP
MDUTP20-VGA/ MDUTP40-VGA/ MDUTP60-VGA/ MDUTP150-VGA
Note: CAC and USB Touch screen are NOT supported.
Package Contents
• MCD-DUAL KVM Switch x 1
• Power Cord x 1
• Rackmount Kit x 1 (including brackets and associated screws)
• DVI-I to VGA Adapter x 2
• Quick Setup Guide x 1
Specifications
Model Name
MCD-104-DUAL
MCD-108-DUAL
Console Connections 1 1

Chapter 1: Introduction
3
Computer Connections (Dual View) 4 8
Console Selection
Hot-Key
OSD menu
Connectors
Console Port
Keyboard 1 x USB Type A Female (White)
Mouse 1 x USB Type A Female (White)
Video 2 x DVI-I Female (White)
Audio 1 x 3.5mm Audio Jack (Black)
Computer Ports
Direct 8 x RJ45 Female (Black) 16 x RJ45 Female (Black)
Maximum 16 (Cascade) 64 (Cascade)
Firmware Upgrade 1 x micro USB Female
Reset button port 1 x Tact Switch
Power 1 x AC Socket with light power switch
LEDs
Operation
Indication
Online 4 (White) 8 (White)
Selected 4 (Green) 8 (Green)
Power Power-On 1 (White)
Video Resolution 1920 x 1200@60Hz (VGA) ,1920 x 1080@60Hz (DVI) , DDC2B
Power
Maximum Input Power Rating AC 100-240V, 1.5A
Power Consumption DC 12V/5.42A (65W)
Environment
Operating Temp. 0-50°C
Storage Temp. -20°C-60°C
Humidity 0-80% RH , Non-condensing
Physical
Housing Metal
Weight 1830g 1860g
Dimension (L x W x H) 440 x 150 x 44mm
Safety CE/FCC/VCCI/UL
MTBF
140,689 hours 105,038 hours

Chapter 1: Introduction
4
Front View
1
Power LED
White LED lights on after powering on the MCD-DUAL.
2
Channel LEDs
"inactive" channels with LEDs light off.
"active" channels with White LEDs light on.
"being accessed" channels with Green LEDs light on.
Rear View

Chapter 1: Introduction
5
1
Power Socket
Connect the power cord.
2
Power Switch
Toggle the power on or off.
3
USB Port (keyboard)
Connect a USB keyboard.
4
USB Port (mouse)
Connect a USB mouse.
5
Audio Output Port
Connect audio input devices, such as speakers or
headphone.
6
2 x DVI-I Connector
(Monitor A/ Monitor B)
Connect monitors. OSD will show on Monitor A only.
(If your monitor does not have a DVI connector, an
appropriate video converter or adapter is required.)
7
Firmware Upgrade Connector
Connect a computer for upgrading the MCD-DUAL's
firmware.
8
Reboot Button
Reboot this KVM switch.
9
Channel Ports
Connect to computers, each channel with 2x RJ45 ports.
10
Chassis Ground
An easy-to-connect chassis ground to prevent any
electrical shock.

6
Note: Please turn off all MCD-DUAL and computers before system installation.
In This Chapter
Console Connection .............................................................................................. 6
Select Proper MDCIMs or MDUTPs ...................................................................... 7
Computer Connection .......................................................................................... 8
Console Connection
Connect a USB keyboard/mouse, speaker and monitors to the connectors on
the MCD-DUAL. (If using a VGA monitor, a DVI-I to VGA adapter is required.)
Chapter 2
Installation

Chapter 2: Installation
7
Select Proper MDCIMs or MDUTPs
Choose appropriate MDCIMs or MDUTP cables according to your computer's
video port and audio requirements.
MCD CIM type Video type Audio transmission
MDUTP cables VGA Support analog audio
MDCIM-HDMI HDMI Support digital audio
MDCIM-DVI DVI NO support
MDCIM-DP Display Port NO support
Note: If the MDCIM or MDUTP cable you purchase is not compatible with the
video port on your computer, the alternative solution is to use a video converter
or adapter to connect MDCIM or MDUTP.

Chapter 2: Installation
8
Computer Connection
One-tier Connection
• Plug the MDCIM or MDUTP cable's USB connectors into one of the
computer's USB ports.
• Plug the MDCIM or MDUTP cable's video connectors into the computer's
video ports.
• Optionally, plug the MDUTP cable's audio connector into the computer's
audio output port.
• Connect the MDCIM to MCD-DUAL by using a standard network patch
cable (Cat5e/6 UTP). The MDUTP is combined with a standard network
patch cable; you can use it to connect with MCD-DUAL directly.
• Repeat the above steps to connect more computers.
Note:
Please make sure the MDCIM or MDUTP must connect to the same channel of
MCD-DUAL.
The signals of USB keyboard/mouse and audio are transmitted via "RJ45 Port A"
only.
For single-monitor connection, please make sure the MDCIM or MDUTP must
connect to" RJ45 Port A".
For both single-monitor and dual-monitor connections, please make sure the
computer’s audio output is set for the MDCIM or MDUTP which is connected to
"RJ45 Port A".

Chapter 2: Installation
9
Two-tier Connection
Step A
• Plug the MDCIM-DVI cable's USB connectors into the 2nd-tier MCD-DUAL’s
USB Keyboard port.
• Plug the MDCIM-DVI cable's DVI connectors into the 2nd-tier MCD-DUAL’s
Monitor A port.
• Connect the MDCIM-DVI to "Channel 1: RJ45 Port A" of the 1st-tier
MCD-DUAL by using a standard network patch cable (Cat5e/6 UTP).
Step B
• Plug the MDCIM-DVI cable's USB connectors into the 2nd-tier MCD-DUAL’s
USB Mouse port.
• Plug the MDCIM-DVI cable's DVI connectors into the 2nd-tier MCD-DUAL’s
Monitor B port.
• Connect the MDCIM-DVI to "Channel 1: RJ45 Port B" of the 1st-tier
MCD-DUAL by using a standard network patch cable (Cat5e/6 UTP).
Step C
• Repeat the above steps to connect more 2nd-tier MCD-DUAL
• Repeat the steps of "One-tier Connection" to connect more computers.

Chapter 2: Installation
10

11
In This Chapter
Hotkey Summary Table ....................................................................................... 11
Hotkey Summary Table
Hotkeys are executed using only the keyboard.
The default hotkey is [Scroll Lock] and can be changed in OSD menu.
Keying Hotkey command must be completed with 6 seconds, or it will be
aborted if exceeding.
Hotkey Summary Table
Chapter 3
Hotkeys

Chapter 3: Hotkeys
12
#
Hotkey Command
Function
Description
1
Hotkey > Hotkey > Hotkey Enter OSD
Press the hotkey three times to trigger the OSD. With the
default hotkey "Scroll Lock", you should press:
Scroll Lock > Scroll Lock > Scroll Lock
2
Hotkey > Hotkey > N + Enter Access Channel N
Press 'Hotkey' twice, then the channel number, and press
Enter.
For example, to access channel 3, press the following
keys:
Scroll Lock > Scroll Lock > 3 > Enter
3
Hotkey > Hotkey > C > Enter
See Video Adjustment (on
page 20)
Adjust a Channel
Video of First-tier
MCD-DUAL
Press the hotkey twice, then the letter "C" and finally
press Enter.
With the default hotkey "Scroll Lock", you should press:
Scroll Lock > Scroll Lock > C > Enter
4
Hotkey > Hotkey > D > Enter
See Video Adjustment (on
page 20)
Adjust a Channel
Video of
Second-tier
MCD-DUAL
Press the hotkey twice, then the letter "D" and finally
press Enter.
With the default hotkey "Scroll Lock", you should press:
Scroll Lock > Scroll Lock > D > Enter
5
Hotkey > Hotkey > H > Enter
See Borderless Mouse
Switching (on page 21)
Mouse Cursor
Calibration
Make sure Borderless Mouse Switching is on.
Press the hotkey twice, then the letter "H" and finally
press Enter.
With the default hotkey "Scroll Lock", you should
press:
Scroll Lock > Scroll Lock > H > Enter
6
Ctrl > Ctrl
Access the next or
prior "active"
channel
Make sure there is no OSD shown onscreen.
To select the next "active" channel, press the RIGHT
'Ctrl' key twice. Ctrl > Ctrl
To select the prior "active" channel, press the LEFT
'Ctrl' key twice. Ctrl > Ctrl
7
Ctrl + Shift + F10 + Enter
See Resetting to Factory
Defaults (on page 33)
Resetting to
Factory Defaults
Press F4 to log out and show the Login screen.
Press Ctrl + Shift + F10 then press Enter to proceed
with the factory reset.
8
Ctrl + F1
See Login Screen (on page
14)
Modify Keyboard
Language Layout
Press F4 to log out and show the Login screen.
Press Ctrl + F1 to modify the keyboard language
layout. (EN33,FR08,GR09)
Press the language number, then the "ESC" to finish
the setting. For example, to choose English Keyboard,
press the following keys:
33 > ESC

13
After turning on the device, the login screen displays. For initial login, use the
built-in administrator account and password. You CANNOT remove the built-in
administrator and user accounts, but you can change their passwords or
rename any user accounts. Only the administrator can rename user accounts or
change passwords.
• Administrator Account:
Default name: admin
Default password: raritan
• User Accounts: Default names: user001 through user015; Default
passwords are NOT available.
Note: Before logging into the OSD, set your keyboard language layout.
1. Press Ctrl + F1 to modify the keyboard language layout. (33: English US, 08:
French, 09: German)
2. Press the language number, then the "ESC" to finish the setting.
For example, to choose "English US "Keyboard, press the following keys:
33 > ESC
In This Chapter
Login Screen ....................................................................................................... 14
Selection Menu ................................................................................................... 14
Setup ................................................................................................................... 16
Viewing Firmware Version .................................................................................. 20
Port Configuration .............................................................................................. 20
Video Adjustment ............................................................................................... 20
Chapter 4
On-Screen Display Interface

Chapter 4: On-Screen Display Interface
14
Login Screen
After turning on the device, the login screen displays. For initial login, use the
built-in administrator account and password.
1
Device ID The model name of your device.
2
User Port The ID number of your console
3
User Name (16
Characters Long)
Password (8 Characters
Long)
The fields for entering user credentials. The user
name and password can consist of any of
combination letters and numbers.
Selection Menu
After the successful login, the Selection Menu displays.

Chapter 4: On-Screen Display Interface
15
1
Model Name Your MCD-DUAL's model name
2
Selected Channel The number of the channel that is being accessed
3
Page Information The current page number and total pages
4
Login ID The currently used login ID
5
Channel Numbers Channel numbers of current page
6
Borderless Mouse
Switching Status
When the function is enabled, the letter "S" will appear.
You can press the S key on the keyboard to switch this
function.
7
Channel Names Available channel names of current page. The channel
connected with a 2nd-tier MCD-DUAL will be marked
with the symbol "+".
8
CIM Resolution The current resolution setting of MDCIM or MDUTP
9
Operation Keys Frequently-used keys for operating the current OSD
2nd-tier Selection Menu
After selecting any channel with a 2nd-tier MCD-DUAL connected, the Selection
Menu of that switch appears.
1
Model Name Your 1st-tier MCD-DUAL's model name
2
1st-tier Channel The channel number of the 1st-tier MCD-DUAL
where the 2nd-tier MCD-DUAL is connected
3
Selected 2nd-tier
Channel
The channel number of the 2nd-tier MCD-DUAL that
is being accessed
4
2nd-tier Channel Names 2nd-tier channel names

Chapter 4: On-Screen Display Interface
16
Setup
On the Selection Menu, press F1. The SETUP Menu displays.
/