Raritan Cat5 Reach DVI HD Installation guide

Type
Installation guide

Raritan Cat5 Reach DVI HD is a high-performance KVM extender that allows you to control a computer or KVM switch from a remote location up to 3,300 feet away. It supports high-quality video resolutions up to 1920x1200, as well as audio and USB signals. The Cat5 Reach DVI HD is ideal for use in a variety of applications, including:

  • Industrial control rooms
  • Digital signage
  • Medical imaging
  • Educational institutions
  • Corporate offices
Cat5 Reach DVI HD Quick Setup Guide 1
QSG-C5RdviHD-0A-v1.0.0-E 255-80-0057-00 RoHS
Cat5 Reach DVI HD
Thank you for purchasing Raritan's Cat5 Reach DVI HD KVM extender. This product can locate the user up to 3,300 feet
(1,000 meters) apart from a computer, server, KVM switch, or an audio/video device like a TV or DVD player, by
cascading Gigabit Ethernet switches with "IGMP v2 and 8K Jumbo Frames" functions.
This Quick Setup Guide explains how to install and configure the Cat5 Reach DVI HD. For further details on using this
product, access its Online Help or User Guide on the
Support page
(
http://www.raritan.com/support/
).
Package Contents
Unpack the components. If anything is missing or damaged,
contact the local dealer or Raritan Technical Support for help.
Items Quantity
C5R-DVI-HD-TX transmitter 1
C5R-DVI-HD-RX receiver 1
DC 5V 3A power adapter 2
DVI-I to VGA adapter 2
1.8-meter audio/microphone cable 1
USB-B to USB-A adapter cable 1
DVI cable 1
Rackmount kit 2
Quick Setup Guide 1
Warranty card 1
QS Rule
Product Overview
This section describes the ports or components implemented
on the Cat5 Reach DVI HD transmitter and receiver.
Cat5 Reach DVI HD Transmitter (C5R-DVI-HD-TX)
Front View
1. Remote/Local button (for switching between different
console modes)
2. LEDs (PWR, TX and RX)
3. Reset button
4. Microphone in (connected to a PC)
5. Audio in (connected to a PC)
6. USB keyboard/mouse/device ports
7. Serial over IP port
Rear View
1. Ground screw
2. RJ-45 LINK port
3. USB-B port (connected to a PC)
4. DVI-I IN port (connected to a PC)
5. DVI-I OUT port (connected to a monitor)
6. Power input port
QUICK SETUP GUIDE
Cat5 Reach DVI HD Quick Setup Guide 2
QSG-C5RdviHD-0A-v1.0.0-E 255-80-0057-00 RoHS
Cat5 Reach DVI HD Receiver (C5R-DVI-HD-RX)
Front View
1. EDID button
2. LEDs (PWR, TX and RX)
3. Reset button
4. Serial over IP port
Note: The EDID button copies EDID in the "Broadcast" mode.
Refer to the User Guide or Online Help for information on this
mode.
Rear View
1. Ground screw
2. RJ-45 LINK port
3. USB keyboard/mouse/device ports
4. DVI-I OUT port
5. Microphone in
6. Audio out
7. Power input port
QS Rule
Rackmount
1. You can attach the rackmount bracket to either side of the
Cat5 Reach DVI HD device, depending on your need.
2. Fasten the Cat5 Reach DVI HD device to the rack via the
rackmount bracket.
QS Rule
Basic Installation
This section illustrates the basic connection to a computer via
a pair of transmitter and receiver.
Refer to the User Guide or Online Help if you want to:
Increase the distance between the transmitter and
receiver up to 3,300 feet (1,000 meters).
Connect multiple receivers to one transmitter (Broadcast
mode).
Connect non-computer devices, such as a KVM switch.
Important: All monitors that you will connect to the
transmitter and receiver(s) must have the same
"maximum" video resolution no matter they are VGA or
DVI monitors.
To connect a computer:
1. Turn off all devices except for the computer.
The computer must be turned ON first for proper video
detection.
2. (Optional) To set up a local console, connect a VGA or DVI
monitor, a USB keyboard and a USB mouse to the
transmitter.
Note: If a VGA monitor is wanted, use the DVI-to-VGA
adapters included in the package. Note that you must
connect "two" DVI-to-VGA adapters to the transmitter for
proper video transmission instead of using only one
adapter.
Cat5 Reach DVI HD Quick Setup Guide 3
QSG-C5RdviHD-0A-v1.0.0-E 255-80-0057-00 RoHS
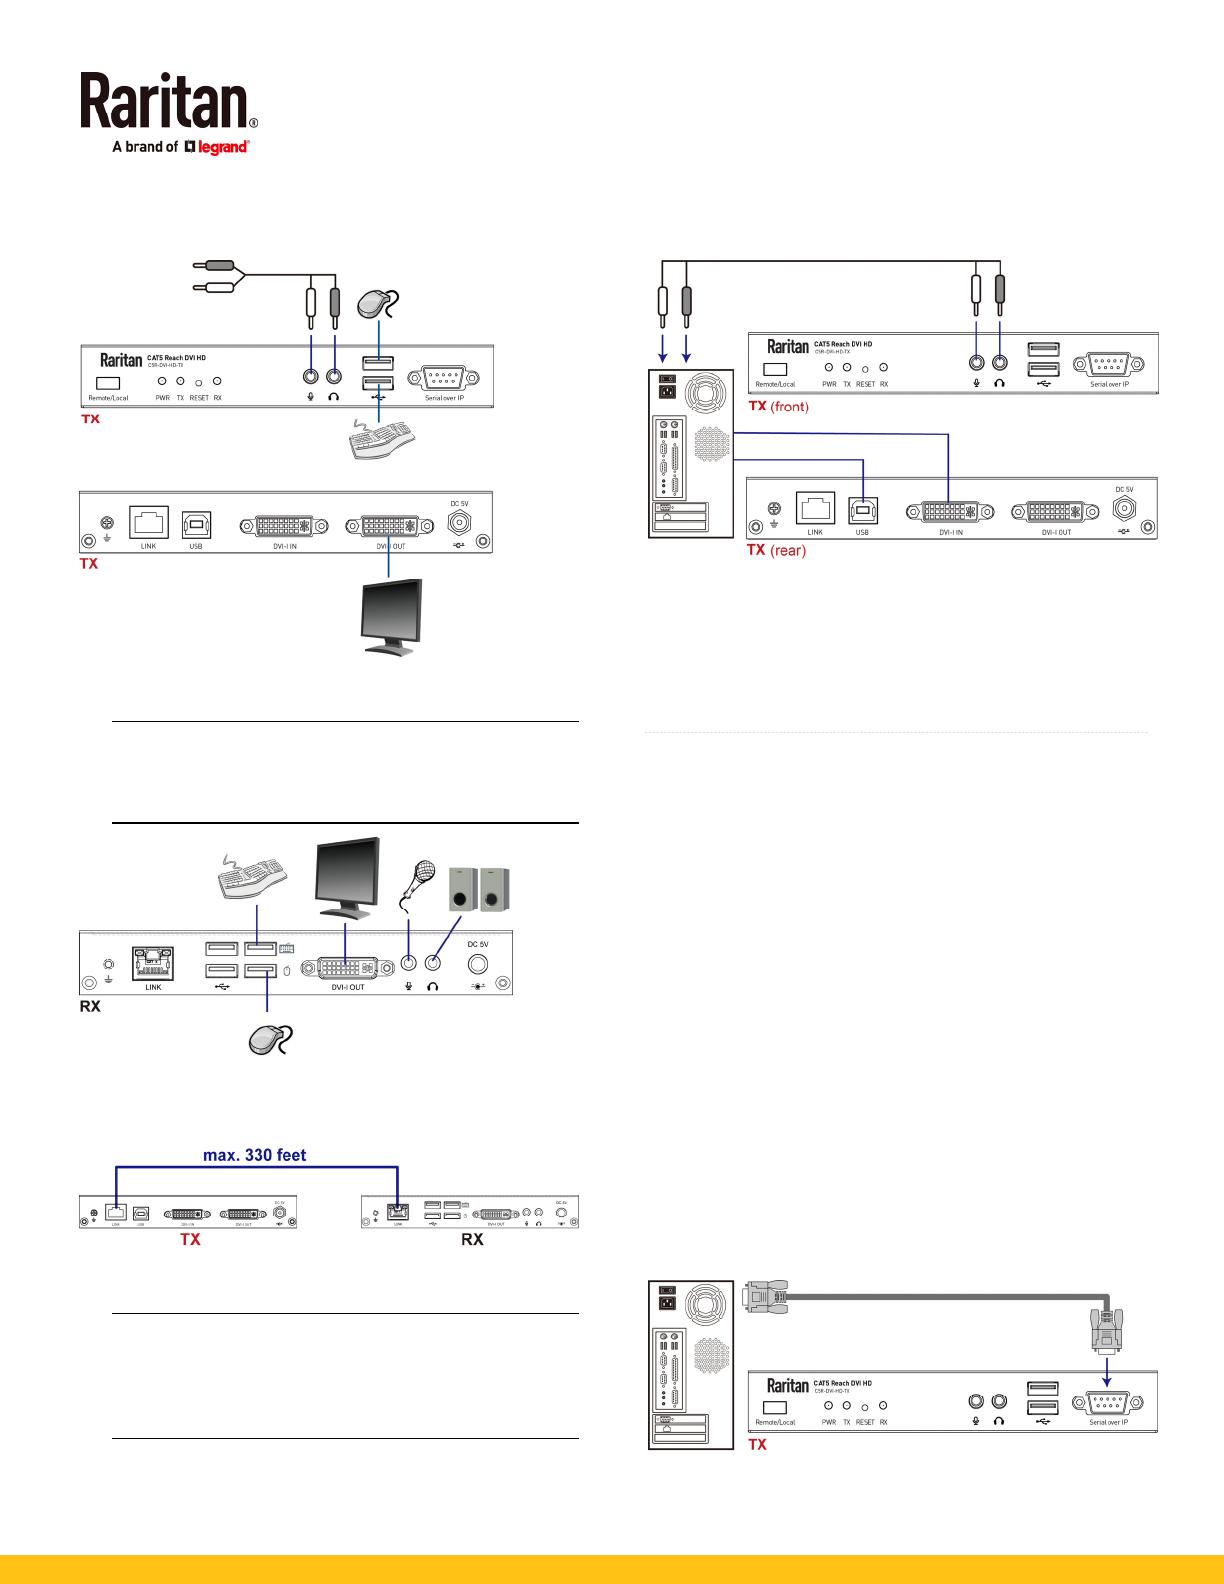
(Optional) If the audio feature is needed, connect one
end of the Raritan-provided audio/microphone cable to
the transmitter.
3. To set up a remote console, connect a VGA or DVI monitor,
a USB keyboard and a USB mouse to the receiver.
Note: A DVI-I to VGA adapter is needed for the VGA
monitor attached with the receiver. You can use the
DVI-to-VGA adapter included in the package or purchase
it from Raritan if insufficient.
4. Use a Cat5e/6 cable up to 330 feet (100 meters) long to
connect the transmitter and receiver. Plug either end of
the cable into the RJ-45 LINK ports.
5. Connect the computer to the transmitter using the
Raritan-provided DVI and USB-B to USB-A cables.
Note: If the computer only provides the VGA port, use the
DVI-to-VGA adapter that is included in the package. Note
that you must connect "two" DVI-to-VGA adapters to the
transmitter for proper video transmission instead of
using only one adapter.
(Optional) If the Raritan-provided audio/microphone
cable has been connected to the transmitter in Step 2,
connect the other end to the computer.
6. Connect the transmitter and receiver to a power source
respectively. Each device's PWR LED is then lit.
Note that TX and RX LEDs on both the transmitter and
receiver should be also lit per factory default because the
default console mode is dual console mode. See
Three
Types of Console Modes
(on page 4).
QS Rule
(Optional) Making an RS-232 Connection
If your computer (or any appropriate device) must
communicate with another peripheral device via RS-232
interface, then make an RS-232 connection among Cat5
Reach DVI HD, the computer and that peripheral device.
In the following illustration, it is assumed that your peripheral
device is Raritan's PDU. Then you can have the computer
access that PDU's command line interface by making an
RS-232 connection.
To make an RS-232 connection:
1. By default, "Serial over IP" (RS-232) ports of both Cat5
Reach DVI HD devices are configured as below.
Baud rate:
115,200 bps
Data bits:
8
Parity:
None
Stop bits:
1
To change the default setting, refer to this product's User
Guide or Online Help for instructions.
2. Connect an RS-232 cable between the computer's RS-232
port and the transmitter's "Serial over IP" port.
Cat5 Reach DVI HD Quick Setup Guide 4
QSG-C5RdviHD-0A-v1.0.0-E 255-80-0057-00 RoHS
3. Connect an RS-232 cable between the receiver's "Serial
over IP" port and the Raritan PDU's RS-232 port.
Note: Depending on the Raritan PDU model you
purchased, an RJ-45 to RS-232 adapter cable may be
required.
4. Make sure the transmitter and receiver are connected to
each other via a Cat5e/6 cable. See
Basic Installation
(on
page 2).
QS Rule
Three Types of Console Modes
The factory default is to enable both consoles -- remote and
local. In this mode, users of both remote and local consoles
are able to control the connected device, such as a computer
or KVM switch, based on the first-come-first-served basis.
You can choose to enable only one console to prevent that
console's operation from being disturbed by users of the
other console.
3 types of console modes:
To switch among 3 types of console modes, press the
Remote/Local button on the transmitter, and the console
mode changes in the following sequence:
dual console (default) > remote console > local
console
Dual console
: Both remote and local users can control
the connected device. When one user is operating it,
the other user can view the operation only.
Remote console
: Only remote users can view and
control the connected device.
Local console
: Only local users can view and control
the connected device.
To identify the 3 console modes:
The current console mode can be indicated by the status
of TX and RX LEDs on both the transmitter and receiver.
Dual console (default):
Both TX and RX LEDs are lit.
Remote console:
Only the RX LED is lit. Besides, the local console's
monitor becomes dark.
Local console:
Only the TX LED is lit. Besides, the remote console's
monitor shows this message "Local Only".
QS Rule
Additional Information
For more information about Cat5 Reach DVI HD and the entire
Raritan product line, see Raritan's website
(www.raritan.com). For technical issues, contact Raritan
Technical Support. See the Contact Support page in the
Support section on Raritan's website for technical support
contact information worldwide.
  • Page 1 1
  • Page 2 2
  • Page 3 3
  • Page 4 4

Raritan Cat5 Reach DVI HD Installation guide

Type
Installation guide

Raritan Cat5 Reach DVI HD is a high-performance KVM extender that allows you to control a computer or KVM switch from a remote location up to 3,300 feet away. It supports high-quality video resolutions up to 1920x1200, as well as audio and USB signals. The Cat5 Reach DVI HD is ideal for use in a variety of applications, including:

  • Industrial control rooms
  • Digital signage
  • Medical imaging
  • Educational institutions
  • Corporate offices

Ask a question and I''ll find the answer in the document

Finding information in a document is now easier with AI