Page is loading ...

Professional Remote Monitoring Station
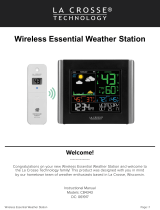
Welcome!
--------------
Congratulations on your new Professional Weather Station and welcome to the
La Crosse Technology family! This product was designed with you in mind by our
hometown team of weather enthusiasts based in La Crosse, Wisconsin.
Instructional Manual
Model: V40-PRO
DC: 101917
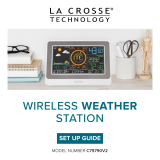
PROFESSIONAL
Remote Monitoring Weather Station

Page | 2
Professional Remote Monitoring Station
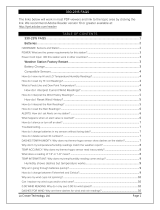
Table of Contents
Step 1: Power Up
Step 2: Station Options
Step 3: Mounting Basics
Option 1: Connect with La Crosse View
Wi-Fi Network Requirements
La Crosse View
La Crosse View Enhancements
Simple Status Messages
Connect Additional Sensors to Your La Crosse
View™ App
Option 2: Standalone Station
Settings Menu
Your Weather Station Features:
Connected or Standalone
Backlight Brightness (5 levels)
Wind Readings
Feels Like Temperature
Wind Speed History
Reset Wind Speed History
Rainfall Readings
Reset Rainfall Readings
HI | LO Temperature/Humidity Records
Reset HI | LO Temperature/Humidity
Alerts
Set Alerts
Disarm Alerts
Active Alerts
Temperature | Humidity Trend Arrows
Seasonal Changes in Foliage
Sensor Search | Sensor ID
Delete your Sensor ID
Factory Reset
Detailed Sensor Set Up and Mounting
Replace Wind Cups
Replace Directional Vane
Clean Rain Sensor
Connect to Weather Underground
Help Us, Help You!
Let’s Be Social!
Care and Maintenance
Specifications
Warranty and Support
FCC Statement
Canada Statement
3
3
3
4
4
5
6
7
8
9
9
10
10
11
11
11
12
12
13
13
14
14
14
15
15
16
16
16
17
17
18
20
20
20
21
22
22
22
23
24
24
24

Page | 3
Professional Remote Monitoring Station
Insert batteries (in any order):
• 3-AA batteries into multi-sensor
• 2-AA batteries into thermo-hygro sensor
• 5 volt power cord (required) into V40-PRO station
*3-AA batteries for optional backup of your time and date
*Battery operation only, station will not update sensor or Wi-Fi data. Power cord is required.
STEP 1: POWER UP
STEP 2: STATION OPTIONS
OPTION 1
CONNECT WITH LA CROSSE VIEW™ APP
The easiest and fastest way to setup your station!
• Enjoy all of the standalone station features along with the enhanced feature set from your
La Crosse View™ app! Continue with these instructions on page 4.
OPTION 2
OPERATE AS A STANDALONE STATION
Full Weather Station Features
• Monitor your backyard temperature, humidity, wind speed, wind direction and rainfall information
on the easy-to-read LCD display. Continue with these instructions on page 9.
• You always have the option of connecting to the La Crosse View™ App at a later time if you choose.
STEP 3: MOUNTING BASICS
At this time, all of your sensor information should be displayed on your station.
Here are a few quick tips for mounting your sensors:
THERMO-HYGRO
Keep out of direct sunlight & ensure the sensor is well-ventilated.
• We recommend mounting under a deck or eave facing north.
MULTI-SENSOR
Ensure the sensor is mounted vertically – an unobstructed rooftop is ideal.
• Your wind sensor should be the tallest object in the area to avoid any obstructions.
• You may need to clean the rain funnel of debris from time to time, to avoid inaccurate rainfall readings.
• For accurate direction, face the solar panel South.
• For detailed sensor setup and mounting instructions, see page 18.

Page | 4
Professional Remote Monitoring Station
Option 1: Connect with La Crosse View™
DOWNLOAD
• Visit the App Store or Google Play Store to download the free La Crosse View™ app on your mobile device.
CHECK YOUR NETWORK
• Confirm that your mobile device is connected to a 2.4GHz (802.11 b/g/n) Wi-Fi band before trying to connect
your station to the La Crosse View app. The station itself cannot accept 5GHz Wi-Fi bands that most
dual-band routers oer. Dual band routers also have a 2.4GHz channel.
MAKE SURE YOUR STATION IS READY TO CONNECT
(Hold the + and - buttons together, SEE APP should flash)
• When connecting to the app, ensure the Wi-Fi Indicator icon is blinking.
• Solid: Indicates that you are connected to Wi-Fi
• Fast Flash: Scan station and enter Wi-Fi password
• Slow Flash: Searching for Wi-Fi Network
• Not displayed: Not Connected
• If it is not blinking, perform a Wi-Fi search by holding the + & - buttons together.
• For detailed information about all of this station’s icons, see page 10.
LAUNCH
• Open the app on your iOS or Android device.
FOLLOW INSTRUCTIONS
• The La Crosse View™ app will walk you through creating an account and connecting your station to the
Internet. Once connected, your time, date, and local forecast information will update instantly on your
weather station’s screen. For online help visit: http://www.lacrossetechnology.com/lacrosseviewsupport
Wi-Fi Network Requirements
In order for your station to connect to your Wi-Fi, it will need to meet the following requirements:
• Confirm that your mobile device is connected to a 2.4GHz (802.11 b/g/n) Wi-Fi band before trying to connect
your station to the La Crosse View app. The station itself cannot accept 5GHz Wi-Fi bands that most
dual-band routers oer
• Weather station power cord use is required for Wi-Fi connection.
iOS Requirements: Mobile device with iOS 9.0 (or higher) with cellular or Wi-Fi service
Android Requirements: Mobile device with Android OS 5.0 (or higher) with cellular or Wi-Fi service
Tips:
• Do not use public Wi-Fi networks.
• Your weather station and mobile device must be within 10 feet of each other during setup.
• If you change your Wi-Fi network, simply go into the La Crosse View™ app, select your station, and then
choose “Select Wi-Fi” from the app menu. Here, you will just need to enter your new Wi-Fi network’s login
information.
• Hold the PLUS and MINUS buttons together for 3 seconds to have your station search for your Wi-Fi.

Page | 5
Professional Remote Monitoring Station
Note: If switching to a new Wi-Fi network, your station may take up to 3 minutes to reacquire all sensor
information.
Note: In the event of a power outage, or your station being unplugged temporarily, your station should
automatically reconnect to your existing Wi-Fi network, once power is reestablished.
Note: Weather station power cord use is required. Battery operation only, will not update sensor or Wi-Fi data.
Connecting You to Your Home Anytime, Anywhere.
ON-THE-GO HOME MONITORING
• Check Current Indoor & Outdoor Readings, View History Charts, and Set Custom Mobile Alerts.
FRIENDS & FAMILY SHARED ACCOUNTS
• No Need to Share Logins or Passwords! Invite Friends & Family to Download the App & Monitor Your
Home’s Data.
BEST IN CLASS APP EXPERIENCE
• Use Your Own Photos and Receive Free Push Notifications on the New, Easy-to-Navigate App
ADD OTHER SENSORS TO YOUR LA CROSSE VIEW™ APP
• You can add additional Temp & Humidity, Wind Speed, Rain, or Multi-Sensors to your La Crosse View™ app,
easily expanding your coverage to all areas of your home.
• Your weather station will act as a Wi-Fi gateway, allowing these additional sensors to pass through the station
and show their data on your La Crosse View™ app.
• Add-on sensor data will, however, not be shown directly on your weather station.
• For more help connection additional sensors, see page 8.

Page | 6
Professional Remote Monitoring Station
Standard Forecast Icons:
NWS Additional Forecast Icons:
Sunny
Partly Sunny
Clouds Rain T-Storm Snow
Note: Snow icon will show when the outdoor temperature is 32°F or lower and the forecast is Rain or T-Storm.
When your station is connected to the NWS, you will see the six icons above as well as the additional eight
icons here:
Windy
Light Rain
Severe T-Storm Light Snow Wintry Mix Blizzard
Fog
Ice
La Crosse View™ Enhancements
NWS (National Weather Service) Daily HI | LO temperature
Note: When not using the app, the daily HI | LO will come from
your outdoor TH sensor.
NWS Chance of Precipitation
• Precipitation percentage will show in the forecast area
NWS Additional Forecast Icons
Standard Icons:
Sunny • Partly Sunny • Clouds • Rain • T-Storm • Snow
Additional Icons:
Windy • Light Rain • Severe T-Storm • Light Snow
Wintry Mix • Blizzard • Fog • Ice

Page | 7
Professional Remote Monitoring Station
“LOST Wi-Fi”
• Check your power cord connection.
(power cord required to connect)
• When trying to reestablish your station’s Wi-Fi
connection, be sure your mobile device is on the
same 2.4GHz network you want your station to use.
• Check your network connection.
• Hold the + and - buttons together for 3 seconds to
search for Wi-Fi. SEE APP should show.
“SEE APP”
• The Wi-Fi router connection is working.
• Scan your station bar code ID on the back.
• Check your connection to the La Crosse View™ app.
• Enter your Wi-Fi password again.
• Is there an update to install?
“NO NWS”
• This indicates an error on the NWS server.
• NWS Expanded Forecast, will not update or show.
• The NWS will resolve this.
• Very rare to have this error.
Note: When you first connect to the La Crosse View™ app, “NO NWS” may alternate with “ALL OK” for a few
seconds until the station establishes contact with the NWS server.
“ALL OK ”
• Your station is connected, there are no problems.
Simple Status Messages
• Your station has built-in connection status messages
for your convenience.
• Press and release the SET button to view.
Note: Only one relevant status message will display.

Page | 8
Professional Remote Monitoring Station
Connect Additional Sensors to Your La Crosse View™ App
Add Sensors:
Open your La Crosse View™ app to add sensors.
1. From Main Menu - select “Devices” under “Add/Edit”
2. On Edit Devices page - select “ADD DEVICE”
3. Scan Device ID - Scan the bar code on your sensor or choose “ADD MANUALLY” to type in the number on
the bar code. Select “CONTINUE”.
4. On Confirm Device page - Confirm the sensor image and select “YES”
5. On Enter Device and Location Name page - enter Device Name and select a location or enter a Location
Name for your sensor. Select “DONE”.
Repeat steps 1-5 for any additional sensors you wish to add.
Note: Additional sensors may be purchased and added to your La Crosse View™ app at any time. Compatible
additional sensors start with the letters “LTV-”. Always check your product page for available sensors:
www.lacrossetechnology.com/V40-PRO
DID YOU KNOW?
You can expand your system’s coverage with additional sensors (sold separately). These add-on sensors will use your
weather station as a gateway to the La Crosse View app, where their data can be viewed and tracked 24/7 from any-
where.
Expand your coverage:
• Your baby’s room
• Your wine cellar
• Your basement
• Your attic
• Your garage
Just add a sensor and use your La Crosse View
™ app to monitor its data anywhere on-the-go.
For support and guidance of your La Crosse View™ app, please visit:
www.lacrossetechnology.com/lacrosseviewsupport

Page | 9
Professional Remote Monitoring Station
Settings Menu
When operating as a standalone station, you can manually adjust your station’s settings
1. Hold the SET button for 3 seconds to enter settings menu.
2. Press and release the + or - buttons to adjust the flashing values. Hold to adjust quickly.
3. Press and release the SET button to confirm and move to the next item.
Note: Press and release the LIGHT button any time to exit settings
Settings order:
•Beep ON/OFF
•12/24 Time
•Hour
•Minutes
•Year
•Month
•Date
•Temperature Fahrenheit/Celsius
•Wind Direction (letters or degrees)
•Wind Speed (MPH | KMH)
•Rainfall unit (Inches | MM)
•SEE APP (connection prompt for app,
no actual function)
Option 2: Standalone Station
BEEP ON | OFF 12 | 24 Hour Time
Hour Minutes
Year Month
Date Temp °F | °C
Wind Direction Wind Speed MPH | KMH
Rain IN | MM Connection Prompt

Page | 10
Professional Remote Monitoring Station
Your Weather Station Features: Connected or Standalone
Weather Forecast Icons
Low Battery Icons
Inches or Millimeters of Rain
Wind Speed Icon
Miles or Kilometers - Wind Speed
Wi-Fi Indicator Icon
Sensor Reception Icon
Trend Arrows
Fahrenheit or Celsius - Temperature
Percentage - Relative Humidity
Relative Humidity Icon
Temperature Icon
AM | PM Indicators
HI | LO Alert Icons
Rain Graph
Backlight Brightness (5 levels)
Your station has 5 levels of brightness for the backlight:
• When operating with the power cord, press and release the LIGHT button to adjust the backlight:
Intensity Levels: 0% | 5% | 20% | 50% | 100%
• When operating on battery power only, press the LIGHT button to activate the backlight for 10 seconds
at 100% brightness.

Page | 11
Professional Remote Monitoring Station
Wind Readings
Wind Speed:
Reflects highest current wind speed
Top Speed:
Reflects highest wind speed in the past 60 minutes.
Wind Direction:
The triangles indicate wind direction on the compass rose.
Wind direction can be shown in degrees or in letters in the center of
the compass rose.
Wind Cup Animation:
The wind cups spinning speed will vary with actual wind speed.
When wind speed is higher, the cups spin faster.
Feels Like Temperature
Your “Feels Like” temperature is a combination of outdoor temperature/humidity and wind speed.
• When outdoor temperature is higher than 80˚F, Heat Index will show as the Feels Like Temperature.
• When outdoor temperature is lower than 50˚F, Wind Chill will show as the Feels Like Temperature.
• When outdoor temperature is between 50˚F and 80˚F, will show Current Outdoor Temperature as the Feels Like
Temperature.
Wind Speed History
Simply press and release the WIND button to cycle through the Wind History
(other readings will disappear temporarily).
• One Hour: Past 60 minute period (default Top Speed record, always shown)
• 24 hour: Past 24 hour period, from last record
• 7 Days: Past 7-day period, from last record
• Current Month: Defined by Calendar Month (i.e. January 1 - January 31)
• Year: Defined by Calendar Year (i.e. January 1 - December 31 )
Top Speed Past 24 Hours
Top Speed Past 7 Days
Top Speed Current Month
Top Speed Current Year

Page | 12
Professional Remote Monitoring Station
1. Press and release the WIND button to view individual wind speed readings.
2. Hold the MINUS button for five seconds to reset the individual value.
3. Wind speed history reading will reset to current wind speed, time and date.
4. Press and release the LIGHT button, or wait 20 seconds to return to a full, normal display.
Reset Wind Speed History
Rainfall Readings
• Simply press and release the RAIN button to cycle through the exact history you’d like displayed (other readings will
disappear temporarily).
• Your station will stay on your selection.
• Press and release the LIGHT button, or wait 20 seconds to return to a full, normal display.
• One Hour: Rainfall in the past 60 minutes (last twelve 5 minute samples).
Example: If current time is 6:49, the 1 HOUR reading is the accumulated rain between 5:50 to 6:49.
• Day: Rainfall from midnight to midnight. Resets each day at 12am midnight.
• 24 Hours: Rainfall for the past 24 hours. Updates at each full hour (running total).
•
7 Days: Rainfall from the last 7 consecutive 24 hour rainfall readings. Updates each day at midnight.
Not subject to your calendar, but be sure you have your time set correctly.
• Month: Current Month: First day to current day. Current month will show.
-Press and release the MINUS button to view up to 11 months of rainfall history.
-Press and release the PLUS button to move forward to current month.
• Year: Current month plus past 11 months total. The year will show.
• Total: Total rainfall since station was powered on or reset. (image not shown)
Note: As time passes without rain, the 1 hour, 24 hour, and 7 day rain totals will count down to zero.
One Hour Day
24 Hour
7 Days
Month Year

Page | 13
Professional Remote Monitoring Station
Reset Rainfall Readings
1. Press the RAIN button to view individual rain readings.
2. Hold the MINUS button for five seconds to reset the individual value.
3. Rainfall reading will reset to 0.00
4. Press and release the LIGHT button, or wait 20 seconds to return to a full, normal display.
HI | LO Temperature/Humidity Records
• Press and release the TEMP button to
view your HI and LO records with time
and date of occurrence.
• A new HI or LO record will replace the
existing record.
Viewing order:
• Outdoor HI Temp with Time/Date
• Outdoor LO Temp with Time/Date
• Outdoor HI Humidity with Time/Date
• Outdoor LO Humidity with Time/Date
• Indoor HI Temp with Time/Date
• Indoor LO Temp with Time/Date
• Indoor HI Humidity with Time/Date
• Indoor LO Humidity with Time/Date
• Feels Like HI
• Feels Like LO
• Outdoor Dew Point

Page | 14
Professional Remote Monitoring Station
Reset HI | LO Temperature/Humidity Records
1. Press the TEMP button to view individual readings.
2. Hold the MINUS button for five seconds to reset the individual value.
3. HI | LO reading will reset to current temperature, humidity, and current time/date.
Alerts
There are 10 programmable weather alerts on this weather station.
• Outdoor LOW Temperature
• Outdoor HIGH Temperature
• Indoor LOW Temperature
• Indoor HIGH Temperature
• 24-hour Rainfall
• When you enter the alerts menu, you will first have to arm the alert you wish to set, then set the alarm value.
• If you do not arm the alert, you will skip that alert and move to the next.
Hold the ALERTS button for 3 seconds to enter alert set mode. Outdoor Low Temperature alert OFF will show.
Alert ON:
1. Press the +/- buttons to arm the alert.
2. Press the ALERTS button and the alert value will flash
3. Press the +/- buttons to set the alert value (Hold to set quickly).
4. Press ALERTS button to move to next alert.
Alert OFF:
• Alerts are OFF unless armed. If you do not wish to set an alert, simply press the ALERTS button again to move to the
next alert.
Set Alerts
• Outdoor LOW Humidity
• Outdoor HIGH Humidity
• Indoor LOW Humidity
• Indoor HIGH Humidity
• High Wind Speed (CURRENT wind)
Outdoor Temperature Alerts

Page | 15
Professional Remote Monitoring Station
1. Hold the ALERTS button 3 seconds to enter alert set mode.
2. Press and release ALERTS button until you see the alert you wish to disarm.
3. Press the +/- buttons to disarm the alert. The alert text goes from ON to OFF.
4. Press the LIGHT button to exit.
Disarm Alerts
Outdoor Humidity Alerts
Wind Speed and Rain Alerts
• When armed alert value is reached, station will beep 5 times each minute, until out of alert range.
• The flashing alert icon will indicate the type of alert.
• Press any button to stop the alert from sounding.
• The alert icon will continue flashing while value while value is in alert range.
Active Alerts

Page | 16
Professional Remote Monitoring Station
UP ARROW: For this to show, the temperature will have to rise by 2°F (1°C), or the humidity go up by
3%RH or more within the current hour.
DOWN ARROW: For this to show, the temperature will have to fall by 2°F (1°C), or the humidity drop by
3%RH or more within the current hour.
Temperature | Humidity Trend Arrows
Your temperature and humidity trend arrows update every 15 minutes. The trend reflects changes over the past
one hour period.
The tree foliage will change seasonally on your weather station. The dates are programmed into your
weather station for an automatic foliage change.
Seasonal Changes in Foliage
March 20th – June 20th
Spring
Autumn
Summer
Winter
June 21st – Sept. 20th
Sept. 21st – Dec 20th
Dec 21st – Mar 19th
Sensor ID | Sensor Search
Each of your sensors has an individual ID number, located by its bar code.
This sensor ID is visible on your station by pressing the SENSOR button.
View ID numbers:
• Press and release the SENSOR button to view individual station and sensor ID numbers. All other information
will disappear temporarily.
TH Sensor ID Multi-sensor ID

Page | 17
Professional Remote Monitoring Station
Search for all sensors:
• While viewing sensor ID, hold the SENSOR button for 3 seconds to search for all sensors.
• The station will search for all sensor ID numbers on the station.
• The sensor reception icon will flash for each sensor while searching.
• The sensor reception icon will be solid when sensor signal is acquired.
• Allow up to 3 minutes to receive sensor signal.
Delete Your Sensor ID
In the rare event you need to replace your sensor, you will first need to delete the old sensor ID
from your station.
1. Remove batteries from your old sensor.
2. Press and release the SENSOR button to view your sensor ID number.
3. While viewing your sensor ID, hold the MINUS button for 5 seconds to delete your old sensor ID. Dashes will
show for the ID number.
4. Your station will automatically begin searching for a new sensor
5. Install batteries in your new sensor and allow up to three minutes for your new sensor readings and ID to
appear on your station.
Press and release the SENSOR button to
view your sensor ID number.
Hold the MINUS button for 5 seconds to
delete your old sensor ID.
Dashes will show for the ID number.
Note: When replacing your Thermo-hygro sensor, press the TX button (under the battery cover) to send a
signal immediately. The Multi-sensors do not have a TX button.
Factory Reset
A Factory Reset will remove all sensor ID numbers and return your station to default settings.
1. Hold the ALERTS and LIGHT button together for 5 seconds.
2. Your station will reset and search for all sensors. Allow up to 3 minutes to reacquire all sensors.

Page | 18
Professional Remote Monitoring Station
Detailed Sensor Set Up and Mounting
RESET
Draining vents for
rain sensor
Reset
button
Red LED
Light
Drain holes for
multi sensor
Rain funnel
(collector)
Wind cups
Battery
compartment
Directional
Vane
The Multi sensor provides wind speed, wind direction and rainfall readings.
LTV-WR1 Multi-sensor:
1. Insert 3 AA batteries into the bottom of the sensor. Observe the correct polarity.
The red LED light will show briefly before transmission.
Mounting:
1. Mount in an open area clear for 50 feet in all directions.
2. Mount with the solar panel facing south, so the wind direction is correct. See N, S, E, W, embossed on the
top of the sensor.
3. Use the bubble level on top of the sensor to ensure it is level, for accurate rainfall readings.
4. The maximum wireless transmission range to the station is over 400 feet (121 meters) in open air, not
including walls or trees.
5. Cups should be on the top of the sensor.
6. Attach to mounting surface with screws through the mounting bracket.
7. The sensor can be mounted from the bottom or from the side.
8. For online video instruction visit: http://bit.ly/Multi_SensorMounting
Alternatively:
• Insert your own mounting pole (up to 1.179”) into the sensor base.
• Tighten screws
• Mounting bracket would not be used.
Bubble
Level
AA
AA
+
-
AA
+
-
+
-
Mounting
Bracket

Page | 19
Professional Remote Monitoring Station
LTV-TH3 Thermo-Hygro Sensor
1. Install 2-AA batteries according to polarity and replace battery cover. The blue LED light will flash
when transmitting.
Mounting:
1. Use the hole at the top to hang your sensor from the back using a nail. Or, insert one mounting screw through
the front of your sensor.
2. Mount your sensor on a north-facing wall or in any shaded area. Under an eave or deck rail is preferred.
3. The maximum wireless transmission range to the weather station is up to 400 feet (121 meters) in open air,
not including walls or floors.
4. Be sure your sensor is mounted vertically, to allow moisture to drain out properly.
5. For online video instruction visit: http://bit.ly/TH_SensorMounting
LED Light
AA
+
-
AA
+
-
Battery Cover
Hole for
mounting
TX
F/C
∙ Press TX to send a signal
∙ Press F/C to select Fahrenheit
or Celsius display on sensor.
V40-PRO station:
1. Insert the power cord into a wall outlet, then into your station.
Optional: insert 3 AA batteries* into your station to maintain time/date in the event of a power outage.
*Battery operation only will not update sensor or Wi-Fi data. Power cord is required.
Mounting:
• Use the mounting holes on the back to place your station on a wall.
• Use the pull down stand on the back of your station to place on a desk or counter.
NOTE: You will want to place your station near an outlet, as the power cord is required for operation. Also, you will want
to mount or place this station within good Wi-Fi range of your wireless router. This will help when using all of the remote
monitoring options the La Crosse View™ app has to oer.
Optional
Batteries
Power
Cord
AA
AA
+
-
AA
+
-
+
-

Page | 20
Professional Remote Monitoring Station
Replace Wind Cups
1. Loosen the screw on side of cups
2. Remove cups
3. Install new cups
4. Tighten screw
Replace Directional Vane
1. Loosen the screw on side of vane
2. Remove direction vane
3. Install new vane
4. Tighten screw
Clean Rain Sensor
1. Remove rain funnel (pull flat side firmly upward).
2. Gently remove debris or insects inside the rain sensor.
3. Clear debris from drain vents.
4. Clear debris from the rain funnel.
5. Reinstall the rain funnel.
Note: Do not oil the rain sensor.
/