Page is loading ...

ELECTRIC ROTARY HAMMER CT0700 & CT0701
ORIGINAL INSTRUCTION
CAUTION:
Before using this
electric rotary hammer
drill or any of its
accessories, read this
manual and follow all
its Safety Rules and
Operating Instructions.
Safety
Instructions
Assembly
Operation
Maintenance
Parts List
SAVE THESE INSTRUCTIONS FOR REFERENCE
Cannon Tools Limited
Address: 20 Station Road, Rowley Regis, West Midlands, B65 0JU.UNITED KINGDOM

EC DECLARATION OF CONFORMITY
We CANNON TOOLS LTD
20 Station road, Rowley Regis, West Midlands,B65 0JU.U.K.
Declare that the following machine complies with the appropriate basic safety and
health requirements of the EC Directive based on its design and type, as brought into
circulation by us.
In case of alteration of the machine, not agreed upon by us, this declaration will lose
its validity.
Product description: ELECTRIC ROTARY HAMMER
Model: CT0700 & CT0701
Applicable EC Directives:
EC-Machinery Directive 2006/42/EC
EC-Directive of Electromagnetic Compatibility(EMC)2014/30/EU
Harmonized standards
EN 60745-1, EN 60745-2-6, EN 55014-1, EN 55014-2,
EN 61000-3-2, EN 61000-3-3
20 Station Road, Rowley Regis, West Midlands, B65 0JU.U.K.
Mr. Gurcharan Tony Singh Sanghera
Managing Director
CANNON TOOLS LTD
2017-10-31
2

SPECIFICATIONS
ROTARY HAMMER
Model
CT0700
CT0701
SDS Chuck
SDS fitting
SDS fitting
Voltage
230V~ 50Hz
110V~ 60Hz
No Load Speed
0-860/min
0-860/min
No. of strokes, under load
0-4250Bpm
0-4250Bpm
Input power
1500 W
1500 W
Drilling capacity in
Concrete mm
Steel mm
32
13
32
13
Wood mm
42
42
Weight kg
5.2
5.2
The SDS Rotary hammer power tool noise output may exceed
85dB(A) at the workplace. Wear safety-hearing protection
Note:
- the declared vibration total value has been measured in accordance with a
standard test method and may be used for
comparing one tool with another;
- the declared vibration total value may also be used in a preliminary assessment of
exposure.
Warning:
- the vibration emission during actual use of the power tool can differ from the
declared total value depending on the ways in which the tool is used;
- avoid vibration risk
Suggestion: 1) wear glove during operation
2) limit operating time and shorten trigger time.
3
WARNING
!

GENERAL SAFETY RULES
Read all safety warnings and all
instructions. Failure to follow all instructions
listed below may result in electric shock, fire
and/or serious injury. The term “power tool” in
all of the warnings listed below refers to your
mains operated (corded) power tool or
battery operated (cordless) power tool.
SAVE THESE INSTRUCTIONS
WORK AREA SAFETY
Keep work area clean and well lit.
Cluttered and dark areas invite accidents.
Do not operate power tools in explosive
atmospheres, such as in the presence of
flammable liquids, gases or dust. Power
tools create sparks, which may ignite the dust
or fumes.
Keep children and bystanders away while
operating a power tool. Distractions can
cause you to lose control.
ELECTRICAL SAFETY
Power tool plugs must match the outlet.
Never modify the plug in any way. Do not
use any adapter plugs with earthed
(grounded) power tools. Unmodified plugs
and matching outlets will reduce risk of
electric shock.
Avoid body contact with earthed or
grounded surfaces such as pipes,
radiators, ranges and refrigerators. There
is an increased risk of electric shock if your
body is earthed or grounded.
Do not expose power tools to rain or wet
conditions. Water entering the power tool
will increase the risk of electric shock.
Do not abuse the cord. Never use the cord
for carrying, pulling or unplugging the
power tool. Keep cord away from heat, oil,
sharp edges or moving parts. Damaged or
entangled cords increase the risk of electric
shock.
When operating a power tool outdoors,
use an extension cord suitable for
outdoor use. Use of a cord suitable for
outdoor use reduces the risk of electric shock
If operating a power tool in a damp
location is unavoidable, use a residual
current device (RCD) protected supply.
Use of an RCD reduces the risk of electric
shock.
PERSONAL SAFETY
Stay alert, watch what you are doing and
use common sense when operating a
power tool. Do not use a power tool while
you are tired or under the influence of
drugs, alcohol or medication. A moment of
inattention while operating power tools may
result in serious personal injury.
Use personal protective equipment.
Always wear eye protection. Safety
equipment such as dust mask, non-skid
safety shoes, hardhat, or hearing protection
used for appropriate conditions will reduce
personal injuries.
Prevent unintentional starting. Ensure the
switch is in the off-position before
connecting to power source and/or
battery pack, picking up or carrying the
tool.
Carrying power tools with your finger on the
switch or energizing power tools that have
the switch on invites accidents.
Remove any adjusting key or wrench
before turning the power tool on. A wrench
or key left attached to a rotating part of the
power tool may result in personal injury.
Do not overreach. Keep proper footing
and balance at all times. This enables
better control of the power tool in unexpected
situations.
Dress properly. Do not wear loose
clothing or jewellery. Keep your hair,
clothing and gloves away from moving
parts. Loose clothes, jewellery or long hair
can be caught in moving parts.
If devices are provided for the connection
of dust extraction and collection facilities,
ensure these are connected and properly
used. Use of these devices can reduce dust
related hazards.
POWER TOOL SAFETY
WARNING
!
4

POWER TOOL USE AND CARE
Do not force the power tool. Use the
correct power tool for your application.
The correct power tool will do the job better
and safer at the rate for which it was
designed.
Do not use the tool if the switch does not
turn it ON or OFF. Any power tool that
cannot be controlled with the switch is
dangerous and must be repaired.
Disconnect the plug from the power
source before making any adjustments,
changing accessories or storing power
tools. Such preventive safety measures
reduce the risk of starting the power tool
accidentally.
Store idle power tools out of the reach of
children and do not allow persons
unfamiliar with the power tool or these
instructions to operate the power tool.
Power tools are dangerous in the hands of
untrained users.
Maintain power tools. Check for
misalignment or binding of moving parts,
breakage of parts and any other condition
that may affect the power tools operation.
If damaged, have the power tool repaired
before use. Many accidents are caused by
poorly maintained power tools.
Keep cutting tools sharp and clean.
Properly maintained cutting tools with sharp
cutting edges are less likely to bind and are
easier to control.
Use the power tool, accessories and tool
bits etc., in accordance with these
instructions and in the manner intended
for the particular type of power tool,
taking into account the working
conditions and the work to be performed.
Use of the power tool for operations different
from intended could result in a hazardous
situation.
SERVICE
Have your power tool serviced by a
qualified repair person using only
identical replacement parts. This will
ensure that the safety of the power tool is
maintained.
When servicing a tool, use only identical
replacement parts. Follow instructions in
the Maintenance section of this manual.
Use of unauthorized parts or failure to follow
Maintenance instructions may create a risk of
electric shock or injury.
SPECIFIC SAFETY RULES
1.Use auxiliary handle(s), if supplied with the
tool. Loss of control can cause personal
injury.
2. Hold power tool by insulated gripping
surfaces, when performing an operation
where the cutting accessory may contact
hidden wiring or its own cord. Cutting
accessory contacting a “live” wire may make
exposed metal parts of the power tool “live”
and could give the operator an electric shock.
For your safety, do not plug in your Power
tool until you have read and understood
this Owner’s Manual.
WEAR EYE PROTECTION. Use face or
dust mask along with safety goggles if
operation is dusty. Use hearing
protection, particularly during extended
periods of operation, wear safety shoes.
Wear ear protectors. Exposure to noise
can cause hearing loss
DO NOT wear jewellery, neckties or
loose clothing.
DO NOT drill material too small to be
securely held.
ALWAYS keep hands out of the path of
the drill bit. Avoid awkward hand
positions where a sudden slip could
cause your hand to move into the path of
the drill bit or saw blade.
SECURE WORKPIECE. Use clamps or
a vice to hold the work when practical. It
is safer than using your hand and it frees
both hands to operate the tool.
MAKE SURE there are no nails or
foreign objects in the part of the
workpiece to be drilled.
POWER TOOL SAFETY
5
WARNING
!

SPECIFIC SAFETY RULES – cont’d
TO AVOID INJURY from accidental
starting, always remove the Plug from
the electrical socket before installing or
removing a drill bit, accessory or
attachment.
Use a metal detector to determine if there
are gas or water pipes hidden in the work
area or call the local utility company for
assistance before beginning the operation.
Striking or cutting into a gas line will result in
explosion. Water entering an electrical device
may cause electrocution.
Always use the side handle for maximum
control over torque reaction or kick-back.
Never attempt to operate this tool with
one hand. The slip clutch engages if you
firmly control the tool during a torque reaction
or kickback.
Use thick cushioned gloves and limit the
exposure time by taking frequent rest
periods. Vibration caused by hammer-drill
action may be harmful to your hands and
arms.
Position the cord clear of rotating bit. Do
not wrap the cord around your arm or
wrist. If cord becomes entangled with the
spinning bit it could entrap you causing
serious personal injury.
Position yourself to avoid being caught
between the tool or side handle and walls
or posts. Should the bit become bound or
jammed in the work, the reaction torque of
the tool could crush your hand or leg.
Do not strike the bit with a handheld
hammer or sledge hammer when
attempting to dislodge a bound or
jammed bit. Fragments of metal from the bit
could dislodge and strike you or bystanders.
Some of the following symbols may be
used on your tool. Please study them and
learn their meaning. Proper interpretation
of these symbols will allow you to operate
the tool better and safer.
This symbol designates
that this tool complies to
European directives.
Were ear and eye
protection
Read original manual
V
volts
A
amperes
Hz
hertz
W
watt
F
farads
Kg
kilograms
h
Hours
min
minutes
s
seconds
No load speed
./min or
minˉ¹
Revolutions or
reciprocations per minute
alternating current
class II construction
1, 2, 3, ...
Speed Selector settings
Diameter
Off position
Arrow
Warning symbol
IPXX
IP symbol
Hammer symbol
Drill symbol
POWER TOOL SAFETY
HAMMER DRILL SAFETY
6
SYMBOLS

Oil gauge
Trigger
SDS chuck
Motor Housing Carbon brush
KNOW YOUR ELECTRIC HAMMER
Rotary Hammer
7

ACCESSORIES & CARTON CONTENTS
AVAILABLE ACCESSORIES
Use only accessories recommended for
this Rotary hammer . Follow instructions
that accompany accessories. Use of
improper accessories may cause injury to
the operator or damage to the rotary
hammer drill.
Do not use any accessory unless you have
completely read the instructions or Owner’s
Manual for that accessory.
Various Drills
Chuck
Disconnect the plug from the power
source before making any assembly,
adjustments or changing accessories.
Such preventive safety measures reduce the
risk of starting the tool accidentally.
Carefully unpack the tools see “Components
chart” at right hand side of this page
NOTE: See illustration of components on
Page 9.
To avoid fire or toxic reaction, never use
gasoline, naphtha, acetone, lacquer
thinners or similar highly volatile solvents
to clean the tool.
CARTON CONTENTS
WARNING
!
CARTON CONTENTS
WARNING
!
WARNING
!
8
Drill no CT0700 & CT0701
KEY
DESCRIPTION
QTY
A
Rotary Hammer
1
B
SDS Chisels
2
C
SDS Masonry drills
3
D
SDS chuck 1-1.5 to
13mm
1
E
Chuck key
1
F
Grease tub
1
G
Drill dust cap
1
H
Plastic carry case
1
I
Carbon brush
1

Always make sure the power tool is
isolated from the power supply before
fitting any attachment
Adjust the handle. See (Fig 1)
For maximum control and safer operation,
always use the auxiliary handle with this tool.
The auxiliary handle swings around to either
side, allowing easy handling of the tool in any
position. Loosen the auxiliary handle by
turning it counter clockwise, swing it to the
desired position and then tighten it by turning
clockwise.
Fig 1
Switching hammer drill on/off
The hammer drill has an On/Off switch (Fig 2)
built in to the handle. Holding the hammer
drill with both hands simply pull the trigger
and the motor will start. To switch off release
the trigger.
Switch
trigger
Fig 2
WARNING
The rotary hammer drill continues for a few
second after the trigger has been release, so
be careful when putting it down.
FIT CHISEL OR DRILL (Fig 3)
1. Slide back the locking sleeve. Caution:
Make sure the tool is switched off and
unplugged and wear protective gloves.
2. Fit the SDS-plus chisel or drill into the
chuck.
3. Make sure that the chisel or drill is fully
inserted.
4. Release the locking sleeve and check
the chisel or drill is securely fixed. To
remove the chisel or drill, slide back the
locking sleeve and pull out the chisel or
drill.
HAMMER FUNCTION (Fig 4)
The hammer/drill switch can switch the drill,
hammer and hammer/ drill functions.
To set the function, please use below
compounding of front and rear hammer/drill
switch.
Hammer/ drill mode:
Drill in masonry, concrete and natural stone.
Don't use the hammer drill function for
ceramic
tile or others material can not withstand
impact
energy.
ASSEMBLY & OPERATION
10
WARNING
!
Fig 3

Hammer mode:
Drill in masonry, concrete and natural stone.
Drilling mode:
Drilling in wood, synthetic materials and
metal.
WARNING! No function mode:
The motor turns without load,the shaft will
not turn. Do not set the switch like this.
It may damage the motor greatly.
Important! When hammer drilling
you will require a low pressure.
Too much pressure will place
unnecessary load on the motor.
Check the drill bits regularly. Re-
sharpen or replace blunt drill bits.
Do not use the chuck with SDS
connector in combination with the
hammer/hammer drill function!
Variable speed dial
Your tool is equipped with a variable speed
dial. The speed and impact force can be
adjusted by rotating the dial. Higher speeds
and impact force work best for faster
penetration when drilling or chiseling in hard
masonry material. Slower speeds work best
to reduce breakout when bits exit material
being drilled or chiseling material such as
plaster or tile (Fig. 4).
Regardless of the pressure applied on the
trigger, the tool will not operate any faster
than maximum speed setting selected.
Fig 4
This rotary hammer drill does not have
reverse direction, so always take care not
to force the drill in case the drill bit gets
stuck. Always make sure you keep the
drill going in and out to remove debris to
make sure the drill does not get stuck.
This drill does not have torque facility. It
is not recommended to use screwdriver
bits in this drill as it could damage the
screwdriver head or bit and could cause
serious injury
REMOVING ACCESSORIES
Accessories may be hot after use. Avoid
contact with skin and use proper protective
gloves or cloth to remove.
To remove an accessory, pull and hold
locking
sleeve backward and pull bit forward. All
accessories should be wiped clean after
removing.
NOTE: The high efficiency available from the
rotary hammers can only be obtained if sharp
and undamaged accessories are used. The
"cost" to maintain sharp and undamaged
accessories is more than offset by the "time
saved" in operating the tool with sharp
accessories.
WARNING
!
WARNING
!
ASSEMBLY & OPERATION
11

Warning: Always use the side grip (auxiliary
handle) and firmly
hold the tool by both side grip and switch
handle during
operations.
HAMMER DRILLING OPERATION
Set the change lever to the symbol.
Position the bit at the desired location for the
hole, then pull the switch trigger. Do not force
the tool. Light pressure gives best results.
Keep the tool in position and prevent it from
slipping away from the hole.
Do not apply more pressure when the hole
becomes clogged with chips or particles.
Instead, run the tool at an idle, then remove
the bit partially from the hole. By repeating
this several times, the hole will be cleaned
out and normal drilling may be resumed.
CAUTION:
• There is a tremendous and sudden twisting
force exerted on the tool/bit at the time of
hole break-through, when the hole becomes
clogged with chips and particles, or when
striking reinforcing rods embedded in the
concrete. Always hold the tool firmly with
both hands. Failure to do so may result in the
loss of control of the tool and potentially
severe injury.
Electrical products must not be thrown out with
domestic waste. Recycle them at the special
disposal centers provided for the purpose.
Contact your local authorities or stockiest for
advice on recycling.
GENERAL
When servicing, use only identical
replacement parts. Use of any other part
may create a hazard or cause product
damage.
DO NOT use solvents when cleaning plastic
parts. Most plastics are susceptible to
damage from various types of commercial
solvents and may be damaged by their use.
Use clean cloth to remove dirt, dust, oil,
grease et
Do not at any time allow brake fluids,
gasoline, petroleum-based products,
penetrating oils, etc. to come in contact
with plastic parts. They contain chemicals
that can damage, weaken or destroy
plastic.
DO NOT abuse power tools. Abusive
practices can damage the tool as well as the
workpiece.
Have you read “POWER TOOL
SAFETY”, “Hammer DRILL SAFETY”
and “SYMBOLS” on pages 4,5 & 6 of
this manual? If not, please do it now
before you operate this Hammer
drill. Your safety depends on it!
Every time you use the hammer drill
you should verify the following:
1. SDS bit or drill chuck is secure.
2. Work piece is properly secured
in SDS chuck or drill chuck.
3. Select drill or masonry before
you engage in the proposed
operation
4. Safety glasses are being worn.
Failure to adhere to these safety
rules can greatly increase the
chances of injury.
WARNING
!
12
WARNING
!
WARNING
!
MAINTENANCE
ASSEMBLY & OPERATION

DO NOT attempt to modify tools or create
accessories not recommended. Any such
alteration or modification is misuse and
could result in a hazardous condition
leading to possible serious injury. It will
also void the warranty.
LUBRICATION
All of the bearings in these electric tools are
lubricated with a sufficient amount of high-
grade lubricant for the life of the unit under
normal conditions. Therefore, no further
lubrication is required.
13

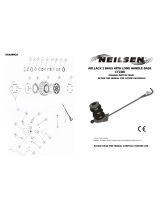
PARTS DIAGRAM
13

14
PARTS LIST


/