Page is loading ...

4030-239 Rev G
Hearth & Home Technologies Inc.
800 W. Jefferson, Lake City, MN 55041.
INSTALLATION & OPERATING
INSTRUCTIONS
CRESTFIRE SERIES
CF550E/CF750E (120V)
CF550EV/CF750EV (208/240V)
ELECTRIC FIREPLACES
Note: Read these instructions completely before
beginning installation. Failure to follow them
could cause an appliance malfunction resulting
in serious injury and/or property damage.
WARNING!
Improper installation, adjustment, alteration, service or
maintenance can cause injury or property damage. Refer to
this manual. For assistance or additional information, con-
sult a qualified installer.
CAUTION:
Do not expose the appliance to the elements
(such as rain, etc.).
SAVE THESE INSTRUCTIONS
WARNING!
Do not modify this appliance. Use it only as described
in this manual. Any other use not recommended by
the manufacturer may result in fire, electric shock or
personal injury and void the warranty.
WARNING!
All electric heaters have hot and arcing or sparking parts
inside. Do not use it in areas where gasoline, paint or flam-
mable liquids are or stored. Do not use where the appli-
ance may be exposed to flammable vapors.
WARNING!
This appliance is tested and listed for use only with
the optional accessories listed in these instructions.
Use of optional accessories not specifically tested for
this appliance could void the appliance warranty and/
or result in a safety hazard.

Hearth & Home Technologies Inc. 800 W.
Jefferson, Lake City, MN 55041.
CRESTFIRE SERIES ELECTRIC FIREPLACE
2
10/03
4030-239 Rev G
IMPORTANT INSTRUCTIONS!
When using electrical appliances, basic precautions should always be followed to reduce the risk
of fire, electric shock, and injury to persons, including the following:
1. Read all instructions before using this heater.
2. This heater is hot when in use. To avoid burns, do not let bare skin touch hot surfaces. If provided, use handles when moving this
heater. Keep combustible materials, such as furniture, pillows, bedding, papers, clothes, and curtains at least 3 feet (.9m) from the
front of the heater and keep them away from the sides and rear.
3. Extreme caution is necessary when any heater is used by or near children or invalids and whenever the heater is left operating and
unattended.
4. Always unplug heater when not in use.
5. Do not operate any heater with a damaged cord or plug or after the heater malfunctions, has been dropped or damaged in any
manner. Return heater to authorized service facility for examination, electrical or mechanical adjustment, or repair.
6. Do not use outdoors.
7. This heater is not intended for use in bathrooms, laundry areas and similar indoor locations. Never locate heater where it may fall
into a bathtub or other water container.
8. Do not run cord under carpeting. Do not cover cord with throw rugs, runners, or the like. Arrange cord away from traffic area and
where it will not be tripped over.
9. To disconnect heater, turn controls to off, then remove plug from outlet.
10. Do not insert or allow foreign objects to enter any ventilation or exhaust opening as this may cause an electric shock or fire, or
damage the heater.
11. To prevent a possible fire, do not block air intakes or exhaust in any manner.
12. A heater has hot and arcing or sparking parts inside. Do not use it in areas where gasoline, paint, or flammable liquids are used or
stored.
13. Use this heater only as described in this manual. Any other use not recommended by the manufacturer may cause fire, electric
shock, or injury to persons.
14. Avoid the use of an extension cord because the extension cord may overheat and cause a risk of fire. However, if you have to use
an extension cord, the cord shall be No. 16 AWG minimum size and rated not less than 1875 watts.
15. Always use properly grounded fused and polarized outlets.
16. Always use ground fault protection where required by electrical code.
17. Always disconnect power before performing any cleaning, maintenance or relocation of the appliance.
18. To prevent a possible fire, do not burn wood or other materials in this appliance.
19. To prevent personal injury, do not strike appliance glass.
20. To prevent electric shock or fire, always use a certified electrician should new circuits or outlets be required.
21. When transporting or storing the heater, keep in a dry place free from excessive vibration and store as to avoid damage.
22. SAVE THESE INSTRUCTIONS FOR FUTURE REFERENCE
Contents
A. Listing Approvals ........................................................................................................................................................... 3
B. Appliance Dimensions ................................................................................................................................................... 3
C. Location and Clearances ............................................................................................................................................... 4
D. Framing .......................................................................................................................................................................... 5
E. Installation...................................................................................................................................................................... 6
F. Wiring ............................................................................................................................................................................ 7
G. Finishing ........................................................................................................................................................................ 9
H. Final Installation ........................................................................................................................................................... 10
I. Operating Instructions .................................................................................................................................................. 11
J. Maintenance Instructions ............................................................................................................................................. 14
K. Troubleshooting ........................................................................................................................................................... 16
L. Optional Components .................................................................................................................................................. 17
M. Replacement Parts ...................................................................................................................................................... 20
Index ............................................................................................................................................................................ 23
Warranty ...................................................................................................................................................................... 24
Note: An arrow (Æ) found in the text and in the index signifies change in content.

Hearth & Home Technologies Inc. 800 W.
Jefferson, Lake City, MN 55041.
CRESTFIRE SERIES ELECTRIC FIREPLACE
3
10/03
4030-239 Rev G
A. LISTING APPROVALS
U.S.AndCanada Certification
The Crestfire Series appliance has been tested in accordance with the UL2021 Standards for fixed and location-dedicated electric
room heaters in the United States, the current CSA C22.2 NO. 46 in Canada and has been listed by Underwriters Laboratories Inc.
for installation as described in this manual. All components are UL or CSA safety certified.
If you need assistance during installation, please contact your local dealer or the Heat-N-Glo Technical Services Department at
1-888-427-3973.
Heat-N-Glo ® is a registered trademark of Hearth & Home Technologies Inc., Division of HON INDUSTRIES.
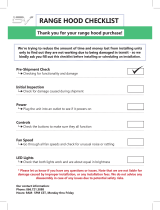
B. APPLIANCE DIMENSIONS
CF750E/CF750EV
LEDOMnoitpircseDegatloVsttaW
spmA
)042/802/021(
E055FCecalperif"13042/802/0210062/0002/00415.21/8.01/5.21
VE055FCecalperif"13042/8020062/00025.21/8.01
E057FCecalperif"63042/802/0210062/0002/00415.21/8.01/5.21
VE057FCecalperif"63042/8020062/00025.21/8.01
Note: This equipment has been
tested and found to comply with the
limits for a Class B digital device,
pursuant to Part 15 of the FCC rules.
CF550E/CF550EV
Æ

Hearth & Home Technologies Inc. 800 W.
Jefferson, Lake City, MN 55041.
CRESTFIRE SERIES ELECTRIC FIREPLACE
4
10/03
4030-239 Rev G
C. LOCATION AND CLEARANCES
WARNING!
Due to high temperatures, this appliance should be lo-
cated out of traffic. Keep combustible materials such
as furniture, pillows, bedding, papers, clothes and cur-
tains at least 3 feet (.9M) from the front of the appliance.
CAUTION:
Do not expose appliance to the elements (such as
rain, etc.).
WARNING!
Never locate this appliance where it may fall into a
bathtub or other water container.
1. Appliance Locations and Space
Requirements
Figure 1 illustrates a variety of ways the
appliance may be located in a room. The
Crestfire Series appliances may be installed
directly on the floor or raised on a hearth.
2. Clearances
Figure 1 shows all clearances that must be
maintained around the appliance.
Figure 1 - Appliance Locations
CAUTION:
Wear gloves and safety glasses for
protection during installation and
maintenance.
Note: Minimum and maximum clearances must be main-
tained at all times. Illustrations throughout these instructions
reflect typical installations and are for design purposes only.
Actual installation may vary slightly due to individual design
preferences.
The illustrations and diagrams used throughout these instal-
lation instructions are not drawn to scale.
WARNING!
To prevent contact with sagging or loose insulation, the appliance must not be installed against vapor barri-
ers or exposed insulation. Localized overheating could occur and a fire could result.

Hearth & Home Technologies Inc. 800 W.
Jefferson, Lake City, MN 55041.
CRESTFIRE SERIES ELECTRIC FIREPLACE
5
10/03
4030-239 Rev G
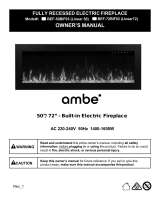
Figure 2 shows a typical framing of this appliance using combustible materials. All required clearances to combustibles must be
adhered to. Header height is measured from the base of the appliance.
D. FRAMING
Figure 2 - Framing
CAUTION:
Provide adequate clearances around the air openings
and adequate accessibility clearances for servicing and
proper operation.
Tools and building supplies normally required for
installation:
Tools: Building Supplies:
Saw Wall-finishing materials
Pliers Framing material
Hammer Surround
Phillips screwdriver Caulking material
Tape measure
Level
Electric drill/bits
Square
Gloves

Hearth & Home Technologies Inc. 800 W.
Jefferson, Lake City, MN 55041.
CRESTFIRE SERIES ELECTRIC FIREPLACE
6
10/03
4030-239 Rev G
WARNING - RISK OF FIRE!
The power cord must not be pinched or against a sharp
edge. Secure cord to avoid tripping or snagging to
reduce the risk of fire, electric shock or personal in-
jury.
Do not run cord under carpeting. Do not cover cord
with throw rugs, runners or the like. Arrange cord away
from traffic areas and where it will not be tripped over.
WARNING - RISK OF FIRE!
To prevent a possible fire, do not block air intake or
exhaust in any manner. Do not use on soft surfaces
(like a bed) where openings may become blocked.
E. INSTALLATION
Select a suitable location that is not susceptible to moisture and is away from drapes, furniture and high traffic areas.
If installing the appliance on/over carpeting, the appliance must be installed on a wood or metal panel extending the full width
and depth of the appliance.
CAUTION:
When transporting or storing this appliance and cord,
keep in a dry place that is free from excessive vibration.
Store so as to avoid damage.
1. Wall Cabinet Kit, Corner Cabinet Kit or Custom Cabinet Installation
*If the power cord is to be used, the Cabinet must provide access to the wall outlet.*
a. For ease of electrical hookup, you may wish to install the appliance near an existing outlet. A 15 amp, 120 volt circuit is
required. A dedicated circuit is preferred but not essential in all cases. A dedicated circuit will be required if, after installation,
the circuit trips or fuse blows on a regular basis while the appliance is operating. Additional appliances on the same circuit
may exceed the current rating of the circuit breaker.
b. If using a listed wall cabinet or corner cabinet, refer to the installation instructions supplied with the kit. For custom cabinets,
frame and construct with the opening and depth dimensions listed in Figures 1 and 2.
c. Before plugging the appliance into the wall outlet, make sure all control switches are in the OFF position. Open the lower
grille panel to gain access to the controls.
d. Before finishing the cabinet, the appliance must be set into the cabinet and the power cord routed to the electrical outlet. If the
power cord is not being used, refer to Section F. Wiring for hard wiring instructions. If the power cord does not reach the
outlet, a No. 16-AWG minimum wire size extension cord rated for a minimum of 1875 watts may be used.
e. To complete the appliance installation, refer to Section H. Final Installation.
2. Non-Cabinet or Chase Installation
a. Follow recommended framing dimensions in Figures 1 and 2.
b. Set the appliance into the framed opening. Secure the appliance in place by bending out the two nailing flanges on both sides
of the appliance and nail to the framing. The nailing flanges have been positioned 5/8 back from the front of the appliance to
allow for the addition of drywall.
c. Wiring instructions for 120/208/240V can be found in Section F. Wiring. The power cord must be removed and appliance be
hardwired in all non-cabinet or chase installations. Use recommended power supply wire size in accordance to national and
local codes. It is recommended to have the appliance on a dedicated service.
d. Remove the protective cover before finishing the front of the appliance. To finish out the appliance, follow the instructions
found in Section G. Finishing.
e. To complete appliance installation, see Section H. Final Installation.
Note: Follow all national and local electrical codes.

Hearth & Home Technologies Inc. 800 W.
Jefferson, Lake City, MN 55041.
CRESTFIRE SERIES ELECTRIC FIREPLACE
7
10/03
4030-239 Rev G
Note: This appliance must be electrically wired and grounded
in accordance with local codes or, in the absence of local codes,
with National Electric Code ANSI/NFPA 70-latest edition or
the Canadian Electric Code, CSA C2.1 as appropriate.
Note: Optional Accessories Requirements: Wiring for optional
accessories should be done now to avoid reconstruction.
CAUTION:
Label all wires prior to disconnection when servicing
controls. Wiring errors can cause improper and dangerous
operation. Verify proper operation after servicing.
F. WIRING
All wiring to be done by a qualified electrician.
Use appropriate wire to meet local and national
codes for rated power consumption.
1. Power Supply Wiring
a. 110/120VAC Wall Outlet Installation
1) The appliance is wired from factory with a polarized plug.
2) For ease of electrical hook up, you may wish to install the appliance near an existing outlet. A 15 amp, 120 volt circuit is
required. A dedicated circuit is preferred but not essential in all cases. A dedicated circuit will be required if, after installation,
the circuit trips or fuse blows on a regular basis when the appliance is operated. Additional appliances on the same circuit
may exceed the current rating of the circuit breaker.
3) Before plugging appliance into wall outlet, make sure all control switches are in the OFF position. To access the controls,
lift up on the lower grille panel and rotate it forward.
4) If the power cord is not being used, go to Step 1b below. If the cord does not reach the outlet, a No. 16-AWG minimum wire
size extension cord rated for a minimum of 1875 watts may be used.
b. 110/120VAC Hardwire Installation (Minimum 14 gauge two conductor wire, non-metallic sheathing with ground.)
1) Turn off circuit breaker.
2) Remove cover plate located on the right side of appliance.
3) Disconnect black (L
1
) and white (L
2
) wires between the appliance and plug. Remove the power cord from the cover plate.
Remove the electrical knockout and install the cable clamp (not provided) onto the cover plate. Remove the connectors
on the wires from the appliance and strip them back ½.
4) Feed 8 of service wire through cable clamp and secure.
5) Connect black (L
1
) and white (L
2
) wires of the appliance to the black and white wires from the service. Connect green
(ground) wire from appliance to the ground of the service. See Figure 3.
6) Wall switch wiring (see below) is to be done at this time.
7) Replace the cover plate onto the appliance.
8) Remove the protective cover by cutting the tape located on the outer perimeter and follow Section H. Final Installation on
setting up the appliance.
c. HT240V Heater Kit and 208/220/240VAC Hardwire Installation (Minimum 14 gauge three conductor wire, non-metallic
sheathing with ground.)
1) Turn off circuit breaker.
2) Remove cover plate located on the right side of appliance.
3) For HT240V installation only, disconnect black (L
1
) and white (L
2
) wires between the appliance and plug. Remove the
power cord (HT240V only) from the cover plate.
4) Remove the electrical knockout and install the cable clamp onto the cover plate. Remove the connectors on the wires
from the appliance and strip them back ½.
5) Feed 8 of service wire through cable clamp (not provided) and secure.
6) Connect black (L
1
), white (L
2
) and red (L
3
) wires of the appliance to the black, white and red wires from the service.
Connect green (ground) wire from appliance to the ground of the service. See Figure 4.
7) Wall switch wiring (see below) is to be done at this time.
8) Replace the cover plate onto the appliance.
9) Remove the protective cover by cutting the tape located on the outer perimeter and follow Section I. Final Installation on
setting up the appliance.
2. Wall Switch Wiring (24VAC) *Do not connect wires to 120/208/240VAC*
(hardwired appliances only)
a. Turn off circuit breaker.
b. Remove cover plate located on the right side of appliance.
c. Feed 8 of wire for the wall switch through the cable clamp and secure. Low voltage wire can be used for the wall switch
connection. It is recommended to only go 10 from the appliance to the wall switch.

Hearth & Home Technologies Inc. 800 W.
Jefferson, Lake City, MN 55041.
CRESTFIRE SERIES ELECTRIC FIREPLACE
8
10/03
4030-239 Rev G
WARNING!
Always use properly grounded, fused and polarized
outlets. Always use ground fault protection where
required by electrical code.
Figure 3 - 110V/120V Wiring Diagram
Figure 4 - 208V/240V Wiring Diagram
d. Locate the light blue (wall switch) wires in the appliance.
Connect one wall switch (blue) wire to wire for switch and
connect the other wall switch (blue) wire to the other wire for
switch.
e. Replace the cover plate onto the appliance.
f. Run the wall switch wire to the wall box and connect to a wall
switch (WSK-21 & WSK-21-W).

Hearth & Home Technologies Inc. 800 W.
Jefferson, Lake City, MN 55041.
CRESTFIRE SERIES ELECTRIC FIREPLACE
9
10/03
4030-239 Rev G
G. FINISHING
Combustible Finishing Material
Materials made of or surfaced with wood, compressed paper, plant
fibers, plastics or any material capable of igniting and burning,
whether flame proofed or not, plastered or unplastered (this includes
drywall).
Noncombustible Finishing Material
Materials which will not ignite and burn. Such materials are those
consisting entirely of steel, iron, brick, tile, concrete, slate, glass or
plasters or combinations thereof, or have a UL Fire rating of Zero(0).
Note: The remote wall switch (hard wired appliances
only) must be wired prior to applying the finishing material
in order to avoid reconstruction.
Figure 5 - Finishing Materials
WARNING!
Grilles on this appliance cannot, in any way, be cov-
ered as it may create a fire hazard.
Finishing Checklist
1. Power supply service must be either completed or placed within the appliance prior to finishing to avoid reconstruction. Wall
switch wires (hardwired appliances only) must also be completed to avoid reconstruction. See Section F. Wiring.
2. Combustible material may cover the black outer surface by ½ on the 110/120V appliances only. See Figures 5-6.
Combustible material may not cover the black outer surface on 208/220/240V appliances. See Figure 7.
Grilles and air openings cannot be covered in any circumstances.
3. Noncombustible material may cover all black outer surfaces. Grilles and air openings may not be covered.
4. Protective cover may stay on during framing, but removed before final finishing. Once final finishing has been completed, the
protective cover can be used to protect appliance until final installation is complete.
Figure 7 - Combustible Finishing Material
(for 208/220/240V appliances)
Figure 6 - Combustible Finishing Material
(for 110/120V appliances)

Hearth & Home Technologies Inc. 800 W.
Jefferson, Lake City, MN 55041.
CRESTFIRE SERIES ELECTRIC FIREPLACE
10
10/03
4030-239 Rev G
H. FINAL INSTALLATION
Remove the protective cover to access final
installation items. Remove the hood, lava rock and
white rock from the inside of the appliance.
1. Attaching the Hood
Attach the hood by sliding the short flange into the
clips located above the upper panel. See Figure8.
2. Remove the Log Assembly
The logs are attached to the grate by two zip-ties.
Carefully cut both ties using a utility knife or side
cutters. Discard the ties and packaging material. Lift
the log set straight up and place in a safe place. At
this time, the optional refractory can be installed into
the appliance. To install the refractory, refer to the
installation instructions supplied with the refractory
kit.
3. White Rock
Open the bag of white rock and spread it over the ember
bed glass and hearth pan. This will create the effect of
burning embers. Not all of the white rock needs to be
used. See Figure 9.
4. Lava Rock
Open the bag of lava rock (black) and spread it
sparingly on top of the white rock. This will create the
effect of an ash bed. Not all of the lava rock needs to
be used. See Figure 10.
5. Replace the Log Assembly
Set the logs back onto the grate assembly. Some of
the rock may have to be rearranged. This will allow
the logs to set correctly on the grate. See Figure 11.
Installation of other optional accessories may be done
at this time.
The appliance is now ready to operate. See Section
I. Operating Instructions.
Figure 8 - Attaching the Hood
Figure 9 - Placing White Rock
Figure 10 - Placing Lava Rock
Figure 11 - Replacing Log Assembly
Note: When placing the white rock and lava rock,
you may want to periodically turn on the appliance
to check the appearance and customize to the
desired effect.

Hearth & Home Technologies Inc. 800 W.
Jefferson, Lake City, MN 55041.
CRESTFIRE SERIES ELECTRIC FIREPLACE
11
10/03
4030-239 Rev G
I. OPERATING INSTRUCTIONS
WARNING!
All electric heaters have hot and arcing or sparking
parts inside. Do not use it in areas where gasoline,
paint or flammable liquids are or stored. Do not use
where the appliance may be exposed to flammable
vapors.
1. Manual Controls
a. Access Controls
Controls are located behind the lower grille panel. To access the controls, lift up on the lower grille panel and rotate it forward.
b. Function of Manual Controls
1) Main Power Switch
a) Main power switch is used to provide power to all controls. When the main power switch is on, the appliance can be
turned on by one of three methods: by the manual control on the appliance, the remote control (optional) and/or the
wall switch (optional). Also, when the main power switch is in the ON position, you will be able to operate the
auxiliary switch.
b) When the main power switch is off, the manual switches, remote control and wall switch will not work.
c) It is recommended that during long periods of non-usage that the main power switch is turned to the OFF position.
2) Flame Switch
a) When the flame switch is in the ON position, the lights and flame will come on.
b) The flame switch must also be in the ON position before the heater system will turn on.
c) When the flame switch is in the OFF position, the remote control or the wall switch can be used to turn the appliance
on and off.
Note: If you lose power during operation or by turning the main power switch to OFF, the appliance will
need to be reset. To reset the appliance, make sure that you have power to the appliance and the main
power switch is in the ON position. Turn the flame switch off and on to reset the appliance.
3) Flame/Ember Bed Intensity Control
To change the intensity of the flame and ember bed, turn the control knob clockwise to increase the intensity.
Turn the control knob counter-clockwise to reduce the intensity.
4) Flame/Ember Bed Motion Control
To change the motion of the flame and ember bed, turn the control knob clockwise to increase the motion.
Turn the control knob counter-clockwise to reduce the motion.
5) Heater Switch
a) The heater will only operate if the flame switch is in the ON position. With the flame switch on, the heater system is
supplied with power and is able to be turned on.
b) When the heater is in the OFF position, the appliance can operate with flame but no heat.
6) Thermostat Control
a) With the heater system on, the thermostat control will allow you to adjust the temperature to the desired setting.
b) To adjust the thermostat to the desired temperature setting, turn the control knob clockwise all the way. Then turn
counter-clockwise until you hear a click.
c) If this is not the desired temperature setting, turn the control knob clockwise slightly. You should hear a click and the
heater should be on. You may have to adjust the thermostat once the desired room temperature is reached and the
heater system is still on.
d) To increase the desired temperature setting, turn the control knob clockwise until you hear a click and the heater
system will turn on.
7) Auxiliary Switch
a) This is used for an optional accessory kit for the CF750E and CF750EV appliances.
b) This switch operates independently from the rest of the switches. The main power switch must be in the ON position.
c) Position I is for low setting and Position II is for high setting.

Hearth & Home Technologies Inc. 800 W.
Jefferson, Lake City, MN 55041.
CRESTFIRE SERIES ELECTRIC FIREPLACE
12
10/03
4030-239 Rev G
2. Hand Held Remote Control Transmitter - RCE-HNG (Optional)
a. The RCE-HNG is an optional accessory listed with the Crestfire Series appliances.
b. The transmitter is a radio frequency remote control. The frequency can be found on the back side of the transmitter. The range
of the transmitter is approximately 20 from appliance.
c. When the remote LED light is RED, the appliance has been turned on or off by the remote transmitter. The manual controls
located on the dashboard will override any other external controls (remote control/wall switch) used to operate the appliance.
d. Hand Held Remote Transmitter/Appliance Initialization
1) The transmitter operates on a 12V battery (included) made specifically for remote controls and electronic lighters. Install
the 12V battery supplied with the appliance into the battery compartment of the hand held remote transmitter. It is
recommended that alkaline batteries always be used for longer battery life and maximum operational performance. If the
signal light does not illuminate (when it normally would), check the position of the transmitters battery.
2) Initialization only has to be done once.
WARNING!
Changes or modifications to this device not expressly approved by the party responsible for compliance
could void the users authority to operate the equipment.
3) Turn the main power switch on and then turn the flame switch on.
4) Locate the LEARN button on the dashboard. The LEARN button is located behind the lower grille/panel. To push the
button, use a blunt object (such as a pencil).
5) Push the button in and release. The remote LED light should blink green. The remote LED light is located above the main
power switch.
6) Push and hold either the ON or OFF button on the hand held remote transmitter. The remote LED light should begin to
blink rapidly.
7) Release the button on the hand held remote transmitter and the remote LED light should stop blinking green and go out.
This indicates that the transmitter and appliance are initialized. If the remote LED light turns red, the hand held remote
transmitter is active.
8) The hand held remote transmitter is ready to be used.
Note: If you lose power during operation or by turning the main power switch to OFF, the appliance will
need to be reset. To reset the appliance, make sure that you have power to the appliance and the main
power switch is in the ON position. Turn the flame switch off and on to reset the appliance.

Hearth & Home Technologies Inc. 800 W.
Jefferson, Lake City, MN 55041.
CRESTFIRE SERIES ELECTRIC FIREPLACE
13
10/03
4030-239 Rev G
Note: This equipment has been tested and found to comply with the limits for a Class B digital device, pursuant to Part 15 of the FCC
rules. These limits are designed to provide reasonable protection against harmful interference in a residential installation. This
equipment generates, uses and can radiate radio frequency energy, and, if not installed and used in accordance with the instructions,
may cause harmful interference to radio communications. However, there is no guarantee that interference will not occur in a particular
installation.
e. Remote Transmitter Function
1) The hand held remote transmitter is only an ON/OFF control. When the transmitter is active, the remote LED light will be
RED. Upon initial use, there may be a delay of three seconds before the remote receiver will respond to the transmitter.
This is part of the systems design.
2) With the main power switch (located on the appliance) in the ON position, press the ON button on the hand held remote
transmitter to turn on the appliance. The transmitter does not control/change the other switches or controls located on the
appliance. Features of the appliance (flame motion and heater) will remain in their last set position. If you would like to
change the setting you will have to access the manual controls (located on the appliance) to set the desired position.
3) To turn off the appliance, press the OFF button on the hand held remote transmitter.
4) With the appliance turned on by the hand held remote transmitter, you can override it by turning the manual flame switch
on the appliance to OFF or by turning the optional wall switch off .
5) Operation of the switches on the dashboard will override all other switches within the appliance system and be operated
by the dashboard switches.
3. Wall Switch Control (hardwired appliances only) (WSK-21 & WSK-21-W)
a. The wall switch wiring can be found in the Section F. Wiring.
b. The wall switch has an operating voltage of 24VAC, do not hook up to 120/208/240VAC. For installations you can use 24AWG
thermostat wire connected to a standard wall switch. It is recommended not to exceed 15 of wire from appliance.
c. With the main power switch (located on the appliance) in the ON position, the wall switch can turn the appliance on and off.
The wall switch does not control the other switches or controls located on the appliance. Features of the appliance (flame
motion and heater) will remain in their last set position. If you would like to change the setting, you will have to access the
manual controls (located on the appliance) to set the desired position.
d. With the appliance turned onby the wall switch, you can override it by turning the manual flame switch on the appliance to
OFF or by pressing the OFF button on the remote transmitter.
4. FCC Requirements
If this equipment does cause harmful interference to radio or television reception, which can be determined by turning the equipment off
and on, the user is encouraged to try to correct the interference by one or more of the following measures:
Reorient or relocate the receiving antenna.
Increase the separation between the equipment and the receiver.
Connect the equipment into an outlet on a circuit different from that to which the receiver is connected.
Consult the dealer or an experienced radio or TV technician for help.
CANADIAN EQUIPMENT REQUIREMENTS
This digital apparatus does not exceed the Class A/Class B limits for radio noise emissions from digital apparatus set out in the Radio
Interference Regulations of the Canadian Department of Communications.
This device complies with RSS-210 of Industry and Science Canada. Operation is subject to the following two conditions: 1) This device
may not cause interference and 2) this device must accept any interference, including interference that may cause undesired operation
of the device.

Hearth & Home Technologies Inc. 800 W.
Jefferson, Lake City, MN 55041.
CRESTFIRE SERIES ELECTRIC FIREPLACE
14
10/03
4030-239 Rev G
J. MAINTENANCE INSTRUCTIONS
1. Cleaning the Firebox and Control Compartment
Keep the firebox, control compartment and heater system clean. Clean by brushing and vacuuming at least once a year. To access
the control compartment, follow the instructions for replacing the light bulbs. Follow the heater maintenance instructions to access
the heater system. Failure to do this may shorten the fans life. Always disconnect power before performing any cleaning or
maintenance.
2. Cleaning the Glass Doors and Back Glass
The glass is cleaned in the factory during the assembly process. During shipment, installation, handling, etc., the glass surface
may collect dust particles. These can be removed by buffing lightly with a clean dry cloth.
To remove fingerprints or other marks, the glass can be cleaned with a damp cloth using a good quality household glass cleaner.
The glass should be completely dried with a lint free cloth or paper towel.
In the event of glass breakage, vacuum all remaining glass pieces with a shop vac. DO NOT VACUUM IF PIECES ARE HOT!
Replace glass with only a glass panel ordered direct or through your local distributor. Never use substitute material. Only fully
tempered soda lime safety glass may be used on this appliance.
WARNING!
To avoid accidental burning of the skin, allow at
least five minutes for the light bulbs to cool before
touching them.
3. Replacing the Light Bulbs
The light bulbs will need to be replaced when the flame
and/or ember bed is dark on one side. Replace the
bulbs with 75 watt halogen bulbs with mini-
candelabra base. Do not exceed 75 watts per bulb.
Light bulbs can be purchased at local hardware, lighting
stores, online or by phone. To order online, log onto
www.lite-house.com or call 1-800-838-0977. Sylvania
model 75Q/CL/MC/RP or Satco model S3157 are
recommended.
Figure 12
Replacing the Bulbs
Safety Note:
Handle glass with care to avoid striking, scratching or slamming shut.
NEVER clean glass when hot. Keep children and pets a safe distance
away.
WARNING!
Always disconnect power and allow the appliance to cool before performing any cleaning,
maintenance or relocation of this appliance. Turn controls to OFF and remove the plug
from the outlet or turn off the circuit breaker to the appliance.
a. Turn off circuit breaker or unplug appliance before
replacing the light bulbs.
b. Open the lower grille panel to view the dashboard
on the appliance (the lower grille may need to be
removed).
c. Remove the four outer screws. See Figure 12.
d. Pull dashboard towards you to expose the light
compartment (the light compartment does not
need to be pulled all of the way out of the
appliance).
e. Carefully remove burned out bulb from light socket.
Place new bulb in socket. Follow directions on
light bulb package for handling requirements.
f. Slide dashboard back into appliance and make
sure all wires are inside appliance.
g. Reinstall the four screws removed earlier.
h. Turn on circuit breaker or plug appliance back into
wall outlet.

Hearth & Home Technologies Inc. 800 W.
Jefferson, Lake City, MN 55041.
CRESTFIRE SERIES ELECTRIC FIREPLACE
15
10/03
4030-239 Rev G
4. Heater System Maintenance
a. Turn off the circuit breaker/unplug the appliance before servicing the heater system.
b. Allow appliance to cool before removing.
c. Remove the hood by pulling it straight out.
d. Remove the upper panel/door front by lifting it up and out.
e. Remove the four outer screws. See Figure 13.
f. Pull the heater system out of appliance. With the heater system out of the appliance, reach into the back of the appliance and
unplug wire harness from connector. To remove the plug, squeeze both sides and pull.
g. Slide the heater system back into the appliance, making sure that the wires do not touch the heater housing. If the heater
system is not locked on the clip the front will not be flush.
h. Once the front of the heater system is flush with appliance, reinstall the four screws removed earlier.
i. Replace the upper panel and hood.
j. Turn on circuit breaker when heater installation is complete.
k. Follow the operating instructions found in section I. Operaing Instructions.
Figure 13
Installing the Heater
CAUTION:
Although the glass is safety glass, it may break if dropped, bumped
or struck. Care must be taken when handling the glass.

Hearth & Home Technologies Inc. 800 W.
Jefferson, Lake City, MN 55041.
CRESTFIRE SERIES ELECTRIC FIREPLACE
16
10/03
4030-239 Rev G
K. TROUBLESHOOTING
seussI
sesuaCelbissoP:snoituloS
emalfhtiwnonrutt'nseodecnailppA
llawrorettimsnartetomer,hctiws
.hctiws
.1
.2
.3
.4
.ffosihctiwsrewopniaM
.deppirtrekaerbtiucriC
.teltuollawmorfdeggulpnU
.gniriwesooL
.1
.2
.3
.4
.noitisop"NO"ehtothctiwsrewopniamehtnruT
roecivresdetacidedanoecnailppaehttupotdeenyaM
.tiuricehtnosecnailppaforebmunehtecuder
.teltuootnidrocgulP
.snoitcennocesoolrofgniriwllakcehC
wolroemalfontubnosiecnailppA
.ytisnetniemalf
.1
.2
.tuodenruberasblubehT
.gniriwesooL
.1
.2
.sblubehtecalpeR
.snoitcennocesoolrofgniriwllakcehC
.nezorferasemalF .1
.2
.3
.gniriwesooL
.rotomotdehcattatonsitnemeleemalF
.evitcefedsirotoM
.1
.2
.3
.snoitcennocesoolrofgniriwllakcehC
.rotomehtottnemeleemalfehthcattaeR
.rotomehtecalpeR
fonoitroprewolniesionevissecxE
.ecnailppaeht
.1
.2
.ylreporpdetaest'nsitnemeleemalF
.evitcefedsirotoM
.1
.2
.tnemeleemalfehtllatsnieR
.rotomehtecalpeR
dnafforonohctiwsretaehehtnruT
.ffostuhsecnailppaeht
otstluafedmetsyss'retaehehtgnitarepO
.gnitteshctiwsemalfeht
ehtothctiwsllawrorettimsnartetomer,hctiwsemalfehtnruT
.noitisop"NO"
.noemoct'nseodretaeH .1
.2
.3
.4
.ffosihctiwsretaeH
.woloottessitatsomrehT
.detaehrevosimetsysretaeH
.gniriwesooL
.1
.2
.3
.4
.nohctiwsretaehnruT
."kcilc"araehuoylitnuesiwkcolcbonktatsomrehtehtnruT
ffotuhS.hctiwstuotuclamrehtaybdetcetorpsiretaehehT
niamehtgnidulcni,draobhsadehtnosehctiwsecnailppalla
.noecnailppaehtnrutneht,setunim5tiaW.hctiwsrewop
.snoitcennocesoolrofgniriwllakcehC
.tuotupsitaehontubsnurnaF .1
.2
.gniriwesooL
.tnemelegnitaehdaB
.1
.2
.snoitcennocesoolrofgniriwllakcehC
.metsysgnitaehehtecalpeR
t'nseodnaftubnositnemeleretaeH
.nur
.1
.2
.gniriwesooL
.evitcefedsinaF
.1
.2
.snoitcennocesoolrofgniriwllakcehC
.metsysgnitaehehtecalpeR
.ffonrutt'nseodretaehehT.hgihoottessitatsomrehT araehuoylitnuesiwkcolc-retnuocbonktatsomrehtehtnruT
."kcilc"
fonoitropreppuniesionevissecxE
.ecnailppaeht
.1
.2
.snafehtnotridfopudliuB
.evitcefedsinafretaeH
.1
.2
.snafllanaelC
.metsysretaehehtecalpeR
.krowt'nseodlortnocetomeR .1
.2
.3
.4
.ffosihctiwsrewopniaM
.egnarfotuosietomeR
.seirettabwoL
.noitazilaitinitsoL
.1
.2
.3
.4
.nohctiwsrewopniamehtnruT
.ecnailppaehtotresolcetomerevoM
.seirettabehtecalpeR
.etomerezilaitinieR
.krowt'nseodhctiwsllaW .1
.2
.3
.ffosihctiwsrewopniaM
.gniriwesooL
.evitcefedsihctiwsllaW
.1
.2
.3
.nohctiwsrewopniamehtnruT
.snoitcennocesoolrofgniriwllakcehC
.hctiwsllawehtecalpeR
.rodO sselmrah,thgilsatimeyamretaehehT
lamronasisihT.desutsrifnehwrodo
ehtfognitaehlaitiniybdesuacnoitidnoc
.niagaruccotonlliwdnastraplanretni

Hearth & Home Technologies Inc. 800 W.
Jefferson, Lake City, MN 55041.
CRESTFIRE SERIES ELECTRIC FIREPLACE
17
10/03
4030-239 Rev G
DM1031 DM1036
DM1031B DM1036B
DM1031S DM1036S
Bi-fold Glass Doors
Fronts
VE055FC/E055FC
metInoitpircseD
M055-FDrooDelddiMkcalB
055-BP)5(spirtSssarBdehsiloP
055-NB)5(spirtSlekciNdehsurB
BP-571-055VRSdooHssarBdehsiloP
NB-571-055VRSdooHlekciNdehsurB
L. OPTIONAL COMPONENTS
HT240V
240V Heater Kit
(CF550E & CF750E only)
Refractories
RCE-HNG
Remote Control
VE057FC/E057FC
metInoitpircseD
M057-FDtnorFkcalB
0006-FDhseMtuohtiwtnorFkcalB
KB-6-MDCkcalB-hseMrooDtenibaC
BP-6-MDCssarBdehsiloP-hseMrooDtenibaC
057-BP)5(spirtSssarBdehsiloP
057-NB)5(spirtSlekciNdehsurB
BP341-06VRSdooHssarBdehsiloP
NB341-06VRSdooHlekciNdehsurB
RFH750E
Hearth Refractory
(CF750E & CF750EV only)
RFH550E
Hearth Refractory
(CF550E & CF550EV only)
RF550E (CF550E & CF550EV)
RF750E (CF750E & CF750EV)
Side Refractory
RF36EH
Refractory
(CF750E & CF750EV only)
WSK-21
WSK-21-W
Wall Switch Kit

Hearth & Home Technologies Inc. 800 W.
Jefferson, Lake City, MN 55041.
CRESTFIRE SERIES ELECTRIC FIREPLACE
18
10/03
4030-239 Rev G
VTS-550 (CF550E & CF550EV)
VTS-550-BK (CF550E & CF550EV)
VTS-36 (CF750E & CF750EV)
VTS-36-BK (CF750E & CF750EV)
Quick Tile Black and Brass Surrounds
Trim Kits
Surrounds
sdnuorruShsulF
)ylnosnoitallatsniesahc(
VE/E055FCVE/E057FC
BS44FOR* BD84FOR*
BS44FVM* BD84FVM*
BS44FLP* BD84FLP*
kaOdeniatsnU=O*
demirP=P*
RP31E (CF550E & CF550EV)
RP36E (CF750E & CF750EV)
Reflective Panels
PB = Polished Brass Finish
BK = Black Finish
PBT-550 (CF550E & CF550EV)
BKT-550 (CF550E & CF550EV)
PBT-6 (CF750E & CF750EV)
BKT-6 (CF750E & CF750EV)
Cabinet Trim
no suffix = Polished Brass Finish
BK = Black Finish

Hearth & Home Technologies Inc. 800 W.
Jefferson, Lake City, MN 55041.
CRESTFIRE SERIES ELECTRIC FIREPLACE
19
10/03
4030-239 Rev G
stenibaCrenroC
VE/E055FCVE/E057FC
BD44AOR* BD84AOR*
BD44AVM* BD84AVM*
BD44ALP* BD84ALP*
kaOdeniatsnU=O*
demirP=P*
stenibaCllaWhtpeD
tongnidluom(
)dedulcni
VE/E055FCVE/E057FCxiffuSA
BS44COR* BS84COR*
BS
"81
)mm852(
BS44CVM* BS84CVM*
BS44CLP* BS84CLP*
BD84COR*
BD
"½42
)mm326(
BD84CVM*
BD84CLP*
kaOdeniatsnU=O*
demirP=P*
Cabinets
xuLelbraM
VE/E055FCVE/E057FC
G-055-LMVG-63-LMV
GB-055-LMVGB-63-LMV
KB-055-LMVKB-63-LMV
Marble Lux

Hearth & Home Technologies Inc. 800 W.
Jefferson, Lake City, MN 55041.
CRESTFIRE SERIES ELECTRIC FIREPLACE
20
10/03
4030-239 Rev G
M. REPLACEMENT PARTS
Replacement parts are available from your distributor/dealer.
/