Page is loading ...

THE NEW FACE
of Glucometer
®
Diabetes Care System
U
SER
G
UIDE
For Use With Ascensia
E
LITE
™
Blood Glucose Meter
Need Help With Reimbursement? Call Our Bayer Care Help Line: 1-877-787-1912.
If You Have Any Questions, Comments or Need Help With Reimbursement For
Your Testing Supplies, Please Call 1-800-348-8100.

Introduction
What it is:
The Ascensia ELITE™ Diabetes Care System is a blood glucose monitoring
system. The system is made up of the Ascensia ELITE™ Meter, Test Strip,
and Code Strip. For quality control of the system, the Ascensia ELITE™
Check Strip and Normal, Low and High Controls are also available.
How it works:
The Ascensia ELITE blood glucose testing process is based on an electrode sensor
technology. Capillary action at the end of the Test Strip draws a small amount
of blood into the reaction chamber and a reading is displayed in 30 seconds.
No timing, wiping or blotting is required.
What is new and different:
Ascensia ELITE™ Test Strips are calibrated to give plasma/serum equivalent
glucose results. Plasma/serum results are used by doctors and laboratories as
the most accurate method for reading blood glucose levels. The Ascensia ELITE
System provides you with readings that correspond directly to those of your
doctor or clinic. Compare Ascensia ELITE Test Strip results only to systems which
use a plasma/serum calibration.

12
8
9
6 75
1
2
3
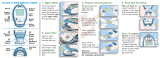
TESTING MATERIALS
4
11
10

i
Test Slot – provides an opening for inserting strip into the Meter.
Icon – shows proper orientation and direction for inserting the Test Strip, Code Strip
or Check Strip into the Meter.
Display – displays test results, current Code (Function) Number (F– #), or low battery
indicator.
Batteries – provide power for the Meter.
Check Strip – confirms that the Meter electronics are working properly, and acti-
vates the memory recall and the delete option.
Code Strip – codes (calibrates) the Meter.
Test Strip – tests for glucose in blood and control solutions, and can be used to
“mark” a control test or to delete a test result from the memory.
Test end – draws sample into the reaction chamber of the Test Strip.
Meter end – inserted into the Meter to activate power.
MICROLET
®
Adjustable Lancing Device and lancet – for skin puncture.
Normal Control Solution – a solution with a known amount of glucose used to
confirm that the system is working properly (Low and High Control Solutions are
also available).
1
2
3
4
5
6
8
9
10
12
11
7

ii
Introduction (continued)
What you do:
1. Insert the Test Strip into the Test Slot located at the top,
center of the Meter.
2. Touch the test end (tip) of the Test Strip to a drop of blood.
A “beep” sounds after the Test Strip reaction chamber is
filled with blood. The test result is displayed in 30 seconds.
The Meter turns on when the Test Strip is inserted and turns off
when the Test Strip is removed, therefore, no operating buttons are required. The Meter auto-
matically stores the last 20 test results, including both blood glucose and control test results.
The Ascensia E
LITE System provides blood glucose results ranging from 20–600 mg/dL
(1.1–33.3 mmol/L). The Meter is battery operated and approximately 1000 tests may be
performed before replacing batteries.
CAUTION: Before using any product to test your blood glucose (sugar),
read all instructions and practice the test. Do all quality control checks
as directed and consult with a diabetes health professional. These
recommendations apply to all blood glucose monitoring systems and
are supported by the American Association of Diabetes Educators,* the
American Diabetes Association, the Food and Drug Administration and
the Health Industry Manufacturers Association.
*You may call the American Association of Diabetes Educators for the
location of a Certified Diabetes Educator (CDE) near you 1-800-338-DMED.

iii
Special Feature
1. WHAT IS DIFFERENT?
The part of the Test Strip that touches the sample.
2. HOW IS IT DIFFERENT?
The blood sample is drawn into the Test Strip and
is not put on the Test Strip.
3. WHEN DOES THIS HAPPEN?
The test end (tip) of the Test Strip draws (pulls) the
blood sample into the Test Strip when the tip touches
the blood sample.

iv
4.
IN OTHER WORDS:
Think of the Test Strip as
a straw used for drink-
ing. You put the straw
into the liquid.
The liquid
is drawn into
the straw
at one end...
SO the
blood sample
is drawn
into the Test Strip at one
end when you put the
tip of the Test Strip into
the sample. We call this
“Sip-in Sampling.”
RIGHT
WRONG

v
Contents
SECTION 1 – The Ascensia ELITE™ Diabetes Care System
• Learn About the System . . . . . . . . . . . . . . . . . . . . . . . . . . . . . . . . . . . . 1
• Install/Replace Batteries . . . . . . . . . . . . . . . . . . . . . . . . . . . . . . . . . . . . 2
• Check the Meter Performance . . . . . . . . . . . . . . . . . . . . . . . . . . . . . . . 3
• The Check Strip Test . . . . . . . . . . . . . . . . . . . . . . . . . . . . . . . . . . . . . . . 4
SECTION 2 – Prepare for the Blood Glucose Test
• Code (Calibrate) the Meter . . . . . . . . . . . . . . . . . . . . . . . . . . . . . . . . . . 6
• The Control Test . . . . . . . . . . . . . . . . . . . . . . . . . . . . . . . . . . . . . . . . . . 9
SECTION 3 – The Blood Glucose Test
• Get Ready for the Blood Glucose Test . . . . . . . . . . . . . . . . . . . . . . . . . . 14
• Perform the Blood Glucose Test . . . . . . . . . . . . . . . . . . . . . . . . . . . . . . 17

vi
Contents (continued)
SECTION 4 – Learn About the Memory Feature
• Introduction to Memory . . . . . . . . . . . . . . . . . . . . . . . . . . . . . . . . . . . . 21
• Recall Test Results from the Memory . . . . . . . . . . . . . . . . . . . . . . . . . . 23
• Delete All Test Results from the Memory . . . . . . . . . . . . . . . . . . . . . . . 24
• Delete a Single Test Result from the Memory . . . . . . . . . . . . . . . . . . . 25
• Mark a Control Test Result . . . . . . . . . . . . . . . . . . . . . . . . . . . . . . . . . . 26
• Things to Remember . . . . . . . . . . . . . . . . . . . . . . . . . . . . . . . . . . . . . . . 27
SECTION 5 – Care of the Meter and Strips . . . . . . . . . . . . . . . . . . . . . . . . . 29
SECTION 6 – Solve Problems
• Meter and Test Strip Problems . . . . . . . . . . . . . . . . . . . . . . . . . . . . . . . 31
• Test Result Problems . . . . . . . . . . . . . . . . . . . . . . . . . . . . . . . . . . . . . . . 33
SECTION 7– Service the System
• Service . . . . . . . . . . . . . . . . . . . . . . . . . . . . . . . . . . . . . . . . . . . . . . . . . . 35
• Check List . . . . . . . . . . . . . . . . . . . . . . . . . . . . . . . . . . . . . . . . . . . . . . . . 36
• Limitations of the Procedure . . . . . . . . . . . . . . . . . . . . . . . . . . . . . . . . . 37
• Specifications . . . . . . . . . . . . . . . . . . . . . . . . . . . . . . . . . . . . . . . . . . . . . 38
• Supplies . . . . . . . . . . . . . . . . . . . . . . . . . . . . . . . . . . . . . . . . . . . . . . . . . 40
• Warranty . . . . . . . . . . . . . . . . . . . . . . . . . . . . . . . . . . . . . . . . . . . . . . . . 41

1
Learn About the System SECTION 1
This booklet is designed to guide you through
the operation of the Ascensia E
LITE™ Diabetes
Care System with detailed directions and
illustrations. A Quick Reference Guide is
provided, and can be carried in your Meter
Carrying Case.
Please read the entire User Guide before you
begin testing.
Before reading the User Guide, you will need
to unpack and set up your testing materials.
See the “Testing Materials” foldout, attached to the
first page of this User Guide, to identify testing
materials needed.
5
0
1
8
4
2
2
1
©
1
9
9
8
,
2
0
0
2
B
a
y
e
r
C
o
r
p
o
r
a
t
i
o
n
R
e
v
.
1
0
/0
2
C
U
S
T
O
M
E
R
S
E
R
V
I
C
E
1
-
8
0
0
-
3
4
8
-
8
1
0
0
B
a
y
e
r
C
o
r
p
o
r
a
t
i
o
n
M
i
s
h
a
w
a
k
a
,
I
N
4
6
5
4
4
U
S
A
Quick Reference Guide
Always refer to your USER
GUID
E for detailed instructions
w
a
sh
in
se
rt
o
n
d
ry
re
m
o
ve
o
ff
stick
wait
30 sec.
re
su
lt
re
co
r
d
r
e
su
lt
stroke
touch
T
H
E
N
E
W
F
A
C
E
of G
lucom
eter
®
D
iab
etes Care System
U
SER
G
U
ID
E
For Use With Ascensia
E
LITE
™
Blood Glucose Meter
N
eed Help W
ith Reim
bursem
ent? Call O
ur Bayer Care H
elp Line: 1-877-787-1912. If
You H
ave A
ny Q
uestions, Com
m
ents or N
eed H
elp W
ith Reim
bursem
ent For
Your Testing Supplies, Please Call 1-800-348-8100.
Diagnostics Division

2
Install / Replace Batteries SECTION 1
THE BATTERIES: The Meter uses two (3-volt lithium) batteries. These are furnished with
the Meter.
WHEN TO REPLACE: When the battery voltage becomes weak (after approximately
1000 readings), the Meter will show a battery display ( ). When this display appears, it is
time to replace the batteries (see page 40 for battery types). The Meter will continue to pro-
vide accurate results for a period of time until the batteries are exhausted. At this time, the
Meter will “lock you out” from further testing.
DIRECTIONS:
1. With the tip of a finger, press the battery compartment
lid latch toward the word “open.” Lift the lid.
2. Place the two new batteries into the battery compartment with
the “+” side up and close the lid. NOTE: If replacing batteries,
remove the old batteries from the compartment and discard.
Things to remember:
• WARNING: Keep batteries away from children. Lithium
batteries are poisonous. If swallowed, immediately
contact your physician.
• Discard batteries according to your local
environmental regulations.
• The Meter memory will not be erased when
batteries are changed.

3
Check the Meter Performance SECTION 1
WHEN:
When your Meter is new and anytime you want to check that
your Meter is functioning properly.
WHAT TO EXPECT:
A Check Strip test result that falls within the Check Strip
Range tells you that the Meter electronics are working properly.
Note the Check Strip Range printed on the
check strip package insert.
A Check Strip test result that falls outside the Check
Strip Range tells you the Meter may not be functioning
properly. If this occurs, refer to Section 6 – page 31.
OTHER:
The Check Strip can also be used to activate the Meter’s memory recall
function, or memory deletion option (see Section 4).
XXXXXXXXXXXXXXXXXXXXXXXXXXXXXX

Insert the Check Strip
fully into the Meter as
shown (with tab pointing
right). A beep sounds and a
full display* appears.
Another beep sounds and the
Check Strip test result is dis-
played. A check mark (✔)
shows on the display when
the Check Strip test is done.
4
MATERIALS
REQUIRED:
•
Ascensia ELITE™ Meter
•
Ascensia ELITE™
Check Strip
CHECK THE METER:
Remove the Check
Strip from its package.
The Check Strip Test SECTION 1
1 2
*A full display, as shown here, indicates that
all characters in the display are working
properly. If ever all the display segments do
not appear, see Section 6, page 32.

5
If the Check Strip test
result is within the range
listed on the package insert
found inside the Check Strip
package, the Meter is
functioning properly. If not,
refer to the Problem Solving
Chart in Section 6.
Carefully remove the Check
Strip from the Meter, and
replace it in its package.
Things to remember:
• It is important to insert
the Check Strip with a
firm motion until it comes
to a full stop. When
inserted fully, the tab on
the top portion of the
strip should be completely
hidden within the Meter.
• Always keep the Check
Strip stored in its package
when not in use.
• Do not bend the Check
Strip.
• You can also use the
Check Strip to recall the
Meter’s memory, or to
delete all of the stored
test results from the
memory (see Section 4).
The Check Strip Test (continued) SECTION 1
XXXXXXXXXXXXXXXXXXXXXXXXXXXXXX
3

6
Code (Calibrate) the Meter SECTION 2
WHY CODE THE METER?
To match the Meter to the reactivity of the Test Strip, you must
first code (calibrate) the Meter using the Code Strip provided in
the carton of Ascensia E
LITE™ Test Strips now in use.
Each lot of Test Strips is tested extensively and assigned a Function
Number (0 through 12) identified on the Code Strip.
WHEN TO CODE THE METER
Reset the code for each new carton of Ascensia ELITE™ Blood Glucose Test Strips used,
unless the new carton of Test Strips has the same Function Number as the previous
one.

7
MATERIALS
REQUIRED:
•
Ascensia ELITE™ Meter
•
Ascensia ELITE™ Code
Strip
CODE THE METER:
1
Open your new carton of
Test Strips and find the
clear plastic packet contain-
ing the Code Strip.
2
Carefully tear open the
packet, and remove the
Code Strip. Save the packet
to store the Code Strip.
Code the Meter (continued) SECTION 2

8
3
Insert the Code Strip
into the Test Slot (as
shown). A beep sounds and a
full display appears briefly.
Another beep sounds and the
Function Number (for exam-
ple, F-4) appears in the
Display.
Things to remember:
• It is important to insert the Code Strip with a firm motion
until it comes to a full stop. When inserted fully, the tab
on the top portion of the strip should be completely hid-
den within the Meter.
• The Function Number appearing in the Display must match
the number appearing:
– on the Code Strip.
– on the front of the Code
Strip packet (see #2).
– on the back of the Test Strip
packet.
• If the Function Numbers match as indicated above, the
Meter may now be used to run a control test or blood
glucose test.
• The Meter must be coded again when a new carton of
Test Strips is used unless the F# of the new carton is the
same as the old carton. Use the new Code Strip found in
the new carton of strips.
• Store the Code Strip in the clear plastic packet until all the
strips are used (in case you ever need to recode the meter).
Throw away the old Code Strip when Test Strips are all used.
Code the Meter (continued) SECTION 2

9
The Control Test SECTION 2
To make sure your Ascensia ELITE™ Diabetes Care System is performing properly, a Control
Test is performed using the Ascensia E
LITE™ Normal Control solution.
WHY? A Control Test confirms that the system is functioning properly and you are using
proper technique. When running a Control Test, the system is defined as: the Meter and
the Test Strips. In addition to the Normal Control, an Ascensia E
LITE Low and High Control
are also available for use with this system.
WHEN TO RUN A CONTROL TEST:
• Any time you want to confirm that the Meter system is working properly, and that your
testing technique is correct.
• Any time you question your blood glucose test results.
• On the advice of your physician or healthcare professional.
WHAT TO EXPECT:
• When the Control Test is done properly, the Control Test result should fall within the
range listed on the end flap of your Test Strip Carton.
• A Control Test result that falls outside of the specified range means the system may not be
functioning properly or your testing technique may not be correct. If this occurs, refer to
Section 6 of this User Guide or the Ascensia E
LITE Control package insert for assistance.
MARK THE CONTROL TEST RESULT (if using the memory feature):
You should always “mark” a Control Test result with a “C” as described in the following
procedure. Marking with a “C” keeps a Control Test result from being included in the
average of your blood glucose tests.

10
MATERIALS
REQUIRED:
•
Ascensia E
LITE
™
Meter
•
Ascensia E
LITE
™
Normal
Control Solution
•
Ascensia E
LITE
™
Test
Strip and Code Strip
•
CLINILOG
®
Diary
PREPARE FOR TEST:
If not already done, code
your Meter using the Code
Strip (see page 7). Also check
to make sure the Test Strips
and the Normal Control
Solution have not passed
their expiration date.
1
Remove foil packets from
the Test Strip carton and
tear off a single packet.
The Control Test (continued) SECTION 2
2
To open the Test Strip
packet, carefully PEEL the
foil until the Test Strip is
completely exposed (as
shown).
NOTE: The numbers printed
on each Test Strip are manu-
facturing numbers and
should not be confused with
a Function Number.
1.
2.
3
Fo
r U
se
W
ith
A
sce
n
sia
™
“
®
1.
2. 3.
M
a
d
e
In
J
a
p
a
n
B
lo
o
d
G
l
u
c
o
s
e
T
e
s
t
S
t
r
ip
Fo
r U
s
e W
ith
A
sce
n
sia
™
E
LIT
E
®
/E
LIT
E
®
X
L M
e
te
rs
“
®
2. 3.
M
a
d
e
In
J
a
p
a
n
o
d
G
l
u
c
o
s
e
T
e
s
t
S
t
r
i
p
F
o
r U
se
W
ith
A
sce
n
sia
™
E
LIT
E
®
/E
L
IT
E
®
X
L M
e
te
rs
“
®
p
F
o
r U
se
W
ith
A
sce
n
sia™
EL
IT
E
®
/E
LITE
®
X
L
M
e
te
rs

11
3
Remove the Test Strip
from packet. Holding the
round end, insert the strip
fully into the Meter.
NOTE: Save the empty foil
packet for use in Step 6.
4
A beep sounds and a full
display appears, followed
by the Function Number (F#)
and the previous test result.
The Function Number and
the previous test result begin
flashing alternately.
If you are not using the
memory feature, go directly
to Step 6.
5
Mark your Control Test
result by pulling out the
Test Strip, and quickly insert-
ing it back into the Meter
(within 2 seconds). A C- and
the Function Number F#
begin flashing in the Display.
Marking a Control Test
excludes the Control Test
result from the average of
stored Blood Glucose Test
results.
The Control Test (continued) SECTION 2
/