Page is loading ...

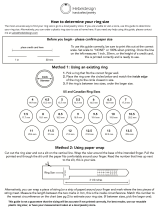
AUTOMATIC PROCESSING PRESS
COMPLETE INSTRUCTIONS
optional Bin & Bracket
Product # 90687
Spline Drive Bushing (1 included)
2 pack Product # 90063
3 pack Product # 90042
4 pack Product # 90095
Bottle Adapter (1 included)
Product # 91151
Base Casting
Part # PA3506
Upper Casting
Part # PA4255
Column (2 included)
¼-20 Flange nut (2 included)
Right lever
Power grip
Left lever
Feed Spring
Part # PR2118
Connecting Link
optional Reloading Stand
Product # 90688
Feed tubes (4)
# PA4340 .28”
# BF3490 .42”
# BF3489 .49”
# TR2458 .53”
Molded feed tube &
case feed support
Part # PA4360
Molded parts risers
Part # PA4384
¼-28 Crown Lock Nut
¼-20 X ⅝ Phillips
Reloading should not be attempted by persons not willing and able to read and fol low instructions exactly. Children should not be permitted
to reload ammunition without strict parental supervision. Always wear safety glasses and hearing protection when reloading and shooting.
Ammunition loaded with these tools and data should only be used in modern guns in good condition. We do not accept responsibility for
ammunition loaded with these tools or data as we have no control over the manufacture and storage of components or the loading procedure
and techniques. Primers and gun powders, like gasoline and matches, can be dangerous if improperly handled or misused.
CAUTION
WARNING: Handling live primers and spent primers may expose you to
lead or other chemicals, which are known to the State of California to
cause reproductive harm and cancer. For more information, go to
www.P65Warnings.ca.gov.
WARNING: This product may contain steel alloyed with trace amounts
of lead and other elements which are known to the State of California
to cause reproductive harm and cancer. For more information, go to
www.P65Warnings.ca.gov. To prevent exposure, do not alter the
product by welding, grinding, etc.
SETUP TOOLS REQUIRED
• Safety glasses
• ⁄” wrench
• Small flat blade screwdriver
SMOOTH OPERATING TIPS
• Do not force it or you will break something. If
it does not feel right, stop and check out the
problem.
• Oil columns and all pivot points using STP
motor oil treatment or motor oil.
1
www.leeprecision.com
PA4336 © SEPT. 2020 printed in USA
The App is the most convenient single station press ever made. You can use any brand shell holder provided the outside
diameter does not exceed 13/16” (20,6mm). Any brand or type of die will also work provided they have a -14 threading. Follow
the instructions to install the shell holder, then adjust your dies according to the manufacturer’s instructions.
US Patent #10,076,781 Exp. 2037
ACCESSORY
App Roller Handle
# 91629
DANGER
Ammunition reloading can be dangerous if done im properly and can result in serious injury or death.

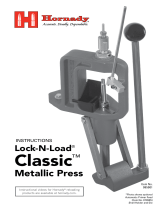
The most convenient way to mount your press is with our Lee Bench Plate or Lee Reloading Stand. These systems
includes all of the mounting hardware and allows for quick press removal without unbolting from bench. Follow
mounting holes identified for Reloader Press as the APP uses the same mounting pattern.
-OR-
Purchase qty. 3, ¼” bolts and nuts, and prepare your
workbench for use with this press using the drill template
provided here:
leeprecision.com/files/instruct/TMPLP.pdf
Drill three 17/64” (7mm) holes.
You can also use the press base as a drill template.
# 90251
Bench Plate
2
APP Accessories
Heavy Duty Guided Decapper
APP Primer Pocket Swage Kit product 91582 APP Bullet Sizing Kit product 91532
APP Bulge Buster Kit product 91572
Use in conjunction
with Universal
Decapping Die
product 90292,
guided decapper
helps align the
case to reduce the
chance of bending or
breaking a decapper.
Allows nose first bullet sizing, change
size with an inexpensive punch and
die. Nose first bullet sizing is the most
accurate, distortion free and because you
are pushing on the base of the bullet no
special nose punches are required.
Bullets are sized as rapidly as you can
operate the press lever. The sized bullets
drop into an attached wide mouth
container. This is the perfect tool for the
now popular powder coated bullets.
The new swage kit removes military primer pocket crimps
as fast as you can operate the lever. Universal shell holder
adapter allows you to use your press shell holder or X-PRESS
shell holder to swage. Typical cases that you will encounter
primer pocket crimps are 45 ACP, 223(5.56mm), 30-06,
308(7.62x51), 9mm Luger and special law enforcement 40
S&W.
See complete product instructions shipped with kit.
The Lee APP Bulge Buster Kit
and the appropriate Lee Factory
Crimp Die (sold separately),
restores free function of
rimless cases that have low
base bulges. Will work with
the following cases: 380 ACP,
10mm, 40 S&W, 41 AE (Use 40
S&W Factory Crimp Die), 45
ACP, 45 GAP, and 45 Win Mag.
Low base bulges usually occur
from chambers that do not fully
support the cartridge or cases
resized in carbide dies from
manufacturers other than Lee.
Caliber Product #
17 cal. & 204 Ruger 91574
22 cal. 91576
6mm to 25 cal. 91577
27 cal. to 7mm 91578
30 cal. 91580
34 cal. to 35 cal. 91581
40 cal. 91583
45 cal. 91584
Drill template
MOUNT YOUR PRESS
# 90688
Reloading Stand
Install OPTIONAL bin and
bracket
Mount to leg of Lee reloading stand
using provided -” bolts and
”- nuts
Mount to workbench using ()
provided Phillip Head Screws.
OR
Breech Lock Ram Prime product 91612
Start priming in seconds, nothing
to adjust. Includes small and large
priming assemblies, no tiny parts
to fumble with or lose. Eortless
priming in the tightest pockets. Uses
any brand press shell holder. Safe
with all brands of primers.

3
Lightly tighten Hex screw
with a ⁄ hex key to retain
position. When you are
finished, you can remove
the adjusted die from
the press by rotating the
spline drive bushing ⅓ of
a turn counterclockwise.
When you use it next time,
it will return to perfect
adjustment.
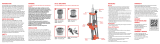
Install cartridge specific
X-PRESS shell holder into shell
holder adapter. Attach clear
bottle to adapter if depriming.
Install this
assembly in the
base casting, and
secure with a ⅓
of a turn counter
clockwise. The shell
holder lips should
be set parallel to the
slide rail to allow
case feeding.
Place lock ring inside the bottle
adapter. Install the bottle adapter
on to the shell holder adapter as
shown.
Loosen the hex screw on the
spline drive bushing with ⁄
hex key.
Available accessory
# 91634 ⁄ hex key
Remove the
lock-ring
from your
die, and
install. Adjust
according to
your reloading
die set
instructions.
CONFIGURING APP FOR RELOADING
Lock
Ring
inside
Shell holder adapter
X-PRESS
shell
holder
Using Universal Decapping Die?
You may want to consider adding
a heavy duty guided decapper to
the die. Guided decapper aligns
the case and decapping pin,
reducing the likelihood of bending
or breaking the pin.
order more bushings:
2 pack Product # 90063
3 pack Product # 90042
4 pack Product # 90095
Caliber Product # Caliber Product #
17 cal. & 204 Ruger
91574 30 cal. 91580
22 cal. 91576 34 cal. to 35 cal. 91581
6mm to 25 cal. 91577 40 cal. 91583
27 cal. to 7mm 91578 45 cal. 91584
X-PRESS SHELL HOLDERS
X-PRESS shell holders
make the nicest single
stage press, the fastest. A
word about X-PRESS shell holders.
The X-PRESS shell holder allows
easy automation on the APP press,
however, the pass through design
reduces the amount of “pull” that
can be applied to the cartridge. That
said, we do not recommend full
length resizing rimless bottle neck
cases. If you insist, we suggest using only Lee dies and Lee case resizing lubricant # 90006. Only Lee dies
include a built-in stuck case remover in the event you damage a rim and stick a case.
Product # Cartridges Product # Cartridges
91534 138 Long & Short Colt, 38 SPL, 357 MAG 91544 11 44 SPL/MAG, 45 Colt, 303 Sav.
91535 245 ACP, 308 Win., 30-06 91545 12 22 PPC, 6 PPC, 7.62x39R
91536 330/30, 6.5x55 Mauser, 32/40 91546 13 45 Auto Rim
91537 4223 Rem, 5.56 NATO, 300 Blackout 91547 14 44/40, 45 Long Colt
91538 5WSM’s, 7mm Rem Mag, 303 British 91548 15 25 ACP
91539 6218 Bee, 25/20, 32/20 91549 16 7.62x54R, 500 S&W
91540 730 M-1, 32 ACP 91552 19 40 S&W, 9mm Luger
91541 833 Win, 348 Win, 40/65, 45/70 91553 20 17 Hornet, 22 Hornet
91542 941 Magnum 91554 21 6.8 Rem SPC, 224 Valkyrie
91543 10 220 Swift, 6.5 Jap, 7x64 Brenneke
The
X-PRESS
shell
holder
should
rotate
freely

Adjust the setscrew when the case
inserter is at the end of the feed rail.
Rotate the setscrew clockwise with flat
blade screwdriver
until there is a slight
amount of capture
when you slide the
case out of the
fingers. We found
it best to adjust for the least amount of
closure as it provides the largest target for
the next case to feed.
4
INSTALLING THE BULLET/CASE SLIDER & ADJUSTING JAWS
CASE FEEDING BULLET FEEDING
The setscrew found on the rear of the case inserter closes the fingers on
the return stroke of the case inserter. For most cases, the adjustment screw
should be backed out to allow maximum jaw opening to allow the rim of the
case to easily enter the jaws. The ball end of the setscrew should protrude
slightly from the bottom of the actuator.
Small diameter bottleneck cases
such as the .223 may require slight
adjustment of the setscrew inward to
close the fingers trapping the case as it
feeds from the feed tube.
Adjust the setscrew with the
case inserter positioned at the
end of the feed rail. Rotate the
setscrew clockwise with flat
blade screwdriver until the
bullet is captured in the finger
tips.
case inserter actuator
The case inserter is shipped with the large fingers installed.
They will work with 25 caliber and larger bullets. If you are
sizing bullets smaller than 25 caliber, change the jaws to the
22 caliber [ see FIG. 1 at website link below].
SEE INSTRUCTIONS HERE:
leeprecision.com/files/instruct/APPchangejaws.pdf
Five unique risers are included, PA4384A-PA4384E. These are double ended and are used for both bullet and case feeding.
Case feeding uses the “C” opening and Bullet feeding uses the “O” opening. With case inserter installed on slider rail, select
the riser that is slightly shorter than the case or bullet you wish to process.
case feeding bullet feeding
Proceed to installing tube supports. If cases | bullets do not freely drop into the jaws from the tube support, see top of
page to adjust the jaws.
Now, select the tallest riser that is NOT taller than the case when installed on
the case inserter. Place on the rail to confirm correct riser. Be sure the “C”
side of the riser is above the jaws.
Now, select the tallest riser that is NOT taller than the bullet
when installed on the case inserter. Place on rail to confirm
correct riser. Be sure the “O” side of the riser is above the jaws.
CASE FEEDING BULLET FEEDING
Riser stop Riser installed against stop Riser installed against stop
RISER INSTALLATION

5
Place empty case|bullet into your
previously configured and adjusted
case inserter and position as shown.
Adjust the nut up or down on the tube
support bolt so there is approximately
a coins thickness between the bottom
of the tube support and the top of the
case. Minimizing the clearance gives
the best results.
Select appropriate tube
support PA4360A or
PA4360B by passing
your bullet or case
through. Select the
smallest hole that the
case or bullet will flow
through unrestricted.
Insert ¼” support bolt
into the adjacent hole
you just selected. Secure
bolt with nut. Thread
another nut onto bolt
about half way. Slide the
bolt into the APP base
casting as shown.
FIG. 2
PA4360A PA4360B
Orientation of tube support
FT2457
¼ support bolt
FT1994 (qty. 3)
¼-20 x 7/16 nuts
PA4360A or B
Tube Support
INSTALLING TUBE SUPPORTS
When you secure
the nut, hold and
orientate the tube
support so it does
not interfere with
the press handle
during operation
as shown.
Install clear feed tube for the
appropriate size hole in tube
support.
Note: due to the large
manufacturer’s tolerance on
these tubes, some may fit
loosely in the tube support.
This does not aect anything,
you can tighten the fit with a
round or two of clear tape.
Install the
last nut on
to the tube
support bolt
underneath
base casting,
and tighten nut
above rail with
7/16” wrench.
Lower handle. Re-attach spring to
case inserter actuator. Cycle a few
cases. If the cases drop too soon,
they may rest on top of feed fingers.
Rotate the feed tube support
farther away (clockwise) from
the press to delay the dropping.
Because of the wide range of
diameters and rim configurations,
you will have to fine tune this
position to provide reliable feeding.
Tighten nut above rail
with 7/16” wrench.
Note: while decapping mixed range brass, you may encounter cases with damaged rims that won’t
feed into shell holder. Remove this case and discard or repair rim damage to allow easy entry.
Case rests on fingers. Rotate feed
tube support clockwise from
press to delay the drop.

6
INSTALLING UNIVERSAL CASE FEEDER (ACCESSORY # 90242)
Re-attach the spring to the case
actuator and test operation on a few
cases. If the cases drop too soon, they may
rest on top of feed fingers. Rotate the feed
tube support farther away (clockwise)
from the press to delay the dropping.
Because of the wide range of diameters
and rim configurations, you will have to
fine tune this position to provide reliable
feeding.
Feed plate
Bottleneck case orientation. Note
neck just clears top of notch.
Works well with most handgun cartridges and small rifle cases like the 223. Can be fitted with optional collator bowl # 90667, fills 4 tube feeder with
handgun cases in about 10 seconds. This feeder will not work for bullet feeding. You must use the case inserter supplied with the APP. The case slider
included in the universal case feeder will not function correctly, it will not center the cases in the X-PRESS shell holder and there is no attach for the feed
spring.
With the
spring
unhooked
from case actuator
hook. Insert case
into jaws of slider
base. Place a coin
on top of the case
mouth. (See setting
for bottleneck
cases)
Slide the feed
plate assembly
into the base
casting hole, and adjust
the top nut so that the
bottom of the feed plate
assembly rests on top
of the coin. Tighten the
top nut so that the feed
plate assembly clears
the frame using a 7/16”
wrench.
If you took o spring
to setup riser/tube
supports, install open end
of spring into tab of upper
App press casting.
Slide
case
inserter
“jaws” first on
to slide rail.
Tube Support
PA4360A and PA4360B
PA4342B (not visible)
PA4342A
PA4342C
PA4342D
PA4342E
PA4342F
PA4342G
Actuator Slider spring # PR2118
PA4384A PA4384B
PA4384C PA4384D PA4384E
¼-20 x 3 bolt
# FT2457
¼-20 nut (qty. 3)
# FT1994
PART # DESCRIPTION PART # DESCRIPTION
PA4342A Slider Top Rail PA4342G 22 cal. Outer Jaw
PA4342B Actuator Screw PA4342H 22 cal. Inner Jaw
PA4342C Actuator PA4384A 0.53” Riser
PA4342D Slider Base PA4384B 0.75” Riser
PA4342E Large Outer Jaw PA4384C 1.0” Riser
PA4342F Large Inner Jaw PA4384D 0.53” Dual Riser
PA4384E 1.3” Riser
PA4342H
Feed tubes
# PA4340 .28”
# BF3490 .42”
# BF3489 .49”
# TR2458 .53”
Lower press handle to
the stroke position
(2”) and install spring
on to case inserter actuator
hook as shown. If the closed
loop on the spring does not
align with hook, twist the
spring towards the press.
Cycle the press handle,
stop to stop, to ensure
smooth operation back
and forth. Notice how the
jaws open and close when
the direction of the slider
changes.
case
inserter
case actuator hook
INSTALL SPRING & TEST SETUP
OPTIONAL
CASE COLLATOR
product # 90667

7
CONFIGURING APP FOR BREECH LOCK BULLET SIZING KIT
Load
the feed
tube with
bullets
nose first.
Install shell
holder
adapter and
appropriate
sized
punch in
upper APP
casting.
The clear
bottle or an
empty powder
container can
be used to catch
sized bullets.
Product Dia. Product Dia. Product Dia.
91505 .224 91514 .314 91523 .427
91506 .225 91515 .323 91524 .429
91507 .243 91516 .329 91525 .430
91508 .278 91517 .339 91526 .451
91509 .284 91518 .356 91527 .452
91510 .285 91519 .357 91528 .454
91511 .308 91520 .358 91529 .457
91512 .309 91521 .401 91530 .501
91513 .311 91522 .410 91531 .510
Diameter not listed?
Custom service available factory-direct:
leeprecision.com/custom-breech-lock-bullet-sizer-punch
Breech Lock Bullet Sizer Kit
Product 91532
Install breech
lock bullet sizer
assembly in APP
base casting.
Tighten ⅓ of
a turn counter
clockwise.
Insert roll
marked end of
bullet sizer in
first into the
Breech Lock
insert.
Install aluminum
bottle adapter
into red bottle
adapter.
Roll mark in
first
Breech
Lock
insert
Bottle adapter
Install bottle adapter
on to bullet sizer
insert.
Sized bullets
will collect in
clear bottle.
You can also
use an empty
powder bottle
or any bottle
with a 53mm
or 43mm
thread.
Note:
If you applied too much Lee Liquid Alox® on your bullets,
you will have feeding problems as the bullets may stick to
the tube or fail to fall from the fingers. If this happens, dust
with powdered mica.
If powdered mica isn’t available, you can use powdered
graphite, but it’s messy.
Have a Bullet Sizing Kit and want to install on APP
press?
SEE INSTRUCTIONS HERE:
leeprecision.com/files/instruct/InstallBulletSizingKitIntoAPPpress.pdf
Bullet Sizer & Punch

8
Slide Bulge
Buster
punch into
shell holder
adapter.
Tighten
a ⅓ of
a turn
clockwise.
Assemble the Bulge Buster and Carbide Factory Crimp Die.
Punch
CONFIGURING APP FOR BULGE BUSTING
APP Bulge Buster Kit product # 91572 restores free function of rimless cases that have low base bulges. Low base bulges
usually occur from chambers that do not fully support the cartridge or cases resized in carbide dies from manufacturers other
than Lee. These show a noticeable stop ring near the base. You will most likely find cases with these problems in mixed range
brass.
Remove
crimp
sleeve and
adjusting
screw from
carbide
factory
crimp die.
Select appropriate intake
funnel and insert into
Breech Lock Bulge Buster
insert holder.
CARBIDE
FACTORY
CRIMP
CARTRIDGE INTAKE
FUNNEL
90867 380 ACP 380
90862 10mm, 40 S&W 10/40
90416 41 AE, 41 MAG 45
90864 45 ACP, 45 GAP, 45 WIN MAG 45
Intake funnel.
Roll mark in first.
Breech Lock Bulge Buster
intake funnel holder.
Please note: if you have
automation kit installed,
insure the jaws are
backed out (maximum
jaw opening).
See Riser & Jaw
adjustment page 4.
Spline drive lock
ring must be used
Install bulge
buster
assembly and
tighten ⅓ of
turn.
10
Insert cases into feed
tube (case mouth
down first) with case
inserter assembly
underneath.
Case mouth
down first
11
Push case through.
BUSTED!
Bulge busted cases
conveniently collect in
catch container, or use your
empty powder container
for even more capacity.
/