Page is loading ...

Ammunition reloading can be dangerous if done im properly and
can result in serious injury or death.
· Reloading should not be attempted by persons not willing and
able to read and fol low instructions exactly.
· Children should not be permitted to reload ammunition without
strict parental supervision.
· Always wear safety glasses and hearing protection when
reloading and shooting.
· Ammunition loaded with these tools and data should only be
used in modern guns in good condition.
· We do not accept responsibility for ammunition loaded with
these tools or data as we have no control over the manufacture
and storage of components or the loading procedure and
techniques.
· Primers and gun powders, like gasoline and matches, can be
dangerous if improperly handled or misused.
TR5223
1
PRO 1000 KIT
INSTRUCTIONS
DANGER
CAUTION
CASE FEED SPRING
# PR2118
LEE PRECISION, INC.
4275 Hwy. U · Hartford WI 53027
www.leeprecision.com
Kits include new Breech
Lock Die Set. Smart
Lock bushings utilize an
integrated o-ring to keep
dies firmly in place, yet
remain finger adjustable.
Color coded for easy
identification. The best
value for Lee Breech Lock
press owners.
Breech Lock Bushing Die Set
DISPOSAL TUBE # BP3064
CAP # BP3127
RAM PIN
# OF3221
LINK BOLT (qty. 2)
#
TP2117
CONNECTING LINK
#
TP2129
LEVER CLAMP
# OF3662
1
” WASHER
#
OF3609
–18 X 1
BOLT
#
FO2113
SLIDER BLOCK
#90497
PRIMER FEED SPRING
# TR5386
TOOL HEAD
#TR5031
FOLDING PRIMER TRAY (1) included
#90606 (2 pack)
5/16-18 x 1 ¼ BOLT
(qty. 3) #FT2886
INDEX ROD
# TR5032
CASE RETAINER
#PR3691
PRIMER SLIDER TROUGH & PIN
#92021
PRIMER SLIDER
#BP5079
CASE EJECTOR
#PR3691
LINK NUT (qty. 2)
# FB1181
SHELL PLATE CARRIER
# TR4415
ROLLER HANDLE
#90746
BASE
#
TR3642
TOGGLE (qty. 2)
# OF2853
RAM
PRIMER OUTLET
# TP3707
LUBRICATION POINT
LUBRICATION POINT
Auto-Drum
powder measure
# 90811
Universal Case Feeder
# 90242
Bin & Bracket
# 90687
Die wrench included
Works on
spline drive
breech lock
bushings
and lock
rings.
LUBRICATION POINTS= use STP
™
motor treatment or motor oil.
See Pg 8
PRO 1000
HELP VIDEOS
LUBRICATION POINT

2
1 2
5
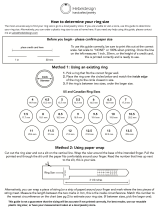
Mount your press. The most convenient way to mount your
press is with our Lee Bench Plate System # 90251. This
system includes all of the mounting hardware and allows
for quick press removal without unbolting from bench.
Or, purchase (qty. 3) ¼” bolts and nuts and prepare your
workbench for use with this press.
# 90251 Bench Plate
TOOL HEAD POSITION & INITIAL SETUP
Position 2 =
Powder Through
Expanding Die
or Rifle Charging
Die
priming
position
Position 1 =
Full Length
Sizer Die
Position 3 =
Bullet Seating Die
Adusting Screw
Funnel Adapter
LEE BREECH LOCK DIES include Smart
Lock bushings on the dies. Lock rings are not
required when utilizing these bushings.
SAFETY CONSIDERATIONS
•Be sure of proper powder and charge for
bullet weight selected.
•Wear safety glasses and hearing protection
when reloading or shooting.
•Be extremely careful to avoid a double
charge. If in doubt, empty the case and
recycle it.
•Do not permit distractions while loading.
This is a complex machine that needs
your fullest attention.
SMOOTH OPERATING TIPS
•Always move the lever smoothly in complete
strokes. An interrupted stroke can cause
a jam or double charge.
•Do not force it or you will break something. If
it does not feel right, stop and check out
the problem.
•Oil ram using STP™ motor oil treatment.
Using any oil, lubricate link bolts and ram
pin every few thousand rounds.
SETUP TOOLS REQUIRED
•Safety glasses & ear protection
•1/2” socket or wrench
HELPFUL SETUP VIDEOS
Open camera application on smart-
phone or tablet, hover over the QR
code for a direct link to help video.
3
Loosen lever clamp. Re-position handle, tighten securely
with ⁄” socket or wrench.
1
3
2
Raise the retaining ring and slide the primer collection
tube assembly into the ram. Slide retaining ring on to
assembly.
4
OR
Verify the handle
passes completely
through lever clamp.
5
Loosen with
a 1/2 inch
wrench
PRO 1000
HELP VIDEOS
Install catch bin and bracket
Mount to leg of Lee reloading stand
using provided -” bolts and
”- nuts
Mount to workbench using ()
provided Phillips head screws.
Ziptie
*TIP* If loaded rounds catch in corner of eject
trough, add a ziptie to your toolhead to guide the
flow to your catch bin.

2
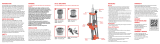
PRO 1000 DIE INSTALLATION
How to install Smart Lock Bushings
Drop the Smart Lock bushing into the press frame, and
rotate the bushing 1/6 of a turn clockwise finger tight.
Remove by rotating 1/6 turn counterclockwise and lifting
from the frame. To prevent die movement, install and
remove by grasping the spline of the bushing. A handy
die wrench is included.
3
Position 1 = Full Length Sizer Die
sizing & depriming must be done in this station
(A) Install appropriate die and bushing onto Auto Drum powder measure.
(B) Insert assembly into position 2.
(C) Position a case under position 2 and raise to top of its stroke (hold
lever down).
(D) Rotate entire powder measure and die inward until the top of stroke
indicator nears the top of the slot in the casting.
Dispense position
Note: slider drop
tube should not
make contact with
top of slot
Position 2 = Powder Through Expanding Die or Rifle Charging Die
(A) Install die and bushing in tool head position 1.
(B) Raise the carrier to top of stroke. (Handle down and hold)
(C) Screw die into contact the shell plate.
(D) Release lever, screw in the die additional 1/3 turn further.
*Note* Using a 1/2” (13mm) wrench on the
decapper clamp makes adjustment easy.
Position 3 = Bullet Seating Die
Handgun
Bullet Seating
Die
Adjusting
Screw
NOTE: handgun powder through expanding dies should be installed
deep enough to flare case mouth to allow easy insertion of bullets.
Install the die and bushing into position 3.
6
Raise carrier to align primer
guide with hole in slider trough
(see detailed image pg 8)
B
Insert a paper clip or small hex
key into hole on the underside of
primer trough, push primer guide
out.
CRaise carrier to
top of stroke,
install correct
primer guide
with the ability to
read the S or L on
top of guide
Installing or Changing Primer Guide
Primer Guide
91981 Large
Primer Guide
91980 Small
Important!
Do not operate without a small or large primer guide intalled
into slider.
*IMPORTANT* Do not operate primer feed without a small or large primer guide installed into slider.
Doing so will cause damage to your primer slider.
A
7

8
9
4
ALL PRIMERS ARE DANGEROUS and it should be anticipated that the primers in the tray could explode through accident, misuse or spontaneously.
Should an explosion occur, our tests have demonstrated that safety glasses will normally prevent serious injury to the user. Primers are capable to
explode with sucient force to seriously injure the user, or persons nearby. When loading primers—safety glasses and hearing protection must be
used. Observe the warnings on the primer box.
Slide the flow
control to
OPEN.
Lift tray so output spout
touches table, shake tray
side to side to upright all
the primers. Allow cover to
naturally fold up, notice how
the primers glide across hinge
upright themselves and work
their way to wards the outlet.
Fold cover over, slide the flow control to
LOCK position, feel for the detent. Grasp
the top and bottom of the flow control valve
using your thumb and index finger above
and below tray.
NOTE: make sure it is in the LOCK detent
position, or else primers may spill.
Slide the tray into the trough.
Slide the flow control to the
ON position. Tap the side of the
trough several times to fill the
trough.
A B C
E
WARNING: Handling live primers and spent primers may expose you to lead or other chemicals, which are known to the State of California to cause
reproductive harm and cancer. For more information, go towww.P65Warnings.ca.gov.
IMPORTANT: the primer is seated during the last inch of lever travel. Make a
conscious eort to feel the primer enter and fully seat into the case. Incomplete
primer seating will not allow the case to eject from the shell plate. This seems to be
the biggest problem for first time users.
Lift firmly on Lift firmly on
lever to seat lever to seat
primerprimer
taptap
Randomly
deposit
primers.
DANGER: Primers can explode with sucient force to seriously injure the user or persons nearby.
Don’t let the primer level fall below the tray level. Running out of primers will cause a mess inside your shell plate carrier.
Once the last primer has exited the folding tray, replenish the primer supply, or else you will be loading cases without
primers.
Fill the primer feed tray. View help video for loading primers into tray:
D
Lower the lever, place a case in front of the slider block and raise lever to insert case into
shell plate. Lower the lever and the case is raised into the sizing die position. Lift the lever, the
case will advance to the priming station and primer will be seated at the carrier’s bottom of
the stroke. Lower the lever, the case will rise into station #2, the powder charging and pistol
expanding station. Raise the lever and the case will advance to bullet seating/crimping station
# 3. Lowering the lever will raise the case into the bullet seating/crimping die to seat the bullet.
At any time if you need to remove the case, raise the shell plate carrier so that the alignment pin is no longer engaged
with the shell plate, you can then rotate the shell plate in either direction to remove the case. Important, if a partially
seated primer holds the case in the shell plate, simply rotate the shell plate to the high primer ejection slot and
remove. Whenever the normal reloading sequence is interrupted, the most important hazard to guard against is a
double charge. It is always best to completely remove the oending case.
DRY RUN (no primers, powder, or bullets)
Cycle the lever up and down to confirm the shell plate is advancing correctly.
Slider blockSlider block
Alignment pinAlignment pin
high primer ejection slothigh primer ejection slot

INSTALLING Universal Case Feed Magazine
A
B
C
Confirm case feed spring
in attached to rear hole of
case slider
See chart on page 8. Install the correctly configured feed
plate (large or small) keeping the bottom of the case feed
plate a pennies thickness above the case mouth. Slide a
case through feed plate. Place penny on top of the case,
slide feed plate into carrier.
Case slider blockCase slider block
RiserRiser
See chart on page 8, some cases require riser
to be removed from top of case slider block.
If utilizing the RISER,
verify CASE SLIDER
BLOCK front and back
are flush. Tighten Phillips
screw on riser block.
A penny’s thickness above case mouth
This accessory will greatly simplify progressive reloading placing a case every time the press is cycled. The case slider block and riser is installed on your
press. Shorter cases will require you to remove the riser from the case slider block. All you need to do is install the feed plate configured for the case that you
will be loading.
Secure the feed plate with a nut above and
below the carrier slide rail. Tighten 7/16” nut
below carrier to secure.
Case Collator
# 90667
D
Consider the
case collator
product #
90667 fill all
four case feed
tubes in as little
as 10 seconds.
CASE FEED MAGAZINE
45
use rear hole
riserriser
slider blockslider block
Don't install the case feed magazine until you are confident of the operation.
Assembled as a SMALL feed plate
Bolt and nuts are adjacent to small
through hole.
small small
holehole
small
plug
installed
large large
holehole
Assembled as a LARGE feed plate
small plug removed
storage spot for
small plug
Reference grid on pg. 8 for setup instructions
Bolt and nuts are adjacent to large through hole.
10
If you are just starting on a progressive press, we suggest you start out using the Pro 1000 as a single stage press by producing one
round at a time round with three cycles of the lever. Install the 3 dies in the press as instructed. Drop an empty case into the case feeder and
cycle the lever three times.
Before attaching the 4 tube case feed magazine, process 50-100 cases until you have the feel of the entire reloading sequence. Be sure to
measure your completed ammunition to verify it is the correct overall length and will chamber in your firearm.
Once you are comfortable and the press is functioning smoothly you can use the press as a full progressive by simply placing a case in front
of the case slider every cycle of the lever. Because each station performs one operation, every time you cycle the lever you produce a finished
round. If you operate the lever at a leisurely 10 seconds per cycle that is 360 rounds an hour.

6
TROUBLESHOOTING
PROBLEM CAUSE REMEDY
Primers not fully seated
• Operator not lifting hard enough
• Shell plate carrier not fully seated or loose
on ram
• Obstruction to full travel
• Learn to feel the primer seating when the lever is pushed up
• Loosen socket head cap screw and force shell plate carrier on the ram. Re-tighten clamp
screw
• Check for primer on base or under shell plate carrier. Carrier should contact the base with no
case in the shell holder
Primer doesn’t feed onto
priming punch
• Oil or gunpowder in trough
• Primer trough not full
• Remove all oil with solvent or blow out powder or dust with compressed air
• Always keep primer trough full
Primer doesn’t enter case • Primer crimp not removed
• Wrong size primer
• Ream or swage primer pocket
• Caution, some 45 ACP cases now have small primer pockets
Tipped primers • Case not fully in shell plate
• Spilled powder in primer trough
• Clean shell plate. Check tension finger. Straighten or replace tension finger as required
• Clean powder out with compressed air
Cases don’t eject • Primers not fully seated • See “Primer not fully seated” problem above
Cases don’t slide out • Cases catch in corner of eject trough • Place 6” ziptie in toolhead slot. See Fig. 1
Case feeder doesn’t work
properly • Case feed spring in wrong case slider hole • See case feed position photo. Spring should be installed into rear hole. See Fig. 2
Press does not index • Worn driver clutch • Rotate driver cluch 90° or replace driver clutch (part # PR3691). See Fig. 3
case feed spring outermost hole
Fig. 1 Fig. 2 Fig. 3
Driver Clutch
(part # PR3691)
With a stubby #2 Phillips screwdriver,
loosen clockwise and remove 1 of the
8-32 x 1/4 Pan HD screws on the clutch
retainer plate.
Ziptie
Remove index rod
A
B
CPull down retainer plate and rotate
driver clutch or replace. Re-intall
clutch retainer plate screw and index
rod.

7
Pro Auto Disk chain hole
Primer guide change hole
FO1770 Pan HD Screw 8-32 x ⁄
TR2437 Primer pin
TR2479 Primer
pin spring
PR3691 Driver clutch
PR3691 Driven clutch
(not visible)
TR5234 Clutch retainer plate
FT2435 ⁄-20 x ⁄
Socket Head Screw
SHELL PLATE CARRIER DETAIL
B C
A
Remove shell plate.
E
D
Remove case ejector
With the carrier at the bottom of the
stroke (handle up), remove index rod.
Loosen turning clockwise with a ⁄ inch hex
key while holding the shell plate
Remove Smart Lock bushing from
station 2.
Changing shell plate
PRO 1000
HELP VIDEOS
TR2437 Primer pin
(short end gets installed down)
FT1781 #8-32 x ¼” Screw
FT1781 #8-32 x ¼” Screw
TR5033 Drive Bolt
Shell Plate (See page 8 for listing)
92021 Primer trough & spring
BP5079 Primer Slider
Primer Guide
91980 Small
91981 Large
TR2443 Tension Fingers
(2 installed, 2 spares)
TR2433 ⁄ Detent Ball
TR3742 Index Spring
TR5086 Primer Slider trough
#PR2125
⁄ short arm hex key.
Use to loosen drive bolt
to remove shell plate
TR4415 Carrier

Te LeeGuarane
lee reloading products are guaranteed not to wear out or break from
normal use for two full years or they will be re paired or replaced
at no charge if returned to the factory. Any Lee product of current
manufacture, regardless of age or condition, will be recon di tioned to
new, including a new guarantee, if re turned to the factory with payment
equal to half the current retail price.
8
WARNING: Handling live primers and spent primers may expose you to
lead or other chemicals, which are known to the State of California to cause
reproductive harm and cancer. For more information, go to
www.P65Warnings.ca.gov.
WARNING: This product may contain steel alloyed with trace amounts of
lead and other elements which are known to the State of California to cause
reproductive harm and cancer. For more information, go to
www.P65Warnings.ca.gov. To prevent exposure, do not alter the product by
welding, grinding, etc.
To convert the Pro from a one cartridge to another, you will need the proper shell plate and appropriate Lee reloading die set. The chart below shows
proper configuration with catalog numbers.
CartridgeCartridge Shell Shell
PlatePlate Shell Plate Shell Plate
Product Product Univ. Case Feed Univ. Case Feed
Plate SizePlate Size Univ. Case Feed Univ. Case Feed
Slider BlockSlider Block Reloading DiesReloading Dies Bushing set Bushing set
neededneeded Charging dieCharging die Primer Primer
GuideGuide
Luger Luger SMALLSMALL N/AN/A YesYes SmallSmall
Mauser Mauser SMALLSMALL N/AN/A YesYes SmallSmall
Tokarev Tokarev N/AN/A N/AN/A YesYes SmallSmall
ACP ACP SS SMALLSMALL N/AN/A YesYes SmallSmall
S&W Long S&W Long ASAS SMALLSMALL N/AN/A NoNo SmallSmall
H&R MAG FED H&R MAG FED ASAS SMALLSMALL N/AN/A YesYes SmallSmall
mm Lugermm Luger SMALLSMALL N/AN/A NoNo SmallSmall
mm Makarovmm Makarov SMALLSMALL N/AN/A YesYes SmallSmall
SS SMALLSMALL N/AN/A YesYes SmallSmall
Sig Sig SMALLSMALL N/AN/A YesYes SmallSmall
Super Super SMALLSMALL N/AN/A NoNo SmallSmall
S&W S&W SS SMALLSMALL N/AN/A YesYes SmallSmall
Auto Auto SS SMALLSMALL N/AN/A NoNo SmallSmall
SPL & MAG SPL & MAG SS SMALLSMALL RISERRISER NoNo SmallSmall
ACP ACP SMALLSMALL N/AN/A NoNo SmallSmall
Short/Long COLT Short/Long COLT SS SMALLSMALL N/AN/A YesYes SmallSmall
S&W S&W SMALLSMALL N/AN/A NoNo SmallSmall
mm Automm Auto SMALLSMALL N/AN/A NoNo LargeLarge
Mag Mag LL LARGELARGE RISERRISER YesYes LargeLarge
SPL & MAG SPL & MAG LL LARGELARGE RISERRISER NoNo LargeLarge
Cor Bon Cor Bon LL LARGELARGE N/AN/A YesYes LargeLarge
MM SS SMALLSMALL RISERRISER YesYes LargeLarge
Russian Russian LL LARGELARGE RISERRISER YesYes LargeLarge
- WIN- WIN SS LARGELARGE RISERRISER YesYes LargeLarge
Casull Casull LL LARGE LARGE RISER RISER YesYes LargeLarge
ACP ACP LL LARGELARGE N/AN/A NoNo SM LG SM LG
Auto Rim Auto Rim LL LARGELARGE N/AN/A YesYes LargeLarge
Colt Colt LL LARGELARGE RISERRISER NoNo LargeLarge
Schofield Schofield LARGELARGE RISERRISER YesYes LargeLarge
GAP GAP LL LARGELARGE N/AN/A YesYes SmallSmall
WIN MAG WIN MAG LL LARGELARGE RISERRISER YesYes LargeLarge
S&W S&W SS LARGELARGE RISERRISER YesYes LargeLarge
Action Express Action Express LL N/AN/A N/AN/A (LUBE REQ.)(LUBE REQ.) YesYes LargeLarge
REM REM SS SMALLSMALL RISERRISER (LUBE REQ.)(LUBE REQ.) NoNo SmallSmall
AAC Blackout AAC Blackout SS SMALLSMALL RISERRISER (LUBE REQ.)(LUBE REQ.) NoNo SmallSmall
x x LL SMALLSMALL RISERRISER (LUBE REQ.)(LUBE REQ.) YesYes LargeLarge
REM REM SS SMALLSMALL RISERRISER (LUBE REQ.)(LUBE REQ.) YesYes SmallSmall
SOCOM SOCOM LL N/AN/A N/A N/A (LUBE REQ.)(LUBE REQ.) YesYes LargeLarge
N/A = Not available LUBE REQ. = # 90006 LEE resizing lubricant required N/A = Not available LUBE REQ. = # 90006 LEE resizing lubricant required
CARTRIDGE CHANGE OVER
/