Page is loading ...

Control Contractor
Ceiling Loudspeakers
Control 24C/CT Micro and
Control 24CT MicroPlus
Owner's Manual

Product Description
Product Feature Identification
Installation Preparations
Step-By-Step Installation and Wiring
Painting the Speaker
Maintenance
Contacting JBL
Table of Contents
2
3
4
6
11
12
14
Thank you for purchasing JBL Control Contractor ceiling loudspeakers.
Read through this manual to familiarize yourself with the features,
applications and precautions bef
ore you use these products.

The JBL Control Contractor ceiling loudspeakers utilize innovative design and materials
to provide premium level performance from compact in-ceiling speakers.
CONTROL 24C MICRO - Most compact of the JBL ceiling speakers, the Control 24C
Micro contains a 4" woofer and a ¾" titanium-coated tweeter, providing high-fidelity
sound over an extremely wide coverage area. The Control 24C Micro also has a small
backcan and is ideal for smaller ceiling spaces.
CONTROL 24CT MICRO - The Control 24CT Micro includes a multitap transformer
for use on 70V or 100V line distribution systems. The transformer has a top tap rating of
9 Watts.
CONTROL 24CT MICROPLUS - The Control 24CT MicroPlus includes a multitap
transformer for use on 70V or 100V line distribution systems. The transformer has a top
tap rating of 25 Watts.
Product Description
2

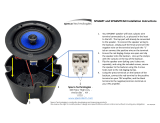
Product Feature Identification
(Control 24CT Micro Shown)
Attachment Screw
Tweeter
Woofer
Steel Backcan
Connector
Block
Rotating
Mounting
Tab
Strain Relief
Tie
Seismic Tab
(Secondary
Support)
3
Attachment points
for included or
installer-provided
strain-relief fittings.
Tuning Port

Installation Preparations
OPTIONAL PRE-INSTALLATION BRACKETS
The entire installation can be accomplished, if necessary, without requiring access above
the ceiling. Bracketry for use with either suspended ceilings or sheetrock ceilings is
included. The speaker is held securely in place via mounting ears which lock into place.
IN MOST CASES
, NO BRACKETS OTHER THAN THE ONES INCLUDED
WITH
YOUR SPEAKER ARE REQ
UIRED. Everything needed for most installations
of these loudspeakers is provided with your Control Contractor ceiling speaker.
However, sometimes a pre-installation bracket is required to reserve the space within
the ceiling area, or to provide a place to which wiring can be tied behind the sheet rock.
A pre-installation bracket can also function as a cutout template when many cutouts are
to be made. Two types of pre-installation brackets are available from JBL Professional
as optional accessories:
1) The optional NEW-CONSTRUCTION BRACKET is made of flat sheet metal,
with wings to attach to the building structure. Holes are drilled for nails or screws at
16 inches (406 mm) and 24 inches (610 mm) on-center. Additional holes can be drilled
by the installer at other spacings up to a maximum of 24 ¾ inches (630 mm) apart.
Sheet rock installs over the bracket, and the bracket provides a template for blind
cutout of the hole in the sheet rock. The sheet rock can typically be cut with a router-
type cutting tool, using the bracket ring as a cutout guide.
Figure 1:
Optional New-Construction Bracket
4

2. The optional PLASTER-RING BRACKET (or "mud ring") is identical to the New
Construction Bracket, with the addition of a circular offset, forming an edge guide for
sheet rock plastering. The bracket has wings that attach to the building structure. Sheet
rock is typically either precut or cut with a rotary cutting tool. The sheet rock hole is
then plastered (or "mudded") up to the ring to create a seamless cutout.
NEW CONSTRUCTION BRACKETS
The model numbers for the New Construction Brackets for the Control 24C/CT Micro and
the Control 24CT MicroPlus are the same as the brackets for the Regular Control 24C & CT
ceiling speaker.
New Construction Bracket: MTC-24NC
Plaster Ring Bracket: MTC-24MR
USING INCL
UDED C-BRACKET WITH SHEETROCK
For most installations, the INCLUDED C-shaped backing plate provides adequate reinforce-
ment to the ceiling material, spreading out the clamping force from the tab clamps.
CUT
OUT SIZES
The speakers are packaged in cardboard cutout templates which can be used for scribing the
cutout hole onto your ceiling surface. The cutout size for the Control 24C/CT Micro and the
Control 24CT MicroPlus is the same as the Regular Control 24C & CT.
Cutout Size: 6.6 inches (168 mm)
5
Figure 2:
Optional Plaster Ring Bracket

6
ALL included support brackets, C-plate and tile rails
MUST be used when installing into suspended ceiling tiles.
FOR SAFETY: IMPORTANT TO USE BRACKETS
Suspended Ceilings - Insert the C-plate through the hole cut in the ceiling tile. Place
the C-plate around the hole with the tabs located as shown on Figure 4. Insert the tile
rails through the cut hole in the ceiling tile. Snap the two rails into the two tabs in the
C-plate and align the rails so that the ends extend OVER the T-channel grid on the
upper side of the tile. Secure the rails onto the C-bracket tabs by inserting a screw
though each tab into the rail. This can all be accomplished from below the ceiling tile,
if necessary.
The installation system has been designed so that the entire installation can be accom-
plished from beneath the ceiling, for instances when access above the tile is not possible
or practical. However, in some cases it may be easier with removable ceiling tiles to
access from both the top and bottom of the ceiling tile during various phases of the
installation.
Step 1 - Cut Ceiling Hole. Cut out the hole size either by tracing the cardboard cutout tem-
plate and cutting the hole or by using a circular cutter set to the cutout sizes listed above. Pull
the wiring through the cutout hole.
Guide to the Pins for Connection - The locking input connector contains 7 terminals,
as marked above the connector. The pin functions are listed on the label located on the
terminal cover plate.
Figure 3:
Hole Cutout
Step 2 - Insert Backing Hardware Through the Hole. Packaged with the speakers are two
types of backing hardware - a C-shaped backing-plate bracket and two tile rails.
Step-by-Step Installation and Wiring

7
Figure 4:
C-Bracket and Tile Rail
Positioning on Ceiling Tile
Tile Rails: The tile rails are designed to fit either standard 24-inch wide tiles or 600-mm
wide tiles. The tile rail pieces do NOT physically attach to the T-grid struts. Instead, the
inverted-V shape at the ends of the rails sit OVER the T-grid strut. During normal
operation, the rails are supported by the edge of the tile. In the unlikely even that the tile
comes out or falls apart, the ends of the support rails are designed to catch onto the T-
grid, providing secure support to hold the loudspeaker assembly in place.
Cutout Placement: The tile rails are pre-punched with attachment holes along their
length. Placement is not limited to the center of the tile, as is the case with many other
tile rail support systems.
Non-Suspended Ceiling Types: The C-bracket can be optionally used by itself to
shore up the ceiling material and to spread out the clamping force from the tab clamps.
Insert the C-plate through the cut hole in the ceiling and place it on the back side of the
hole before inserting the speaker.
Step 3 - Connect the Wiring to the Input Terminal Block. Connect the wiring to the UL &
CE-rated, touch-proof terminal block that is attached to the side of the speaker by stripping
the insulation back about about
3/16 inches (5 mm) [do not strip any longer than this], inserting
the bare end of wire into the connector and screwing the hold-down screw until tight using a
small flat blade screwdriver. Tighten any unused screws to avoid vibration.
Figure 5:
Connecting Wires to Connector

8
Control 24CT Micro:
9W 4W 2W 1W 0.5W Com 70V
N.C. 9W 4W 2W 1W Com 100V
Control 24CT MicroPlus:
N.C. N.C. 6W 12W 25W Com 70V
N.C. N.C. 12W 25W N.C. Com 100V
Control 24C Micro:
+-
Hookup Chart
Hookup Chart
For Control 24CT Micro and the Control 24CT MicroPlus, connect the negative input to
the "Common" terminal and connect the positive input to the appropriate tap. The input
pins correspond to the taps of the transformer indicated on the label above each connec-
tor. For example, if the system is being driven from a 70V Distributed Line, and the 2W
tap is the desired connection, the positive input would be made to the input marked "2W,
Violet." The negative connection would be made to the "Common" pin.
On the Control 24C Micro, low impedance version, connect the negative wire to the "-"
terminal and connect the positive wire to the "+" terminal.
All other pins are "No Connection."
Paralleling Input Terminals - It is common to run two sets of wires - one set is the
input to the speaker and the other is the feed to the next speaker. In this case, simply par-
allel the two sets of wires to the same terminals on the speaker's terminal block.
Guide to the Pins for Connection - The locking input connector contains 7 terminals,
as marked above the connector. The pin functions are listed on the label located on the
terminal cover plate.
Step 4 - Add included metal strain relief as necessary. The Control 24C/CT Micro and the
24CT MicroPlus are equipped with two locations where the installer can affix strain relief con-
nectors - one is on the back of backcan and one is on the side (for applications with shallow
access). The location of these two attachment points is shown on the Product Feature
Identification on Page 3. The installer can attach a wide variety of installer provided fittings to
these points if the included equipment is not adequate for the particular installation. Refer to
Figure 6 shows the strain relief INCLUDED with the Control 24C/CT Micro and Control 24CT
MicroPlus.
Figure 6:
Included Metal Strain Relief

1 - Cable Tie - If using loose wire, this cable tie can secure the loose ends of wire that
are connected to the terminal block. The strap can be tightened by pulling on the loose
end and then tightening the holding screw.
2 - Adjustable Metal Strap - This adjustable steel tie fitting is provided for those applica-
tions where it can be utilized to affix a set of wires. It can be useful for regions where
such a fitting is allowed for terminating a flexible conduit. It can also be used for tight-
ening down onto incoming wires to provide strain relief. It might be necessary to place
electrical tape or heat shrink over any wire bundle, underneath the metal strap, to physi-
cally protect the wire from the strap.
3 - PEM Screws - Two screws, which are threaded into PEM fittings in the backcan,
one on the back and one on the side, can be used to attach a wide variety of strain fit-
tings. Please remove the correct screws with the PEM fitting, as shown on the Product
Feature Identification Picture on Page 3, NOT the two screws that hold the backcan in
place. Check building codes in your area for what kind of physical strain relief fittings
are required in your region.
Always use the proper fitting in accordance with
your area's building codes and regulations.
CAUTION:
Figure 7:
Tightening the Cable Tie
9

10
Then tighten the mounting tabs by turning the screw CLOCKWISE until tight. The first ¼
clockwise turn rotates the attachment tabs outward and the remaining turns tighten the tabs
down onto the back of the ceiling surface. DO NO
T OVERTIGHTEN.
Figure 9:
Tightening Mounting Tabs
Step 6 - Connect a Secondary Support Line to Seismic Tab - A tab is provided on the side
of the Control 24C/CT Micro and the Control 24CT MicroPlus for connection to an inde-
pendent secondary support point. Some construction codes require using this secondary sup-
port point, by connecting a support line to a separate secure support point.
Consult construction codes in your region.
Step 7 - Insert the Grille - Consider which direction the logo is facing and press the grille into
place until the front of the grille is flush with the rim. Make sure grille is securely seated to pre-
vent it from vibrating loose and falling.
Figure 8:
Inserting Speaker Into Ceiling
Step 5 - Insert the Speaker Into the Ceiling and Tighten.
Insert the speaker into the ceiling as far as it goes, until the front baffle rim touches the ceiling.
Turn the attachment screws to tighten the mounting tabs, by using the following directions:
IMPORTANT - For each attachment screw, FIRST turn ½ turn COUNTER-CLOCKWISE
to release the mounting tab from its guide.

Painting the Speaker
The speaker's textured white finish complements most decors and does not need further
finishing. Where the interior design requires it, these speakers are easy to paint.
The rim can be painted before installation or in cases where the rim needs to be finished
along with the ceiling, the speaker rim can be painted after attaching into the ceiling.
Type of Paint - The speaker's polystyrene rim accepts almost any type of latex or oil
based paint. Two coats are recommended.
Painting Process - For best results, it is recommended to use the following procedure:
11
Painting the Grille - Painting the grille requires removal of the logo and the internal grille
cloth, then spray painting. If the grille is rolled or brush painted, the mesh may become
clogged with paint and poor sound quality may result. Replace the internal grille cloth
(or if damaged use new internal grille cloth) and JBL logo.
· Clean the rim and grille with a light solvent such as mineral spirits by rubbing
the item with a lightly dampened cloth. Do not, however, use abrasives such as
sandpaper or steel wool. Nor should you use gasoline, kerosene, acetone, MEK,
paint thinner, harsh detergents or other chemicals. Use of these cleaners may
result in permanent damage to the enclosure.
· Mask the baffle.
· After cleaning, apply two or more two thin coats of either latex or oil-based
paints. Latex paint will adhere better if an oil-based primer is used first.
Application can be made by rolling, brushing or spraying.

These products are in compliance with the EMC Directive 89/336/EEC and Article 10 (1) of
the directive. In compliance with Technical Regulations EN50081-1 and EN50082-1. For a
copy of the model-specific CE Declaration of Conformity, contact JBL at the address listed at
the end of this manual.
Maintenance
No maintenance is required when installed in accordance with installation and wiring guidelines
described in this manual.
12
Control 24CT Micro
Transformer Taps: 70V: 9W, 4W, 2W, 1W, 0.5W
100V; 9W, 4W, 2W, 1W
Control 24CT MicroPlus
Transformer Taps: 70V: 25W, 12W, 6W
100V; 25W, 12W
Control 24C Micro
Power Capacity: 15W Continuous Pink Noise (UL shaped pink noise as
defined by a 6dB Crest Factor)
30W Continuous Program POwer (Defined as 3dB
above Pink Noise Power)
Continuous-Tone Test Rating: 5.3V RMS (Pure sine wave signal swept from 800
Hz to 2400 Hz over ten seconds)
When using a distributed line system, the distribution amplifier is incapable of
producing an output voltage higher than its rating (70.7 V or 100 V depending
on geographic region). This is a peak voltage rating. As such, loudpseakers
utilizing distribution transformers are not rated for voltage inputs in excess of
those amplifier specifications.
NOTE

13

Warranty & Contacting JBL
These products are designed and backed by JBL Professional, the world leader in sound rein-
forcement. For complete JBL warranty information, to order replacement parts or to ask for
clarifications to this manual, contact JBL Professional.
WITHIN THE UNITED STATES: OUTSIDE OF THE USA:
Applications Department, JBL Professional
PO Box 2200, 8400 Balboa Blvd.
Northridge, CA 91329 USA
In the USA you may call Monday through
Friday 8:00 am to 5:00 pm Pacific Coast Time
(818) 894-8850.
Contact the JBL Professional
Distributor in your country.
A list of JBL Professional Distributors and U.S. Service Centers can be attained
from the JBL Professional website: www.jblpro.com
14

JBL Professional
8500 Balboa Blvd, P.O. Box 2200
Northridge, CA 91329 U.S.A.
A Harman International Company
MAN_C24MICRO
Revision D
/