12 Preparing for Installation
Note
If your total RG-6 coaxial
cable length from the dish
to the receiver is more than
112 feet, you may need
additional installation
component, such as a line
amplifier, to compensate for
the longer cable length.
Note
You must use RG-6 coaxial
cable from the satellite dish
to the SATELLITE IN jack on
the receiver. Other types of
coaxial cable, such as those
used for cable television
(RG-59) do not work for the
digital satellite system.
Tip
If you have a dual-output
LNB and plan to connect
your dish to two separate
receivers, don’t forget to
double the RG-6 cable
estimate to the grounding
block, and include a
separate estimate from the
grounding block to the
second receiver.
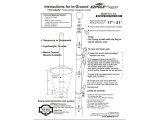
Cable Estimate Procedure
1. Locate the central building ground. You will ground the dish (via
the cable grounding block) to a single point in the central building
ground. The following is a list of acceptable building ground points:
• Grounded interior metal cold water pipe within five feet of the
point where it enters the building.
• Grounded metallic service raceway.
• Grounded electrical service equipment enclosure.
• Eight-foot grounding rod driven into the ground (only if
bonded to the central building ground by #6 or heavier
bonding wire).
• Other acceptable grounding electrodes that comply with
sections 250 and 810 of the National Electrical Code (NEC).
2. Choose a location to mount the grounding block. The block
should be as close as possible to the point where the cable will
enter the house.
3. Decide where inside the house you plan to put the satellite receiver.
4. Estimate the amount of cable you will need for each of the
following:
• One (1) RG-6 coaxial cable with messenger (ground) wire to
run from the dish to a grounding block for each LNB output.
The grounding block should be located near the cable’s point
of entry into the house.
Write that distance here: .
• One (1) RG-6 coaxial cable (per LNB output) to run from the
grounding block to each satellite receiver.
Write that distance here: .
• Grounding wire (#10 copper or #8 aluminum) to run from the
grounding block to the central building ground.
Write that distance here: .
Estimating Cable Requirements