Zebra QLn User guide

Category
POS/mobile printers
Type
User guide

This manual is also suitable for

Zebra QLn is a rugged mobile printer that combines innovative design with advanced technology to deliver reliable label printing solutions for a wide range of applications. With its compact size, durable construction, and versatile connectivity options, Zebra QLn is ideal for on-the-go printing needs. Its fast print speeds, high-resolution output, and support for various media types make it suitable for various industries, including retail, healthcare, manufacturing, and transportation.

Zebra QLn is a rugged mobile printer that combines innovative design with advanced technology to deliver reliable label printing solutions for a wide range of applications. With its compact size, durable construction, and versatile connectivity options, Zebra QLn is ideal for on-the-go printing needs. Its fast print speeds, high-resolution output, and support for various media types make it suitable for various industries, including retail, healthcare, manufacturing, and transportation.

QLn Series Mobile Printers
Quick Start Guide
1
Introduction
Battery Install &
Charging
Media Loading
Connect Printer/
Printer Controls
Cleaning and
Troubleshooting
Accessories and
Contact Info
Introduction
Thank you for choosing the Zebra QLn™ Se-
ries Mobile Printers. These rugged printers will
become a productive and efficient addition to
your workplace thanks to their innovative design. Because
it is made by Zebra Technologies you can be assured of
world-class support for all of your bar code printers, soft-
ware, and supplies.
This document provides an easy reference for operating
and maintaining the QLn Series Mobile Printer.
Complete and current documentation for this printer
is provided by the QLn Series User Guide available on the
Internet at: www.zebra.com/manuals.
QLn320 QLn220
Media width:
1.0 in. to 3.125 in.
(25,4 mm to 79,4 mm)
Media width:
.63 in. to 2.18 in.
(16 mm to 55,37 mm)
Printer Dimensions
H: 6.85 in. (173,659 mm)*
W: 4.65 in.(117,856 mm)
D: 3.15 in (76,9 mm)
* with belt clip
Printer Dimension
H: 6.73 in. (170,9 mm)*
W: 3.60 in. (91,4 mm)
D: 2.75 in. (69,9 mm)
* with belt clip
Always refer to the Important Safety Information data
sheet shipped with each printer and the Technical Bulletin
shipped with each battery pack. These documents detail
procedures to ensure maximum reliability and safety while
using this printer.
© ZIH Corp 2011
P1031679-002 Rev. A
QLn320
QLn220
QLn Series Overview (QLn320 Shown)
1. Platen Roller
2. Bar Sensor
3. Media Support Disks
4. Tear Bar
5. Label Present Sensor
6. Peeler Lever
7. Peeler Bail
8. Latch Release Lever
9. Keypad
10. Strap Post
11. LCD Screen
12. Printhead
13. Media Cover
14. Gap Sensor
15. Power Button
16. Feed Button
17. LED Charge Indicator
2
8
6
7
12
10
13
14
1
11
5
4
3
17
1615
QLn Series Mobile Printers
Quick Start Guide
2
Introduction
Battery Install &
Charging
Media Loading
Connect Printer/
Printer Controls
Cleaning and
Troubleshooting
Accessories and
Contact Info
Removing the BatteryQLn Series Overview continued
19
18
21
18. Belt Clip
19. Battery
20. USB/RS232 Comm Ports
21. MAC Address Label
22. Docking Contacts
23. DC Input
20
Rotate the Belt Clip out of the
way of the Battery
Installing the Battery
QLn Series Smart
Battery
Squeeze clip on battery pack
and remove.
23
22
3
Introduction
Battery Install &
Charging
Media Loading
Connect Printer/
Printer Controls
Cleaning and Trouble
-
shooting
Accessories and
Contact Info
QLn Series Mobile Printers
Quick Start Guide
UCLI72-4 Quad Charger
The UCLI72-4 Quad Charger charges up to four QLn Series
battery packs simultaneously. Batteries must be removed
from the printer to be charged in the Quad Charger.
The indicators under the battery will allow you to monitor the
charging process per the table below:
Fault
Fast Charge
Fault
Fast Charge
Fault
Fast Charge
Ready
Power
Full Charge
Ready
Full Charge
Ready
Full Charge
Full Charge
Fault
Fast Charge
Ready
Charger Bay
Amber
Indicator
Green
Indicator
Power Indicator
Power Supply
2. Slide Battery Pack
into Charger bay
3. Rock Battery Pack
into place
Amber Green
Battery Status
On O Charging
On Flashing
80% charged (O.K.
to use)
O On
Completely
Charged
Flashing O Fault
Charging the Battery
1. Plug Power Supply
into A.C. Outlet.
There are five (5) ways to charge the QLn Series battery,
two of which being with the battery outside the printer (Quad
Charger and Smart Charger-2), and three inside the printer
(AC Power Adapter, Single Bay Ethernet Cradle, and Four Bay
Ethernet Cradle). All five options are detailed in the following
sections.
Smart Charger-2 (SC2) Single Battery Charger
Battery
Pack
Charge Status
LED Indicator
Plug the SC2 charger into the AC outlet.
Insert the smart battery pack in the SC2 charger.
The LED on the front of the charger will indicate the battery packs
charge status. Green indicates fully charged, Yellow indicates charg-
ing, and Amber indicates a fault.
When the SC2 is plugged in but no battery is present, the Charge Status LED
indicator will be green.
A second LED will indicate the health of the battery pack:
Green=GOOD, Yellow=CAPACITY DIMINISHED, Yellow
Flashing=PAST USEFUL LIFE, and Amber=UNUSABLE-REPLACE
BATTERY. If the LED is off, there is either no battery or power pres-
ent.
Consult the QLn Series User Guide available at www.zebra.com/manuals for
complete information on using the SC2 Single Charger.
Health Status
LED Indicator
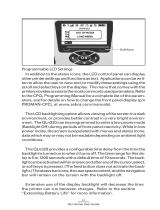
The charge state of the QLn Series battery is reected by the LED Charge
Indicator located on the front of printer (as illustrated in the Printer Controls
section on Page 8).
Caution • Do not incinerate, disassemble, short circuit, or expose to
temperatures higher than 60
o
C (140
o
F).
4
Introduction
Battery Install &
Charging
Media Loading
Connect Printer/
Printer Controls
Cleaning and Trouble
-
shooting
Accessories and
Contact Info
QLn Series Mobile Printers
Quick Start Guide
Ethernet Cradle (Single Bay & Four Bay)
Single Bay (QLn-EC)
Power Status
Indicator
Four Bay (QLn-EC4)
LED Function LED Status Indication
Power Solid Green Power On
Ethernet Blinking Green Ethernet Activity
Ethernet Status
Indicator
AC Power Adapter (included in kit p/n P1031365-024)
DC Input Jack
Qln320 AC
Adapter
AC Power Cord
(varies with
location)
Open the protective cover on the QLn Series printer
to expose the DC input charger jack.
Connect the appropriate AC power cord for your geography
to the adapter and then plug the power cord into an AC re-
ceptacle.
Plug the barrel plug from the AC adapter into the
charger jack on the printer.
The printer will power up and begin charging. The printer
can be left on or turned off at this point. Charging will con-
tinue in either state, the status of which will be monitored
by the LED charge indicator on the front of the printer.
Batteries are shipped uncharged. Remove protective shrink-
wrap and labels from new battery packs and allow them to
charge completely prior to initial use.
While its possible to charge the battery when using the
printer, charge times will increase under this condition.
Release Button
NOTE: Remove the “Docking Cradle Access” label (shown below) on the bottom
of the printer before docking the printer in the cradle.
DOCKING CRADLE ACCESS
5
Introduction
Battery Install &
Charging
Media Loading
Connect Printer/
Printer Controls
Cleaning and Trouble
-
shooting
Accessories and
Contact Info
QLn Series Mobile Printers
Quick Start Guide
4
Loading the Media
B.
C.
A.
Press Latch Button
Media Cover
ips open
Pull Media Supports
apart where shown.
Media Roll
Note direction media
pulls o the roll.
Pull Media out of
Printer
Close Media
Cover
6
Introduction
Battery Install &
Charging
Media Loading
Connect Printer/
Printer Controls
Cleaning and Trouble
-
shooting
Accessories and
Contact Info
QLn Series Mobile Printers
Quick Start Guide
Loading the Media (Peeler Activated)
4
5
6
7
B.A. C.
D.
8
E.
To disengage the peeler
bail, press down until it
locks in the home posi-
tion.
7
Introduction
Battery Install &
Charging
Media Loading
Connect Printer/
Printer Controls
Cleaning and
Troubleshooting
Accessories and
Contact Info
QLn Series Mobile Printers
Quick Start Guide
Connecting the Printer
Connect The Printer With a Cable
You can connect your printer to a terminal or a PC using either RS232C or USB protocols. USB drivers are included in the Zebra Design-
er Driver which is available on the QLn Series product CD or can be downloaded from the Zebra Web site at www.zebra.com/software .
Cable Communications with a Terminal.
Cable Communications with a PC
Communications
Port
RS232C or USB Communications
Cable to Terminal
Refer to Appendix A in the QLn Series
User Guide for part numbers.
Terminal
RS-232C or USB Communications
Cable to Computer
Refer to Appendix A in the User Guide
for part numbers.
USB
Connector
RS232
Connector
To provide strain relief for the commu-
nication cables, twist the locking cap
in a clockwise direction to secure. Only
one cable can be used at a time in this
orientation.
Locking Cap
8
Introduction
Battery Install &
Charging
Media Loading
Connect Printer/
Printer Controls
Cleaning and
Troubleshooting
Accessories and
Contact Info
QLn Series Mobile Printers
Quick Start Guide
Printer Controls
Feed Button
Press to advance a blank label or a software deter-
mined length of journal media.
Power Button
Press to turn unit on. There will be a 10
second boot up time.
Press again to turn unit o
LED Charge Indicator
Solid Yellow: Charging
Solid Green: Fully charged
O: No DC Power Applied
O: With DC Power Applied: Charge Fault
Printer Status Bar
Indicates the status of several
printer functions.**
Status Screen
Default screen the
printer will display
when the user is not
navigating the main
menu screen.
Four Way Navigation
Buttons
Scroll through menu
choices on Status Screen
Press “OK” to enter.
Navigation Bar
Displays user-selectable
options.
Soft Keys
Press to select a
function on the
Navigation Bar.
Main Menu Screen
Displays graphical options in-
cluding Communication, Display,
Media, Battery, and Help.
** Not every icon will be dis-
played on the Status Bar at one
time, only those applicable to the
printer’s conguration.
9
Introduction
Battery Install &
Charging
Media Loading
Connect Printer/
Printer Controls
Cleaning and
Troubleshooting
Accessories and
Contact Info
QLn Series Mobile Printers
Quick Start Guide
Cleaning the Printers
Caution • To avoid possible personal injury or damage to the printer never insert sharp or
pointed objects into the printer mechanism.
Area Cleaning Method Interval
Printhead Use the supplied cleaning pen to clean the print
elements from end to end (the print elements are
located in the thin gray line on the printhead).
After every ve rolls of media (or more often,
if needed) Linerless media requires more
frequent cleaning
Platen Surface
Rotate the platen roller and clean it thoroughly
with the cleaning pen.
Linerless Platen
Surface
Units with linerless platens: Rotate platen & clean
bearing points only. Avoid use of alcohol on the
surface of linerless platens!
Peeler bar
Clean thoroughly with the cleaning pen. As needed
Scraper (Linerless
units only)
Clean thoroughly with the cleaning pen.
After every ve rolls of media (or more
often, if needed)
Tear bar Clean thoroughly with the cleaning pen.
As needed
Exterior Wipe with water-dampened cloth
Interior
Brush/air blow. Ensure the Bar Sensor, Gap
Sensor and Label Present Sensor windows are
free of dust.
Interior of units
with Linerless
Platens
Clean inside surfaces of Media Supports & Media
Support Disks with the supplied cleaning pen or 70%
isopropyl alcohol on a cotton swab.
After every ve rolls of media (or more
often, if needed)
Printhead
Elements
Peeler Bar
Label Present
Sensor
Gap Sensor
Bearing Points
Linerless Platens only
Tear Bar
Platen Surface
Avoid using alcohol on
linerless platen surface
Bar Sensor
Linerless View
Scraper
Media Support Disks
Linerless units only
10
Introduction
Battery Install &
Charging
Media Loading
Connect Printer/
Printer Controls
Cleaning and
Troubleshooting
Accessories and
Contact Info
QLn Series Mobile Printers
Quick Start Guide
Troubleshooting
LCD Control Panel
The top of the display shows icons indicating the status of various printer functions. Check
the indicator status and refer to the referenced Troubleshooting table below.
Icon Status Indication
On
Bluetooth Link established
Not Present
Bluetooth Link inactive
Blinking
Connecting and Transmitting Labels
Antenna Blinking
Looking for AP
Antenna Blinking 1 Parenthesis Solid
Associated/Attempting WLAN Authentication
Antenna and 2 Parentheses Solid
Associated and Authenticated
Antenna and 2 Parentheses Blinking
Receiving Data
Not Present
No Radio Present
4 Bars >80% Charged
3 Bars 60%-80% Charged
2 Bars 40%-60% Charged
1 Bar 20%-40% Charged
0 Bars Low Battery
4 Bars Blinking w/ Lightning Bolt Charging at >80% Capacity
3 Bars Blinking w/ Lightning Bolt Charging at 60-80% Capacity
2 Bars Blinking w/ Lightning Bolt Charging at 40-60% Capacity
1 Bar Blinking w/ Lightning Bolt Charging at 20-40% Capacity
0 Bars w/ Lightning Bolt Charging at <20% Capacity
Blinking Media Cover Open
Blinking Retrieving printer data
Solid Connected & Not Receiving Label Data
Not Present No Ethernet Connection
Blinking Data processing in progress
Steady No data being processed
Blinking Out of Media
Steady Media present
Blinking
Error exists (excluding Media Out and Head Latch
Open)
Not Present No error exists
4 Bars 802.11 signal strength > 75%
3 Bars 802.11 signal strength </= 75%
2 Bars 802.11 signal strength </= 50% but >25%
1 Bar 802.11 signal strength </= 25%
0 Bars No signal strength
11
Introduction
Battery Install &
Charging
Media Loading
Connect Printer/
Printer Controls
Cleaning and
Troubleshooting
Accessories and
Contact Info
QLn Series Mobile Printers
Quick Start Guide
Accessories
Belt Clip (standard on most printers)
To use: Hook the clip over your belt, and ensure that the clip is
securely attached to the belt. The belt clip will pivot in all direc-
tions to allow you to move freely while wearing the printer.
Adjustable Shoulder Strap
Pull Strap
here to
lengthen
Pull
Strap
here to
shorten
Hold Buckle
Insert loop
into cut-outs
on printer.
Secure loop
over button to
fasten.
Hand Strap
Belt
Printer can pivot
freely
Clip printer to
belt
Soft Case
Both the QLn220 and 320 have soft case options that
also allow you to carry the printer from your belt.
12
Introduction
Battery Install &
Charging
Media Loading
Connect Printer/
Printer Controls
Cleaning and
Troubleshooting
Accessories and
Contact Info
QLn Series Mobile Printers
Quick Start Guide
Product Support
For product support, and the latest versions of all customer documentation, contact
Zebra Technologies at: www.zebra.com
Refer to Appendix D in the QLn320 User Guide for more detailed contact information
In the AmerIcAs contAct:
Zebra Technologies Corporation
475 Half Day Road, Suite 500
Lincolnshire, IL 60069
Phone: +1.847.634.6700 or +1.866.230.9494
Fax: +1.847.913.8766
In europe, AfrIcA, the mIddle eAst, And IndIA contAct:
Zebra Technologies Europe Limited
Dukes Meadow, Millboard Road
Bourne End
Buckinghamshire, SL8 5XF, UK
Phone: +44.1628.556000
Fax: +44.1628.556001
In the AsIA pAcIfIc regIon contAct:
Zebra Technologies Asia Pacic Pte. Ltd.
120 Robinson Road
#06-01 Parakou Building
Singapore 068913
Phone: +65-6858 0722
Fax: +65-6885 0838
Go to www.zebra.com/contact for complete contact information.
Zebra Technologies Corporation
475 Half Day Road, Suite 500
Lincolnshire, IL 60069
Phone: +1.847.634.6700 or +1.800.423.0442
Fax: +1.847.913.8766
  • Page 1 1
  • Page 2 2
  • Page 3 3
  • Page 4 4
  • Page 5 5
  • Page 6 6
  • Page 7 7
  • Page 8 8
  • Page 9 9
  • Page 10 10
  • Page 11 11
  • Page 12 12

Zebra QLn User guide

Category
POS/mobile printers
Type
User guide
This manual is also suitable for

Zebra QLn is a rugged mobile printer that combines innovative design with advanced technology to deliver reliable label printing solutions for a wide range of applications. With its compact size, durable construction, and versatile connectivity options, Zebra QLn is ideal for on-the-go printing needs. Its fast print speeds, high-resolution output, and support for various media types make it suitable for various industries, including retail, healthcare, manufacturing, and transportation.

Ask a question and I''ll find the answer in the document

Finding information in a document is now easier with AI