Page is loading ...

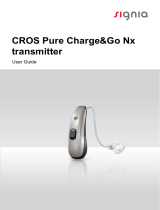
Phonak CROS L
User Guide
Phonak CROS L-R
Phonak CROS L-R Trial
Phonak Charger Ease

2 3
Your CROS system and charger
details
CROS device model
c CROS L-R
c CROS L-R Trial
If no box is checked and you do not know the
model of your CROS device or charging accessories,
please ask your hearing care professional.
The CROS device described in this user guide
contains a built-in and non-removable rechargeable
lithium-ion battery.
Please also read safety information regarding the
handling of a rechargeable CROS device (chapter 24).
Wireless CROS device
Phonak CROS L-R
Phonak CROS L-R Trial
Charging accessories
Phonak Charger Ease
This user guide is valid for:
Charging accessories
c Phonak Charger Ease
incl. USB cable (< 3 m)
Earpieces
c Dome
c SlimTip
c CROS Tip

4 5
Your CROS device and charger have been developed by
Phonak – a world leader in hearing solutions based in
Zurich, Switzerland.
These premium products are the result of decades of
research and expertise and are designed with your
well-being in mind. We thank you for making such a great
choice and wish you many years of listening pleasure.
Please read the user guide carefully to make sure that you
understand and get the best out of your device.
Training is not required for handling of this device.
A hearing care professional will help set up this device
according to your individual preferences during the tting
consultation.
For more information regarding features, benets, set up,
use, maintenance or repair of your CROS device and
accessories, please contact your hearing care professional
or the manufacturer representative.
Additional information can be found in the datasheet of
your product.
Phonak - life is on
www.phonak.com
Contents
Your CROS device and charger
Using the charger
Using the CROS device
1. Quick guide 7
2. Parts of the CROS device and charger 9
3. Preparing the charger 13
4. Charging the CROS device 14
5. Left and right CROS device markings 18
6. Putting on the CROS device 19
7. Removing the CROS device 20
8. Multi-function button 21
9. On/O 22
10. Tap Control 23
11. Connectivity overview 24
12. Initial pairing 25
13. Phone calls 27
14. Flight mode 32
15. Rebooting your CROS device 35
16. myPhonak and myPhonak Junior apps overview 36

6 7
1. Quick guide
Left and right CROS device markings
Charging your CROS device
After placing your CROS device
in the charger, the indicator
light will show the charging
state of the battery until the
CROS device is fully charged.
When fully charged the
indicator light will be
constantly on, i.e. solid
green light.
Red marking for device
worn on the right ear.
Blue marking for device
worn on the left ear.
Further information
Before using your hearing aid for the rst time, it is
recommended to charge it for 3 hours.
17. Operating, transport and storage conditions 37
18. Care and maintenance 39
19. Exchanging the earpiece 42
20. Service and warranty 44
21. Compliance information 46
22. Information and description of symbols 51
23. Troubleshooting 57
24. Important safety information 60
25. For the US market only, complies with
the FDA regulations 79

8 9
Multi-function button with indicator light
The button has several functions. The primary
function is as an on/o switch. Together with
your hearing care professional, you can decide
if it also allows for balance control, mute and/
or program change. This is indicated in your
individual instructions.
Phone calls: If paired with a Bluetooth® enabled phone, a short
press will accept and a long press will reject an incoming call.
On/O: Firmly press the lower part of the button for
3 seconds until the indicator light blinks.
On: indicator light is solid green
O: indicator light is solid red
Enter ight mode: When device is o, press the lower part of
the button for 7 seconds until the solid orange light appears.
Then release the button.
Tap Control
If your CROS system is t with a performance level L90 or L70
Audéo L-R, Audéo L-RT, Naída L-PR or Sky L-PR hearing aid,
multiple functions can be accessed using Tap Control. Please refer
to chapter 10 of this user guide and to the user guide of your
hearing aid. To use Tap Control, tap the top of your ear twice.
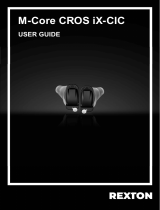
2. Parts of the CROS device and charger
The following pictures show the CROS device model and
charger accessories described in this user guide.
You can identify your personal models by:
• checking “Your CROS device and charger details” on
page 3.
• comparing your earpieces, hearing aid and charger with
the models on the following pages.
Phonak CROS L device + Phonak hearing aid =
Phonak CROS system
Phonak CROS L provides a CROS and BICROS solution for
people with an unaidable hearing loss in one ear. CROS L
is worn on the unaidable ear to pick up sounds and
wirelessly transmits them to a compatible Phonak hearing
aid worn on the ear with better hearing.
CROS L has no acoustical output.
CROS L is only compatible with Audéo L-R, Audéo
L-RT, Naída L-PR and Sky L-PR hearing aids.

10 11
Anchor (optional) Speaker dummy
(without earpiece attached)
Multi-function button with built-in indicator light
CROS L-R
CROS L-R Trial
Tube
Possible earpieces
CROS Tip SlimTip Dome
Cavity for earpieces
Hearing aid charging
slots with left/right
indicators
Phonak Charger Ease
Charger Case lid
USB-C port

12 13
Power adapter*
External power supply
USB cable (< 3 m)
* The power adapter is not provided with this product.
3. Preparing the charger
a) Plug the larger end of the USB cable into the
poweradapter.
b) Plug the smaller end into the USB port on the charger.
c) Insert the power adapter into a power outlet.
d) The indicator light around the USB port will light up
green when the charger is connected to the power
outlet.
Connecting to the power supply
a
b
d
c
Power adapter and Charger Ease specications
Power adapter input voltage 100-240 VAC, 50/60 Hz,
current 0.25 A
Power adapter output voltage 5 VDC +/-5%, current 1 A
Charger input voltage 5 VDC +/-5%, current 250 mA
USB cable specications 5 V min. 1 A, USB-A to USB-C,
maximum length 3 m

14 15
4. Charging the CROS device
Low power: You will hear two beeps in the hearing
aid when the battery is low. You will have
approximately 60 minutes before you have to charge
the CROS system (this can vary, depending on the
hearing aid or CROS device settings). After this time
the CROS system automatically shuts down.
The CROS device contains a built-in and non-
removable rechargeable lithium-ion battery.
Before using your CROS system for the rst time, it
is recommended to charge it for 3 hours.
The CROS system must be dry before charging,
see chapter 18.
Please ensure to charge and use the CROS system
within operating temperature range: +5° to +40°
Celsius (41° to 104° Fahrenheit).
For more information on how to charge the hearing
aid part of the CROS system, refer to the user guide of
the hearing aid.
Please refer to chapter 3 for how to set up the charger.
1.
Insert the CROS device into the charging slot and the
earpiece in the large cavity.
Make sure the left/right marking on the CROS device
matches the left (blue) or right (red) indicator next to the
charging slots. The CROS device will automatically switch
o once inserted into the charger connected to the power
supply.

16 17
2.
The indicator light on the CROS device will show the
charging state of the battery until it is fully charged.
When fully charged the indicator light will remain on, i.e.
solid green light.
The charging process will automatically stop when the
battery is fully charged, so the CROS device can be safely
left in the charger. It can take up to 3 hours to charge the
CROS device. The charger case lid can be closed while
charging.
Charging times
Indicator light Charging state Approx. charging times
0 – 10%
11 – 80%
30 min (30%)
60 min (50%)
90 min (80%)
81 – 99%
100% 3 h
Do not hold the tube to remove the CROS device from
the charger as this can damage the tube.
To prevent discharge, turn o your CROS device
before storing it in the disconnected charger.
To prevent discharge, turn o your CROS device after
unplugging the charger with the CROS device
charging inside.
Always close the lid when charging your CROS device
in a humid environment.
3.
Remove the CROS device from the charging slot by
simply lifting it out of the charger.
The CROS device can be set to switch on automatically
when removed from the charger. In this case the indicator
light starts blinking. The solid green light indicates the
CROS device is ready for use.

18 19
5. Left and right CROS device markings
There is a red or blue marking on the back of the CROS
device and on the speaker dummy. This will tell you if the
CROS device is meant to be worn on the left or the right
ear.
Blue marking
for device worn on
the left ear.
Red marking
for device worn on
the right ear.
6. Putting on the CROS device
1.
Place the CROS device behind
your ear.
2.
Insert the earpiece into your
ear canal.
3.
If there is an anchor attached
to the earpiece, tuck it into
the bowl of your ear to secure
your CROS device.

20 21
7. Removing the CROS device
Pull on the bend of the tube
and remove the CROS device
from behind the ear.
8. Multi-function button
It functions as an on/o
switch, a mute/unmute
switch, a balance control
when there is a wireless
transmission of sound from
the CROS device to the
hearing aid and/or a program
change depending on the
CROS system programming.
This is indicated in your
The multi-function button has several functions.
If the CROS system is paired with a Bluetooth enabled
phone, a short press on the upper or the lower part of the
button will accept an incoming call and a long press will
reject an incoming call – refer to chapter 13.
individual “CROS device or hearing aid instructions”.
Please ask your hearing care professional for a printout.

22 23
9. On/O
Switch on CROS device
The CROS device can be
congured to switch on
automatically when removed
from the charger. If this
function is not congured,
rmly press and hold the lower
part of the button for 3 seconds
until the indicator light blinks. Wait until the solid green
light indicates the CROS device is ready.
Switch o CROS device
When you switch on the CROS device you might hear
a start-up melody on the hearing aid side
Press and hold the lower part of button for 3 seconds
until the solid red light indicates the CROS device is
switching o.
Blinking green CROS device is switching on
Solid red for 2 seconds CROS device is switching o
Tap Control is available only for L90 and L70 rechargeable
models on the Lumity platform.
If they are part of the CROS system, the Tap Control
functions are available on the CROS device too and are
described in the hearing aid user guide.
To use Tap Control, tap the top of your ear twice.
10. Tap Control

24 25
11. Connectivity overview
The illustration below shows the connectivity options
available for your CROS system.
* The TV Connector can be connected to any audio source such as a TV, PC or hi- system.
** Roger wireless microphones can be connected to your CROS system as well.
Bluetooth enabled
device, e.g. cell
phone
TV Connector connected to TV*
Roger**
Please note that in a CROS system the connectivity to
external devices is routed through the hearing aid only.
12.1 Initial pairing to a Bluetooth® enabled device
It is only necessary to perform the pairing procedure
once with each device featuring Bluetooth wireless
technology. After the initial pairing, your CROS system
will connect automatically to the device. The initial
pairing process can take up to 2 minutes.
1.
On your device (e.g. a phone), ensure that Bluetooth
wireless technology is enabled and search for Bluetooth
enabled devices in the connectivity setting menu.
12. Initial pairing
2.
Switch on both hearing aid
and CROSdevice.
You now have 3 minutes
to pair your CROS system
with your device.

26 27
For more information about pairing instructions for
Bluetooth wireless technology, specic to some of the
most popular phone manufacturers, go to:
https://www.phonak.com/en-int/support
3.
Your device shows a list of Bluetooth enabled devices.
Select the hearing aid from the list to pair the CROS
system with the device. A beep played through the
hearing aid conrms successful paring.
12.2 Connecting to the device
The connection will be maintained as long as the
device remains ON and within range.
Your CROS system can be connected to one device at
a time and paired to up to eight devices.
After your CROS system has been paired to your device,
itwill automatically connect again when switched on.
13. Phone calls
Your CROS system connects directly with Bluetooth
enabled phones. When paired and connected to your
phone, you will hear notications, incoming call
notication and the caller’s voice directly in your hearing
aid. Phone calls are “hands free”, this means that your
voice is picked up by the hearing aid microphones and
transmitted to the phone.
Your voice

28 29
13.1 Making a call
Enter the phone number and press the dial button.
You will hear the dialing tone through your hearing aid.
Your voice is picked up by the hearing aid microphones
and transmitted to the phone.
13.2 Accepting a call
When receiving a call, an incoming call notication will be
heard in the hearing aid (e.g. ring tone or voice
notication).
The call can be accepted by tapping the top of your ear
twice (only if CROS device is paired with performance
level L90 or L70), a short press on the upper or lower part
of the multi-function button on the hearing aid or CROS
device (less than 2 seconds) or directly on your phone.
short press
< 2 sec
tap ear
twice

30 31
13.3 Ending a call
A call can be ended by tapping the top of your ear twice
(only if CROS device is paired with performance level L90
or L70), a long press on the upper or lower part of the
multi-function button on the hearing aid or CROS device
(more than 2 seconds) or directly on your phone.
long press
> 2 sec
tap ear
twice
13.4 Rejecting a call
An incoming call can be rejected by a long press on the
upper or lower part of the multi-function button on the
hearing aid or CROS device (more than 2 seconds) or
directly on your phone.
long press
> 2 sec

32 33
14. Flight mode
Your CROS system operates in the 2.4 GHz - 2.48 GHz
frequency range. When ying some operators require all
devices to be switched into ight mode. Entering ight
mode will not disable normal hearing aid functionality,
and will only disable the Bluetooth connectivity functions,
including the wireless transmission of sound from the
CROS device to the hearing aid on the other ear.
14.1 Enter ight mode
To disable the wireless function and enter ight mode in
CROS device:
1. If the CROS device is turned o,
proceed to step 2.
If the CROS device is on, turn it o
by pressing and holding the lower
part of the button for 3 seconds,
until the indicator light turns solid
red for 3 seconds, signifying that
the CROS device is switching o.
2. Press and hold the lower part of
the button. The green indicator
light blinks when the CROS device
starts up.
3. Keep pressing the button for
7 seconds, until the indicator light
is solid orange, then release the
button.
The solid orange light indicates the
CROS device is in ight mode.
In ight mode, your CROS system cannot connect directly
to your phone.

34 35
14.2 Exit ight mode
To enable the wireless function
and exit ight mode,
switch the CROS system o
and then on again - refer to
chapter 9.
15. Rebooting your CROS device
Use this technique if your CROS device is in an error state.
This will not remove or delete any program or settings.
1.
Press the lower part of the multi-function button for at
least 15 seconds. It does not matter if the CROS device
isswitched on or o before you start pressing the button.
There is no light or acoustic notication at the end of
the 15 seconds.
2.
Place the CROS device in the power-connected charger
and wait until the indicator light blinks green. This can
take up to 30 seconds. The CROS device is now ready to
use.

36 37
16. myPhonak and myPhonak Junior
apps overview
To install myPhonak, please scan the QR code
To learn more about myPhonak, please visit
the webpage
https://www.phonak.com/en-int/hearing-
devices/apps/myphonak
or scan the QR code
To install myPhonak Junior, please scan the
QR code
To learn more about myPhonak Junior, please
visit the webpage
www.phonak.com/junior-ug
or scan the QR code
17. Operating, transport and storage
conditions
The product is designed such that it functions without
problems or restrictions if used as intended, unless
otherwise noted in these user guides.
Please ensure to use, charge, transport and store the
CROS device and the charger according to the following
conditions:
Use Charging Transport Storage
Temperature
Maximum
range
Recommended
range
+5 to +40 °C
(41 to 104 °F)
+5 to +40 °C
(41 to 104 °F)
-20 to +60 °C
(-4 to 140 °F)
-20 to +60 °C
(-4 to 140 °F)
+5 to +40 °C
(41 to 104 °F)
+7 to +32 °C
(45 to 90 °F)
0 to +20 °C
(32 to 68 °F)
0 to +20 °C
(32 to 68 °F)
Humidity
Maximum
range
Recommended
range
0% to 85%
(non condensing)
0% to 85%
(non condensing)
0% to 70% 0% to 70%
0% to 60%
(non condensing)
0% to 60%
(non condensing)
0% to 60% 0% to 60%
Atmospheric
pressure
500 hPa to
1060 hPa
500 hPa to
1060 hPa
500 hPa to
1060 hPa
500 hPa to
1060 hPa

38 39
Please ensure to charge the CROS device regularly during
long-term storage.
If the device has been subject to storage and transport
conditions outside of the recommended use conditions,
bring the device back into recommended use conditions
before starting the device.
This CROS device is classied as IP68. This means that it is
water and dust resistant and designed to withstand daily
life situations. It can be worn in the rain but should not be
fully submerged in water or used when taking a shower,
swimming or other water activities. This CROS device
should never be exposed to chlorinated water, soap, salt
water or other liquids with a chemical content.
18. Care and maintenance
Expected Service Life:
The CROS device and the compatible charger have the
expected service life of ve years. The devices are expected
to remain safe for use for this duration.
Commercial service period:
Routine and diligent care of your CROS device and charger
will contribute to the outstanding performance for the
duration of the expected service life of your devices.
Sonova AG will provide a minimum of a ve year repair
service period after the respective CROS device, charger
and essential components have been phased out of the
product portfolio.
Please use the following specications as a guideline. For
further information regarding product safety, see chapter
24.2.
General information
Before using hair spray or applying cosmetics, you should
remove your CROS device from your ear, because these
products may damage it.
/