
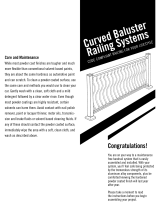
# 14 Type F
self-threading
screws
Stair Aluminum Railing Kit Instructions
• Consult your local building code official and check all Code Requirements
• Read all instructions thoroughly prior to assembly to assure correct installation. THE
MANUFACTURER WILL NOT BE HELD RESPONSIBLE FOR UNSAFE OR INCORRECT
INSTALLATION.
• These instructions are guidelines and do not cover every installation scenario
• Always use the fasteners provided in the railing kit. DO NOT swap any hardware.
• This railing kit has been tested by ATI and meets the IRC and IBC construction code standards
• Always follow all safety regulations when installing the railing section and always wear safety
glasses
• Purchaser has the sole responsibility to determine whether the aluminum railing and aluminum
post products comply with the applicable codes and are appropriate for the intended use. The
purchaser and installer should review the intended use of the products with a licensed
professional engineer to determine code compliance. Aluminum railing products are tested to meet
IRC and IBC Codes; additional testing information is available upon request.
• Cordless Drill/Impact Driver
• 13/64” Drill Bit
• #3 Phillips Screwdriver Bit
• Speed Square
• 2’ Level
• Post level (optional)
• Tape Measure
• Miter saw or portable band saw
• Rubber Mallet
• Clamps with at least 4” clearance (x2)
TOOLS
BEFORE YOU BEGIN INSTALLATION:
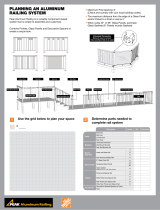
¾” Square
Balusters
Two-piece top
and bottom
adjustable
brackets
Note: Stair Railing section pivots between 30-38 degrees
HARDWARE & PROFILES

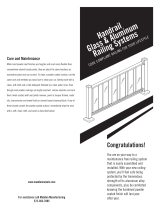
Mark here, then add 1-1/8”
from the mark to find the
proper length of the rail
Section 1: The Posts
1. Lay out and mark where the posts will be installed on the deck surface. Assure that the
5”x5” base plate is at least 2” from the edge of the deck to allow for the 2-piece trim.
2. If installing on a deck (wood, composite), assure that the posts will attach to the sub-
structure of the deck or patio. The decking may need to be reinforced with support
lumber (backer board such as a 2”x10” or 2”x12” treated lumber cut to fit tightly
between the joists and installed flat under the decking). Use appropriate weatherproof
fasteners (Not included) for your application.
3. If installing on concrete, use the appropriate weatherproof concrete anchors for your
application.
4. Use the included shims and a level to plumb and square the post.
5. Secure the posts to the deck and slide on the included 2-piece post skirt.
Section 2: Preparing the Rails
1. After the posts have been installed, determine the height of the bottom
rail to stair tread (it must be at least ¾” to clear the post skirt). A wood
spacer works best
2. Assemble the panel and set the rail section on top of the spacers against
the post (tip: install with just the two pickets closest to the post to make
it easier to take apart and cut the rails)
3. Assure that the railing section is at the proper pitch and adjust the rails
to create an equal space between the pickets and the post
4. NOTE: mark the top and bottom rail at this point so that the section is
placed the same way each time
5. Line each bracket up with the rails, assuring that the bracket is flat
against the post
6. Mark the rail at the open edge of the bracket. Repeat this step for each
end
7. Remove the panel and disassemble. Add 1-1/8” from the mark to
account for the part of the rail that goes into the bracket
8. Cut the rails at the second mark
Section 3: Installing the panel
1. Re-assemble the panel and place the brackets on each end. Then
set the panel in between the posts
2. Double check the spacing between the picket and the posts to
assure the panel is seated correctly
3. Once the panel is properly seated between the posts, mark the
position of each bracket on the posts
4. Mark the position of the top brackets to assure they are fastened to
the top rail correctly
5. Fasten the bottom brackets to the rail, assuring that the bracket is tight against the post and
the spacing is correct
6. Note: mark each bracket to assure it is placed in the same spot
7. Remove the panel and fasten the top brackets to the rail at the mark
8. Take brackets apart at the joint; each backer plate will need to be fastened to the post
9. Seat the fully assembled panel with brackets into the backer plates, assuring that all marks
match up.
10. Secure the brackets to the backer plate to finish the installation.
11. Alter the post height if necessary, then tap the cap securely into place with a rubber mallet
-
 1
1
-
 2
2


Weatherables AWAL-ADJSTAIRSET Installation guide
- Type
- Installation guide
- This manual is also suitable for
Ask a question and I''ll find the answer in the document
Finding information in a document is now easier with AI
Related papers
-
Weatherables WBR-J36-A6 Installation guide
-
-
-
-
-
Weatherables WBR-J36-A8S Installation guide
-
-
-
-
Other documents
-
 EZ Handrail EZCB10PKT36-HB Installation guide
-
Unbranded EZTBPM2W Installation guide
-
Unbranded EZTBPM2W Operating instructions
-
 Peak Aluminum Railing 50981 Operating instructions
-
 Peak Aluminum Railing 50210 Operating instructions
-
 Trex 5457185 Installation guide
-
 Trex 5457472 Operating instructions
-
Trex WT12088 Installation guide
-
Trex WT040448APSRT Installation guide
-
 EZ Handrail EZG112 Installation guide


