Page is loading ...

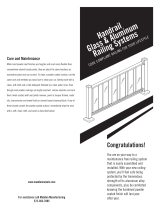
Congratulations!
You are on your way to a maintenance
free handrail system that is easily
assembled and installed. With your
system, you’ll feel safe being protected
by the tremendous strength of its
aluminum alloy components, plus be
comforted knowing the hardened
powder coated finish will last year
after year.
Please take a moment to read
the instructions before you begin
assembling your project.
Care and Maintenance
While most powder coat finishes are tougher and much
more flexible than conventional solvent based paints,
they are about the same hardness as automotive paint
and can scratch. To clean a powder coated surface, use
the same care and methods you would use to clean your
car. Gently wash with a clean, soft cloth and a mild
detergent followed by a clear water rinse. Even though
most powder coatings are highly resistant, certain
solvents can harm them. Avoid contact with nail polish
remover, paint or lacquer thinner, motor oils, transmis-
sion and brake fluids or solvent based cleaning fluids. If
any of these should contact the powder coated surface,
immediately wipe the area with a soft, clean cloth, and
wash as described above.
Curved Baluster
Railing Systems
CODE COMPLIANT R AILING FOR YOUR LIFESTYLE

Contents
Contents/Introduction 2
Tools You Will Need (not included) 3
Curved Baluster Railing Components 4
Curved Baluster Railing Assembly Overview 4
Illustrated Curved Baluster Railing Component 5
Pre-Sizing Top and Bottom Rails 6
Top and Botttom Rail Assembly 6
Baluster Infill Spacing 7
Installing Balusters 7
Determining Baluster Spacing 8-12
Care and Maintenance BC
Please take a moment to read the instructions
before you begin assembling your railing.
Introduction
Check the contents of Handrail box with these instructions to verify all parts
are present. This will allow you to become familiar with the components of
your new Handrail system.
• Inspectallcomponentpartsforfamiliarity
• Layoutrecommendedtools
• Beforecuttinganycomponent,knowitsuse–“measuretwiceandcutonce”
• Theincludedconcretefastenersareforbrickandconcrete
Handrail shown with Posts and
Base Covers sold separately.
Tools You Will Need
(not included)
A - Level
B - Chop Saw (60 tooth wood blade)
C - Safety Glasses
D - 1/4" Hex Bit Driver
5/16" Hex Bit Driver
E - Tape Measure
F - Screw or Impact Gun
G - Pencil
H - Drill Bits: 1/8" wood, 1/4" wood,
1/4"x 3.5"concrete, 3/16" metal
B
D
F
H
C
E
G
I
A
J
2
www.maddenmetals.com
3
For assistance call Madden Manufacturing
573-365-7085
I - (2) pcs 10" 2 x 4 lumber
to support railing during
installation (optional)
J - Ear Protection
K - Automatic Center Punch
or Awl
L - Masking/Painters Tape
K L

Curved Baluster Railing Box Contents
Curved Baluster Railing Components
(2) Top & Bottom Rails (A&B are identical)
(4) Rail Mounting Brackets (C)
(15, 20) Curved Balusters (D) 15 for 6', 20 for 8' kit
(50, 60) 7/8" Self Tapper (E) 50 for 6', 60 for 8' kit
(2) 3 3/4" Spacer (F)
(8) 2 1/4" Tapcons (G) for masonry install
(8) 2" SMS Fasteners (H) for wood install
Curved Baluster Railing Assembly Overview
Curved Baluster Handrail installed heights are 36" for residential and 42" for
commercial. Always start installation at the midpoint of the handrail section.
Note: Posts heights are 38" for residential railing and
42" for commercial railing (sold separately).
ADA compliant handrails are available for this system.
Visit website for more information.
4
www.maddenmetals.com
Rail Mount Bracket (C)
Illustration #1
Top Rail (A) or (B)Curved Balusters (D)
Bottom Rail (A) or (B)
5
For assistance call Madden Manufacturing
573-365-7085
Rail Mount Bracket (C)
A
B
C
E
F
D
G
H

Post Installation with Welded Base Plate
Start by ensuring that you have a solid and level mounting surface for your
post(s). Washers or galvanized/stainless metal shims (not included) may be
used to plum posts.
Post Mounts are installed with railing
sections in later steps. Mounts shown for
informational purpose only in this step.
IMPORTANT: The distance
between posts should not exceed
6 ft. when installed above ground
level. Always refer to your local
building department for building
code clarification.
Note: When installing the post base into ACQ
lumber, use stainless steel bolts (not included)
IMPORTANT: Install
supporting lumber
below composite/wood
decking when surface
mounting posts to
a deck. Fasten the
4" bolts through the
decking and supporting
underside lumber with
the provided tee nuts.
5a
www.maddenmetals.com
Stair Adjustable
Mount
Stair Adjustable
Mount
5b
For assistance call Madden Manufacturing
573-365-7085
Installation into wood/composite
decking/Non ACQ lumber:
1. Determine the 3"x 3" post location(s). Spacing between posts should be 6’
or less to meet IBC codes when installed 24" or higher above the ground.
2. We recommend the edge of the 5"x 5" base plate is fastened at least
1 3/4" in from the edge of the deck (do not lag screw into the rim joist
unless absolutely necessary).
3. Reinforcethedeckingwithsupportlumber“backerboard".Apieceof
2"x 10" lumber cut to fit tightly between the joists and installed flat under
the decking works great.
4. Square up the post with the deck and mark all (4) holes with a pencil.
5. At your (4) pencil marks, drill a ¼" hole through the decking and backer board.
6. Using a 7/16" socket bit in your drill, thread the 1/4"x 4" Thru Bolt into the
post plate, through the deck, and through the backer board. **
7. Thread the Tee Nut onto the 4" Thru Bolt underneath the decking
and support lumber.
8. Tighten post firmly to deck.
9. Slide on optional post base cover to hide fasteners.
10. Attach post cap after railing has been installed using 1" fasteners provided.
** Note: The 4" Thru Bolt fits very tightly into the post base plate
(especially Textured Black Posts due to thicker powder coat finish) and in
some cases must be predrilled using a 1/4
" drill bit.
Installation into concrete
1. Turn the post upside down on a
hard surface and prepare to drill
larger holes in base plate. Enlarge
the (4) existing post base plate holes
to 5/16" (using a 5/16" drill bit).
2. Determine the 3"x 3" post location(s).
Spacing between posts should be 6'
or less to meet IBC codes when installed
24" or higher above the ground.
3. We recommend the edge of the 5"x 5"
base plate is fastened at least 1 ½" in
from the edge of any concrete face
(assuming normal weight concrete).
4. Square up the post with the concrete
surface and mark all (4) holes with
a marker.
5. At your (4) marks, drill a 1/4" to
3 1/2" or deeper hole into the concrete
using a masonry bit.
6. Fasten post in place with provided
1/4" x 3" Powers Wedge Bolts
7. Begin tightening the anchor with
socket wrench or impact wrench by rotating clockwise and applying
pressure in toward the concrete.
8. Continue tightening the anchor until the head is firmly seated
against the post base plate. (Do not over tighten).
9. Slide on optional post base cover to hide fasteners. Attach post cap
after railing has been installed using 1" fasteners provided.

6
www.maddenmetals.com
7
For assistance call Madden Manufacturing
573-365-7085
Assembly Instructions
Pre-sizing and Cutting Top and Bottom Rails
(prior to assembly):
1. Measure the distance between your posts from the inside edge of the
post to the inside edge of the other post. Ensure the measurement is
the same at the top and at the bottom of the posts (IIlustration #1).
If the measurements are different, your posts may not be level and
may need to be shimmed.
2. Cut both top and
bottom rail sections
½" shorter than your
measurements,
assuring they will
pass between the
posts without
scratching the post’s
surface during
installation.
Top and Bottom Rail Installation:
1. Place a short cut of 2"x4" lumber on edge near each post
perpendicular to the railing direction. (Illustration #2)
2. Slide mounting brackets (C) on each end of the bottom rail.
3. Setthebottomrailsection(withbracketsoneachend)ontothe2”x4”’s
and between the posts. The 2x4's will provide the proper 3 1/2" gap
below the bottom rail.
4. Centering the bottom rail bracket from each edge
of the post, fasten it using the 7/8" self-drilling
fasteners (E) for EZ Posts or 2" SMS fasteners (F)
for wood posts.IMPORTANT: Once the brackets are
secure on the posts, fasten the bracket and rail together
using a 7/8" self-drilling fastener. Drilling a pilot hole
with an 1/8" bit and fastening on the non-visible
side is preferable. (Illustration# 2).
5. Measure from the decking up the post to 36 ¼" for
residential and 42 ¼" for commercial railing
make a pencil mark at the center of the post.
Repeat process at the opposite post. (Illustration #3)
6. Slide mounting brackets onto both ends of your top
rail (flat surface up) and hold the top of the top rail
in place at your pencil marks. (Illustration #3.5)
7. Using a baluster (C) test that the vertical spacing
between the rails, allows the baluster fasteners
holes to center on the railing fastener line.
(Illustration #4)
Illustration #2.5
(J)
(D)
Spacing is not to exceed 3 3/4" from the
bottom rail to the deck.
Predrill using
a 1/8" pilot hole.
Illustration #1
Illustration #3
Illustration #7
Note: A&B are
identical pieces
(A)
(B)
8. Holding the top of the bracket at your pencil mark, level
the top rail and fasten each bracket to your posts using
the appropriate fasteners provided (same fasteners
as the bottom rail). (Illustration #5)
9. Once the brackets are secure on the posts, fasten the
bracket and rail together using a 7/8" self-drilling
fastener. Drilling a pilot hole with an 1/8" bit and
fastening on the non-visible side is preferable.
Baluster Infill spacing:
To determine symmetric baluster spacing for your
railing section, REVIEW APPENDIX A and follow
the steps below.
1. Determine your preferred baluster spacing from Appendix A. We recommend
using Method 2: Decks.com Baluster Calculator www.decks.com/calculators/
baluster-spacing.Also,werecommendthe“spacewidth”(distancebetween
balusters)tobe3¾”.However,ifthiscausesthe“outsidespace”tobe
greatly different than the baluster spacing, try smaller spacing calculations
foramoreuniformlook(e.g.31/2”).(Illustration #6)
2. Ifyourbalusterspacingisdifferentthan3¾”,cuttheincludedSpacer(F)
to your new spacing width.
3. Using the results from your decks.com calculations and the Spacer (F),
temporarily space the balusters to verify the overall layout. Start by stretching
your tape measure across entire bottom rail.
4. Make on-center marks (from decks.com calculator)
or use small pieces masking/painters tape on the
top vertical leg of the bottom
rail from left to right.
5. Verify if there are any height
variations of the balusters. This
is common. Move the shorter
length balusters to the middle
locations as they will be
installed first.
Installing the balusters:
1. Place the middle (shortest baluster) in its on
center mark spaced location and in between the top and bottom rails.
2. At the bottom hole of the baluster, mark the center
of the fastener hole using a punch or awl.
3. Atyourpunchmark,drilla3/16”pilothole
into the bottom rail using the included drill bit.
4. Secure the baluster to the bottom rail using a
5/16”hexbitanda7/8”fastener(E).
5. Level the baluster vertically. Double check with a
horizontal measurement from the post to the edge
of baluster at the top and bottom rails.
6. Set next baluster in place to the left using the
Spacer (F). Use the Spacer at both the top and
bottom rail.
7. Verify baluster is aligned with the on-center marks
on the bottom rail.
8. Punch bottom fastener location, drill pilot hole
and secure bottom of baluster with fastener.
9. Punch top fastener location, drill pilot hole and secure top
of baluster with fastener.
10. Repeat installing balusters on the left side and repeat from middle
to the end of the right side.
Illustration #6.5
Illustration #4
3 3/4"
Illustration #3.5
Illustration #5
Illustration #6
Illustration #2
3 3/4"

www.maddenmetals.com
APPENDIX A:
Determining Uniform Baluster Spacing
(3 Possible Methods):
We all approach construction in different ways, so we in-
cluded three possible methods for determining your baluster
spacing: table of measurements, the decks.com website
calculatorthatprovides“oncenter”measurements,anda
mathematical equation.
Method 1:
Table of measurements and illustration of
measurement locations:
Rail Approximate Approximate # Pickets
Length Outside Space Baluster Spacing Required
96 3 9/16 3 5/8 20
94 3 3/4 3 1/2 20
94 3 3/4 3 3/4 19
92 3 7/8 3 5/8 19
90 2 7/8 3 5/8 19
88 3 1/8 3 3/4 18
86 2 1/8 3 3/4 18
84 3 1/4 3 1/2 18
82 2 1/2 3 3/4 17
80 3 1/2 3 1/2 17
78 2 1/2 3 1/2 17
76 3 3/4 3 1/2 16
74 2 3/4 3 1/2 16
72 3 1/8 3 5/8 15
70 3 3 1/2 15
68 3 3/4 3 1/4 15
72 3 1/8 3 5/8 15
70 3 3 1/2 15
68 2 7/8 3 3/8 15
66 3 1/4 3 1/2 14
64 3 1/16 3 3/8 14
62 3 1/2 3 1/2 13
60 2 1/2 3 1/2 13
58 3 3/4 3 1/2 12
57 2 3/4 3 1/2 12
56 3 3/4 3 3/4 11
54 2 3/4 3 3/4 11
52 3 3 1/2 11
50 3 1/8 3 3/4 10
48 3 1/4 3 1/2 10
46 3 3/8 3 1/4 10
44 3 1/2 3 1/2 9
42 3 1/2 3 1/4 9
8 9
For assistance call Madden Manufacturing
573-365-7085
Install this baluster first
if your railing section has an ODD number of balusters
Create gap first
if your railing section has an EVEN number of balusters
Outside Space Space Width Outside Space
Table A

Baluster Width
Space Width
Sections (post to post)
Section A Width
Section B Width
Custom Width
inches + fraction
inches + fraction
inches + fraction
inches + fraction
1 0
3 3/4
72 0
0 0
Result
Total Balusters Needed: 15
Section:A
Section Width: 72"
Center Point: 36" (balusters centered)
Balusters Needed: 15
Outside Space: 2-1/4"
On Center Measurements (left to right)
2-3/4", 7-1/2", 12-1/4", 17", 21-3/4", 26-1/2", 31-1/4",
36", 40-3/4", 45-1/2", 50-1/4", 55", 59-3/4", 64-1/2", 69-1/4"
Section:A
Section Width: 0"
No Balusters Needed
www.maddenmetals.com
Method 2:
Use the “On Center” Baluster Spacing calculator
at decks.com:
http://www.decks.com/calculators/baluster-spacing
Important Note: Baluster width is 1"
Method 3:
Mathematical equation to determine baluster spacing:
Post to post inside dimension – # of pickets / (# of pickets + 1)
Use chart from Method 1 to determine # of pickets
Use the chart below to determine the fractional
measurement from the decimal calculation.
Results:
Input:
11 12
For assistance call Madden Manufacturing
573-365-7085
Fraction/Decimal
1/64 0.0156
1/32 0.0313
3/64 0.0469
1/16 0.0625
5/64 0.0781
3/32 0.0937
7/64 0.1094
1/8 0.1250
9/64 0.1406
5/32 0.1562
11/64 0.1719
3/16 0.1875
13/64 0.2031
7/32 0.2187
15/64 0.2344
1/4 0.2500
17/64 0.2650
9/32 0.2812
19/64 0.2969
5/16 0.3125
21/64 0.3281
11/32 0.3437
23/64 0.3594
3/8 0.3750
25/64 0.3906
13/32 0.4062
27/64 0.4219
7/16 0.4375
29/64 0.4531
15/32 0.4687
31/64 0.4844
1/2 0.5000
33/64 0.5156
17/32 0.5312
35/64 0.5469
9/16 0.5625
37/64 0.5781
19/32 0.5937
39/64 0.6094
5/8 0.6250
41/64 0.6406
21/32 0.6562
43/64 0.6719
11/16 0.6875
45/64 0.7031
23/32 0.7187
47/64 0.7344
3/4 0.7500
49/64 0.7656
25/32 0.7812
51/64 0.7969
13/16 0.8125
53/64 0.8281
27/32 0.8437
55/64 0.8594
7/8 0.8750
57/64 0.8906
29/32 0.9062
59/64 0.9219
15/16 0.9375
61/64 0.9531
31/32 0.9687
63/64 0.9844
1 1.0000
Disregard Section B
/