We’re happy to help. Call 1-888-743-3673.
BEFORE YOU BEGIN INSTALLATION:
• ConsultyourlocalbuildingcodeofcialandcheckallCodeRequirements.
• Readallinstructionsthoroughlypriortoassemblytoassurecorrectinstallation.
THEMANUFACTURERWILLNOTBEHELDRESPONSIBLEFORUNSAFEORINCORRECT
INSTALLATION.
• Theseinstructionsareguidelinesanddonotcovereveryinstallationscenario.
• Alwaysusethefastenersprovidedintherailingkit.DONOTswapanyhardware.
• Alwaysfollowallsafetyregulationswheninstallingtherailingsectionandalwayswearsafety
glasses.
• Purchaserhasthesoleresponsibilitytodeterminewhetherthealuminumrailingandaluminumpost
productscomplywiththeapplicablecodesandareappropriatefortheintendeduse.Thepurchaser
andinstallershouldreviewtheintendeduseoftheproductsandthestructuralintegrityofthedeck,
concretepad,orpatioforinstallingthepostswithalicensedprofessionalengineer.
1
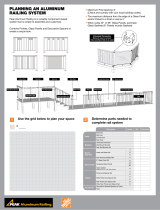
Note:StairRailingsectionpivotsbetween30-38°
Aluminum Stair Railing Assembly
HARDWARE & PROFILES
TopRail
BottomRail
#14TEKself-tapping
screws
Two-piecetopand
bottomadjustable
brackets
¾”SquareBalusters
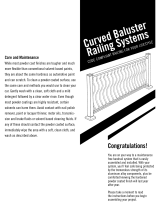
ThankyouforchoosingWeatherablesrailingforyourdeckorpatio!Ouraluminumrailingprovides
strength,durabilityandismaintenancefree.Itmeetsallnationwide(IRC/IBC)buildingcodes.Idealfor
thedoityourselferoraprofessionalinstaller,itissimpletoinstallanddoesnotrequireanyspecial
tools.Madetolastalifetime,ourpremiumaluminumrailingismanufacturedwiththebestAmerican
madematerialsonthemarkettoday.Thisguidewillhelpmakeyourinstallationeasy.Forquestions,
pleasecall1-888-743-3673andwelcometoWeatherables.
The best choice for strong & durable railing.