Page is loading ...

Fastmark M6 PLUS Series
Thermal Transfer Barcode Printer
User’s Guide
i
February 2012 Document #120650

Copyright Information
©2012 AMT Datasouth Corporation
The copyright in this manual, the software and firmware in the printer described
therein are owned by the printer manufacturer, All rights reserved.
CG Triumvirate is a trademark of Agfa Corporation. CG Triumvirate Bold Condensed
font is under license from the Monotype Corporation. Windows is a registered
trademark of Microsoft Corporation.
All other trademarks are the property of their respective owners.
Information in this document is subject to change without notice and does not
represent a commitment on the part of AMT Datasouth Corporation. No part of this
manual may be reproduced or transmitted in any form or by any means, for any
purpose other than the purchaser’s personal use, without the expressed written
permission of AMT Datasouth Corporation.
ii

Agency Compliance and Approvals
CE CLASS A
EN 55022:2006 +A1:2007
EN 55024:1998+A1:2001+A2:2003
EN 61000-4 SERIES REQULATIONS
FCC CFR Title 47 Part 15 Subpart B:2009-Section 15.107 and
15.109
ICES-003 Issue 4:2004 Class A
AS/NZS CISPR 22:2009
CLASS A
GB4953-2001
GB9254-2008 (CLASS A)
GB17625.1-2003
此为 A 级产品,在生活环境中,该产品可能会造成无线电干扰,在这种
情况下,可能需要用户对干扰采取切实可行的措施。
UL 60950-1(2
nd
Edition)
CSA C22.2 No. 60950-1-07(2
nd
Edition)
EN 60950-1/A1:2010
IEC 60950-1/A1:2009
IEC 60950-1:2005(2
nd
Edition)
iii

iv

Contents
1. Introduction ....................................................1
1.1 Product Introduction ................................................................................................1
1.2 Product Features ......................................................................................................2
1.2.1 Printer standard features.........................................................................2
1.2.2 Printer optional features..........................................................................3
1.3 General Specifications.............................................................................................4
1.4 Print Specifications .............................................4
1.5 Ribbon Specifications............................................4
1.6 Media Specifications.............................................5
2. Operations Overview .............................................6
2.1 Unpacking and Inspection.......................................................................................6
2.2 Printer Overview .......................................................................................................7
2.2.1 Front View .................................................................................................7
2.2.2 Interior view ..............................................................................................8
2.2.3 Rear View ..................................................................................................9
2.3 Operator Controls...................................................................................................11
2.3.1 Front Panel & Keys.................................................................................11
2.3.2 LED Indicators ........................................................................................12
2.4 Setting up the Printer .............................................................................................12
2.5 Installation of Ribbon.............................................................................................13
2.5.1 Loading the Ribbon................................................................................13
2.6 Installation of Media ...............................................................................................17
2.6.1 Loading the Roll Label...........................................................................17
2.6.2 Loading Fan-fold Label..........................................................................21
2.6.3 Loading Media in Peel-off Mode (Option).............................................22
2.6.4 Loading Media in Cutter Mode (Option) ...............................................24
2.7 Print Head Pressure Adjustment Knob.................................................................25
3. LCD Panel Menu Function (Option) .................................26
3.1 Setup Menu Overview.............................................................................................27
3.1.1-1 Printer Setup (TSPL2) .........................................................................28
3.1.1-2 Printer Setup (ZPL2)............................................................................35
3.1.2 Sensor .....................................................................................................42
3.1.3 Serial Comm............................................................................................52
v

vi
3.1.4 Ethernet...................................................................................................55
3.2 File Manager............................................................................................................58
3.2.1 File List....................................................................................................58
3.2.2 Avail. Memory .........................................................................................59
3.2.3 Del. All Files ............................................................................................59
3.3 Diagnostics..............................................................................................................60
3.3.1 Print Config.............................................................................................60
3.3.2 Dump Mode.............................................................................................60
3.3.3 Rotate Cutter...........................................................................................61
3.4 Language.................................................................................................................61
3.5 Service.....................................................................................................................62
3.5.1 Initialization.............................................................................................62
3.5.2 Mileage Info.............................................................................................62
4. Diagnostic Tool ................................................63
4.1 Start the Diagnostic Tool .......................................................................................63
4.2 Printer Function......................................................................................................64
5 Setting Ethernet by Diagnostic Utility (Option) .........................67
5.1 Using USB interface to setup Ethernet interface.................................................67
5.2 Using RS-232 interface to setup Ethernet interface ............................................68
5.3 Using Ethernet interface to setup Ethernet interface..........................................69
6. Troubleshooting................................................71
6.1 Common Problems.................................................................................................71
6.2 Mechanism Fine Adjustment to Avoid Ribbon Wrinkles ....................................75
7. Maintenance ...................................................77

1
1. Introduction
1.1 Product Introduction
Thank you very much for purchasing your bar code printer.
Fastmark M6 PLUS series of industrial thermal label printers is designed to offer the right features
at the best value in the industry. The M6 PLUS series features a small footprint and low profile
design that fits where larger industrial printers do not.
It’s quiet operation and fast label throughput is equally at home, in the office or shop floor
environment. The printers all-metal construction and die-cast aluminum print mechanism engine is
durable enough to withstand the toughest production environments.
The moveable sensor design can accept wide range of label media. All of the most frequently used
bar code formats are included. Fonts and bar codes can be printed in any one of the four directions.
This printer is built-in the high quality, high performance MONOTYPE IMAGING
®
True Type font
engine and one CG Triumvirate Bold Condensed smooth font. With flexible firmware design, user
can also download the True Type Font from PC into printer memory for printing labels. Besides the
scalable font, it also provides a choice of five different sizes of alphanumeric bitmap font, OCR-A
and OCR-B fonts. By integrating rich features, it is the most cost-effective and high performance
printer in its class!
• Applications
o Healthcare
o Compliance labeling for shipping and receiving
o Pallet labeling
o Inventory control labeling
o Drum labeling
o Warning labels
o Custom signage
o Brand marketing featuring graphics, logos and texts
o Multiple-up labels (two or three labels across)

2
1.2 Product Features
1.2.1 Printer standard features
The printer offers the following standard features.
Product standard feature
203 dpi
models
300 dpi
models
Thermal transfer printing
z z
Direct thermal printing
z z
Die-cast based print mechanism
z z
Metal cover with large clear media view window
z z
LCD display (graphic type, 128x64 pixel) with back
light
z z
Position adjustable gap sensor
z z
Position adjustable black mark sensor
z z
Ribbon end sensor
z z
Ribbon encoder sensor
z z
LED indicators
z z
Real time clock
z z
Internal Ethernet print server (10/100 Mbps)
interface
z z
USB 2.0 (full speed) interface
z z
USB-A host (Support PC keyboard and bar code
scanner)
z z
Serial RS-232C (2400-115200 bps) interface
z z
8 MB SDRAM memory
z z
4 MB FLASH memory
z z
SD FLASH memory card reader for memory
expansion up to 4 GB
z z
Standard industry emulations right out of the box
including Eltron
®
,Zebra
®
and Datamax
®
language
support
z z
Internal 8 alpha-numeric bitmap fonts
z z
Fonts and bar codes can be printed in any one of
the four directions (0, 90,180, 270 degree)
z z

3
Internal Monotype Imaging
®
true type font engine
with one CG Triumvirate Bold Condensed scalable
font
z z
Downloadable fonts from PC to printer memory
z z
Downloadable firmware upgrades
z z
Text, bar code, graphics/image printing (please ask
your reseller about PAL programming for specific
applications and print requirements).
Supported bar code Supported image
1D bar code 2D bar code
Code 39,
Code 93,
Code128UCC,
Code128 subsets
A.B.C, Codabar,
Interleave 2 of 5,
EAN-8, EAN-13,
EAN-128,
UPC-A,
UPC-E,
EAN and UPC 2(5)
digits add-on,
MSI,
PLESSEY,
POSTNET,
China POST,
GS1 DataBar,
Code 11,
Logmars
PDF-417,
Maxicode,
DataMatrix,
QR code,
Aztec
BITMAP,
BMP,
PCX
(Max. 256 colors
graphics)
z z
1.2.2 Printer optional features
The printer offers the following optional features.
Product option feature
User
options
Dealer
options
Factory
options
Peel-off module
‐
z
‐
Cutter module
‐
z
‐
Bluetooth module (RS-232C interface)
z
‐ ‐
KP-200 Plus keyboard display unit
z
‐ ‐
KU-007 Plus programmable smart
keyboard display unit
z
‐ ‐
HCS-200 long rang CCD scanner
z
‐ ‐

4
1.3 General Specifications
General Specifications
Physical dimensions 11.3 in (W) x 10.2 in (H) x 17.1 in (D)
Weight 24.3 lbs
Electrical Internal switching power supply
Input: AC 100-240V
Output: DC 24V 3.3A
Environmental
condition
Operation: 5 ~ 40˚C (41 ~ 104˚F), 25~85% non-condensing
Storage: -40 ~ 60 ˚C (-40 ~ 140˚F), 10~90%
non-condensing
1.4 Print Specifications
Print Specifications 203 dpi models 300 dpi models
Print head resolution 203 dots/inch (8 dots/mm) 300 dots/inch (12 dots/mm)
Printing method Thermal transfer and direct thermal
Dot size
(width x length)
0.125 x 0.125 mm
(1 mm = 8 dots)
0.084 x 0.084 mm
(1 mm = 11.8 dots)
Print speed
(inches per second)
Up to 6 ips Up to 4 ips
Max. print width 104 mm (4.09”)
Max. print length 2,286 mm (90”) 1,016 mm (40”)
1.5 Ribbon Specifications
Ribbon Specifications
Ribbon outside diameter Max. 81.3 mm
Ribbon length 450 meter
Ribbon core inside diameter 1 inch (25.4 mm)
Max. 110 mm Ribbon width
Min. 40 mm
Ribbon wound type Outside wound

5
1.6 Media Specifications
Media Specifications 203 dpi models 300 dpi models
Label roll capacity 8 in (203.2 mm) OD
Media alignment Edge alignment
Media type Continuous, die-cut, black mark, fan-fold, notch
Media wound type Printing face outside wound
Max. 4.6 in (118 mm) Media width (label +
liner)
Min. 1.0 in (25.4 mm)
Max. 11 mil (0.28 mm) Media thickness (label
+ liner)
Min. 2.36 mil (0.06 mm)
Media core diameter 1~3 in (25.4 mm~76.2 mm)
Label length 0.2~90 in (5~2286 mm) 0.2~40 in (5~1,016 mm)
Max. 6 in (152.4 mm) Label length (peeler
mode)
Min. 1 in (25.4 mm)
Max. 90 in (2,286 mm) Max. 40 in (1,016 mm) Label length (cutter
mode)
Min. 1 in (25.4 mm) Min. 1 in (25.4 mm)
Gap height Min. .078 in (2 mm)
Black mark height Min. .078 in (2 mm)
Black mark width Min. .31 in (8 mm)

2. Operations Overview
2.1 Unpacking and Inspection
This printer has been specially packaged to withstand damage during shipping. Please carefully
inspect the packaging and printer upon receiving the bar code printer. Please retain the packaging
materials in case you need to reship the printer.
Unpacking the printer, the following items are included in the carton.
One printer unit
One Windows labeling software/Windows driver CD disk
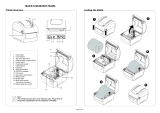
One quick installation guide
One power cord
One USB interface cable
One ribbon take up paper core
If any parts are missing, please contact the Customer Service Department of your purchased
reseller or distributor.
6

2.2 Printer Overview
2.2.1 Front View
1
2
3
4
9
5
6
8
7
1. LED indicators
2. LCD Display
3. Menu Key
4. Pause Key
5. Feed Key
6. Paper Exit Chute
7. Lower Front Cover
8. Printer Right Side Opener
9. Media Viewing Window
7

2.2.2 Interior view
1
6
7
2
8
3
4
9
10
5
8
1. Ribbon rewind spindle
2. Ribbon supply spindle
3. Print head pressure adjustment knob
4. Ribbon end sensor
11
12
13 14
5. Print head release lever
6. Label roll guard
7. 3” core adapter
8. Label supply spindle
9. Ribbon guide bar
10. Media guide bar
11. Print head
12. Platen roller
13. Media sensor
14. Label guide

2.2.3 Rear View
5
1
2
6
7
8
3
4
1. Internal Ethernet interface
2. Fan-fold paper entrance chute
3. RS-232C interface (Max. 115,200 bps)
4. USB interface (USB 2.0/ Full speed mode)
*5. SD card slot
6. USB host
7. Power switch
8. Power jack socket
Note:
* Refer to next page for SD Memory card specifications.
9

10
* Recommended SD card specification
SD card spec SD card capacity Approved SD card manufacturer
V1.0, V1.1 128 MB SanDisk, Transcend
V1.0, V1.1 256 MB SanDisk, Transcend, Panasonic
V1.0, V1.1 512 MB SanDisk, Transcend, Panasonic
V1.0, V1.1 1 GB SanDisk, Transcend, Panasonic
V2.0 SDHC CLASS 4 4 GB
V2.0 SDHC CLASS 6 4 GB SanDisk, Transcend, Panasonic
V1.0, V1.1 microSD 128 MB Transcend, Panasonic
V1.0, V1.1 microSD 256 MB Transcend, Panasonic
V1.0, V1.1 microSD 512 MB Panasonic
V1.0, V1.1 microSD 1 GB Transcend, Panasonic
V2.0 SDHC CLASS 4 microSD 4 GB Panasonic
V2.0 SDHC CLASS 6 microSD 4 GB Transcend
V1.0, V1.1 miniSD 128 MB Transcend, Panasonic
V1.0, V1.1 miniSD 256 MB Transcend, Panasonic
V1.0, V1.1 miniSD 512 MB Transcend, Panasonic
V1.0, V1.1 miniSD 1 GB Transcend, Panasonic
V2.0 SDHC CLASS 4 miniSD 4 GB Transcend
V2.0 SDHC CLASS 6 miniSD 4 GB
- The DOS FAT file system is supported for the SD card.
- Folders/files stored in the SD card should be in the 8.3 filename format
- The miniSD/microSD card adapter is required for SD card reader.

2.3 Operator Controls
2.3.1 Front Panel & Keys
LED indicators
LCD display
Front panel keys
Keys Function
1. Enter the menu
2. Exit from a menu or cancel a setting and return to the previous menu
Pause/Resume the printing process
Advance one label
Scroll up the menu list
Scroll down the menu list
Enter/select cursor located option
11

12
2.3.2 LED Indicators
LED Status Indication
Off The printer power is turned off
POWER
On The printer power is turned on
On Printer is ready
Pause
ON-LINE
Blinking
Downloading data into printer
Off Printer is ready
On “Carriage open”, “Cutter error” or “Clearing data”
ERROR
Blinking “No paper”, “Paper jam” or “No ribbon”
2.4 Setting up the Printer
1. Place the printer on a flat, secure surface.
2. Make sure the power switch is off.
3. Connect the printer to the computer with the provided USB cable.
4. Plug the power cord into the AC power cord socket at the rear of the printer, and then plug the
power cord into a properly grounded power outlet.
Note:
Please switch OFF printer power switch prior to plug in the power cord to printer power jack.

2.5 Installation of Ribbon
2.5.1 Loading the Ribbon
1. Open the printer right side cover.
2. Install the ribbon and paper core onto the
ribbon supply spindle and ribbon rewind
spindle. Push the paper core and ribbon
roll to the end of the spindle.
13

3. Push the print head release lever to open
the print head mechanism.
4. Thread the ribbon leader through the slot
between ribbon sensor and ribbon guide
bar until ribbon passes through the print
head and place the ribbon leader onto the
ribbon rewind spindle.
Ribbon sensor
Ribbon guide bar
Ribbon leader
14
/