Page is loading ...

© March 2016 AMT Datasouth Corp.
Fastmark M5e
Thermal Barcode Printer
(Direct & Transfer)
User’s Guide
Document # 121038

- ii -
Copyright Declaration
Information in this manual is subject to change without notice and does not represent a
commitment on the part of AMT Datasouth Corporation. No part of this manual may be
reproduced or transmitted in any form by any means, for any purpose other than the
purchaser’s personal use, without the expressed written permission of AMT Datasouth
Corporation.
Trademark credits:
CG is a registered trademark of Agfa Corporation.
CG Triumvirate Bold Condensed font is under license from the Monotype
Corporation.
Windows is a registered trademark of Microsoft Corporation.
All other trademarks are property of their respective owners.
Regulatory statement:
UL 60950-1(2
nd
Edition)
CSA C22.2 No.60950-1-07
(2
nd
Edition)
120VAC ~ 60Hz ~ 2.5A
LISTED
I.T.E.
E178707
EN 55022, Class B
EN 55024
EN 60950-1
EN 60950-1
AS/NZS CISPR 22 (Class B)
http://www.amtdatasouth.com/support-1/downloads/
FCC part 15B, Class B
Wichtige Sicherheits-Hinweise
1.
Bitte lesen Sie diese Hinweis sorgfältig durch.
2.
Heben Sie diese Anleitung fűr den späteren Gebrauch auf.
3.
Vor jedem Reinigen ist das Gerät vom Stromentz zu
trennen. Verwenden Sie keine Flüssig-oder
Aerosolreiniger. Am besten eignet sich ein angefeuchtetes
Tuch zur Reinigung.
4.
Die Netzanschluß-Steckdose soll nahe dem Gerät angebracht und
leicht zugänglich sein.
5.
Das Gerät ist vor Feuchtigkeit zu schűtzen.
6.
Bei der Aufstellung des Gerätes ist auf sicheren Stand zu
achten. Ein Kippen oder Fallen könnte
Beschädigungen
hervorrufen.
7.
Beachten Sie beim Anschluß ans Stromnetz die Anschlußwerte.
8.
Dieses Gerät kann bis zu einer Außentemperatur von maximal
40℃ betrieben werden
FCC STATEMENT:
This equipment has been tested and found to comply with the limits for a
Class B digital device, pursuant to part 15 of the FCC Rules. These limits
are designed to provide reasonable protection against harmful
interference in a residential installation. This equipment generates, uses
and can radiate radio frequency energy and, if not installed and used in
accordance with the instructions, may cause harmful interference to
radio communications. However, there is no guarantee that interference
will not occur in a particular installation. If this equipment does cause
harmful interference to radio or television reception, which can be
determined by turning the equipment off and on, the user is encouraged
to try to correct the interference by one or more of the following
measures:
-Reorient or relocate the receiving antenna.
-Increase the separation between the equipment and receiver.
-Connect the equipment into an outlet on a circuit different from that to
which the receiver is connected.
-Consult the dealer or an experienced radio/ TV technician for help.
This device complies with Part 15 of the
FCC Rules. Operation is subject to the
following two
conditions: (1) This device
may cause harmful interference, and (2)
this device must accept any
interference
received, including interference that may
cause undesired operation.

- 3 -
User Caution................................................................................................................... 5
Packaging ....................................................................................................................... 6
Unpacking the printer .................................................................................................................................... 6
Removing protective material ........................................................................................................................ 6
Introduction .................................................................................................................... 7
Product .......................................................................................................................................................... 7
Printer Overview ............................................................................................................ 8
Front view ...................................................................................................................................................... 8
Interior view ................................................................................................................................................... 9
Rear view ..................................................................................................................................................... 10
Operator Controls ........................................................................................................ 11
LED indication .............................................................................................................................................. 11
Button function ............................................................................................................................................. 11
Installation .................................................................................................................... 12
Setting up the printer ................................................................................................................................... 12
Open/Closing the top cover ......................................................................................................................... 13
Loading the ribbon ....................................................................................................................................... 14
Loading path for ribbon ................................................................................................................................ 16
Loading the media ....................................................................................................................................... 17
Loading path for media ................................................................................................................................ 19
External label roll installation ....................................................................................................................... 20
Loading media in Peel-off mode (option) .................................................................................................... 22
Loading media with cutter (option) .............................................................................................................. 23
PAL
TM
Print and Program overview ............................................................................................................. 23
Traditional printing ....................................................................................................................................... 24
Legacy data stream interpretation ............................................................................................................... 24
Standalone/Downtime applications ............................................................................................................. 25
Power-on Utilities ......................................................................................................... 27
Ribbon and Gap/Black Mark sensor calibration .......................................................................................... 28
Gap/Black Mark calibration, Self-test and Dump mode............................................................................... 29
Self-test ........................................................................................................................................................ 30
Dump mode ................................................................................................................................................. 31
Printer initialization....................................................................................................................................... 32
Setting Black Mark sensing + calibration ..................................................................................................... 33
Setting Gap sensing + calibration ................................................................................................................ 33
Skip AUTO.BAS........................................................................................................................................... 34
Table of Contents

- 4 -
LCD Menu Function ..................................................................................................... 35
Entering the menu ....................................................................................................................................... 35
Main menu overview .................................................................................................................................... 36
TSPL2 .......................................................................................................................................................... 37
ZPL2 ............................................................................................................................................................ 39
Sensors ........................................................................................................................................................ 42
Interface ....................................................................................................................................................... 43
Ethernet ....................................................................................................................................................... 44
Bluetooth ...................................................................................................................................................... 45
WiFi .............................................................................................................................................................. 45
File Manager ................................................................................................................................................ 46
Diagnostics .................................................................................................................................................. 47
Advanced ..................................................................................................................................................... 50
Service ......................................................................................................................................................... 51
Diagnostic Tool ............................................................................................................ 52
Starting Diagnostic Tool .............................................................................................................................. 52
Using Printer Function ................................................................................................................................. 53
Setting Ethernet by diagnostic utility............................................................................................................ 53
Using USB interface to setup Ethernet interface ......................................................................................... 54
Using RS-232 interface to setup Ethernet interface .................................................................................... 55
Using Ethernet interface to setup Ethernet interface................................................................................... 56
Troubleshooting ........................................................................................................... 58
Common problems ...................................................................................................................................... 58
Maintenance ................................................................................................................. 62
Tools and methods ...................................................................................................................................... 62
Product Specifications ................................................................................................ 63
Standard features ........................................................................................................................................ 63
Bar code symbologies & graphics ............................................................................................................... 64
Printer optional features .............................................................................................................................. 65
General specifications ................................................................................................................................. 66
Print specifications ....................................................................................................................................... 66
Ribbon specifications ................................................................................................................................... 67
Media specifications .................................................................................................................................... 67
Table of Contents

- 5 -
User Caution
Any changes or modifications not
expressly approved by the grantee
of this device could void the user's
authority to operate the equipment.
Before connecting or disconnecting
the interface cable, be sure to turn
off the printer.
Hazardous moving parts in cutter
module. Keep finger(s) and other
body parts away.
Unpack the printer. Make sure that the
printer body and all accessories are
included in the package and no parts are
damaged.
Do not use the printer in a location
exposed to direct sunlight or close to a
heater or other heat generating
equipment.
Place the printer on a rigid, horizontal
base in a location that is free of vibration.
Operational safety
CAUTION
Cautions in setting up
ATTENTION
Mechanical and electrical repairs
should be conducted by qualified
service personnel.
Refer to the product label (bottom of
printer) and verify your power source
exactly meets those requirements.
Do not use this product near heat or
water.
Unplug this product from the power
outlet before cleaning.
The main circuit board includes real
time clock feature and has lithium
battery CR2032 installed. Risk of
explosion if battery is replaced by an
incorrect type. Dispose of used
batteries according to the
manufacturer instructions.
Do not turn off the printer during printing,
as this may lead to a malfunction.
Refer to print adjustments in this manual
before attempting alignments.
“VORSICHT”
Explosionsgefahr bei unsachgemäßen Austaush der Batterie. Ersatz nur durch denselben oder einem
vom Hersteller empfohlenem ähnlichen Typ. Entsorgung gebrauchter Batterien nach Angabren des
Herstellers.
Any changes or modifications not expressly approved by the grantee of this device could void the
user's authority to operate the equipment.

- 6 -
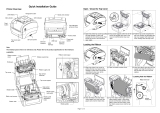
Packaging
Unpacking the printer
Removing protective material
1. Open the packing box, remove the printer. Open right cover and remove
foam block from printhead assembly. Remove paper between printhead
and platen.
2. If any parts are missing, please contact the Customer Service
Department of your purchased reseller or distributor.
3. It is recommended to keep packaging materials for future use if needed.
CD ROM
M5e Printer
USB Cable
AC Power Cord
Power Adapter
Quick Start Guide

- 7 -
Introduction
Product
Thank you for purchasing your AMT Datasouth bar code printer.
The Fastmark M5e series of thermal transfer desktop barcode printer, label printer
with its new, smaller footprint, offers the high performance that customers have
come to expect from AMT Datasouth. Durable, reliable and fast, the Fastmark
M5e generates 4-inch-wide labels, tags or receipts at up to 6 ips (203dpi), 4 ips
(300dpi) offering a price performance combination that is unmatched by other
desktop thermal barcode printers on the market.
The moveable sensor design can accept a wide range of label media. All of the
most frequently used bar code formats are included. Fonts and bar codes can be
printed in any one of the four directions.
Applications:
Healthcare patient safety
Work in process
Distribution
Shipping/ receiving
Electronics labeling
Compliance labeling
Order fulfillment
Distribution
Ticketing

- 8 -
Printer Overview
Front view
1
2
4
5
6
3
7
8
9
1. LCD display 6. Ribbon access cover
2. Menu button 7. Top cover lever
3. Feed button 8. *SD card socket
4. LED indicator 9. Paper exit chute
5. Navigation button
SD card spec
SD card capacity
Approved SD card manufacturer
V2.0 SDHC CLASS 4
2 GB
Transcend
V2.0 SDHC CLASS 4
8 GB
SanDisk
V3.0 CLASS 10 UHS
16 GB
SanDisk
V3.0 CLASS 10 UHS
32 MB
Transcend
V2.0 SDHC CLASS 4
microSD 4GB
Transcend

- 9 -
Interior view
1
2
3
4
5
6
7
8
9
10
11
12
13
1. Ribbon rewind hub 8. Ribbon supply hub
2. Ribbon rewind gear 9. Top cover support
3. Gap sensor (receiver) 10. Media guide adjustment button
4. Media holder 11. Media guides
5. Media holder locking switch 12. Black mark sensor
6. Gap sensor (transmitter) 13. Platen roller
7. Print head

- 10 -
Rear view
1
2
3
4
5
6
7
1. Ethernet interface
2. USB interface
3. USB host interface
4. RS-232C interface
5. Power jack socket
6. Power switch
7. External label entrance chute
The interface picture here is for reference only. Please refer
to the product specification for the interfaces availability.

- 11 -
Operator Controls
LED indication
Button function
LED Color
Description
Green/ Solid
This illuminates that the power is on and the device is ready to use.
Green/ Flash
This illuminates that the system is downloading data from PC to memory or the
printer is paused.
Amber
This illuminates that the system is clearing data from printer.
Red / Solid
This illuminates printer head open, cutter error.
Red / Flash
This illuminates a print error, such as head open, paper empty, paper jam, or
memory error etc.
Feed button
When the printer is ready, press the button to feed one label to the
beginning of next label
When the printer is printing, press the button to pause a print job. When
the printer is paused the power LED will blink green. Press the button
again to continue the print job
When the printer enters the menu, press the button to enter/select cursor
located item
Menu button
Enter the menu
Exit from a menu or cancel a setting and return to the previous menu
Navigation button
Scroll the menu list

- 12 -
Installation
Setting up the printer
1. Place the printer on a flat, secure surface.
2. Make sure the power switch is off.
3. Connect the printer to the computer with the provided USB cable.
4. Plug the AC power cord (female connector) into the power supply
socket. Then plug the DC power supply plug into the rear of the printer.
Then plug the power cord into a properly grounded power outlet.
Verify the printer power switch is in the OFF
position before installing the power cord.
Power switch
Power cord plug
Power supply
Power cord
female connector
DC power
supply plug

- 13 -
Open/Closing the top cover
1.
1. Open the printer’s top cover by
pulling the top cover open
levers located on each side of
the printer and lifting the top
cover to the maximum open
angle.
2. A top cover support at the rear of the
printer will engage with lower inner
cover to hold the printer top cover
open.
3. Hold the top cover and press the
top cover support to disengage the
top cover support with lower inner
cover. Gently close the top cover.

- 14 -
Loading the ribbon
1. Open the printer’s top cover by
pulling the top cover open levers
located on each side of the
printer and lifting the top cover
to the maximum open angle.
2. Open the ribbon access cover
and the media cover.
Note:
1.
In normal print mode, the
ribbon access cover can be
opened or closed.
2.
In peeler and cutter mode,
please open the top cover, then
the ribbon access cover can be
opened or closed.
3.
Insert the ribbon right side onto
the supply hub. Align the notches
on the left side and mount onto
the spokes.

- 15 -
4.
Insert the paper core right side onto the rewind hub. Align the notches
on the left side and mount onto the spokes.
5.
Stick the ribbon onto the ribbon
rewind paper core. Additional tape
may be required.
6.
Turn the ribbon rewind gear until the
ribbon plastic leader is thoroughly
wound and the black section of the
ribbon covers the print head.
TIP: Apply a small piece of tape to the black
ribbon surface. Remove the piece of tape,
if the black ribbon material is removed
you have the correct surface facing
outward. If not, turn the ribbon over
to the opposite side.

- 16 -
Loading path for ribbon
7.
Close the ribbon access cover
and the top cover.
Ribbon
supply roll
Ribbon rewind roll

- 17 -
Loading the media
1.
Open the printer top cover by
pulling the tabs located on each
side towards the front of the
printer then lift the top cover to
the maximum open angle.
2. Separate and hold open the
media holders.
3. Place the roll between the
holders and close them onto
the core.

- 18 -
4. Press down the media holder lock
switch to hold the label roll firmly.
5. Place the paper, print side face up,
through the media sensor and place
the label leading edge onto the
platen roller. Move the media
guides to fit the label width by
turning the guide adjuster knob.
6. Disengage the top cover support
and close the top cover gently.
PUSH

- 19 -
Loading path for media
7. Use “Diagnostic Tool” or LCD menu function to set the media sensor type
and calibrate the selected sensor.
Note:
Please calibrate the gap/black mark sensor when changing media.
Please refer to the diagnostic utility quick start guide for more
information. (Start the “Diagnostic tool”, select the “Printer
Configuration” tab, then click on the “Calibrate Sensor” button)
Media holder

- 20 -
External label roll installation
1. Attach the external paper roll mount on the bottom of the printer.
2. Insert a 3” label spindle into a
paper roll. And install it onto the
external paper roll mount.
3. Open the printer’s top cover and
separate the media holders to fit the
media width. Press down the media
holder lock switch to fix the
media holder.
PUSH
/