Page is loading ...

Document #120522 Rev-A
i
Fastmark M5 Plus Series
Thermal Transfer Barcode Printer
User’s Guide

Document #120522 Rev-A
ii
COMPLIANCES............................................................................................... III
1. Introduction.........................................................................................1
2. Getting Started....................................................................................1
2.1 Unpacking and Inspection............................................................1
2.2 Equipment Checklist.....................................................................1
2.3 Printer Parts...................................................................................3
3. Setup....................................................................................................4
3.1 Instructions to Top Cover Operation...........................................4
3.2 Setting Up the Printer ...................................................................6
3.3 Loading the Ribbon.......................................................................6
3.4 Loading Media Stock ....................................................................8
3.5 External Media Roll Mount Installation (Option).......................10
3.6 Peel-off Module Installation (Option).........................................12
3.6.1 Loading Labels into Peel-off Module..................................15
3.7 Cutter Module Installation (Option) ...........................................17
3.7.1 Loading Media in Cutter Mode.............................................19
3.8 Diagnostic Tool ...........................................................................21
3.8.1 Start the Diagnostic Tool......................................................21
3.8.2 Printer Function (Calibrate, Ethernet, RTC setup…) .........22
3.9 Install Memory Card....................................................................23
4. Power on Utilities..............................................................................24
4.1 Ribbon and Gap/Black Mark Sensor Calibration......................24
4.2 Gap/Black Mark Calibration, Self-test and Dump Mode...........25
4.3 Printer Initialization.....................................................................28
4.4 Black Mark Sensor Setting and Calibration..............................29
4.5 Gap Sensor Setting and Calibration..........................................29
4.6 Skip AUTO.BAS...........................................................................29
5. Maintenance......................................................................................30
5.1 Cleaning.......................................................................................30
6. Troubleshooting................................................................................31
6.1 LED Status...................................................................................31
6.2 Print Quality.................................................................................32
7. LED and Button Operation...............................................................34
7.1 LED...............................................................................................34
7.2 Button Operation.........................................................................34
Revise History.......................................................................................38
Contents

Document #120522 Rev-A
iii
Copyright Declaration
Information in this manual is subject to change without notice and does not
represent a commitment on the part of AMT Datasouth Corporation. No part of this
manual may be reproduced or transmitted in any form by any means, for any
purpose other than the purchaser’s personal use, without the expressed written
permission of AMT Datasouth Corporation.
Compliances
CE Class B:
EN55022: 1998+A1: 2000+A2: 2003
EN55024: 1998+A1: 2001+A2: 2003 IEC 61000-4 Series
EN61000-3-2: 2006 & EN61000-3-3: 1995+A1: 2001
FCC Part 15, Class B
UL, CUL
C-Tick:
CFR 47, Part 15/CISPR 22 3
rd
Edition: 1997, Class B
ANSI C63.4: 2003
Canadian ICES-003
TÜV-GS: EN60950: 2000
Wichtige Sicherheits-Hinweise
1. Bitte lesen Sie Diese Hinweis sorgfältig durch
2. Heben Sie diese Anleitung fűr den späteren Gebrauch auf.
3. Vor jedem Reinigen ist das Gerät vom Stromentz zu trennen. Verwenden
Sie Keine Flűssig-oder Aerosolreiniger. Am besten eignet sich ein
angefeuchtetes Tuch zur Reinigung.
4. Die Netzanschlußsteckdose soll nahe dem Gerät angebraucht und leicht
zugänglich sein.
5. Das Gerät ist vor Feuchtigkeit zu schűtzen.
6. Bei der Aufstellung des Gerätes ist auf sicheren Stand zu achten. Ein
Kippen oder Fallen könnte Beschädigungen hervorrufen.
7. Beáchten Sie beim Anschluß an das stromnetz die Anschlußwerte.
8. Dieses das Gerät kann bis zu einer Außentemperatur von maximal 40
betieben werden.

Document #120522 Rev-A
1
1. Introduction
Thank you for purchasing the AMT Datasouth M5 PLUS series Thermal Transfer
and Direct Thermal Bar Code Printers. Although the printer takes only a small
amount of space, it delivers reliable, superior performance.
This printer provides both thermal transfer and direct thermal printing at user
selectable speeds of: 2.0, 3.0, 4.0 or 5.0 inches per second (ips), for 203dots per
inch (dpi) resolution. And 2.0 or 3.0 ips for 300dpi resolution. It accepts roll feed,
die-cut, and fan-fold labels for both thermal transfer and direct thermal printing. All
common bar codes formats are available. Fonts and bar codes can be printed in 4
directions, 8 different alphanumeric bitmap fonts and a build-in true type font
capability. You will enjoy high throughput for printing labels with this printer.
2. Getting Started
2.1 Unpacking and Inspection
This printer has been specially packaged to withstand damage during shipping.
Please carefully inspect the packaging and printer upon opening and prior to
installation. Please retain the packaging materials in case you need to reship the
printer.
2.2 Equipment Checklist
Printer
User CD Disk (BarTender Ultralite, Printer User Manuals & Diagnostic Software)
Quick start guide
USB port cable
External universal switching power supply
Power Cord
Label Spindle, fixing tab x2, 1.5” core adapter x2
Ribbon spindle x2
Ribbon rewind spindle paper core
If any parts are missing, please contact the Customer Service Department of
your purchased reseller or distributor.

Document #120522 Rev-A
2
Optional Configurations
Peel off module assembly.
Guillotine cutter
Full cut:
Paper thickness: 0.06~ 0.19mm, 500,000 cuts
Partial cut:
Paper thickness: 0.06~0.12mm, 500,000 cuts
Paper thickness: 0.19mm 200,000 cuts
Main board integrated with internal Ethernet
Internal Ethernet print server module
Accessories
KP-200
KU-007 plus
External Ethernet print server
External wireless (802.11b/g) print server
External roll mount, media OD. 214 mm (8.4”) with 3” core label spindle
Contact CCD contact scanner
Long range linear image bar code scanner

Document #120522 Rev-A
3
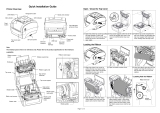
2.3 Printer Parts
Fig. 1 Top front view
Top Cover Open Lever
LED Indicator
Feed Button
Printer Top Cover
Ribbon Access Cover
Clear Window
1
2
3
4 5
6
1. USB Interface
2. Centronics Interface
3. RS-232C DB-9 Interface
4. Power Jack
5. Power Switch
6. Rear Paper Guide
Fig. 2 Rear view

Document #120522 Rev-A
4
3. Setup
3.1 Instructions to Top Cover Operation
Please take care when opening or closing the printer’s top cover by carefully
following these instructions.
To Open:
1. When facing the front of the printer pull the cover release levers on both sides
of printer towards you.
2. Lift up the top gradually.
There are two stop positions for the top cover. Position 1 and 2 are indicated on
the label below.
Note: To hold the cover open at position 1, you must lift the cover higher
than the stopping point at position 1 and gently lower the cover to stop
position 1. DO NOT free fall the top cover!
3. Fully open the top cover and gently lower it to stop position 2.
Top cover support is fixed at position 2
4. To close the cover, lift up to the maximum angle and release. The cover will be
kept at a stop position between 1 and 2 for a while. Use both hands to gently
push down the top cover to close and make sure the cover is latched on both
sides.

Document #120522 Rev-A
5
Note: DO NOT place your hands or fingers between the top and lower
cover while closing!
Top cover is fully open and ready to close
Use both hands to close the top cover
5. Do not force the cover! If you are not sure if the top cover is fixed at the stop
position, please do not force the cover to close. Doing so may damage the
cover and support arm.
Please open the top cover to the maximum angle and close again. Use both
hands to gently press the cover close.

Document #120522 Rev-A
6
3.2 Setting Up the Printer
1. Place the printer on a flat, secure surface.
2. Make sure the power switch is off.
3. Connect the printer to the computer with the Centronics or USB cable.
4. Plug the power cord into the power supply connector at the rear of the
printer, and then plug the power cord into a properly grounded receptacle.
Fig. 3 Attach power supply to printer
3.3 Loading the Ribbon
The printer will detect if the ribbon is installed after turning the power on and it will
set printing mode to thermal transfer or direct thermal printing mode automatically.
If the printer does not detect the ribbon, the ribbon take up motor will be turned off.
Power Supply
Plug
Power Cable
Power Switch
USB
RS-232C
Centronics

Document #120522 Rev-A
7
Make sure the printer top cover is engaged properly at both sides prior to powering
up the printer.
Please follow the steps below to install the ribbon into printer.
1. Push down on the ribbon access window to unlatch and open the cover.
2. Place a paper core onto the ribbon rewind spindle.
3. Mount the ribbon rewind paper core on the front hubs.
4. Install a ribbon on the ribbon supply spindle.
5. Mount the ribbon supply spindle on the rear hubs.
6. Thread the ribbon leader downward pass the print head.
7. Attach the ribbon leader to the ribbon rewind paper core by a piece of tape.
8. Rotate the ribbon rewind paper core until the ribbon leader is thoroughly
encompassed by the black section of the ribbon.
9. Close the ribbon access window.
Fig. 4 Ribbon installation (I)
Ribbon S
p
indle
Front Hub
Paper Core
Back Hub
Ribbon Access Cove
r

Document #120522 Rev-A
8
Fig. 5 Ribbon installation (II)
3.4 Loading Media Stock
1. Insert spindle into a media roll (If your media core is 1 inch, remove the 1.5 inch
core adapter from the fixing tab). If label width is 4 inch wide, two fixing tabs are
not required).
Fig. 6 Label Roll installation (I)
Rear Hub
Ribbon
Leader
Ribbon supply spindle
Ribbon Rewind S
p
indle with Pa
p
er Core
Pa
p
er Roll
1” Media Spindle
Printing Side
Face U
p
1.5” Core
Adapter
*
Fixed Tab

Document #120522 Rev-A
9
2. Open the printer’s top cover by releasing the green levers located on each side
of the printer and lifting the top cover. A top cover support at the rear of the
printer will hold the cover open.
Fig. 7 Pull the lever to open the cover
3. Place a roll of media onto the internal Media Spindle.
4. Feed the media (printing side face up) under the Teflon bar and through the
support guides. The media should come to rest outside the printer. Refer to
Fig #8.
5. Adjust the green center-biased media guides to slightly touch the edges of the
media/backing.
6. To close the printer top cover, lift the cover to the maximum open angle then
use both hands to close the cover gently. Close the printer top cover slowly and
make sure the cover latches securely.
Note:
1. Make sure your hands or fingers are not placed between printer top
and lower cover when closing.
2. Do not free fall the top cover.
3. Failure to securely close and lock the cover will result in poor print
quality.
Lower Cover

Document #120522 Rev-A
10
Fig. 8 Media installation (II)
3.5 External Media Roll Mount Installation (Option)
1. Attach an external media roll mount on the bottom of the printer.
Fig. 9 Attach the external roll mount to the printer
2. Open the printer top cover by releasing the top cover open levers. The top
cover support will hold the cover open.
3. Install a roll of media on the external roll mount.
4. Feed the media (printing side face up) into the external opening located at the
rear of the printer and then through the media guides.
Printer Top Cover
Top Cover Support
Media Guide
T
eflon Ba
r
Top Cover Open Lever
Paper Roll Mount

Document #120522 Rev-A
11
Fig. 10 External roll mount media installation (I)
5. Continue feeding the media through the internal printer guides and place it on
top of the platen.
6. Adjust the media guides to fit the appropriate width.
7. Close the printer top cover by lifting to the maximum open angle then push
down the top cover gently.
Fig. 11 External roll mount media installation (II)
External Media Feed Opening
External Paper Roll
Mount
Media Guide
Platen
Rear Media Guide
Top Cover Support Arm

Document #120522 Rev-A
12
3.6 Peel-off Module Installation (Option)
1. Open the top cover and remove the front panel from the printer.
Fig. 12 Remove the front panel
2. Lift and hold the top cover while pushing down and sliding the cover support
arm backwards to release.
3. Use a screwdriver to remove 6 screws on the lower inner cover.
Fig. 13 Remove 6 screws from lower inner cover
Front Panel
Lower Cove
r
Screws
Lower Inner
Cover
Top Cover
Screws
Top Cover Support Arm
Flute

Document #120522 Rev-A
13
4. Turn over the printer. Remove two screws located near the top cover hinge,
and remove one screw at memory card cover.
5. Separate the top, inner, and the lower cover.
6. Thread the sensor cable through the bezel. Connect the peel-off panel cable to
the 5-pin socket on printer PCB.
Fig. 14 Connect peel-off sensor cable to main board
Fig. 15 Peel-off sensor cable installation
Peel-off
panel
Peel-off panel
Cable
5-pin Socket
PCB
Mounting Tabs
Bezel
Slot

Document #120522 Rev-A
14
Peel Off Assembly Tab
Inner Hinge Holes
7. Insert the peel-off assembly tabs into the lower inner cover hinge holes until
they snap into place.
Fig. 16 Peel-off panel installation (I)
8. Reassemble parts in reverse procedures after installing the module.
Fig. 17 Peel-off panel installation (II)
9. Lift up the peel-off panel and snap into place to close.
10. Use a screwdriver to secure enclosure cover screws (9-places).
11. Close the top cover by placing the support arm back into the flute and then
push down the top cover gently.
Roller
Lower Inner Cover
Lower Cover
Peel-off panel
Roller

Document #120522 Rev-A
15
Peel-off panel
Backing paper
Opening
3.6.1 Loading Labels into Peel-off Module
Note: Both thermal paper and plain paper labels apply for peel-off
function, neither PVC nor vinyl work with peel-off function.
1. Insert a 1” label spindle into a label roll.
2. Open the printer top cover by pulling the top cover open levers. The top cover
support will hold the printer top cover.
Fig. 18 Open the top cover
3. Install the label roll onto the paper roll mount.
4. Open the peel-off panel by pulling it forward.
Fig. 19 Open the peel-off panel
Peel-off
panel
Top Cover Open Lever

Document #120522 Rev-A
16
5. Feed the label, printing side facing up, through the paper guides and place it on
top of the platen.
6. Thread the label through the liner opening, which is beneath the roller and
tear off one piece of the label.
7. Adjust the paper guides by moving left or right to fit the label/backing width.
Fig. 20 Load label into peeler roller assembly
8. Lift the peel-off panel up and back into the closed position.
9. Close the top cover by lifting up the top cover support and close the top cover
slowly.
Note: Pull the label outward removing slack after closing the top cover.
Fig. 21 Complete label installation for peel-off mode
Roller
Top Cover
Top Cover Support
Peel-off panel

Document #120522 Rev-A
17
3.7 Cutter Module Installation (Option)
1. Pull the top cover open levers to open the top cover.
2. Remove the front panel from the lower cover.
Fig. 22 Pull the lever to open the cover
3. Lift and hold the top cover while pushing down and sliding the cover support
arm backwards to release.
4. Use a screwdriver to remove 6 screws on the lower inner cover.
Fig. 23 Remove 6 screws from lower inner cover
Lower Cover
Screws
Top Cover
Screws
Top Cover Support
Flute
Lower Cove
r
Lower Inner Cove
r
Front Panel
/