Page is loading ...

Trek
Super Commuter+
Diamant
Zouma+
Dealer Service Information
2017


1
Trek Super Commuter+ 8/ 9/ 8S/ 9S
Diamant Zouma+ (/S /Elite /Elite S)
Table of Contents
1. Overview bicycle configurations .....................................................................................................................................................................3
2. Walk around ..........................................................................................................................................................................................................4
2.1 Show view – Colors and drive systems ..................................................................................................................................................4
2.2 Front/Rear view ...........................................................................................................................................................................................5
2.3 Side view ........................................................................................................................................................................................................5
2.4 Cockpit ...........................................................................................................................................................................................................6
3. Technical details ...................................................................................................................................................................................................7
3.1 Frame 7
3.1.1 Frame sizes ........................................................................................................................................................................................7
3.1.2 Use Condition ...................................................................................................................................................................................7
3.1.3 Drop-outs ..........................................................................................................................................................................................7
3.2 Specific parts ................................................................................................................................................................................................7
3.2.1 Specific parts - overview .................................................................................................................................................................7
3.2.2 Specific parts – photos ....................................................................................................................................................................8
3.3 Model and sales region specific components ......................................................................................................................................9
3.3.1 Configuration depending parts - overview ...................................................................................................................................9
3.3.2 Configuration depending parts - photos .....................................................................................................................................10
3.4 Additional parts on 45 km/h EU-models ............................................................................................................................................. 11
3.4.1 Additional parts on 45 km/h EU-models - overview ................................................................................................................ 11
3.4.2 Additional parts on 45 km/h EU-models – photos ................................................................................................................... 12
3.5 Bosch eBike Assist system ...................................................................................................................................................................... 12
3.5.1 Bosch eBike Assist system - overview ......................................................................................................................................... 13
3.5.2 Bosch eBike Assist system – photos ............................................................................................................................................ 13
3.6 Drive train .................................................................................................................................................................................................... 14
3.7 Brake system ...............................................................................................................................................................................................14
3.7.1 Brake system – overview ............................................................................................................................................................... 14
3.7.2 Brake system – details ...................................................................................................................................................................14
3.8 Fenders .........................................................................................................................................................................................................14
3.8.1 Front fender attachment ...............................................................................................................................................................14
3.8.2 Rear fender attachment ................................................................................................................................................................ 15
3.9 Rear rack ...................................................................................................................................................................................................... 16
3.9.1 Rack – design and application ...................................................................................................................................................... 16
3.9.2 Rack – maximum allowed load .................................................................................................................................................... 16
3.10 Cable routing .............................................................................................................................................................................................. 16
3.10.1 Routing of the front brake cable at the fork ...............................................................................................................................16
3.10.2 Routing of the rear brake and shifter cables .............................................................................................................................. 17
3.10.3 Routing of electrical wiring to the front of the bicycle .............................................................................................................. 17
3.10.4 Routing of electrical wiring to the rear of the bicycle ............................................................................................................... 17
3.10.5 Cable routing – photos .................................................................................................................................................................. 18
3.10.6 Cable routing – technical drawings ............................................................................................................................................. 19
3.11 Tires ..............................................................................................................................................................................................................22
3.11.1 Tire size ............................................................................................................................................................................................22
3.11.2 Tire pressure ...................................................................................................................................................................................22
3.11.3 Tires specifications .........................................................................................................................................................................22
4. Electrical specifications ...................................................................................................................................................................................23
4.1 Light configurations ..................................................................................................................................................................................23
4.1.1 Lights on EU 25 km/h models ......................................................................................................................................................23
4.1.2 Lights on US 28 mph models .......................................................................................................................................................23
4.1.3 Lights on 45 km/h models with EU-Type Approval ..................................................................................................................23
4.1.4 Lights – photos .............................................................................................................................................................................. 24

2
4.2 Electric diagram of lights ........................................................................................................................................................................ 25
4.2.1 Electric diagram of lights on non EU-Type Approval bicycles ................................................................................................. 25
4.2.2 Electric diagram of lights on EU-Type Approval bicycles ........................................................................................................ 26
4.2.3 Electrical connections to the Bosch drive unit ............................................................................................................................27
5. Operating instructions .................................................................................................................................................................................... 28
5.1 Charging the battery ................................................................................................................................................................................ 28
5.2 Battery removal/installation .................................................................................................................................................................. 28
5.2.1 Battery removal ............................................................................................................................................................................. 28
5.2.2 Battery installation ....................................................................................................................................................................... 29
5.3 Operating the Bosch eBike assist system ........................................................................................................................................... 29
5.4 Switching the lights On/Of .................................................................................................................................................................... 29
5.4.1 Switching the lights On/Off on Non – EU-Type Approval bicycles........................................................................................ 29
5.4.2 Switching the lights On/Off on models with EU-Type Approval ........................................................................................... 30
5.5 Panniers ....................................................................................................................................................................................................... 30
6. Bicycle specific maintenance......................................................................................................................................................................... 30
6.1 Battery rail ................................................................................................................................................................................................... 31
6.1.1 Adjusting the battery rail position ............................................................................................................................................... 31
6.1.2 Replacing the battery rail ..............................................................................................................................................................32
6.2 Replacing the battery lock .......................................................................................................................................................................33
6.3 Replacing the battery docking ............................................................................................................................................................... 34
6.4 Drop-out mounting ...................................................................................................................................................................................35
6.5 Replacing the front fender ...................................................................................................................................................................... 36
6.6 Replacing the rear fender ....................................................................................................................................................................... 36
6.6.1 Needed tools and parts ................................................................................................................................................................ 36
6.6.2 Removing the old fender and the components ..........................................................................................................................37
6.6.3 Marking holes on the replacement fender................................................................................................................................. 38
6.6.4 Drilling holes in the replacement fender .................................................................................................................................... 38
6.6.5 Mounting the new fender ............................................................................................................................................................ 39
6.7 Rack mounting .......................................................................................................................................................................................... 39
6.8 Mounting the drive unit ..........................................................................................................................................................................40
6.8.1 Replacing the drive unit................................................................................................................................................................40
6.8.2 Drive unit mounting - technical drawing .................................................................................................................................... 41
7. Spare parts .......................................................................................................................................................................................................... 42
7.1 Spare parts - bicycle ................................................................................................................................................................................ 42
7.2 Spare parts - Bosch eBike System ........................................................................................................................................................ 43
7.3 Disposal ...................................................................................................................................................................................................... 43
7.3.1 Disposal of electrical components .............................................................................................................................................. 43
7.3.2 Disposal of batteries ..................................................................................................................................................................... 43
8. RIDE+ Owner’s manuals .................................................................................................................................................................................44
8.1 RIDE+ Owner’s manuals - content and languages...........................................................................................................................44
8.1.1 RIDE+ Owner’s manual for bicycles sold in Europe..................................................................................................................44
8.1.2 RIDE+ Owner’s manual for bicycles sold in the US .................................................................................................................. 44
8.2 RIDE+ Owner’s manuals - overview MY2017 ...................................................................................................................................44

3
1. Overview bicycle configurations
The bicycles with the Trek ‘SC-frame’ are available in these configurations, depending on region:
Model Gear
Maximum
speed
EU - Type
Approval Region
Diamant Zouma+ 11 speed derailleur 25 km/h No Germany, Austria, Switzerland
Zouma Elite+ NuVinci N380 SE 25 km/h No Germany, Austria, Switzerland
Zouma+ S 11 speed derailleur 45 km/h Yes Germany, Austria, Switzerland
Zouma Elite+ S NuVinci N380 SE 45 km/h Yes Germany, Austria, Switzerland
Trek Super Commuter+ 8 11 speed derailleur 25 km/h No EU
Super Commuter+ 9 NuVinci N380 SE 25 km/h No EU
Super Commuter+ 8S 11 speed derailleur 45 km/h Yes EU
Super Commuter+ 9S NuVinci N380 SE 45 km/h Yes EU
Super Commuter+ 8S 11 speed derailleur 28 mph No US/Canada

4
2. Walk around
2.1 Show view – Colors and drive systems
Trek Diamant
IGH IGH
Super Commuter 9 - 9S Diamant Zouma Elite+ (S)
Derailleur Derailleur
Super Commuter 8 - 8S Diamant Zouma+ (S)

5
2.2 Front/Rear view
Front view Rear view
* Note.
Type of front/taillight and presence of the mirror is depending on the bicycles’ configuration and region.
2.3 Side view
Side view (IGH)

6
Side view (Derailleur)
2.4 Cockpit
Variant with Bosch Purion display and IGH shifter
Variant with Bosch Purion display and derailleur shifter
Notes.
• The mirror is mandatory for Speed Pedelecs in Europe according to the European Type Approval
(position: above handlebar).
• The high beam light switch is only present on bicycles with the Supernova M99 Pro head light.

7
3. Technical details
3.1 Frame
The bicycles are equipped with a specially designed frame for a center Bosch drive unit and have a semi integrated
battery pack. The frames are adapted to accommodate the brake and shifter cables and electric wiring inside. The
bicycle frames comply with the ISO 4210 norm.
3.1.1 Frame sizes
The Trek Super Commuter+ and Diamant Zouma+ bicycles are available in four frame sizes:
45, 50, 55 and 60cm. The frame sizing is virtual. As virtual size, the actual seat tube length is 5cm shorter, to
create a better stand over.
3.1.2 Use Condition
There are many types of bicycles, and each is designed for a specific Use Condition.
This bicycle is designed for Use Condition 1; “Riding on a paved surface where the tires are always on the ground”.
• The total weight limit (rider and luggage) for this bicycle is 136kg / 300lb.
• The maximum weight of the rider is 125kg / 275lb).
• The maximum allowed load on the rack is 7,5kg / 16,5lb per side; in total 15kg / 33lb.
3.1.3 Drop-outs
The frame is designed to mount two types of drop-outs; IGH drop-outs or derailleur drop-outs.
If the IGH drop-outs are mounted (on bicycles with IGH), the slotted holes in the frame can be used to adjust the
dropouts for proper chain tension.
Slotted holes to adjust the chain tension
3.2 Specific parts
3.2.1 Specific parts - overview
All bicycles with the ‘SC-frame’ are equipped with the following special features:
• Semi integrated battery • Motor armor
• Battery rail • Cover on electrics drive unit
• Battery lock • Chain guide on motor
• Charger plug cover • Chain stay protector
• Bosch Purion display • Rear rack
• Special spacers on the rear fender • Brake cable mounting at fork
• Fender end pieces • Cable plug down tube left & right

8
3.2.2 Specific parts – photos
Semi integrated battery Battery rail Battery lock
Battery charge plug Bosch Purion display Special spacers on the rear fender
Fender end piece Motor armor Chain guide on motor
Cover on drive unit Chain stay protector Rear rack
Cable plug down tube
left & right

9
3.3 Model and sales region specific components
3.3.1 Configuration depending parts - overview
Depending on the configuration and region, the bicycles are equipped with a selection of these parts:
• Front light: • Rear derailleur protector*
Supernova E3 Mini2 • Rear hub:
Supernova M99 Pure+ 11 speed rear derailleur
Supernova M99 Pro (daytime running light,
low beam and high beam
NuVinci N380 SE gear hub
• Shifter:
• Taillight: Shimano trigger shifter
Supernova E3 NuVinci roller shifter
Supernova M99 (with built-in brake light and
license plate light) *On bicycles with rear derailleur.

10
3.3.2 Configuration depending parts - photos
Supernova E3 Mini2 Supernova M99 Pure+ Supernova M99 Pro
Supernova E3 taillight +
rear reflector
Supernova M99 taillight +
rear reflector
Derailleur protector
11 speed derailleur NuVinci N380 SE
Shimano trigger shifter NuVinci roller shifter Cable mounting on chain stay
Derailleur (A)/ IGH (B)

11
3.4 Additional parts on 45 km/h EU-models
3.4.1 Additional parts on 45 km/h EU-models - overview
The 45 km/h fast electric bicycle EU-models comply with EU-Type Approval (e1-2002-24-0727-00) for MY2017
and to this aim are additionally equipped with the following bicycle parts*:
• Front light with daytime running light and high
beam
• Brake light switches on both brake levers
• Speed bicycle brake levers
• Light switch (for high beam) • Rear view mirror (position: above handlebar)
• LED rear light with built-in brake light and license
plate light
• Side reflectors
• A unique VIN number per bicycle
• Adjustable license plate holder
* These additional parts are all part of the EU Type Approval. It is not allowed to remove or exchange them for other
(non-certified) equipment. This also applies to the fork, tires, brakes, kickstand, motor, battery pack and display.

12
3.4.2 Additional parts on 45 km/h EU-models – photos
Front light Supernova M99 Pro High beam switch Rear light, including brake
light and license plate light
License plate holder Lever blades with ball-end
(including brake light switch)
Mirror
(position: above handlebar)
Side reflectors A unique VIN number per SC-frame
3.5 Bosch eBike Assist system
All bicycles are equipped with the Bosch ‘Performance Line’ assist system. The exact configuration of the kit
depends on the region of sale. This also determines the specific firmware and thus the maximum allowed assist
speed and also speed indication (km/h or mph). Depending on the configuration and region, the Bosch drive unit
can assist up to 20 mph, 25 km/h, 28 mph or 45 km/h.
Refer to chapter 1 for all configurations of the Trek and Diamant models.
The drive unit is built into the middle of the specially designed frame. The frame has a semi integrated battery
pack and battery rail. The battery can be charged on the bicycle or can be taken from the bicycle to be charged
elsewhere.

13
3.5.1 Bosch eBike Assist system - overview
Bosch Part Description 25 km/h (Bosch P/N:) 45 km/h - 28 mph (Bosch P/N:)
Drive unit Performance Line 0 275 007 037 (CX) 0275.007.041 (Speed, 45 km/h -28 mph)
Display Purion 1270.020.917 1270.020.917 (km/h or mph on display)
Battery pack Down tube, 500 Wh 0275.007.530 0275.007.530 (EU)
0275.007.533/534 (US)
Charger Standard 4A 0275.007.907 0275.007.907
Bosch eBike Assist System parts
3.5.2 Bosch eBike Assist system – photos
Performance Line drive unit Purion display Integrated down-tube battery
Charge plug Standard charger

14
3.6 Drive train
The Super Commuter+ and Diamant Zouma+ bicycles are available either with IGH or 11 speed rear derailleur gear
systems. Consequently, the shifter on the handle bar is a IGH shifter or an rear derailleur shifter. From the IGH
shifter, two operating cables run through the frame to the hub, the rear derailleur shifter has one operating cable
routed to the rear derailleur.
3.7 Brake system
3.7.1 Brake system – overview
Model Brake system
Maximum
speed Remarks Region
Diamant Zouma+ Shimano M615 hydraulic
brake system
25 km/h - Germany, Austria,
Switzerland
Zouma Elite+ Magura MT4/MT5
hydraulic brake system
25 km/h - Germany, Austria,
Switzerland
Zouma+ S
Zouma Elite+ S
Magura MT5e hydraulic
brake system
45 km/h EU-Type Approval,
eBall brake levers
with brake switch
Germany, Austria,
Switzerland
Trek Super Commuter+ 8 Shimano M615 hydraulic
brake system
25 km/h - EU
Super Commuter+ 9 Magura MT4/MT5
hydraulic brake system
25 km/h - EU
Super Commuter+ 8S Shimano M615 hydraulic
brake system
28 mph - US/Canada
Super Commuter+ 8S
Super Commuter+ 9S
Magura MT5e hydraulic
brake system
45 km/h EU-Type Approval,
eBall brake levers
with brake switch
EU
3.7.2 Brake system – details
All bicycles are equipped with a hydraulic brake system and have a 180mm brake disc on front and rear hub. The
EU-bicycles with Type Approval have built-in electric brake switches at both left and right hand brake levers that
activate the brake light.
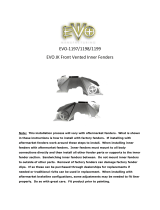
3.8 Fenders
3.8.1 Front fender attachment
The front fender is directly mounted to the fork. On the top, the fender is mounted to the fork crown, with a thin
spacer between fender and fork crown. The other side of the fender is secured to the fork with a specially designed
fender stay. The front fender has a fender end piece at both ends.
Front fender and fender end piece (at both ends)

15
3.8.2 Rear fender attachment
The rear fender is directly mounted to the frame at the seat stay bridge and at the chain stay bridge (near motor
mount), with a spacer between fender and frame. At the rear it is connected to the dropouts by the rear rack. The
default spacers are 10mm thick at the motor mount and 5mm thick at the seat stay bridge (with the drop-outs in
the middle position). The spacer applied at the lower position may vary in thickness (or even be left out), as the
fender will move with the adjustment of the dropouts. Consequently, depending on the position of the drop-outs,
the distance between frame and fender can change as well. The rear fender is an integrated part of the rear rack
mounting, it acts as a rack stay. The rear fender has a fender end piece at the rear and has a channel for the electric
wiring to the rear light(s).
Note.
Rear fenders are drilled size-specific; the location of the holes varies per frame size.
The rear fender is mounted to the rack and the frame Fender end piece
The lower spacer may vary in thickness (0mm to 10mm) The top spacer (5mm)

16
3.9 Rear rack
3.9.1 Rack – design and application
The rear rack is designed to carry a pannier on both sides. The rack has a stop at each side to prevent the panniers
sliding back and forth.
The rack is designed to support the fender – it is an integrated part, together with the drop-outs, of the rear part of
the bicycle.
The rack as an integrated part of the rear end Slide stoppers
The rear fender end piece
3.9.2 Rack – maximum allowed load
The maximum allowed load on the rack is 7,5kg / 16,5lb per side; in total 15kg / 33lb.
3.10 Cable routing
3.10.1 Routing of the front brake cable at the fork
At the fork, a brake cable is led to the front brake caliper. It is secured to the fork with one (or two; depending on
the bicycles’ configuration) fasteners to prevent damage to the brake cable and paint of the fork.

17
3.10.2 Routing of the rear brake and shifter cables
All cables to the back of the bicycle run through the frame. On each side of the down tube, the brake, shifter and
electrical cables enter the frame via an opening in the frame. From there, the cables run via the battery bay to the
back of the frame.
In the battery bay, the cables are secured to both sides of the battery rail spacers with help of tie-wraps.
The brake cable is led through the left hand chain stay to the rear brake caliper.
The shifter cable(s) run along the drive unit and chain stay to the derailleur or IGH. These cables are firmly secured
to the drive unit and chain stay with specially designed clips.
There are two types of clips available; one to secure the single cable of a derailleur drive system, the other to secure
the twin cables of the IGH.
3.10.3 Routing of electrical wiring to the front of the bicycle
The electric wiring to the front of the bicycle consists of wiring to power the front light and to the brake switches
(if applicable, depending on configuration). The wires enter the frame via an opening in the frame and run via the
battery bay to the drive unit, along the cables of rear brake and shifter.
All cables running through the battery bay are secured to the battery rail spacers with tie-wraps, on both sides. The
electrical connections at the drive unit are protected by a specially designed cover that fits between drive unit and
frame.
3.10.4 Routing of electrical wiring to the rear of the bicycle
The electric wiring to the rear of the bicycle consists of wiring to the rear light and, if applicable, the brake light and
license plate lighting. Also the cable from the speed sensor is part of the rear wiring.
The wire for the lighting is led through the rear fender. The fender has a built-in channel to hide and protect the
wiring. Four clips secure the wire in the channel (ensure to fit the flat side of the clip pointing to the wiring cable).
At the front end, the wiring enters the motor cover, and is routed to the electrical connection at the drive unit.
The speed sensor cable runs through the non-drive side stay, via an opening in the stay, to the speed sensor. The
opening is covered with a specially designed frame plug. The connector of the speed sensor is connected to the
drive unit.

18
3.10.5 Cable routing – photos
Front frame entry (both sides) Rear brake, shifter and electrical cables
through the battery bay
Cable(s) at drive unit Top: Cable at chain stay
(derailleur)
Bottom:
Cables at chain stay (IGH)
Front brake cable mounted at the fork Rear light cable, secured with a clip,
in the fender guide
Rear light cable routed to drive unit
/