Page is loading ...

Part No. 84445
5000TOC Sensor
Instruction Manual


IMPORTANT SAFETY INFORMATION
- Please read thoroughly before operating the 5000TOC Sensor product -
• Follow all warnings, cautions, and instructions indicated on and supplied with this product.
• Install equipment as specified in this instruction manual. Follow appropriate local and national codes.
• Use only factory documented components for repair. Tampering or unauthorized substitution of parts
and procedures can affect the performance and cause unsafe operation of your process as well as
void factory warranties.
• Protective covers must be in place unless qualified personnel are performing maintenance.
• Use of this equipment is in a manner not specified by the manufacturer; the protection provided by it
against hazards may be impaired.
• Prior to shipping sensor back to the factory for repair or re-calibration, water MUST be drained from
sensor to avoid damage due to freezing.
WARNINGS:
• Installation of cable connections and servicing of this product require access to shock hazard voltage
levels.
• Main power must employ a switch or circuit breaker as the disconnecting device for the equipment.
The switch on circuit breaker shall be located in close proximity to the equipment and with in easy
reach of the operator and shall be marked as the disconnect device.
• Electrical installation must be in accordance with the National Electrical Code and/or any other
applicable national or local codes.
• Safety and performance require that this instrument be connected and properly grounded through a
three-wire power source.
• PROCESS UPSETS: Because process and safety conditions may depend on consistent operation of
this instrument, provide appropriate means to maintain operation during sensor cleaning,
replacement, or sensor or instrument calibration.
• Ozone gas (O
3
) is generated inside the 5000TOC Sensor enclosure during normal operation. The
smell of ozone may be apparent when opening the front cover of the enclosure and caution should be
taken when opening. Prolonged exposure to ozone gas is hazardous and may cause health
problems.
This manual includes safety information with the following designations and formats:
WARNING: POTENTIAL FOR PERSONAL INJURY.
CAUTION: possible instrument damage or malfunction.
NOTE: important operating information
Definition of Equipment Symbols
On the instrument indicates: Caution, risk of electric shock
On the instrument indicates: Caution (refer to accompanying documents)
~ On the instrument indicates: There is alternating current present.


TABLE OF CONTENTS
1. INTRODUCTION ....................................................................................................... 1
2. INSTALLATION......................................................................................................... 1
UNPACKING.............................................................................................................. 1
INSTRUMENT DESCRIPTION.................................................................................. 2
INSTRUMENT INSTALLATION................................................................................. 2
SAMPLE TUBING CONNECTIONS .......................................................................... 2
AC POWER CONNECTION ...................................................................................... 4
SMART SENSOR CONNECTION ............................................................................. 4
SENSOR DETAILS.................................................................................................... 4
3. TOC FUNCTIONS ..................................................................................................... 5
770MAX TOC MENUS............................................................................................... 5
LAMP TIME/LAMP RESET/LAMP LIMIT ................................................................... 6
AUTO START ............................................................................................................ 7
RINSE TIME .............................................................................................................. 7
AUTOBALANCE/AUTOBALANCE TIME/ AUTOBALANCE LIMIT ............................ 7
SENSOR KEY LOCK................................................................................................. 7
SET FLOW RATE...................................................................................................... 8
4. OPERATION.............................................................................................................. 8
INITIAL START-UP.................................................................................................... 8
SETTING SAMPLE FLOW RATE.............................................................................. 8
START TOC MEASUREMENT.................................................................................. 9
NORMAL OPERATION ............................................................................................. 9
5. CALIBRATION ........................................................................................................ 10
FLOW CALIBRATION.............................................................................................. 10
TEMPERATURE CALIBRATION............................................................................. 11
CONDUCTIVITY CALIBRATION ............................................................................. 11
TOC CALIBRATION ................................................................................................ 11
6. SERVICE AND MAINTENANCE............................................................................. 12
UV LAMP REPLACEMENT ..................................................................................... 12
40 MICRON FILTER REPLACEMENT .................................................................... 13
INTERNAL TUBING REPLACEMENT..................................................................... 14
FRONT PANEL CLEANING..................................................................................... 14
TROUBLESHOOTING CHECKLIST........................................................................ 14
ERRORS & FAULTS ............................................................................................... 14
7. SPECIFICATIONS................................................................................................... 16
8. ACCESSORIES AND REPLACEMENT PARTS..................................................... 17
5000TOC SENSOR ACCESSORIES ...................................................................... 17
5000TOC SENSOR REPLACEMENT PARTS......................................................... 17
5000TOC SENSOR CONSUMABLES..................................................................... 17
9. RATINGS................................................................................................................. 18
CE DECLARATION ................................................................................................. 18
UL LISTING (Approval pending) .............................................................................. 18
10. WARRANTY............................................................................................................ 19
RETURNED GOODS:.............................................................................................. 19


1
1. INTRODUCTION
The 5000TOC Sensor is an addition to the Smart family of sensors available for use with the 770MAX
Multiparameter Analyzer/Transmitter. This manual covers the routine operation of the 5000TOC sensor
and also includes instructions for using the functions in the 770MAX instrument that are specific to the
5000TOC Sensor.
The 5000TOC Sensor and 770MAX instrument provide continuous, accurate and repeatable total organic
carbon measurement of pure and ultrapure water. Operation of this equipment should be in accordance
with its intended use only and should adhere to the installation and operational guidelines described in
this manual.
Please refer to the 770MAX Multiparameter Analyzer/Transmitter Manual, Part No. 84372, for detailed
instructions of instrument functions beyond those specific to the 5000TOC sensor.
NOTE: The 5000TOC Sensor is used with 770MAX instruments operating on software version 4.0
or higher. You may upgrade a 770MAX instrument to operate with the 5000TOC Sensor if the
instrument is currently operating on software version 3.0 or higher. Contact Mettler-Toledo
Thornton, Inc. Technical Service for details.
The 5000TOC Sensor has more functions than most 770MAX Smart sensors, requiring more extensive
interface between instrument and sensor. A maximum of two 5000TOC Sensors can be installed on one
770MAX instrument, in any of the four smart input channels. A single 770MAX patch cable is used to
interface each sensor with the instrument. The remaining channels may be used for other Smart
Sensors.
2. INSTALLATION
UNPACKING
Carefully unpack the 5000TOC sensor. The box should contain the following items:
• 5000TOC Sensor
• 5000TOC Sensor Instruction Manual
• 5000TOC Start-up Sheet
• Certificate of Calibration
• Installation Kit includes:
One - 6 foot (2m) length of PTFE tubing, 0.125 inch O.D., with compression type tube ferrule attached at
one end
Two - 5 foot (1.5m) lengths of Polyurethane tubing, 0.25 inch O.D. with no fittings attached
One - Plastic 30cc Syringe
One - Tool, 5000TOC cover
One - Pressure regulator, 316 SS with integral 40 micron filter

2
INSTRUMENT DESCRIPTION
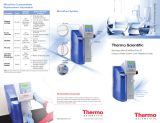
Shown below (FIGURE 1) are the case dimensions for the 5000TOC Sensor.
RMTTELE OLOTDE
Senso r Statu s
UV Lamp ON
lO
Error
Faul t
770MAX
CONN ECT ION
DO NOT
OPEN WHEN
UV L AMP
IS O N
UV LA MP
REPLACEMENT COVER
SAMPLE
INLET
SAMPLE
OUTLET
Mettler-Toledo Thornton
THORNTON 5000TOC
100 PSI MAX PRESSURE
DRAIN BEFORE SHIPPING
AC
POWER
HIGH VOLTAGE
DISCO NN ECT
POW ER FOR
SERVICING
FIGURE 1
INSTRUMENT INSTALLATION
Mount the 5000TOC Sensor as close to the sample point of your system as possible. Shorter sample
tubing length between the sampling point and the 5000TOC Sensor will reduce response time. As
shown in Figure 1, the 5000TOC Sensor is supplied with wall-mounting tabs for wall or panel mount. The
5000TOC sensor can be mounted to a pipe using a pipe-mount accessory (See Section 8: Accessories
and Replacement parts.).
Please note when pipe mounting this sensor there is risk of sensor damage due to sudden shock or
excessive vibration. Be sure the pipe is securely fastened.
The 5000TOC Sensor can also be placed on a bench-top or table. In this type of installation, the
mounting tabs must be removed from the bottom of the sensor enclosure in order for the sensor to stand
on its own. The bottom safety drain fitting will need to be removed as well for bench top installation,
leaving the small opening in the bottom of the enclosure open.
Sensor internals include components made of fragile materials; therefore precautions should be taken to
avoid damage due to improper handling. The 5000TOC Sensor requires routine maintenance; therefore
it is beneficial to mount the sensor in an easily accessible location.
SAMPLE TUBING CONNECTIONS
The installation kit provided with the sensor includes sample tubing consisting of two 5-foot (1.5 m)
lengths of 0.25 inch O.D. Polyurethane tubing and one 6-foot (2 m) length of PTFE
(polytetrafluoroethylene) tubing with a tube ferrule fitting attached to one end.
The following items are necessary to insure the proper installation of the sensor:
• Sample isolation valve (not provided with sensor).
• 0.125 inch compression tube fitting for sample point (common tube fitting adapters are available from
Thornton, see Accessories in section 8).

3
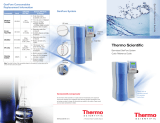
NOTE: The sample point should contain a shut-off valve to isolate the sensor when necessary. Proper
installation guidelines should be followed when installing this valve to reduce the possibility of air
entrapment or sediment in the sample line.
RMTTELE
THORNTON
OLOTDE
Sensor S tatus
UV Lamp ON
lO
5000TOC
Error
Fault
PRO C ESS PIPE
SA M P LE
DRAIN
ISOLATION
VALVE
30°-60°
PRO C ESS
PI PE
CROSS-SECTION
REC O M M END ED
SA F ETY
DRAIN
ATMOSPHERIC
DRAIN
6 TO 36 IN.
[15 TO 90c m]
FIGURE 2
• Remove the protective covers from the sample connections on the sensor.
• Attached the open tube end of the PTFE tubing to the sample isolation valve. Cut excess tubing to
minimize sample tubing length. Be sure all fittings are properly fastened to avoid leaks and the
possibility of air ingress.
Flush the sample inlet tubing to remove any particles that may be in the line or fittings before
connecting it to the 5000TOC Sensor, or prior to initial sensor startup.
• Locate the Pressure Regulator with integral 40 micron filter, provided in the sensor installation kit.
The male-threaded end of the regulator is screwed into the female-threaded sample inlet fitting.
Secure with a wrench to insure the connection is tight, making sure the knob on the regulator is facing
outward towards the front of the enclosure so that the adjustment knob is accessible. Do not over
tighten.
• Connect the ferruled end of the 0.125 inch PTFE tubing to the pressure regulator, by screwing the
male-threaded fitting end into the female-threaded connection of the 40 micron filter. The pressure
regulator is pre-assembled to the 40 micron filter at the factory; therefore the pressure regulator can
only be assembled in the one direction.
• Connect the length of Polyurethane tubing containing the hose barb connector to the Sample Outlet
fitting. The fitting is attached to the tube; therefore thread the fitting into the fitting on the sensor.
• Run tube to atmospheric drain located close to the sensor. See figure 2, for dimensional detail of
drain location. Take note of the 6 to 36” drain requirement.
Important! Polyurethane sample outlet tubing must be fed to a nearby standpipe or drain sump to
create an air gap and prevent siphoning. Installation must adhere to the dimensions shown in
Figure 2 for proper sensor operation.
• Connect second length of Polyurethane tubing to the safety drain (if provided) located on the bottom
of enclosure.
• Run tube to atmospheric drain located close to the sensor. See Figure 2, for dimensional detail of
drain location.
• Once all tubing connections are complete and the sample inlet tubing has been flushed to drain,
sample water can be introduced to the sensor. Slowly open the isolation valve at the sample point
until flow is observed at the sample outlet drain. Adjustment of the inlet pressure regulator may be

4
required in order to achieve flow. This is accomplished by turning the locking ring counterclockwise
and then turning the adjustment knob clockwise to increase flow. At this point, actual flow rate is not
critical as this is only a rinse step. Recommended initial rinse time is 4 to 24 hours, however time
may be decreased based on sample point conditions. For more details on pressure regulator
operation see Section 4. Shut off the sample flow to the sensor and connect AC power to the
5000TOC Sensor.
AC POWER CONNECTION
As shown in the left side view of Figure 1, there is a bulkhead cable gland located on the left-hand side of
the sensor enclosure labeled ‘AC POWER’ to allow for the passage of the AC power cable (not provided
with sensor). If the installation demands hard conduit installation for AC power, this fitting may be
removed and the hole used to terminate a conduit fitting.
NOTE: Use watertight fitting and hub that comply with the requirements of UL514B. Connect the conduit
hub to the conduit before attaching the fitting to the analyzer (UL508-263.16). The opening accepts a 3/8”
NPT conduit fitting with nut.
The terminal connections for AC power are located on the printed circuit board mounted to the front cover
of the sensor, as shown in Figure 3. Keep AC power separated from all other internal wiring. Use the
fasteners provided to secure the power wires. Be sure there is enough excess to avoid putting
mechanical stress on the wiring when the front door is fully opened. The diagram below shows the
terminal connections for AC power. Be sure the line fuse is properly installed when making electrical
connections. A spare fuse kit is available from Thornton. See Section 8 for ordering information.
EARTH GROUND
NEUTRAL
LINE
AC
LINE
IN
LINE FUSE
FIGURE 3
SMART SENSOR CONNECTION
Also located on the left-hand side of the sensor enclosure (refer to Figure 1) is the 770MAX smart sensor
connector, labeled ‘770MAX Connection’. The standard 770MAX patch cable attaches directly to this
connector. Align the keys of the two connectors and twist the locking nut to secure the patch cable.
Once both electrical connections are secured, the sample shut-off valve can be opened and the sensor
flushed with sample water.
Section 3 of this manual defines the TOC functions available when using the 5000TOC Sensor in
conjunction with the 770MAX instrument. Read carefully prior to operating the 5000TOC Sensor.
SENSOR DETAILS
The 5000TOC Sensor is designed with four local LED indicators and a UV Lamp control key on the front
panel, as shown in Figure 4. The LEDs are designed to provide local indication of sensor status. The
operation of the LEDs is synchronized with the 770MAX display status messages that appear in the 6-
digit measurement name location.

5
LED Indicators:
FUNCTION COLOR OPERATION
FAULT RED Flashes during Fault condition, sensor operation stopped
ERROR AMBER (Orange)
Illuminates during Error condition, sensor remains
operational
SENSOR
STATUS
GREEN
Illuminates whenever AC Power is on and 770MAX patch
cable is connected to the sensor
UV LAMP ON GREEN Illuminates whenever the UV Lamp is on
The UV Lamp control key is designed to provide a local On/Off control for the UV lamp to allow for quick
lamp change-out and assist the operator during troubleshooting, if necessary.
NOTE: If the UV Lamp Key is pressed to turn the UV Lamp off, the UV Lamp cannot be turned on
from the 770MAX, it can only be turned on by pressing the sensor key again.
RMTTELE
THORNTON
O
L
O
TDE
Sensor Status
UV Lamp ON
lO
5000TOC
Error
Fault
FIGURE 4. 5000TOC Front Panel
The front cover of the sensor is hinged on the left side. Located at the top and bottom right corners of the
sensor enclosure are two triangle-shaped door fasteners. The installation kit provided with the sensor
includes the special tool needed to loosen these fasteners and open the front door to the enclosure.
Periodic access will be required to perform routine service and maintenance. Additional front cover tools
are available from Thornton. See Section 8 for ordering information.
3. TOC Functions
The 5000TOC Sensor is part of the 770MAX family of Smart sensors. The 770MAX will automatically
identify the 5000TOC Sensor when it is connected to the 770MAX and all cell constants and factory
calibration data are automatically read and stored. The 770MAX will also provide TOC specific menus for
the channel connected to the 5000TOC Sensor. Section 3.1 shows these menus and provides the data
entry options for each menu item.
The 5000TOC Sensor is configured with factory default settings to minimize measurement setup time.
These default settings allow for sensor operation with minimal keystrokes. The 5000TOC Sensor is more
complex than other Smart sensors and may require a higher level of operational setup. Once these
parameters are set, the TOC sensor will function automatically, similar to other Smart sensors, and will
require user interface only for periodic service and maintenance. Measurements available from the
5000TOC Sensor include TOC, Conductivity/Resistivity (compensated and uncompensated) and
Temperature. Refer to the 770MAX manual for instructions of how to configure the display and use these
measurements for other control functions available with the 770MAX instrument.
770MAX TOC MENUS
The menu tree shown below appears in the Measurements menu of the 770MAX when the 5000TOC
Sensor is connected to one of the four 770MAX Smart channels. The information shown inside the menu
blocks reflects the factory default values when a new sensor is connected to the 770MAX. To the right of

6
Sensor Input: Channel
attached to measurement
Units: Options are TOC
(ppb, ppm, ppt), gC/L
(m, µ, ŋ)
Name: 6-digit user name
Multiplier/Adder: TOC
calibration constant
Averaging: None, Low,
Medium, High, Special
AutoBal in: time before next
Autobalance
AutoBal Hold: yes/no, option to hold
the last measurment during an Auto-
balance
AutoBal Now: yes/no, allows an auto-
balance immediately upon selecting
Lamp Time: Time remaining on
UV lamp
Lamp Reset: user entered date
of last UV Lamp change
Lamp Limit: User selectable
from 400 to 9999 hours
Auto Start: yes/no, allows sensor to
automatically start when power is
restored to 5000TOC Sensor.
Rinse Time: selectable from 0 to
999 minutes
AutoBal: yes/no, option for balancing
both conductivity sensors before
starting a TOC measurement
AutoBal time: selectable from 24 to
4000 hours
AutoBal limit: selectable from 0-20%
Sensor Key Lock: yes/no, allows
the user to disable the key on the
5000TOC Sensor.
Set Flow Rate: yes/no, allows the
user to adjust the flow rate through
the sensor when yes is selected.
Must be turned back to no once
completed.
the menu blocks is the definition of each menu item and the user options available. Menu items shown
in bold are user configurable. It is important to be familiar with the TOC menus prior to operating the
5000TOC sensor.
Main Menu
Select a menu using
↑↓ then press enter
Go to Measurements
MEASUREMENT: A ↑
Sensor Input: Chan 1
Units: gC/L Auto
Name: none ↓
TOC Setup: Ch 1 ↑
Lamp Remain: 4000 hr
Lamp Reset: 12/12/04
Lamp Limit: 4000 hr ↓
MEASUREMENT: A ↑
Multiplier1 1.23456
Adder1 0.56789
Averaging: High ↓
TOC Setup: Ch 1 ↑
Auto Start: no
Rinse time: 015 min ↓
MEASUREMENT: A ↑
Reading: 1.2345 gC/L
5803600X S=00342391
Cal Date: 12/12/04
TOC Setup: Ch 1 ↑
AutoBal in 4000 hr
Autobal hold: yes
AutoBal now: no ↓
TOC Setup: Ch 1 ↑
Sensor Key lock: no
Set Flow rate: no
LAMP TIME/LAMP RESET/LAMP LIMIT
The UV lamp in the 5000TOC Sensor is rated for 4000 hours of normal usage. The 770MAX will display
an error message when the lamp operating time has exceeded the lamp limit. The user can reset the
Lamp Limit from 400 to 9999 hours. It is the user’s responsibility to assure by calibration or other means
that the lamp is outputting sufficient UV light for the sensor to make accurate TOC measurements.
To set the Lamp Limit or reset the lamp installation date, enter the Measurement menu for the
measurement displaying the TOC value. Press Page Down until “Press 5 for TOC menu” is displayed.
Press 5 and then Page Down until the lamp parameters are displayed. The Lamp Remain value is the
number of hours remaining before the Lamp Limit has been exceeded. This value cannot be directly
changed. When a new lamp is installed, the date should be entered using the keypad into the Lamp
Reset value. Press Enter after the new date is entered. The Lamp Remain time will be reset to the Lamp
Limit value. The Lamp Limit is changed by directly entering a value for 400 to 9999 hours. When the
lamp operating time is exceeded, an Error message will be displayed.
MEASUREMENT: A ↑
Resolution: 0.001
Press 5 for TOC menu
UV Lamp: On/Off ↓
TOC Setup: Ch 1 ↑
AutoBal: yes
AutoBal Time: 4000 hr
AutoBal limit: 7% ↓
NOTE: All of the setup parameters described in this section are located within the
MEASUREMENTS menu of the 770MAX. Once in the ‘Measurements’ screen, press page-down
twice to arrive at the TOC Setup prompt screen. The menu will prompt you to ‘Press 5’ to enter
the specific TOC Setup menus. The factory default values are as shown.
Press Enter to move the cursor from one field to another. Press the up or down arrow to change
the “yes/no” or enter numbers using the keypad.
5
Resolution: measurement
display resolution (Auto, 1,
0.1, 0.01, 0.001)
UV Lamp: On/Off. For
initial start-up, sensor key
must be pressed.
Reading: shows current
TOC measurement
TOC Sensor Part # and
Serial #
Cal Date: date of last
calibration

7
AUTO START
Auto Start is a feature that allows the 5000TOC Sensor to automatically start making TOC measurements
when it is connected to a 770MAX or when the 770MAX restarts after a power failure. The factory default
setting for the Auto Start function is ‘No’. Therefore during initial start-up, the 770MAX will identify the
sensor as a 5000TOC Sensor, yet will not start a TOC measurement. To start a TOC measurement the
user must go to the ‘UV Lamp: On/Off’ screen and set this mode to ‘On’ to turn the UV lamp on and start
a TOC measurement. The user may also push the UV lamp button at the sensor to start a measurement.
Once the ‘Auto Start’ mode is set to ‘Yes’, it is no longer necessary to turn the ‘UV Lamp’ option to ‘On’ as
the ‘Auto Start’ function will override the Measure TOC function.
To enable Auto Start, enter the measurement menu for the measurement displaying the TOC value.
Press Page Down until “Press 5 for TOC menu” is displayed. Press 5 and then press Page Down until
the Auto Start function is displayed. Select ‘Yes’ if you want to enable the Auto Start feature. Select ‘No’
to disable this feature. In the event that direct human intervention is desired to re-start measurements,
this feature should be set to ‘No’.
RINSE TIME
The Rinse Time is the time at start up (initial connection to a 770MAX, 770MAX system reset or 770MAX
power reset) that the sensor will have sample water flowing through it before making TOC measurements.
The Rinse Time can be set from 1 to 999 minutes. To set the Rinse Time, enter the measurement menu
for the measurement displaying the TOC value. Press Page Down until “Press 5 for TOC menu” is
displayed. Press 5 and then press Page Down until the Rinse Time is displayed. Using the 770MAX
keypad, enter the Rinse Time desired and press Enter.
AUTOBALANCE/AUTOBALANCE TIME/ AUTOBALANCE LIMIT
The 5000TOC Sensor is capable of automatically balancing the two conductivity sensors. This step is
performed to account for small differences in conductivity measurement between the two conductivity
sensors. This step is performed at the factory prior to shipment of a new sensor and is performed during
sensor startup. If power to the sensor is interrupted and restored, or if the patch cable is disconnected
and then re-connected, an Autobalance will occur if the Autobalance function is enabled. The user also
has the ability to set or change settings for the following functions associated with Autobalance:
• Enable (yes) or disable (no) Autobalance feature
• Set a time interval (AutoBal Time) for the Autobalance to occur automatically
• Set the tolerance (AutoBal Limit) for balancing the sensors (limit in %)
• View the time remaining until the next Autobalance (AutoBal in xxxx.x hr)
• Set a hold ‘current measurement’ so the analog outputs and relays are held in their current state
while an Autobalance occurs (AutoBal Hold)
• Perform an immediate Autobalance (AutoBal Now)
To set the Autobalance parameters, enter the measurement menu for the measurement displaying the
TOC value. Press Page Down until “Press 5 for TOC menu” is displayed. Press 5 and then press Page
Down until the Autobalance features are displayed. There are 2 screens of Autobalance features. In the
first screen, you can enable or disable the Autobalance feature (default is yes). You can select the time
interval for the Autobalance. It is selectable from 24 to 4000 hours (factory default is 4000 hours). You
can set the Autobalance limit. This is the percentage difference allowed between the two conductivity cell
readings during an Autobalance cycle when the lamp is off. Under normal operating conditions, there is
no need to reset the AutoBal Limit or AutoBal Time.
Press Page Down to access the next screen of Autobalance features. You can directly view the time
remaining until the next Autobalance. This time cannot be directly changed. You can select whether to
hold the outputs during the Autobalance cycle. You can also elect to do an Autobalance immediately by
selecting ‘Yes’ for the AutoBal Now function.
SENSOR KEY LOCK
The Sensor Key Lock menu is located below the Autobalance menus. You can set the Sensor Key Lock
to ‘Yes’ or ‘No’. The default is ‘No’. To de-activate the Keypad at the Sensor, change this to ‘Yes’. This

8
function can be used to avoid inadvertently turning the UV lamp off at the sensor under normal operating
condition.
SET FLOW RATE
The capability to set the flow rate is located in the final TOC screen. When Set Flow Rate is set to ‘Yes’,
the sensor LED lights act as flow indicators during the flow adjustment process. See Section 4, for details
on how and when to perform a flow adjustment. Once the flow is adjusted to the proper level, the user
must change the Set Flow Rate: ‘Yes’ back to ‘No’ to confirm the flow rate is properly set.
4. OPERATION
There are two basic operational circumstances for the 5000TOC Sensor and 770MAX system. Both
scenarios are described below. The first of which is called the ‘Initial Start-up’ condition and the second is
called the ‘Normal Operation’ condition.
INITIAL START-UP
Initial start-up refers to the condition where a 5000TOC Sensor is installed and setup for the first time. As
shown in Section 3, factory default settings for a 5000TOC Sensor are designed to minimize setup time
for this sensor and allow the sensor to measure automatically. However, during initial start-up it is
desirable to first set the flow rate through the sensor. This is performed to insure the flow is optimized
through the sensor and to avoid a potential flow rate alarm condition. Once the sensor is installed and
sample water flowing through the sensor, and the 770MAX patch cable is connected, follow these steps
to insure the sensor operates at the specified sample flow rate.
SETTING SAMPLE FLOW RATE
The 5000TOC Sensor is designed to operate optimally at a flow rate of 20 mL/min. The flow rate was set
during the factory calibration to this value. However, since the flow rate may depend on the sample line
plumbing and input pressure, it is advisable to reset the flow rate at installation and to check it
periodically. It is also possible to calibrate the flow sensor device, refer to Section 5, Flow Calibration. To
set the flow rate, enter the measurement menu for the measurement displaying the TOC value. Press
Page Down until “Press 5 for TOC menu” is displayed. Press 5 and then Page Down until the Set Flow
Rate menu is displayed . Change the ‘No’ to ‘Yes’ to immediately initiate the ‘set flow rate’ mode at the
sensor. It will stay in this mode until the ‘Yes’ is changed back to ‘No’.
In this mode, the sensor LED lights on the front cover act as a bar-graph type indicator as described
below. The flow rate is set by adjusting the pressure regulator installed on the sample inlet connection of
the 5000TOC Sensor (see Figure 5). There is a small adjustment knob in the center of the regulator and
a larger locking ring below it. Turn the locking ring counterclockwise to unlock the adjustment knob.
Turning the small adjustment knob clockwise will increase the flow rate while turning it counterclockwise
will decrease the flow rate. Initially, start adjustment with the regulator knob turned counterclockwise until
there is no flow observed. Caution should be taken not to thread the knob out if the regulator body. Once
this is completed, begin turning the adjustment knob clockwise slowly to gradually increase flow.
Ol
FIGURE 5. Pressure Regulator Location
The flow rate value is indicated by the four LEDs on the front of the 5000TOC Sensor. When the flow
rate is set to 20 mL/min (±5%), all four LEDs will be on as shown in the table below. If the flow rate is too

9
high, only the top LEDs will be on (turn the adjustment knob counterclockwise). If the flow rate is too low,
the bottom LEDs will be on (turn the adjustment knob clockwise). If the flow rate is far from 20 mL/min,
only the top (Fault) LED or the bottom (UV Lamp) LED will be on. As the flow rate approaches the correct
value more LEDs will turn on. Turning on 3 or 4 LEDs is acceptable. Refer to the table below.
LOW LOW LOW NEAR SET SET NEAR SET HIGH HIGH HIGH
{ { {
z z z z
{ {
z z z z
{
{
z z z z
{ {
z z z z
{ { {
{
= not illuminated
z = illuminated
When the flow rate is set correctly (3 or 4 LEDs on), turn the locking ring on the pressure regulator
clockwise to lock the adjustment knob in place, being careful not to move the adjusting knob. Return the
Set Flow Rate option to ‘No’ in order to leave this mode and this menu. The flow rate setting operation is
now complete.
START TOC MEASUREMENT
Now that the flow rate is set, the operator can return from the TOC menus in order to start the TOC
measurement process. The factory default for Auto Start is No. It is for this reason that the UV Lamp did
not automatically turn on. Return to the menu option to turn the UV Lamp on. Change the factory default
from ‘No’ to ‘Yes’. At this point, the 770MAX display will display the following message: ‘Press the switch
on Sensor # _ to turn UV Lamp on, or press enter to continue’. The number displayed in this message is
the channel associated to the 5000TOC Sensor. If more than one TOC sensor is installed, the user can
change the number to whichever sensor they wish to control. No more than 2 TOC sensors can be
installed on one 770MAX meter.
At this time, the Key on the sensor must be pressed before the UV Lamp will turn on and a TOC
measurement will begin. This process is designed for safety, to insure that an operator is not working
inside the sensor when someone at the 770MAX instrument is trying to turn on the UV Lamp.
During the setup of the TOC sensor, if the Auto Start function in the TOC setup menus is changed from
‘No’ to ‘Yes’, the 770MAX would still have prompted the operator to press the key at the sensor during
this initial start-up. However after this startup, the Auto Start function takes priority and the sensor would
automatically start.
NORMAL OPERATION
Under normal operating conditions, the 5000TOC Sensor is continuously relaying information to and from
the 770MAX. The 770MAX display also acts as a status indicator for the sensor. If the display screen is
set to display a measurement from the 5000TOC Sensor, under normal operating conditions the display
will show the measurement letter, name and value, same as all other sensor measurements. If the
5000TOC Sensor is in any mode other than measurement mode, such as Rinsing, Auto balance, Error or
Fault, then this status is displayed by flashing alternately within the six-character block used for the
measurement name.
The 770MAX six-character TOC status indicators are as follows:
UV OFF Flashes alternately with measurement name when UV lamp is turned off.
RINSE Flashes alternately with the measurement name when sensor is in Rinse mode.
AUTBAL Flashes alternately with the measurement name when sensor is in the Autobalance mode.
ERROR Flashes alternately with measurement name when an Error exists with the TOC sensor.
FAULT Continuously displayed in place of measurement name when Fault condition exists.

10
If an ERROR or FAULT condition is displayed on the measurement screen, the user can go to the
Messages screen to retrieve more information regarding the cause of the condition. Refer to Section 6.4
of this manual for more information. If the Auto-balance function is set to “yes”, the 5000TOC sensor will
perform an auto-balance based on the interval set within the 770MAX TOC sensor setup menus.
5. CALIBRATION
If a complete calibration is needed, the normal order of parameters to calibrate is flow rate, temperature,
conductivity, and TOC.
FLOW CALIBRATION
Periodically it may be necessary to calibrate the sample flow rate through the 5000TOC Sensor.
Changes that may affect the flow calibration of the sensor include dramatic process condition changes at
the sample point, a change to the sensor’s physical location or to the sensor sample tubing. All of these
can sometimes alter flow characteristics and affect flow measurement.
In the Calibrate/Sensor menu of the 770MAX, the user can calibrate the flow measurement from the
5000TOC Sensor (refer to the 770MAX instruction manual for keystroke instructions and further details).
The options for the type of calibration are a one-point or two-point calibration. A two-point calibration will
provide the best results. Ideally, the two calibration points should be approximately 15 mL/min and
25 mL/min. Calibrating the flow sensor of the 5000TOC Sensor requires equipment such as a graduated
cylinder or beaker and a stopwatch or other timing instrument. Alternatively, using a balance to weigh the
volume collected will provide a more accurate measurement and precise calibration.
When ready to perform a calibration, use the sample outlet tubing to capture a specific volume into the
beaker or graduated cylinder and note the amount of time taken to reach that volume. Convert the
volume and time into units of mL/min. It is important that the user is careful not to drastically change the
relative position of the Sample Outlet tubing when capturing flow samples for calibration, as this will
cause some variation in calibration.
To perform a flow calibration, select the Calibrate menu in the 770MAX instrument menus (reference the
calibration procedure in the 770MAX instrument operation manual, p/n 84372).
• Select Sensor calibration. The menu will allow the user to enter a hold time, which holds the current
output to avoid triggering alarm setpoints during the calibration process. If left at ‘00’ there is no hold
function in effect.
• Press Page Down and select the measurement letter corresponding to the sensor being calibrated, in
this case the letter associated to the TOC sensor.
• On the same screen select either one- or two- point calibration.
• On the same screen select the parameter to calibrate. The options are TOC, gC/L, C1, C2, T1, T2
and Flow. Select Flow.
• Press Page Down. The display shows the current reading for the flow rate. At this point, measure
the actual flow rate from the Sample Outlet using a graduated cylinder/beaker and stopwatch.
• Adjust flow accordingly, until the desired flow rate is attained, i.e., ~25 mL/min ±5%.
• Enter the actual flow rate.
• Press Page Down to perform the calibration of point 1.
• If doing a 2-point calibration, adjust the flow rate to the second value, i.e., ~15 mL/min ± 5%.
• Enter the actual flow rate.
• Press Page Down to perform the calibration of point 2.
• The display will show the measured value before and after calibration.
• Enter calibration date. Press page down.
• Save changes to accept calibration.
• Exit menus.

11
TEMPERATURE CALIBRATION
A one-point calibration is used for the temperature sensors (that are contained within the conductivity
sensors). Refer to the 770MAX instrument manual 84372 for instructions to perform a temperature
calibration using the 770MAX.
The principal methodology to calibrate the two temperature sensors is to turn off the TOC lamp and flush
water through the TOC unit and also flush water into a reference sensor that is in parallel with the TOC
system. The water should be near ambient temperature to minimize the ambient cooling of the water as it
flows through piping. This helps to insure that the water at the reference sensor and the water at the
sensor under test (SUT) are at the same temperature. Maintaining a high flow rate also helps to reduce
the ambient cooling/heating effects.
Thornton provides the service and/or the equipment to perform such a test (excluding the plumbing
hardware to tee off of the sample line to the TOC sensor). Thornton’s 1885 770MAX Calibration Kit
includes the necessary equipment. The kit includes a flow chamber and calibrated, traceable 2-electrode
conductivity sensor, along with a calibrated, traceable 770MAX instrument. Consult Thornton Technical
Service for assistance.
The sequence of steps to perform the calibration of C1 or C2 is identical to the Flow calibration with the
following exceptions.
• Select T1 or T2 accordingly.
• Select 1-point calibration.
• Use an appropriate temperature reference as described above.
CONDUCTIVITY CALIBRATION
A one-point calibration is used for 2-electrode resistivity or conductivity sensors such as those used in the
5000TOC Sensor. Refer to the 770MAX instrument manual 84372 for instructions to perform a
conductivity calibration using the 770MAX.
The principal methodology to calibrate the two conductivity sensors is to turn off the TOC lamp and flush
high purity process water through the TOC unit and also flush water into a reference sensor that is in
parallel with the TOC system. The water should be near ambient temperature to minimize the ambient
cooling of the water as it flows through piping. This helps to insure that the water at the reference sensor
and the water at the sensor under test (SUT) are at the same conductivity. Maintaining a high flow rate
also helps to reduce any impact of CO
2
altering the conductivity measurement.
NOTE: It is not desirable to calibrate the sensors inside the 5000TOC Sensor with a conductivity
reference standard solution. The conductivity of standard solutions is very high in comparison to the
normal operating range of the conductivity sensors within the TOC sensor. Therefore, this type of
calibration is not recommended.
Thornton provides the service and/or the equipment to perform such a test (excluding the plumbing
hardware to tee off of the sample line to the TOC sensor). Thornton’s 1885 770MAX Calibration Kit
includes the necessary equipment. The kit includes a flow chamber and calibrated, traceable 2-electrode
conductivity sensor, along with a calibrated, traceable 770MAX instrument. Consult Thornton Technical
Service for assistance.
The sequence of steps to perform the calibration of C1 or C2 is identical to the Flow calibration with the
following exceptions.
• Select C1 or C2 accordingly.
• Select 1-point calibration.
• Use an appropriate reference conductivity standard as described above.
TOC CALIBRATION
A 1-point and a 2-point TOC calibration are available when using the 5000TOC Sensor with the 770MAX
instrument. Refer to the 770MAX instrument manual 84372 for key-stroke instructions to perform
calibrations using the 770MAX.

12
For field TOC calibration, a 1–point calibration is recommended at mid-range for the sensor, or a 500 ppb
Sucrose solution, prepared using a traceable reference standard. As the 5000TOC Sensor is a flow
through device that operates using sample line feed pressure to move the sample through the device,
auxiliary equipment is required to introduce the reference solution. Solution volume should be 200 mL
minimum. Thornton can provide the service and/or additional equipment needed to perform this
calibration. The System Suitability Kit 58091525 provides the necessary equipment capable of
introducing a standard solution. Contact Thornton for details regarding calibration standard solutions.
Low-level TOC calibrations (<100 ppb) are not recommended for on-site field calibrations as it is typically
not practical to inject low concentrations of organics and achieve acceptable results as this requires
sophisticated equipment and very controlled test conditions. However, a second method for verification
and calibration with the use of a separate calibrated TOC instrument is an acceptable option. If a
separate calibrated, traceable, TOC instrument is available, a side-by-side comparison and verification
can be performed and the 5000TOC Sensor can be calibrated against this device using a one-point
calibration. This second instrument needs to be plumbed into the same sample line as the sensor and
care taken to insure there are no loose fittings or wide variations in sample inlet tubing lengths to each
instrument. These factors are likely to cause erroneous readings.
The sequence of steps to perform the calibration of TOC is identical to the Flow calibration with the
following exceptions.
• Select TOC or gC/L accordingly.
• Select 1-point or 2-point calibration. 1-point Calibration is recommended for most applications.
• Use an appropriate reference TOC standard as described above.
• When performing a 1-point calibration, the user has the option to adjust the Slope or the Offset in the
calibration factors. Select Slope for most 1-point calibrations. Select Offset only for very low TOC
applications, typically <5-10 ppb.
• In all calibrations, the new Slope or Offset is automatically determined.
• Like any other calibration, when performing a 2-point calibration, make sure to use two TOC solutions
that differ significantly in TOC.
6. SERVICE AND MAINTENANCE
The 5000TOC Sensor is designed to minimize service and maintenance. There are no moving
mechanical components, therefore normal operating wear and tear is negligible. This reduces the
amount of consumable components as well as the amount of time needed to maintain the sensor. Listed
below are instructions on how to perform simple periodic maintenance, which includes UV Lamp change
(every 4000 hours of operation), filter replacement (typically every 12-18 months), internal tubing
replacement (typically every 3-5 years), and general cleaning. It is recommended to re-calibrate flow
during periodic maintenance to insure proper flow through the sensor.
UV LAMP REPLACEMENT
Thornton recommends after every 4000 hours of operation, the UV lamp inside the 5000TOC Sensor is
replaced. This is a simple procedure that requires only a few minutes to complete. The following steps
explain the proper procedure for the UV lamp change-out. Refer to Figure 6.
NOTE: Use of a UV lamp other than those provided by Thornton specifically for use with the
5000TOC Sensor will affect performance and void the warranty of this product.
Step 1 – At the sensor, turn off UV lamp (UV lamp ON LED will turn off). If the LED does not turn off,
check that the Sensor Key Lock is off in the 770MAX. Refer to Section 3 Sensor Key Lock function in this
manual.
Step 2 – Once power to the UV lamp is off, open the front cover of the sensor enclosure with the front
cover tool.
Step 3 – Remove the side cover labeled ‘UV LAMP REPLACEMENT COVER’ on the left side of the
sensor enclosure. Use a flat-head screwdriver and turn the cover counterclockwise to loosen and
unscrew the cover.

13
Step 4 – Disconnect the power cable to the UV lamp. This connector is located on the backside of the
front cover, above the circuit board.
Step 5 – Slide the cable of the UV lamp through the side opening of the enclosure and gently slide the UV
lamp out of the oxidation chamber assembly (black cylinder). Be careful not to let the UV lamp hit the
quartz glass tube inside the chamber.
Step 6 – Hold new lamp from the ends of the lamp. Do not touch the bulb. Slide the new UV lamp
into the side opening of the enclosure and into the oxidation chamber opening until it stops. Do not use
excessive force to insert the UV lamp as this may cause damage to the lamp or the internal components
of the oxidation chamber.
Step 7 - Feed the power cable through the side opening of the enclosure. Re-connect it to the power
connector on the front door.
Step 8 – Close front cover of the sensor and secure fasteners with the front cover tool.
Step 9 – Install the UV Lamp replacement cover on the opening on the side of the enclosure.
Step 10 - In the 770MAX menus, select the measurement corresponding to the TOC sensor and page
down until prompted to ‘push 5 to enter TOC menus’. Press the 5 key.
Step 11 – Press Enter key until the cursor is under the date shown for Lamp Reset: Enter the date when
the lamp was replaced and hit the enter key. Back out of menus and SAVE changes prior to exiting the
measurement menu. This resets the lamp timer to the Lamp limit value (factory default is 4000 hours).
M TTEL
Se nso r Statu s
UV Lamp ON
lO
Error
Fault
5000TOC
LETTM
770M AX
CONNECTION
UV LAM P
REPL ACEMENT C OVER
AC
POWER
HIGH VOLTAGE
DISCONNECT
POWER FOR
SER VICING
DO NO T
OPEN WHEN
UV LAMP
IS ON
FIGURE 6.
40 MICRON FILTER REPLACEMENT
The 5000TOC Sensor includes two (2) 40 micron sintered 316 SS filter fittings. Sample feed water to the
sensor is pure and ultrapure water, therefore the frequency of filter change should be low. Thornton
recommends every 12-18 months as a preventative maintenance measure; however the filters may
perform acceptably for longer periods of time.
The first filter is located on the sample inlet tubing and was pre-assembled to the tubing provided with the
sensor. The filter is a small 316 SS fitting with a female-threaded end (end attached to the sample tubing
fitting) and a male-threaded end (the end which is secured into the pressure regulator inlet). Using 5/16”
(8mm) sized wrench, this filter can be removed by first removing the tubing from the female-end and then
unscrewing the male-end from the pressure regulator inlet. The replacement fitting kit provides a
separate instruction sheet to complete this procedure.
The second filter is located inside the sensor enclosure. This filter is located on the outlet side of the
second conductivity sensor (the conductivity sensor downstream of the oxidation chamber labeled sensor

14
2). A similar procedure to the sample inlet filter is required for removal and replacement of this filter. The
replacement fitting kit provides a separate instruction sheet to complete this procedure. See Section 8,
Accessories for part number.
INTERNAL TUBING REPLACEMENT
Under normal operating conditions, replacement of internal tubing is required only as a preventative
maintenance measure, every 3 to 5 years of operation. In varied operating conditions, replacement may
be necessary at a different timeframe. An Internal Tubing Replacement Kit includes all pre-cut tubing and
ferruled ends where needed, as well as instructions of how to replace each length of tubing. See Section
8, Accessories for part number.
FRONT PANEL CLEANING
Clean the 5000TOC Sensor enclosure and front face-panel with a damp soft cloth (water only, no
solvents). Gently wipe the surface and dry with a soft cloth.
TROUBLESHOOTING CHECKLIST
Listed below are some techniques that may assist in troubleshooting this piece of equipment. Refer to
Section 6.4 for Fault and Error messages that appear in the 770MAX menus when a Fault or Error LED
illuminates to signal the user that an undesirable condition exists with the TOC measurement system.
Problem Possible Cause
None of the LEDs
illuminated
• Patch cable disconnected
• LED/Keypad failure.
• Circuit board failure
Only the RED Fault LED
is illuminated.
• Power to sensor disconnected or circuit breaker tripped with patch
cable to 770MAX plugged in
No Flow from sensor
sample outlet
• Flow orifice clogged
• Pressure regulator not adjusted properly
• Sample flow shut off to sensor inlet
• Internal component leaking
• Sample feed pressure too low
Erratic flow through the
sensor
• Sample outlet tubing not installed per manufacturer’s instructions
• Pressure regulator failure or not adjusted properly
• Sample feed pressure to low
ERRORS & FAULTS
When an Error or Fault condition exists, the 770MAX TOC measurement will display the status indication
by flashing alternately with the measurement name (flashing ERROR or FAULT). In the messages menu
of the 770MAX, there is an option to display the current message or the message history (last 3
messages) for any of the 16 measurements. The messages associated with the 5000TOC Sensor are
listed in the following tables. The first character of the message will be an F for a fault and an E for an
error. A fault will cause the sensor to not operate. Faults cause the 770MAX to control relays and analog
outputs to the defined failsafe condition, i.e., on fault set minimum or maximum.
/