Page is loading ...

LT-6221 Rev 0 Page 1 of 4
RB-MD-1062-22 Replacement PC Board for
TX3-TOUCH-S22-C and TX3-TOUCH-F22-C
A. Shut down the Touch Screen
1. At the Touch Screen terminal, enter 9999.
2. Enter your administrator password, and then press OK.
3. Select File > Shut down > Shut down.
4. After the TX3 Configurator and Windows have shut down, disconnect power from the
Touch Screen.
5. Turn off the lobby controller board.
B. Remove the old board
Caution: To prevent damage to the boards, always hold them by the edges.
1. Disconnect the power harness from the PC board.
2. Disconnect all input, output, and networking harnesses from the current PC board.
3. Unscrew the four screws that hold the current board in place.
C. Attach the new board
Caution: To prevent damage to the boards, always hold them by the edges.
1. Secure the new board with the four screws you removed in step B.
Note: Use either the included plastic standoffs, or the existing metal standoffs and the
included plastic washers.
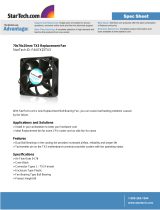
2. Connect all the input, output, and networking harnesses to the new board. Two cables are
included with this kit (WX-065 and WC-25008). See Figure 1.
3. Connect the power harness (labeled WX-065) to the new board last. See Figure 1.
4. Turn on the lobby controller board.
5. Turn on the Touch Screen.
You are done! If you need more help, see the wiring information in LT-996 TX3 Touch Screen
Installation Guide on http://www.mircom.com. You can also call us at 1-888-660-4655.

LT-6221 Rev 0 Page 2 of 4
PC Board Wiring and Jumpers
Figure 1 RB-MD-1062-22 wiring
Figure 2 RB-MD-1062-22 default jumper settings
WX-081
(not included)
WC-25008: P1
on MD-1236
WX-053
(not included)
Camera
WX-080
(not included)
Battery
WX-065: TS10A
on MD-1236
+
-
Red
Black
Optional Fan Connection
WX-082
(not included)
Touch Screen VGA
cable (not included)
WX-089
(not included)
WX-082 (not
included)
CN6
CN2
CN1
CN31
USB
CN3
BAT1A
CN32
CN15CN14
CN12
JP4
JP3
{
{
Pin 1
Pin 2
Pin 1
Pin 2
Pin 3
Pin 1
Pin 2
Pin 3
Pin 1
Pin 2
Pin 3
JP5
JP1
pins 1 and 2 shorted
JP2
pins 1 and 2 shorted
No pins shorted
JP6
JP7
JP8
JP9
JP10
JP11
JP5 - no pins shorted
JP6 - pins 1 and 2 shorted
JP7 - pins 2 and 3 shorted
JP8 - pins 2 and 3 shorted
JP9 - pins 1 and 2 shorted
JP10 - pins 1 and 2 shorted
JP11 - pins 2 and 3 shorted

LT-6221 Rev 0 Page 3 of 4
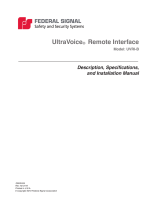
PC Board Battery
To prevent the PC Board from overheating, position the battery off of the board. The battery is
attached to a chip on the board using double-sided adhesive material. Follow the steps and
refer to the figure below.
1. Remove the battery from the PC Board by peeling the battery off the board. The adhesive
material should come off with the battery.
2. Position the battery with the adhesive material onto the side of the chassis as far away as
possible from the PC Board. This is the same chassis that the PC Board mounts onto.

LT-6221 Rev 0 Page 4 of 4
New position of the Battery should be on the side of the Chassis
and as far away from the PC Board as possible
Battery
Chassis
Wall
MD-1062 Atom
PC Board
/