
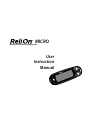
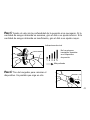
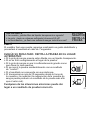
MICRO
User
Instruction
Manual
Blood Glucose Monitoring System
MICRO

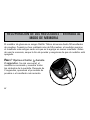
CAUTION:
Before using any product to test your blood sugar (blood
glucose), read all instructions and practice the test. Do
all quality control checks as directed and consult with a
diabetes healthcare professional. These recommendations
apply to all blood glucose monitoring systems and are
supported by the American Association of Diabetes
Educators, the American Diabetes Association, the U.S.
Food and Drug Administration, and the Health Industry
Manufacturers Association.

Introduction . . . . . . . . . . . . . . . . . . . . . . . . . . . . . . . . . . . . . . . . . .5
Intended Use ......................................6
Understanding the ReliOn
®
Micro Blood Glucose Meter ......... 7
Changing the Battery ...............................10
Meter Set-up ........................................13
Basic Rules . . . . . . . . . . . . . . . . . . . . . . . . . . . . . . . . . . . . .15
Audible Beep ...................................16
Year ...........................................18
Month/Day .....................................19
Hour/Minute . . . . . . . . . . . . . . . . . . . . . . . . . . . . . . . . . . . .20
Test Average Display. . . . . . . . . . . . . . . . . . . . . . . . . . . . . .21
Ending Set-up .......................................22
TABLE OF CONTENTS
3

Blood Glucose Testing ......................................23
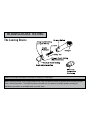
The Lancing Device. . . . . . . . . . . . . . . . . . . . . . . . . . . . . . . . . . . . . . 23
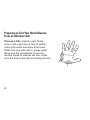
Getting a Drop of Blood ..................................26
Performing a Blood Glucose Test ...........................28
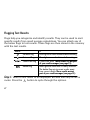
Flagging Test Results ....................................32
Alternate Site Testing (AST) . . . . . . . . . . . . . . . . . . . . . . . . . . . . . . . . . . 34
Understanding Test Results. . . . . . . . . . . . . . . . . . . . . . . . . . . . . . . . 43
Performing a Control Solution Test
..........................48
Troubleshooting Control Solution Test
. . . . . . . . . . . . . . . . . . . . . . . . 55
Recalling Results - Entering Memory Mode . . . . . . . . . . . . . . . . . . . . . . 58
Maintenance .............................................62
Cleaning ..............................................62
Storage and Handling ....................................63
Display Screen and Error Messages .........................64
Product Information ........................................69
ProductSpecications ...................................69
Warnings, Precautions & Limitations ........................70
Warranty . . . . . . . . . . . . . . . . . . . . . . . . . . . . . . . . . . . . . . . . . . . . . . 73
4

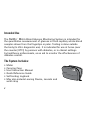
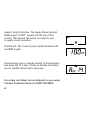
Thank you for choosing the ReliOn
®
Micro Blood Glucose Monitoring
System. This system measures blood glucose in fresh capillary whole
blood. Results are shown as plasma values. This makes it easy to
compare the
ReliOn
®
Micro Blood Glucose Meter and lab results.
Please read this manual before using the system. If you have any
questions, call Customer Service at 855.776.0662. Contact your
healthcare professional with questions if you are unable to reach
Customer Service.
INTRODUCTION
5

6
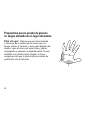
Intended Use
The ReliOn
®
Micro Blood Glucose Monitoring System is intended for
the quantitative measurement of glucose in fresh capillary whole blood
samplesdrawnfromthengertipsorpalm.Testingisdoneoutside
the body (In Vitro diagnostic use). It is indicated for use at home (over
the counter [OTC]) by persons with diabetes, or in clinical settings
by healthcare professionals, as an aid to monitor the effectiveness of
diabetes control.
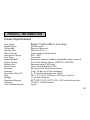
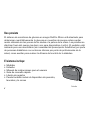
The System Includes:
• Meter
• CarryingCase
• UserInstructionManual
• QuickReferenceGuide
• Self-testingLogbook
• MayalsoincludeLancingDevice,Lancetsand
wrist strap

7
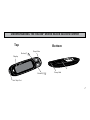
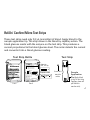
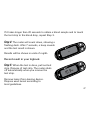
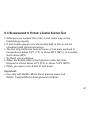
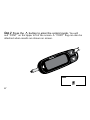
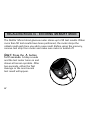
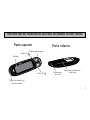
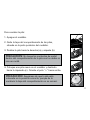
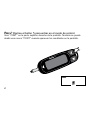
UNDERSTANDING THE RELION® MICRO BLOOD GLUCOSE METER
Test Strip Port
Top
Display
Button(2)
Strap Hole
Strap Hole
Button(1)
MICRO
Bottom

NOTE: Meters in the USA are programmed to show results in mg/dL.
Meters used outside the USA are programmed to show results in either mg/
dL or mmol/L. Results displayed in mmol/L will always have a decimal point.
Results displayed in mg/dL will never have a decimal point.
8
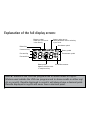
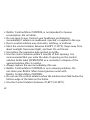
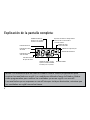
Explanation of the full display screen:
Memory symbol:
Shows you a past result
in the memory.
Appears when you are
setting the date or time or reviewing
a past result.
Delete flag
Control test flag
Pre-meal flag
Post-meal flag
Battery symbol
Blood symbol:
Appears when the meter
is ready for testing.
Unit of Measurement
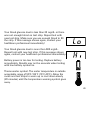
Thermometer symbol
Sound mute symbol

9
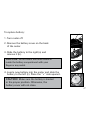
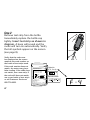
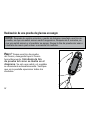
ReliOn
®
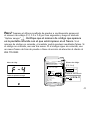
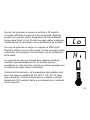
Conrm/Micro Test Strips
These test strips need only 0.3 µL (microliter) of blood. Apply blood to the
sample application tip. The strip draws in the blood by capillary action. The
blood glucose reacts with the enzyme on the test strip. This produces a
current proportional to the blood glucose level. The meter detects the current
and converts it into a blood glucose reading.
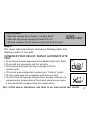
Code No.
(F-2, 3 or 4)
Expiration date
F- 4
06E1A01
2014-11
H : XXX - XXX mg/dL
Control Solution Range
Rango de la solución de control
N : XXX - XXX mg/dL
L : XXX - XXX mg/dL
Item No., N. de artículo : 78497
14
021B
F-4
Product# 710050 P/N 7408-02 Rev 5/13
Distributed by:
Wal-Mart Stores, Inc.
Bentonville, AR 72716
855.776.0662
Made in Japan
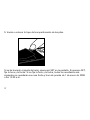
Test Strip Bottle
Front Back
Test Strip
Sample
Application
Tip (Apply blood
to end of test strip.
Capillary draw will
pull blood to
reaction site).
Insert this
way into
meter
Blood Glucose Test Strips

10
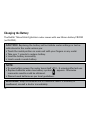
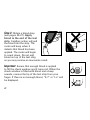
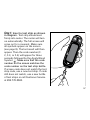
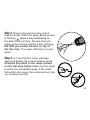
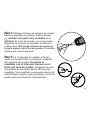
CAUTION: Replacing the battery will not delete meter settings or test re-
sults stored in the meter unless you:
•Touchthemetalportiononmainunitwithyourngersoranymetal.
•Takeover1minutetoreplacebattery.
•Loadthebatteryincorrectly.
•Loadausedorweakbattery.
Changing the Battery
The ReliOn
®
Micro blood glucose meter comes with one lithium battery CR2032
(or DL2032).
WARNING: Keep all batteries out of children’s reach. If a battery is
swallowed, consult a doctor immediately.
NOTE:
•Tosavebatterypower,themeterturnsitselfoff3–5minutesafterlastuse.
•Replacebatterieswhenlowbatterysymbolappears.Otherwise
inaccurate results could be obtained.
•Discardusedbatteriesasperlocalguidelines.

11
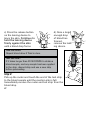
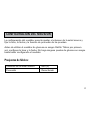
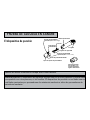
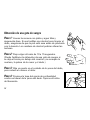
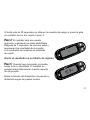
To replace battery:
1. Turn meter off.
2. Remove the battery cover on the back
of the meter.
3. Slide the battery to the right (a) and
remove it (b).
4. Load a new battery into the meter and slide the
battery to the left (c). Place the “+” side upward.
CAUTION: Make sure the battery is loaded
in the proper position. Otherwise, the
battery cover will not close.
CAUTION: Do not touch the metal contacts
inside the battery compartment with your
ngeroranymetal.
a
b
c

12
5. Replace battery cover.
If the clock setting has been deleted, SET will appear on the screen. If
SET appears, set the time and date. If you do not set the time and date, all
subsequent results will be stored with a test date and time of January 1,
2008, 12:00 a.m.

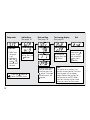
Meter set-up allows you to adjust the audible beep volume and to set
time, date, and test averaging.
Before using the ReliOn
®
Microbloodglucosemeterforthersttime,set
the time and date. Do not perform a blood glucose test until you have set-
up the meter.
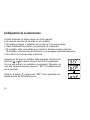
METER SET-UP
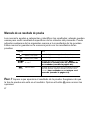
Default Settings:
Audible Beep Volume High (3)
Average Off
13

14
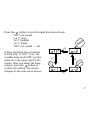
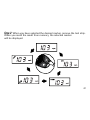
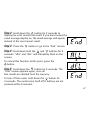
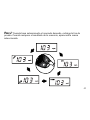
Setup mode Audible Beep
See page 16.
Date and time
See page 18.
Test average display
See page 21.
End
Press the button to
follow the black arrows.
To move from month
to day or from hour
to minute, press the
uppbutton. To change
the value, press the
lowbutton.
To go to SET:
1. Make sure
the meter
is off.
2. Hold down
both the
buttons for 5
seconds.
To change the
setting, press the
button.
NOTE
The meter turns itself off if no
buttons are pressed for 3 minutes.
Your changes will have been
stored. Review the settings for
confirmation in the SET mode.
Your new settings will be saved
when you reach the End screen.
and
To change the
setting, press the
button.
To turn off the
meter, press
button. To go
back to the bEP
screen, press
button.

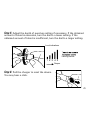
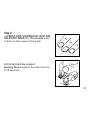
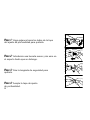
Step 2: Press the and buttons at the
same time for 5 seconds. A beep sounds and the
meter turns on. Next, a second beep sounds and
“SET” shows on the screen.
15
Step 3: Use the button to change the set-up screen. When you press
the button, the set-up screen changes in the order shown in the dia-
gram to the left. Press the
button to change a setting within a set-up
screen menu.
Note: If you need to go back to a setting, you must scroll through each set-
up option. You cannot go backwards in set-up mode.
In set-up mode, the meter will turn off automatically after 3 minutes of non-
use.
Basic rules for meter set-up:
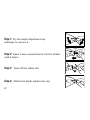
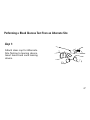
Step 1: Turn off meter.

16
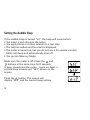
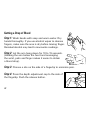
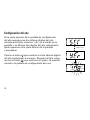
Setting the Audible Beep
If the audible beep is turned “on”, the beep will sound when:
•Youinsertateststripintothemeter.
•Youapplybloodorcontrolsolutiontoateststrip.
•Thetesthasendedandtheresultisdisplayed.
•Themeteristurnedon,butyoudonotuseitforseveralminutes.
Meter will beep and automatically shut off.
•YougointoMemoryMode.
Make sure the meter is off. Press the and
buttons at the same time for 5 seconds.
A beep sounds and the meter turns on. Next, a
second beep sounds and “SET” shows on the
screen.
Press the button. The screen will
display “bEP” and the current beep setting.

17
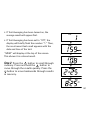
Press the button to cycle through the volume levels:
“OFF” (no sound)
”on 1” (low)
“on 2”(middle)
“on 3” (high)
“OFF” (no sound) …, etc.
A beep sounds at the set volume
at each step. If “OFF” is set, the
“audible beep mute (Off)” symbol
lights up in the upper right of the
screen. After you select the beep
volume, press the button to
conrmthesetting.Thescreen
changes to the year set-up screen.
Beep
Beep
Beep
[4]
[1]
[2]
[3]

18
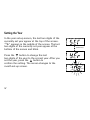
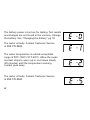
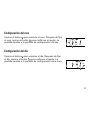
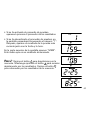
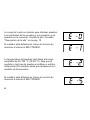
Setting the Year
In the year set-up screen, the last two digits of the
currently set year appear at the top of the screen.
“
y
Er” appears in the middle of the screen. The last
two digits of the currently set year appear at the
bottom of the screen and blink.
Press the
button to change the last
two digits of the year to the correct year. After you
set the year, press the
button to
conrmthesetting.Thescreenchangestothe
month set-up screen.
(audible beep)

19
Setting the Month
Press the button to change the month. After you
set the month, press the
buttontoconrmthe
setting. The screen changes to the day set-up screen.
Setting the Day
Press the button to change the day. After you set
the day, press the
buttontoconrmthesetting.
The screen changes to the hour set-up screen.

20
Setting the Hour
Press the button to change the hour. After you set
the hour, press the
buttontoconrmthesetting.
The screen changes to the minute set-up screen.
Setting the Minute
Press the button to change the minute. After you
set the minute, press the
buttontoconrmthe
setting. The screen changes to the test averaging set-
up screen.
Page is loading ...
Page is loading ...
Page is loading ...
Page is loading ...
Page is loading ...
Page is loading ...
Page is loading ...
Page is loading ...
Page is loading ...
Page is loading ...
Page is loading ...
Page is loading ...
Page is loading ...
Page is loading ...
Page is loading ...
Page is loading ...
Page is loading ...
Page is loading ...
Page is loading ...
Page is loading ...
Page is loading ...
Page is loading ...
Page is loading ...
Page is loading ...
Page is loading ...
Page is loading ...
Page is loading ...
Page is loading ...
Page is loading ...
Page is loading ...
Page is loading ...
Page is loading ...
Page is loading ...
Page is loading ...
Page is loading ...
Page is loading ...
Page is loading ...
Page is loading ...
Page is loading ...
Page is loading ...
Page is loading ...
Page is loading ...
Page is loading ...
Page is loading ...
Page is loading ...
Page is loading ...
Page is loading ...
Page is loading ...
Page is loading ...
Page is loading ...
Page is loading ...
Page is loading ...
Page is loading ...
Page is loading ...
Page is loading ...
Page is loading ...
Page is loading ...
Page is loading ...
Page is loading ...
Page is loading ...
Page is loading ...
Page is loading ...
Page is loading ...
Page is loading ...
Page is loading ...
Page is loading ...
Page is loading ...
Page is loading ...
Page is loading ...
Page is loading ...
Page is loading ...
Page is loading ...
Page is loading ...
Page is loading ...
Page is loading ...
Page is loading ...
Page is loading ...
Page is loading ...
Page is loading ...
Page is loading ...
Page is loading ...
Page is loading ...
Page is loading ...
Page is loading ...
Page is loading ...
Page is loading ...
Page is loading ...
Page is loading ...
Page is loading ...
Page is loading ...
Page is loading ...
Page is loading ...
Page is loading ...
Page is loading ...
Page is loading ...
Page is loading ...
Page is loading ...
Page is loading ...
Page is loading ...
Page is loading ...
Page is loading ...
Page is loading ...
Page is loading ...
Page is loading ...
Page is loading ...
Page is loading ...
Page is loading ...
Page is loading ...
Page is loading ...
Page is loading ...
Page is loading ...
Page is loading ...
Page is loading ...
Page is loading ...
Page is loading ...
Page is loading ...
Page is loading ...
Page is loading ...
Page is loading ...
Page is loading ...
Page is loading ...
Page is loading ...
Page is loading ...
Page is loading ...
Page is loading ...
Page is loading ...
Page is loading ...
Page is loading ...
-
 1
1
-
 2
2
-
 3
3
-
 4
4
-
 5
5
-
 6
6
-
 7
7
-
 8
8
-
 9
9
-
 10
10
-
 11
11
-
 12
12
-
 13
13
-
 14
14
-
 15
15
-
 16
16
-
 17
17
-
 18
18
-
 19
19
-
 20
20
-
 21
21
-
 22
22
-
 23
23
-
 24
24
-
 25
25
-
 26
26
-
 27
27
-
 28
28
-
 29
29
-
 30
30
-
 31
31
-
 32
32
-
 33
33
-
 34
34
-
 35
35
-
 36
36
-
 37
37
-
 38
38
-
 39
39
-
 40
40
-
 41
41
-
 42
42
-
 43
43
-
 44
44
-
 45
45
-
 46
46
-
 47
47
-
 48
48
-
 49
49
-
 50
50
-
 51
51
-
 52
52
-
 53
53
-
 54
54
-
 55
55
-
 56
56
-
 57
57
-
 58
58
-
 59
59
-
 60
60
-
 61
61
-
 62
62
-
 63
63
-
 64
64
-
 65
65
-
 66
66
-
 67
67
-
 68
68
-
 69
69
-
 70
70
-
 71
71
-
 72
72
-
 73
73
-
 74
74
-
 75
75
-
 76
76
-
 77
77
-
 78
78
-
 79
79
-
 80
80
-
 81
81
-
 82
82
-
 83
83
-
 84
84
-
 85
85
-
 86
86
-
 87
87
-
 88
88
-
 89
89
-
 90
90
-
 91
91
-
 92
92
-
 93
93
-
 94
94
-
 95
95
-
 96
96
-
 97
97
-
 98
98
-
 99
99
-
 100
100
-
 101
101
-
 102
102
-
 103
103
-
 104
104
-
 105
105
-
 106
106
-
 107
107
-
 108
108
-
 109
109
-
 110
110
-
 111
111
-
 112
112
-
 113
113
-
 114
114
-
 115
115
-
 116
116
-
 117
117
-
 118
118
-
 119
119
-
 120
120
-
 121
121
-
 122
122
-
 123
123
-
 124
124
-
 125
125
-
 126
126
-
 127
127
-
 128
128
-
 129
129
-
 130
130
-
 131
131
-
 132
132
-
 133
133
-
 134
134
-
 135
135
-
 136
136
-
 137
137
-
 138
138
-
 139
139
-
 140
140
-
 141
141
-
 142
142
-
 143
143
-
 144
144
-
 145
145
-
 146
146
-
 147
147
-
 148
148


Ask a question and I''ll find the answer in the document
Finding information in a document is now easier with AI
in other languages
- español: ReliOn Micro
Related papers
-
ReliOn Confirm User manual
-
-
-
-
-
-
ReliOn ART21258 User manual
-
ReliOn PLATINUM User guide
-
-
ReliOn Insight 12V120-GC2-LT 48V Lithium Golf Cart Battery Installation guide
Other documents
-
 Arkray GLUCOCARD SM Operating instructions
-
 Arkray Glucocard X-Meter Quick Reference Manual
-
Spirit CareSens N Owner's Booklet
-
 Arkray Glucocard Shine User manual
-
 arkaray Glucocard Shine Blood Glucose Monitoring System User manual
-
-
 On Call Plus User manual
-
-
Lifescan ULTRA 2 User manual
-
 NIPRO Diagnostics TRUE METRIX Owner's Booklet


