Page is loading ...

For single user / home use only
User Manual

Table of Contents
Information
Important Information:Read this First! 4
Important Health-Related Information 5
Specifications 6
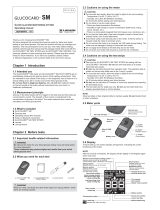
GLUCOCARD® Shine Blood Glucose Monitoring System 7
Inserting or Replacing the Batteries 8
GLUCOCARD® Shine Blood Glucose Test Strip 9
GLUCOCARD Shine Blood Glucose Meter 11
GLUCOCARD Shine Blood Glucose Meter Display 12
Preparation
Setting up Your System 13
Adjusting the Date and Time 13
Setting the Sound On/OFF 15
Turn on the Strip Expiration Date Indicator 16
Turn on the Hypoglycemia (HYPo) Indicator 17
Checking the System 18
Control Solution Testing 19
Comparing the Control Solution Test Results 21
Testing
Using the Lancing Device 22
Preparing the Lancing Device 23
Preparing the Meter and Test Strip 25
Flagging Post-meal Test Results 25
Applying Blood Sample 26
Discarding Used Lancets 28
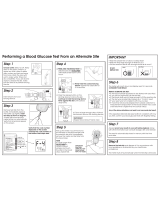
Alternative Site Testing 29
HI and Lo Messages 32
Target Blood Glucose Ranges 33
Transferring Test Results 33
Additional Functions
Meter Memory 34
Viewing Averages 34
Viewing Test Results 36
Setting the Post-meal Alarm (PP2 alarm) 37
Setting the Strip Expiration Date Indicator 38
Maintenance
Caring for Your System 39
Understanding Error and Other Messages 44
General Troubleshooting 46
Performance Characteristics 47
Warranty Information 50

4 www.arkrayusa.com
Important Information: Read this First!
Intended use:
The GLUCOCARD Shine Blood Glucose Monitoring System is
intended for the quantitative measurement of glucose in fresh
capillary whole blood samples drawn from the fingertips and
alternative sites such as the forearm, palm, thigh, and calf.
Alternative site testing should be used only during steady-
state blood glucose conditions. The GLUCOCARD Shine Blood
Glucose Monitoring System is intended for self testing outside
the body (in vitro) by people with diabetes at home as an aid to
monitor the effectiveness of diabetes control. The system is
intended to be used by a single person and should not be
shared. It is not intended for use on neonates and is not for the
diagnosis or screening of diabetes.
The GLUCOCARD Shine Blood Glucose Test Strips are for
use with the GLUCOCARD Shine Blood Glucose Meter to
quantitatively measure glucose in fresh capillary whole blood
samples drawn from the fingertips and alternative sites.
The GLUCOCARD® Shine Control Solutions are for use with the
GLUCOCARD Shine Meter and GLUCOCARD Shine Test Strips
to check that the meter and the test strips are working together
properly and that the test is performing correctly.
To receive safe and optimum system benefits, please read the
entire manual contents before using the system. Please note the
following instructions:
• Do not use the system for the diagnosis or screening of
diabetes.
• Use only fresh capillary whole blood samples for testing.
• Alternative site and fingertip test results may differ significantly
due to rapid changes in the glucose level after eating, insulin
injection or exercise.

www.arkrayusa.com 5
• The GLUCOCARD Shine Blood Glucose Monitoring System is
intended for in vitro (outside the body) diagnostic use only and for
the quantitative measurement of glucose in capillary whole blood.
• The GLUCOCARD Shine Blood Glucose Monitoring System is
intended for use by a single user only. Do not share the meter and
lancing device with another person.
• The GLUCOCARD Shine Blood Glucose Meter is designed to
minimize code related errors in monitoring by using the no-coding
function.
• The glucose in the blood sample mixes with special chemicals
on the test strip to produce a small electrical current. The
GLUCOCARD Shine Meter converts this electrical current to
glucose concentration.
• The GLUCOCARD Shine Blood Glucose Meter should be used only
with the GLUCOCARD Shine Test Strip.
• An abnormally high or low red blood cell count (hematocrit level
over 60% or below 20%) may produce inaccurate results.
• Inaccurate results may occur in severely hypotensive (having low
blood pressure) individuals or patients in shock. Inaccurate low
results may occur for individuals experiencing a hyperglycemic
(high blood sugar) or hyperosmolar state, with or without ketosis.
Critically ill patients should not be tested with blood glucose
meters.
• All parts of the kit are considered biohazardous and can potentially
transmit infectious diseases, even after you have performed
pre-cleaning and disinfection.
The GLUCOCARD Shine Blood Glucose Monitoring System is
waived under CLIA document number CR??????. To obtain further
information about this waiver, visit the FDA website at
http://www.accessdata.fda.gov/scripts/cdrh/cfdocs/cfclia/search.cfm
Important Health-Related Information

6 www.arkrayusa.com
Specifications
• Productspecifications
• Operatingranges
Measurement range 20-600 mg/dL
Sample size Minimum 0.5 μL
Test time 5 seconds
Sample type Fresh capillary whole blood
Calibration Plasma-equivalent
Assay method Electrochemical
Battery life 1,000 tests
Power Two 3.0 V lithium batteries
(disposable, type CR2032)
Memory 500 test results
Size 3.74 x 1.30 x 0.75 in
Weight 1.45 oz (with batteries)
Temperature 50-104˚F (10-40˚C)
Relative humidity 10-90%
Hematocrit 20-60%
• For questions or concerns, contact Customer Service:
800.566.8558, 24 hours a day, 7 days a week, US and Canada.
At all other times or in case of emergency, please contact your
healthcare professional or emergency medical response.

www.arkrayusa.com 7
GLUCOCARDShineBloodGlucoseMonitoringSystem
Components
GLUCOCARDShineBGMSystemincludesthefollowing
items:
* GLUCOCARD Shine Blood Glucose Meter
* User’s Manual
* Quick Reference Guide
* Batteries
GLUCOCARDShineBGMSystemmayincludethe
followingitems:
* GLUCOCARD Shine Blood Glucose Test Strips
* Lancing Device
* Lancets
* Logbook
* Carrying Case
• Check all the components after opening the GLUCOCARD
Shine Blood Glucose Monitoring System package.
• The GLUCOCARD Shine Control Solutions (Level 1 and 2)
are necessary but not included. The GLUCOCARD Shine
Control Solutions and the cable for the data transmission to
a PC can be ordered separately. Please contact Customer
Service, 800.566.8558, 24 hours a day, 7 days a week, US
and Canada.
Caution: The meter and lancing device are only intended for
a single user. Do not share them with anyone including other
family members. Never use on multiple users.

8 www.arkrayusa.com
The GLUCOCARD Shine Meter uses two 3.0 V lithium
batteries. Before using the meter, check the battery
compartment and insert batteries if empty.
When the
symbol appears on the display for the first
time,the batteries should be replaced as soon as possible.
The test results might not be saved if the batteries run out.
InsertingorReplacingtheBatteries
Note: Removing the meter batteries will not affect your
stored result. However, you may need to reset your meter
settings. See pages 13-17.
Step 1
Make sure the meter is turned off.
Press down and slide off the battery
compartment cover.
Step 2
Remove the used batteries one at a time.
Slip your index finger under the battery to
lift and pull out as shown. Insert two new
batteries with the + side facing up and
make sure the batteries are inserted firmly
in place.
Step 3
Place the cover on the battery
compartment. Push down until you hear
the tab click into place.

www.arkrayusa.com 9
GLUCOCARDShineBloodGlucoseTestStrip
The GLUCOCARD Shine Blood Glucose Monitoring System
measures blood glucose quickly and accurately. It automatically
absorbs the small blood sample applied to the narrow edge of
the strip.
Insert
Contact bars
Gently push the test strip, with its
contact bars facing up, into the test
strip port of meter
Confirmationwindow
Check here to see whether
sufficient blood sample has been
applied
Edgetoapplybloodsample
Apply blood sample here for testing
ImportantSafetyInstruction
• All components that come into contact with blood samples
should be considered to be biohazards capable of transmitting
viral diseases, even after disinfection.
• Do not share your meter or lancing device with another
person.

10 www.arkrayusa.com
Note: You can get more safety information at FDA Public
Health Notification (http://www.fda.gov/MedicalDevices/
Safety/AlertsandNotices/ucm224025.htm) or at CDC Clinical
Reminder (http://www.cdc.gov/injectionsafety/Fingerstick-
DevicesBGM.html).
• The GLUCOCARD Shine Test Strip should be used only with
fresh capillary whole blood samples.
• Do not reuse test strips.
• Do not use GLUCOCARD Shine Test Strips beyond the
expiration date. This may cause inaccurate results.
• Test strips in new, unopened vials and test strips in vials
that have been opened can be used until the expiration date
printed on the test strip box and vial label if the test strips
are used and stored according to its storage and handling
methods.
• Store test strips in a cool and dry place at a temperature of
34-86˚F (1-30˚C).
• Keep test strips away from direct sunlight or heat and do not
freeze.
• Store test strips only in their original vial.
• Close the vial tightly after taking out a test strip and use the
test strip immediately.
• Handle test strips only with clean, dry hands.
• Do not bend, cut, or alter test strips in any way.
• For detailed storage and usage information, refer to the
GLUCOCARD Shine Test Strip package insert.
• Keep the meter and testing supplies away from young
children.

www.arkrayusa.com 11
Note: The cable for data transmission to a PC can be ordered
separately. Please contact Customer Service, 800.566.8558.
GLUCOCARDShineBloodGlucoseMeter
DataPort
Used to transfer data
from the meter to
a computer with
a cable
>>Button
Turns the meter on/off,
confirms menu selections,
and changes information
Display
Shows results,
messages
Test Strip Port
Insert test strip
here
<<Button
Turns the meter
on, selects
or changes
information

12 www.arkrayusa.com
GLUCOCARDShineBloodGlucoseMeterDisplay
Test results: test results displaying panel
Batterysymbol:indicates meter battery is running low and
needs to be replaced
mem: appears when test results stored in the memory are
displayed
alarm: appears when the post-meal alarm has been set
check: appears when test results have not been saved
Hypoglycemiasymbol:appears when the test result is
below the hypoglycemic level
Mutesymbol:appears only when the sound is set to OFF
Post-meal test flag: appears during post-meal testing and
when post-meal test results are displayed
Month/Day/Hour/Minute
Temperaturesymbol:displays recorded temperature when
blood glucose levels are tested
Bloodinsertionsymbol:indicates meter is ready for the
application of a drop of blood or control solution
Decimalpoint:appears when the blood glucose measuring
unit is set to mmol/L
mg/dL, mmol/L: unit for measuring blood glucose
10
12
1
2
3
4
5
6
7
8
9
11
13
1
12
2 3
4
5
6
78
9
13
10
11
Note: The unit of measurement is fixed in mg/dL and it
cannot be changed to mmol/L by the user.

www.arkrayusa.com 13
SettingupYourSystem
Press and hold the >> button for 3 seconds to enter the set
mode. After all settings are finished, press and hold the >>
button for 3 seconds to turn off the meter.
Press << to reach the accurate value. Press and hold << to
scroll faster.
AdjustingtheDateandTime
Step 1 Entering the SET Mode
Press and hold the >> button for 3
seconds to enter the set mode. After all
the segments flash across the screen,
"SET" is displayed on the screen.
Press the >> button again to set the
year.
Step 2 Setting the Year
Press and release << to adjust until the
correct year appears. After setting the
year, press the >> button to confirm
your selection and set the month.
Step 3 Setting the Month
A number indicating the month will
blink on the left corner of the screen.
Press << until the correct month
appears. Press the >> button to
confirm your selection and set the day.

14 www.arkrayusa.com
Step 7 Setting the Minute
Press << until the correct minute
appears. After setting the minute,
press the >> button to set the sound.
Step4SettingtheDate
Press << until the screen displays the
correct day. Press the >> button to
confirm the date and set the time.
Step 5 Setting the Time Format
The meter can be set in the AM/PM
(12-hour) or the 24-hour clock format.
Press << to select a format.
AM/PM is not displayed in the
24-hour format. After selecting the
format, press the >> button to set the
hour.
Step 6 Setting the Hour
Press << until the correct hour appears.
After the hour is set, press the
>> button to set the minute.

www.arkrayusa.com 15
Step 8
On pressing <<, the screen will
display the “On” or “OFF”. Press the
>> button to confirm the selection
and move to the next mode.
The meter will beep in the following
instances, if set to On.
• When you push the >> button or
<< button to turn on the meter
• When the test strip is inserted in
the meter
• When the blood sample is
absorbed into the test strip and the
test starts
• When the test result is displayed
• When you push the << button to
set the post-meal (PP2) alarm
• When it is time for a preset blood
glucose test
If the sound is set to OFF, none of the
sound functions will work.
SettingtheSoundOn/OFF
Note: When the sound is set to OFF, the symbol appears
on the display.

16 www.arkrayusa.com
Step 9
This mode allows you to turn the
strip expiration date indicator on or
off.
When “EP” blinks on the screen,
press <<. The screen will display
“On” or “OFF”. Press the >>
button to confirm the setting and
move to the next mode.
This mode turns the function on
or off only. See page 38 to set the
strip expiration date.
TurnontheStripExpirationDateIndicator
Note: If the pre-set expiration date
expires, the meter will display the
following. For example, in the case
when the expiration date is set to
October of 2014, the meter displays
“EP” at the startof November of 2014.

www.arkrayusa.com 17
Step 10
This mode allows you to turn the
hypoglycemia indicator (possible low
blood sugar) on or off and to select the
desired level for the indicator. You will
be alerted any time your test result is
lower than the selected level.
When “Hypo” is displayed (along with
the hypoglycemia symbol
), press
<<. The screen will display “On” or
“OFF”. Press the >> button when “On”
appears to set the desired level.
Then press << until the desired
hypoglycemic level (between 20 and 60
mg/dL) is being displayed. Then press
the >> button to confirm the level.
TurnontheHypoglycemia(HYPo)Indicator
Caution: Before the HYPo indicator is set, ask your doctor or
diabetes nurse to help you decide what your hypoglycemia
level will be.
Note: If the test result is lower than the
pre-set hypoglycemia level, the meter will
display the following.
If you do not want to set the indicator, press the >> button
while the screen displays “no”. The screen will then return to
step 2 (See page 13).
When you are done setting all the modes, turn the meter off
by pressing and holding the >> button for 3 seconds.

18 www.arkrayusa.com
CheckingtheSystem
You should check your meter and test strips using the
GLUCOCARD Shine Control Solutions (Control Level
1 and 2). The GLUCOCARD Shine Control Solutions
contain known amounts of glucose and are used to
check that the meter and the test strips are working
properly. The test strip vials have GLUCOCARD
Shine Control Solution ranges printed on their labels.
Compare the result displayed on the meter to the
GLUCOCARD Shine Control Solution range printed on
the test strip vial. Before using a new meter or a new
vial of test strips, you should conduct a control solution
test following the procedure on pages 19-20 with two different
levels of solutions (Control Level 1 and 2).
Notes:
• GLUCOCARD Shine Meter and GLUCOCARD Shine Test Strips
only can be used with GLUCOCARD Shine Control Solutions.
• Check the expiration dates printed on the bottle. When you first
open a control solution bottle, record the discard date (date
opened plus three (3) months) in the space provided on the
label.
• Make sure your meter, test strips and control solutions are at
room temperature before testing. Control solution tests must
be done at room temperature 68-77˚F (20-25˚C).
• Before using the control solution, shake the bottle, discard the
first 1 or 2 drops and wipe the tip clean.
• Close the control solution bottle tightly and store at a
temperature of 46-86˚F (8-30˚C).
You should do a control solution test:
• When you want to practice the test procedure using the control
solution instead of blood;
• When using the meter for the first time;

www.arkrayusa.com 19
Control Solution Testing
Step 1
Insert a test strip into the meter’s test strip
port, with the contact bars facing upwards.
Gently push the test strip into the test strip
port until the meter beeps. Be careful not
to bend the strip while pushing it in. The
symbol will be displayed on the screen.
• Whenever you open a new vial of test strips;
• If the meter or test strips do not function properly;
• If your symptoms are inconsistent with the blood glucose
test results and you feel that the meter or test strips are not
working properly;
• If you drop or damage the meter;
• When using the meter for blood glucose test after any
disinfection procedure.
Step 2
Shake the GLUCOCARD Shine
Control Solution bottle before each
test. Remove the cap and squeeze
the bottle to discard the first 1 or 2
drops.
Then wipe the tip with a clean
tissue or cloth. After the
symbol appears on the display,
apply the solution to the narrow edge of the test strip until
the meter beeps. Make sure the confirmation window fills
completely.

20 www.arkrayusa.com
Note: The meter will switch off, if the control solution
sample is not applied within 2 minutes of the
symbol
appearing on the screen. If the meter turns off, remove the
strip, reinsert, and start from step 1.
Step 3
A test result will appear after the
meter counts down from 5 to 1.
After your control solution result
appears on the display, press <<
for 3 seconds until the ‘check’
symbol appears on the display.
When the ‘check’ symbol is displayed, the result is not stored
in the meter’s memory and is not included in the averages.
Step 4
Compare the result displayed on the
meter to the range printed on the test
strip vial. The result should fall within that
range. Used strips should be discarded
safely in disposable containers.
Caution: The ranges printed on the test strip vial are for
the GLUCOCARD Shine Control Solutions only. They do not
have any connection to your blood glucose level.
Control Solution Range /
Rango de la solución de
control
Level 1: 101-151 mg/dL
Level 2: 184-276 mg/dL

www.arkrayusa.com 21
Comparing the Control Solution Test Results
The test result of each control solution should be within the
range printed on the label of test strip vial. Repeat the control
solution test if the test result falls outside of this range. Out of
range results may occur due to the following factors:
Caution: If results continue to fall outside the range printed
on the test strip vial, the Test Strip and Meter may not be
working properly. Do not use your system and contact
Customer Service, 800.566.8558.
Note: The GLUCOCARD Shine Control Solution can
be purchased separately. Contact Customer Service,
800.566.8558, 24 hours a day, 7 days a week, US and Canada.
Situations
• When the control solution bottle was not
shaken well.
• When the meter, test strip, or the control
solution were exposed to high or low
temperatures.
• When the first drop of the control solution
was not discarded or the tip of the bottle
was not wiped clean.
•
When the meter is not functioning properly
.
• When the control solution is past the
expiration date printed on the bottle.
• When the control solution is past its
discard date (the date the bottle was
opened plus three (3) months).
• When the control solution is contaminated.
Actions
Repeat the
control solution
test by referring
to the “Notes”
on page 18.
Discard the used
control solution
and repeat the
test using a new
bottle of control
solution.
/


![LivongoBlood Glucose Monitoring System [PL00497]](http://vs1.manuzoid.com/store/data/001794217_2-3e764f07ad29ea86e9aa74e34fbfeb35-160x210.png)
