Page is loading ...

Zencam 720P/1080P
Fixed Camera
E1B, E1W, E2B, E2W
User Manual
Version 2.0.8
Revised October 9th, 2018

2
Contents
Welcome .......................................................................................................................................................... 3
Important Security Warning ............................................................................................................................ 3
Important Safeguards and Warnings ............................................................................................................... 3
1 Features and Specifications ...................................................................................................................... 4
1.1 Overview ............................................................................................................................................ 4
1.2 Features .............................................................................................................................................. 5
2 Device Overview ........................................................................................................................................ 5
3 Connection & Installation .......................................................................................................................... 6
4 Zencam Security App Setup ...................................................................................................................... 8
4.1 Default Username and Password ....................................................................................................... 8
4.2 Camera setup methods ...................................................................................................................... 8
4.3 Motion Detection Setup ................................................................................................................... 21
4.4 Push Notification Setup .................................................................................................................... 23
4.5 Email Alert Setup .............................................................................................................................. 24
4.6 Firmware Upgrade ........................................................................................................................... 28
5 Zencam Desktop Support ........................................................................................................................ 31
5.1 Desktop Support Software Setup ..................................................................................................... 31
FCC Statement ............................................................................................................................................... 44
IC Statement .................................................................................................................................................. 45
Appendix A: Toxic Hazardous Materials or Elements .................................................................................... 46

3
Welcome
Thank you for purchasing a Zencam Cube camera!
This user manual is designed to be a reference tool for the installation and operation of your IP camera.
Here you can find information about the camera’s features and functions, as well as information to aid in
troubleshooting.
To contact Zencam support, please do one of the following:
● Visit http://Zencam.com/contacts and use the email form
● Call Zencam Support using one of the following numbers Toll Free: (888) 212-7538
International Callers (Outside of US): +1-713-893-8956
USA: +1-713-893-8956
Canada: 437-888-0177
UK: 203-769-2757
● For email support: support@Zencam.com
Important Security Warning
To keep your Zencam camera secure and prevent unauthorized access, please make sure to follow the
steps below:
● Always make sure that your camera has the latest firmware
● Never use the default password for your camera. Always ensure that
your password is at least 8-10 characters long and contains a combination of
lowercase characters, uppercase characters as well as numbers.
Important Safeguards and Warnings
1.Electrical Safety
All installation and operation should conform to your local electrical safety codes.
The product must be grounded to reduce the risk of electric shock.
We assume no liability or responsibility for any fires or electrical shock caused by improper handling or
installation.
2.Transportation Security
Heavy stress, violent vibrations, and excess moisture should not occur during transportation, storage,
and installation of the device.

4
3.Installation
Handle the device with care.
Do not apply power to the camera before completing installation. Do
not place objects on top of the camera.
4.Repair Professionals
All the examination and repair work should be done by qualified service engineers.
We are not liable for any problems caused by unauthorized modifications or user-attempted repair.
5.Environment
The camera should be kept in a cool, dry place away from direct sunlight, flammable materials, explosive
substances, etc.
This product should be transported, stored, and used only in the specified environments as stated
above. Do not aim the camera at a strong light source, as it may cause overexposure of the picture, and
may affect the longevity of the camera’s sensors.
Ensure that the camera is in a well-ventilated area to prevent overheating.
6. Operation and Maintenance
Do not touch the camera sensor or lens directly.
To clean dust or dirt off the lens, use an air blower or a microfiber cloth.
7. Accessories
Be sure to use only the accessories recommended by manufacturer.
Before installation, please open the package and check to ensure that all the components are present.
Contact the retailer that you purchased from, or Zencam directly if anything is broken or missing in the
package.
1 Features and Specifications
1.1 Overview
The Zencam Cube Series camera is an excellent tool for digital surveillance that can be useful to a wide
variety of users. It’s easy to use and can be set up in a relatively small amount of time. It has various
functions such as recording, playback, and monitoring functionality and it synchronizes audio and video
by default via the Zencam security app, or the Zencam Desktop application.
This Zencam Cube Series camera adopts a high-quality design to achieve high levels of reliability and
security. It can be configured to work locally, over the internet. The Zencam M Series camera also has a
built-in WiFi adapter that allows for the camera to be used on a wireless network, without needing a
physical connection to a router or PC.

5
1.2 Features
The Zencam Cube Series camera has the following features:
● Network Access
The Zencam Cube Series camera connects to a wide variety of routers to connect to the internet,
both through a wired connection and wirelessly. Once setup, the camera can be accessed
remotely from a wide variety of internet connected devices, including PCs, iPhones, iPads,
Android tablets, and Android phones.
● Cloud Storage Functionality
The Zencam Cube Series camera can record video and audio streams to the Zencam Cloud
service to enable long-term storage for recordings. Zencam Cloud also allows the user to easily
find and download recorded video for playback from any internet connected PC or Mac
computer.
● Advanced Playback Function
This device supports real-time recording and supports searching through recorded footage, fast
forward playback, and downloading of videos and screenshots. The Zencam Cube series camera
can also playback in slow motion, backwards, and frame by frame as needed. When recording,
the Zencam Cube Series camera shows a date/time overlay to ensure accurate viewing of events
when they occurred.
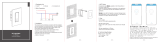
2 Device Overview
Please refer to Table 0-1 for more details about each port.

6
3 Connection & Installation
This section provides information about the connection and installation of the Zencam Cube Series
network camera.
3.1 Connection Guide
The camera initially should be connected via the following method:
⚫ The following figures are for reference only, please refer to the actual device for more details.
⚫ Before installation, please make sure the installation surface can at least support 3x weight of the
camera.
The device can adopt two types of installation mode which are desktop installation and ceiling mount.
Please refer to Figure 2-1 for desktop installation.
Figure 2-1
For desktop installation, you just need to stick the device on the installation surface.

7
Please refer to Figure 2-2 for ceiling mount.
Figure 2-2
The exact installation steps are shown as follows:
Step 1: Drill holes on the proper installation surface according to the hole sites on the quick installation
board.
Step 2: Knock the expansion bolts provided in the kit into the drilled holes.
Step 3: Use self-tapping screws to fix the quick installation board well.
Step 4: Connect to device power.
Step 5: Adjust the monitoring angle and stick the device on the quick installation board.
Note:
⚫ This quick start guide is for reference only. Slight difference may be found in user interface.
⚫ All the designs and software here are subject to change without prior written notice.
⚫ All trademarks and registered trademarks mentioned are the properties of their respective owners.
⚫ If there is any uncertainty or controversy, please refer to the final explanation of us.
⚫ Please visit our website or contact your local service engineer for more information.

8
4 Zencam Security App Setup
This section of the guide will provide the user with information on how to setup access to the camera
through any of the following methods.
4.1 Default Username and Password
To login to the system for the first time, use one of the following default username/password
combinations. Once you’ve successfully logged in, it is highly recommended to change the password for
security reasons.
Username: admin
Password: admin
Note: Logging in for the first time will prompt the user to change the password to the admin account.
4.2 Camera setup methods
To make your experience with the Zencam Cube Series easy and simple, we've provided multiple ways to
set up, view, and operate your camera depending on your needs. Please follow the instructions on this
page to set up your camera in the way that works best for you.
Setting up your camera for the first time
If setting up your camera for the first time, please follow the instructions as outlined in section Using the
Zencam security app on your smartphone or tablet, you can view your camera live from anywhere, and
access features such as pan/tilt/zoom, recording, taking snapshots, two-way audio, and more.
4.2.1 Zencam App Setup: Using the Zencam Security app on your smartphone or tablet, you can view
your camera live from anywhere, and access features such as pan/tilt/zoom, recording, taking snapshots,
two-way audio, and more.
4.2.2 Device Sharing Setup: Device sharing allows you to add specific Zencam users to your account.
Device sharing also allows you to access your camera using multiple mobile devices.
4.2.3 Zencam Cloud Activation Setup: Zencam cameras function off a cloud-based storage and playback
service which allows you to access recorded footage from any device. Please follow the instructions as
outlined on section to activate your Zencam cloud service.

9
4.2.1 Zencam App Setup
Note: Please Download and open the Zencam View Pro app from the App Store or Play Store.
Step 1 Power on the camera using the included power adapter.
Step 2 Download the Zencam app from the Apple Store or Google Play Store.
Step 3 Register a Zencam account.
Step 4 Tap the + icon on the top right corner of the Cameras page to add a new camera.

10
Step 5 Next scan the QR code on the back (or bottom) of your Zencam camera. If you are not able to
scan the QR code successfully, you can manually enter in the serial number of the camera by tapping on
the “Manually Enter Serial Number” button.

11
Step 6 If you entered or scanned a valid serial number, the model of your camera will show on the next
screen. Tap the Next button to continue.
Step 7 You will be prompted to set up the camera on Wi-Fi. Tap the button to continue. Ensure you are
connected to the Wi-Fi network you would like to set the camera up on.

12
You will be shown some important information regarding the Wi-Fi setup process. Note that Zencam
cameras only operate on the 2.4 Ghz frequency (so ensure your network is running on 2.4Ghz). Position
the camera about a foot away from your mobile device. Once the setup process begins, your device will
start to play a sound.
Step 8 Your camera should connect successfully after about a minute.

13
Step 9 Once the camera is connected, you will be requested to enter in the camera’s password. The
default password for the camera is admin.
Step 10 Next, you will be prompted to change the password. Please enter in a password that is at least 8
characters long, with a combination of both letters and numbers.
Step 11 Lastly, change the name of the camera. You can name the camera in relation to where it is
located, such as “Living Room”, “Office”, or “Kitchen”. Tap the Save icon in the top right corner once
finished.

14
Step 12 Congratulations! You have now set up your Zencam camera successfully. For recordings, you can
sign up for a free trial of Zencam Cloud for cloud recordings or insert a microSD card for local recordings.
If you had a microSD card inserted previously, you will need to re-insert it.
4.2.2 Device Sharing Setup
Device sharing allows you to add specific Zencam users to your account. When you add a shared user,
the shared user will have access to your camera and features such as live viewing, recording, playback,
and two-way audio. If you would like to proceed with the device sharing process, please follow the step
by step instructions provided in this article.
Step 1: Please log into your camera via the Zencam Security app.
Step 2: Once you are logged into your camera, please select the settings (gear wheel) icon in the upper
right-hand corner.
Step 3: In the settings menu, please click on "Device Sharing".

15
Step 4: In the device sharing menu, please click on, "Add a Shared User".
Step 5: In the Add a Shared User menu, please enter a registered Zencam account email you would like
to share your camera feed with. Once you have entered in the email address you would like to share
your camera with, please press "OK" to continue.

16
Step 6: Once you have pressed OK, you will be prompted as to whether you would like to still add the
shared user to your device. If you would like to proceed with the process, please press "OK", if not there
is also an option to cancel the process.
Once you press OK, the device will be successfully shared with the desired user. To continue, please
press "OK".

17
Once you have completed the device sharing process you will then see the added user in your "Live View
Sharing" menu. This will indicate that the shared user is successfully entered your list of authorized users
that can view your camera's live feed.
4.2.3 Cloud Activation Setup
Zencam offers a diverse solution for storing your recorded events, such as providing cloud-based storage
options. If this is your first time setting up cloud storage on your Zencam camera, please follow the step
by step guide provided to complete the process.
Step 1: Please select "Cloud Recordings" from the main menu. If you are setting up a new cloud service,
please click on the "Activate Cloud Storage" to continue.

18
Step 2: In this menu you will notice a variety of different cloud plans to choose from. These includes
plans that provide 7-day storage, to 14 days, up to 30 days of storage. Please select which plan will suit
your needs from the menu. Once you have chosen the desired storage plan, please click on the "Buy"
option to continue.
Step 3: Please enter your method of payment. Zencam offers you several different methods of payment.
You can pay directly with a credit card, PayPal, as well as provides you an option to auto renew your

19
subscription. To proceed with the process, please select your method of payment and confirm the
payment with the "Confirm Payment" button.
Note: If auto renew is selected, your subscription will be renewed every month unless you cancel it.
Payment will automatically be taken two days before it is due. Please ensure that you have appropriate
funds in your account before payment is due.
Step 4: Once you have confirmed your payment method you will then need to enter your payment
credentials. For a credit card payment, please enter the name listed on the card, a valid phone number,
the credit card number, expiration date, CCV number listed on the back of the card, and the billing zip
code. Once this information is entered, please select the "Pay" option to continue.

20
Once the payment credentials have been properly entered and the "Pay" button is selected, your
transaction will then begin to process.
Congratulations! Once the payment has been processed successfully, you have now completed the cloud
storage activation process. You will now be able to store, and access recorded events via your
established cloud account.
/