9. Technical Specifications .........................................................................35
4 Table of contents
Table of contents
1. Safety Instructions .....................................................................................5
2. System Requirements ............................................................................... 7
3. Getting Started - Connecting Devices ..................................................... 8
3.1 Setup............................................................................................................ 8
3.2 User Account and Camera Setup on Android™ Devices......................... 9
3.2.1 Power ON and Connect the Camera ........................................ 9
3.2.2 Download Hubble for Motorola Monitors App .......................... 9
3.2.3 Run Hubble for Motorola Monitors App on Android™
Devices ........................................................................................ 9
3.2.4 Add the Camera to your account ............................................. 10
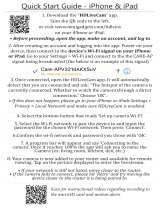
3.3 User Account and Camera Setup on iPhone
®
/iPad
® .....................................
13
3.3.1 Power ON and Connect the Camera ...................................... 13
3.3.2 Download Hubble for Motorola Monitors App ........................ 13
3.3.3 Run Hubble for Motorola Monitors App on iPhone
®
/iPad
®
... 13
3.3.4 Add the Camera to your account ............................................. 14
4. Camera Functions:.................................................................................. 19
4.1 Connecting the Camera Unit to power ................................................... 19
4.2 Overview of the Features on Hubble App ............................................... 19
5. Working with PC/Notebook...................................................................22
6. Procedure for Resetting the Camera......................................................23
7. Help..........................................................................................................24
8. General Information ................................................................................ 31