Page is loading ...

Predator NX
Gas
& Gas SE
Gas Gas SE
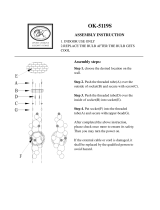
MAIN BLADES 710mm 700mm
MAIN ROTOR SPAN 62.2 in 61.4 in
TAIL ROTOR SPAN 10.5 in 11.2 in
OVERALL LENGTH 56.9 in 56.9 in
HEIGHT 18 in 18 in
ENGINE Z231H Z260H
Century Helicopter Products
Designed and Developed in USA
4th Edition, Copyright September 2007. All rights reserved.
SPECIFICATIONS
Instruction
Manual

2
Building Instructions for the Predator Gas eCCPM helicopter kits.
Introduction
Congratulations on your purchase of Century Helicopter Product’s newest RC helicopter model.
The Predator Gas eCCPM is an excellent addition to Century’s Predator model helicopter line.
The two stroke gasoline Predator is well suited for all ying levels and lowers fuel costs while
extending into markets where the glow engines cannot compete. Compared to other 60 class
models, pilots will be elated to nd the Predator Gas is easy to build. This kit will exceed your
expectations for precision control at an aordable price.
In order to take advantage of the Predator’s performance capabilities we recommend using a high
quality computer radio system with 120 degree eCCPM mixing. The radio system should have
at least 8 channels to use modern heading lock gyros and throttle governors. The radio should
also have a minimum of 5 programmable points on both throttle and pitch curves. Servos used
should be a matched set of 3 for the collective system, be of quality coreless, ball bearing and
having a minimum torque rating of 70 oz/in. The tail rotor servo should have a servo speed of
0.11sec/60 degrees or better.
Warning
This radio controlled model is not a toy! It is a precision machine requiring proper assembly
and setup to avoid accidents. It is the responsibility of the owner to operate this product in a
safe manner as it can inict serious injury otherwise. It is recommended that if you are in doubt
of your abilities, seek assistance from experienced radio control modelers and associations. As
manufacturer, we assume no liability for the use of this product.
Pre-assembly Information
Upon opening the kit, all the major component parts are bagged by relationship to the dierent
sections of the helicopter. Various assemblies have been pre-assembled only requiring the nal
assembly. The particular parts, screws and nuts required for each step are packaged in the same
bag as the parts. Be careful when opening each bag as not to lose any hardware. As a reminder,
all metal to metal screw assemblies require L242 Blue thread lock compound, all metal to plastic
screw assemblies require slow setting cyanoacrylate adhesive (Slow CA) and all bearing race to
metal shafts should use L262 Red threadlock compound.
Care has been taken in lling and packing of each bag however mistakes do happen, if there is
a parts shortage or missing hardware please contact us at:
Century Helicopter Products
1740 Unit C Junction Ave.
San Jose, CA 95112
Tel: 1-408-451-1155
www.centuryheli.com
Helicopter Building Safety
Upon opening the helicopter kit, various components
have been pre-assembled to allow the builder to progress
quickly through the construction process. Ultimately, it
is your responsibility to check and verify that all compo-
nents are installed and setup to operate properly.

3
This manual has been written for both the Predator Gas, CN1303 & Predator Gas SE, CN1304 se-
ries of helicopter kits. The manual follows a step by step approach to building the helicopter with highlight
labeling for components that are included in the Gas SE only.
Every attempt has been made to ease the assembly of your kit, at each step where there are complex as-
semblies you can read the detailed written instructions to walk you through each step. Remember to take a
few minutes before each step to carefully examine the step in order to become familiar with the parts and
assembly sequence before beginning that step.
Predator Gas & Gas SE Construction Manual
Part#CN2015 Hardened Tip Hex Screw Driver Set
Part#CN2026 Pitch Gauge with Paddle Gauge
Part#CN2034A 15
0
Curve Tip Ball link Pliers
Part#CN2052 Main Blade Balancer
Part#CN2293 Fan Hub Puller
Part#CN2055 Ball Link Sizing Tool
Part#CN2070 Universal Flybar Lock
Part#CN2219 Ball Link Easy Driver
Part#CN2255 Control Rod Guage
Part#CNWI26555 5.5mm Nut Driver
Strap Wrenches
Torque Wrench
Screwdrivers - Slotted and Phillips head.
Long-Nosed Pliers.
Allen Wrenches - 1.5 to 5.0mm
Appropriate Socket Wrench - Spark Plug
Hobby Scissors
Double Sided Foam Tape ( 1/16” - 3/32” )
Foam Rubber ( radio packing )
JB Weld ( bond clutch lining )
Locktight 260 Green, 242 Removeable
& 262 Permanent
Hobby Grease ( Super Lube )
Oil to lubricate sliding shafts (Triow)
Tygon Fuel Line 1/8” ID - Z231 (3 feet)
Tygon Fuel Line 3/32” ID -Z260 (3 feet)
Recommended Tools & Accessories
The tools and materials listed below are
the minimum needed to build the helicopter:
In addition, the following will make assembly and setup
easier, and prove useful later in your model toolbox:
Symbols used to help assist you in building the kit:
Apply
oil
Apply
threadlock
Special At-
tention
Full Scale
Drawing
Repeat Steps
as specied
Apply JB
Weld
Partially
tighten
Purchased
Separately
Apply
Grease
Cut away
Shaded Por-
tion
Helpful
Tip
Hardware Description and Identication: M3x6 = 3x6mm and can refer to screws or ball bearings.
M3x6 Phillips Machine Screw
M - metric
3 - diameter
6 - length
M3x6 Self Tapping Screw
M - metric
3 - diameter
6 - length
M3x10 Socket Cap Screw
M - metric
3 - diameter
6 - length
3x7 Ball Bearing
M - metric
3 - inside
6 - outside
Remove oil
residue from
fasteners before applying
any threadlock agent.
Tap holes with
machine screws
before installing steel
balls in plastic.
Tap holes with
machine screws
before installing self tap
screws in plastic.
Tap holes with
machine screws
carefully in plastic holes
with bottoms.
Apply
CA glue

4
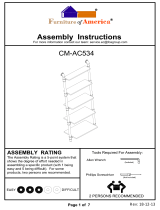
#HI6160A
Rotor Head Block
& M2.5x8 Socket Screw x 2
The entire rotor head comes pre-assembled
with the standard HI6181A (red) head dampers
installed. 3D and aerobatic pilots should disas-
semble the rotorhead and install the hard HI6181B
(black) head dampers. Press in the head dampers
into the rotor head block. Lubricate the inside
surface of each damper with light oil. Leave the
M2.5 screws loose.
M3 Threaded Stud
Bond the M3 threaded stud into the head button using
L262 Red threadlock then apply more threadlock to the
exposed threads and thread into the top of the rotor head
block. Remove any extra threadlock compound.
Insert one ball bearing into each bear-
ing cup and insert into the offset plate.
Apply one small drop of slow cyano-
acrylate glue (Slow CA) to the joint
between the backside of the bearing
cup and the offset plate. Insert one
ball bearing into each tie bar, using
an available M3 socket cap screw
form threads into both ends of the tie
bars. Insert one M3x6 button head
screw through the right side hole of
the offset plate (see photo) and thread
into one tie bar. Make two identical
sub-assemblies. Note that the bear-
ing cups face outwards from the head
block. Insert one M3x15 button head
screw through the tie bar bearing, slide
one steel spacer and carefully apply
L242 Blue threadlock to the exposed
threads and insert into the right side
of the head block. Do not overtighten.
Repeat for the second sub-assembly.
Once complete apply a small amout
of slow cyanoacrylate glue and insert
one HI6167 special long thread ball
into each offset plate to complete the
assembly.
#HI3167B Off-
set Plates x 2
#HI3167F
Bearing Cups x 2
#HI3167G
Tie Bars &
Spacers
#CNBB37
M3x7 Ball
Bearing x 2
#CNBB48
M4x8 Ball
Bearing x 2
#HI6167
Special Ball x 2
Steel Ball on Left side.
M3x15 Button
Head Screw
#HW6001
#HW6001
M3x6 Button
Head Screw x 2
Step 1 Rotor Head Block
#HI6181B
Head Dampers
Hard (Black) x 2
3D Flying
#HI6181A
Head Dampers Stan-
dard (Red) x 2
Sport & Scale Flying
Step 2 Seesaw Assembly
Completed rotor head.
Bond bearing cup
holder to metal
offset plate.
Step 3 Head Button - Gas SE
#CN2215A
Machined Head
Button
Gas SE only

5
#HI6189
Bell Mixing
Arm
#HW6001
M3x18 Special
Shoulder Bolt
#CNBB37F
M3x7 Flange Ball
Bearing x 2
#CNLR1014
Short Ball
#CNLR1020
Medium Ball
Press one M3x7 anged ball bearing into
one side followed by one M3x5 spacer and
another anged bearing from the opposite
side. If the bearing is tight, lightly sand the
bell mixer and use L262 Red threadlock
to bond the bearing in place. Install the
CNLR1014 short steel ball into the single
hole side of the bell mixer and install the
CNLR1020 medium steel ball using L242
Blue threadlock. Install the medium steel
ball according to the table to suit your y-
ing preference. Use the center hole for sport
ying. Make two assemblies.
Step 4 Bell Mixer
Press one M8x16 ball bearing into both ends of
each main rotor blade grip. Slide one M14 thrust
washer against the bearing closest to the main
rotor blade. Make sure that the bearing and the
thrust washer are properly seated into the deep
end of the blade grip. If necessary use a socket
that matches the outside diameter of the bearing
and press into position. Make two assemblies.
1:1.6 3D
1:1.3 3D & Sport
1:1 Sport & FAI
Bell Mixer Ratios
#HI6184A
Main Blade
Grip
#CNBB816
M8x16 Ball
Bearing
#HW6183
M14 Thrust
Washer
M3x18 Special Socket
Shoulder Screw
#HW6001
#CNLR1014
Short Ball
Step 5 Main Blade Grip
Bell Mixer
Assembly
#HW6205
M3x5x3
Spacer
Step 6 Main Blade Grip Assembly
Using an available M3 screw, care-
fully form the threads in the blade
grip arm. Slide the M3x18 special
socket shoulder screw through the
bell mixer arm from the at side, add
one M3x5x3 spacer and apply a drop
of Slow Cyanoacrylate glue or Epoxy
glue to the end of the threads before
installing into the blade grip. Tighten
the bolt until there is no end to end
movement, but do not overtighten
the bolt as you can strip out the hole.
Make two assemblies.
Slow cyanoacrylate
or Epoxy glue
Blade Grip assembly
from Step 5
#HW6205
M3x5x3 Steel
Spacer x 2
#CNLR1020
Medium Ball

6
Remove one damper and press the feathering spindle to seat the ball near the center of the rotor hub. Reposition the rubber
damper in the rotor hub and slide one large shim against the damper followed by three regular stiffness shims and one blade
grip assembly onto the feathering spindle. The bell mixer and pitch arm of the blade grip is mounted on the leading edge
when as the head rotates clockwise. Install the M7x15 thrust bearing and lubricate the bearings with light grease. Looking at
the two steel races of the thrust bearing, note that the innermost surfaces have different widths because the inside diameters
are different. Slide the rst larger diameter steel washer (thin race, larger ID) followed by the greased ball race, followed by
the second steel washer (thick race, smaller ID). Remove any grease that may have transfered to the threads using a cotton
swab dipped in alcohol. Apply L242 Blue threadlock to the inside threads on the feathering spindle using a pin and install
the M5x10 socket cap screw with washer. Do not overtighten this bolt because it will air the end of the spindle making
removal of the blade grip nearly impossible. Repeat for the other blade grip.
Step 7 Feathering Spindle & Blade Grip
#HW6182
Stiffness
Shims
#HW6180A
Feathering
Spindle
Large
#HW6180A M5x10
Socket Screw & M5
Flat Washer
thin
race
(inside)
larger ID
thick race
(outside)
smaller ID
#CNBB715T
M7x15 Thrust
Ball Bearing
Hobby Grease
Generally, grease
is needed for thrust
bearings and the tail
rotor gears. A light
Lithium or Silicon
grease should be
used, commonly
found at hobbyshops
for RC cars.
Step 8 Flybar Control Yoke
Pushrod A is already assembled but check that the length is
actually 47mm (center to center). As the pushrods are build
and installed they should be checked for tightness. Press
one ball link onto each double studded steel ball, making
sure that pressure is applied from the side of the ball link
with circle mark. While holding one ybar control arm, ap-
ply a small amount of slow cyanoacrylate glue and thread
one end of the double studded steel ball into each standoff.
When it becomes difcult to turn with ngers, apply slow
CA to the threads and start screwing in the tapered control
arm stand-off on the other end of the ball.
M3x12 Button
Cap Screw
#HI3176C
Flybar Con-
trol Arm
#HW3176C Double
Studded Steel Ball
Pushrod A 47mm
(center to center)
#HI6145 Ball Link x 2
#HW6192 25mm Pushrod x 2
#CNLR1006
M4x6 Micro Washer
M4x5 Set
Screw
#HI3176C
Tapered
Standoff
Ball Link Direction
All ball links are molded to be installed in only one
direction. Look carefully at the hole for the ball,
one side is clean while the other side has a circular
mark, 1mm larger than the hole. The marked side
presses over the steel control balls.
Circle Mark
presses over
steel ball.
Round Recess
on Top
A correctly installed the ball link should rotate with
some resistance when the metal pushrod is rotated in
your ngers. If the ball link to too tight the preferred
solution is to purchase Century’s ball link sizing tool
[CN2055] to custom t each ball link to its steel ball.

7
Step 9 Flybar & Flybar Paddles
Slide and center the ybar through the head assembly. Carefully look at the ybar control arm assemblies from the previous
step and notice that when installed correctly, the securing set screw is on top. Insert one M4x6x0.5 micro washer #CNLR1006
against each bearing then slide the control arm halves onto each side, so that they match together and the set screw remains on
top. Insert one M3x12 button head socket screw to secure the opposite standoff, hold the tapered standoff using pliers while
tightening the screw (to avoid the double studded ball from stripping the plastic threads in the center). Loosely tighten the
M4x5 set screws into the round aluminum inserts aligned with the at spots on the ybar. Using a ruler, check the distance
between the end of the ybar and the control arm and adjust until the lengths are the same. Tighten both set screws, one at
a time using L242 Blue threadlock. Make a pencil mark 5mm past the threads on both ends of the ybar. Thread the ybar
paddles onto the ybar until the mark is reached, align the paddles parallel. Again using the ruler, rotate one paddle or the
other to get equal distances, remember leading edge of the paddles turn clockwise.
Set the length of pushrod B to 26mm (center to center) and attach to the ball on the adjustable side of the bell mixer and to
the steel ball on the lower seesaw assembly. Check the ball links for proper t, adjusting if necessary and remember that the
bell mixer is positioned on the leading edge as the rotor head rotates clockwise.
Pushrod B
26mm (center to center)
#HI6145 Short Ball Link x 2
#HW6192 14mm Pushrod x 2
Note: Bell Mixer
positioned on
leading edge
as head rotates
clockwise.
#HW6173 Flybar 520mm
*packed with tailboom.
M4x5 Set
Screw
M3x12 Button
Head Screw
HI6179B 30gr Sport Black Gas
#HI6009A Cooling Fan
M3x6 Flat Head
Screws x 4
Step 10 Cooling Fan
The cooling fan hub and fan comes assembled but
requires nal assembly. Remove each of the M3x6 at
head screws one at a time, apply L242 Blue threadlock
and tighten back into the cooling fan hub.
If a governor is planned to be installed, install magnets
into the holes provided in the bottom of the cooling
fan. A similar hole has been made in the cooling fan
shroud mount plate to mount the sensor on the right
side (mufer side) of the engine.
#HW6012HDV2
Cooling Fan
Hub
Holes for installing
governor magnets.

8
Step 11 Gas Engine Preparation
Remove and keep the four M4x14 Phillips head screws
to remove the pull start unit from the factory mount
plate. Similarly remove the factory pull start plate and
also keep the M5x14 at head screws. The screw will
be reused to mount the engine and pull start unit to
the helicopter.
Care must be taken in removing the M5 at head screws
from the engine because they are very tight. Use the
T-handle Phillips screwdriver tool that is included with
the engine, as this it the correct size.
Step 12 Landing Gear Frame
Align the engine crankcase to the land-
ing gear frame and carefully route the
red coil wire above the coil without
putting a strain on the wire. Insert three
M5x15 countersunk Phillips screws
using L242 Blue threadlock. On some
helicopters, the clutch will sit slightly
below the bottom of the clutchbell. If
needed, insert three shims between the
engine and the landing gear frame.
#HW6117B
Landing Gear
Frame
M5x14 Coun-
tersunk Phillips
Screws x 3
(with engine)
#HW6117B
Landing Gear
Frame
M4x6 Socket Cap
Screw x 2
M4x10 Socket
Cap Screw x 2
M4x6x4
Spacer x 4
Step 13
Removeable Pull Start
Mount & Hardware - Gas SE
Install the spacers onto the M4 socket
bolts. Install two M4x6 socket bolts
with spacers to the rearmost holes us-
ing L242 Blue threadlock. These only
hold the plate while starting, do not
overtighen. Install the M4x10 socket
bolts with spacers to the forwardmost
holes using threadlock. Using the
original M4x14 Phillips bolts, insert
the screws through the removable plate
with the larger end of the keyholes in
the counter clockwise direction. Mate
the pull start unit from the other side
with the handle down and rearward and
secure with four M4 locknuts. This will
position the handle on the carburetor
side with space to pull freely.
M4x6 Socket
Cap Screw
& Spacer x 2
(shorter)
M4x10 Socket
Cap Screw &
Spacer x 2 (lon-
ger)
M4x14 Phillips
Machine Screws &
M4 Locknuts x 4
Observe
correct
direction!
Gas SE only
HW6118A
Removeable Pull Start Plate &
M4 Locknut x 4
#HW6207
M6x13x0.2 Shims x 4

9
Step 14 Removeable Pull Start Plate
Note that the pull start handle should be on the carburetor side. Align
the pull start plate keyholes to the bolts on the bottom plate, press
towards the engine and once the two plates are ush, rotate the pull
starter unit clockwise until it stops. Removal is just the opposite.
When choosing to use the removeable plate, the starter unit must
be removed prior to ying the model, as it could easily fall during
ight off from vibration.
M4 Locknuts x 4
Handle is mounted
on carburetor side.
Gas SE only
Step 15 Fixed Pull Start Unit
Look carefully at the bottom plate as there are four M4
threaded holes to the immediate right edge of each oval
slot. These are to permanently attach the pull start unit
to the bottom plate. Position the pull start unit to have
the handle point rearward when the handle is mounted
on the carburetor side of the engine. This will allow the
handle to be pulled without interference with the land-
ing struts. Attach using four M4x14 Phillips machine
screws using L242 Blue threadlock.
M4x14 Phillips
Machine Screws x 4
(with engine)
Step 16b Cooling Fan Shroud Mount Plate
Lay the cooling fan shroud mount plate onto the face of the
engine with the straight edge towards the cylinder head and
the access hole on the mufer side. Install four M5x8 socket
cap screws to secure the plate using L242 Blue threadlock.
Do not overtighten these bolts as they thread into the front
half of the aluminum cast engine crankcase. Dip a cloth in
rubbing alcohol and degrease the threads in the end of the
engine crankshaft. Apply liquid oil to the outside taper of
the engine crankshaft, the entire taper should be coated. Do
not get oil into the internal threads. Use Triow or equiva-
lent oil.
#HW6118
Cooling
Shroud
Mount Plate
M5x8 Socket Cap
Screws x 4
Access hole for
optional governor
Sensor
Degrease crankshaft
threads.
Carburetor Mount
A greater danger is the potential to generate sufcient RF
(radio) noise to cause radio gitching and in certain circum-
stances will force a PCM reciever into radio lock out, com-
monly resulting in a crash.
Overtightening the fan hub in the next step can
cause these screw heads to interfer with the fan,
these can be shortened if necessary.
Step 16a Engine Stabilization System
CN2300
Increases rigidity of the main frame of all
Predator Gassers to enable you to perform
hard maneuvers with more ease. Install
as shown in these photos. You will need
to dremel the fan shroud where the E.S.S.
mounts.

10
Step 17 Engine Cooling Fan
Slide the cooling fan assembly onto the engine. Locate
the M6x15 socket cap screw and M6x13 at washer
and thoroughly clean these parts to remove any oil
residue. Install the fan assembly onto the crankshaft.
Slide the washer onto the M6x15 socket cap screw
install through the center of the fan hub. Using a strap-
wrench wrapped around the outside of the cooling fan,
tighten the M6x15 socket cap screw until hand tight
and check the runout of the fan assembly. Acceptable
runout is 0.002”, if more, remove the fan assembly
and install again. Once satised, remove the M6x15
socket cap screw, apply L242 Blue thread lock and
secure in place.
M6x15 Socket Cap
Bolt & M6x13 Flat
Washer
5.0mm Hex
Key required
#HI6009A Cool-
ing Fan
#HW6012HDV2
Fan Hub
#HI6020A Fi-
berglass Cool-
ing Shroud
M2.5x8 Socket
Cap Screws x 3
Step 18 Cooling Fan Shroud
Slide the fan shroud over the cooling fan and secure
using three M2.5x8 socket cap screws using L242
Blue threadlock. Tighten these until they stop and
that’s it, do not torque these bolts!
If you plan to install a governor, it is best to fabricate
the mount for the sensor at this time, get it tted and
set the sensor gap before the fan shroud is installed.
#HW6011HD
Clutch Shoe
M4x6
Button Head
Screws x 4
Step 19 Clutch Assembly
Apply light oil to the Torrington bearing in the center of the clutch shoe. Be
sure that no grease contacts the edge of the clutch or it could get transfered to
the clutchbell. Slide the clutch shoe onto the fan hub, press down and install
four M3x6 button head screws using L242 Blue threadlock.
Apply a few drops
of light oil on the
Torrington bearing.
Take the time now to make sure that the clutch shoe is properly
seated on the fan assembly by looking at it from the side and
making sure there is no vertical movement as you slowly turn
over the engine. Experience modelers can dial indicate the
clutch, the acceptable amount of runout is 0.002”

11
Step 20 Rear & X Frame Assembly
Align the rear X frame with the left side of the rear
lower frame (notice the spark plug access holes
align) for the spark plug wire. Insert one M3x8
socket cap screw from the outside of the lower
frame, through the lower hole only in the X frame
and secure with an M3 locknut on the inside. At-
tach the right side lower frame in exactly the same
way.
Assemble these bolts only to position the frames
at this time, they will be tightened when the up-
per frames are installed. Note that the upper hole
remains empty until that time also.
#HW6117A
Rear X Frame
#HW6115C
Rear Lower
Frames - Left
Side
M3x8 Socket
Cap Screw &
M3 Locknut x 2
Align the
cutouts.
Step 21 Rear Lower &Bottom Frame
Slide the rear frame assembly over the land-
ing gear frame and insert the spark plug wire
through the cutout in the left side frame and
the X frame. Insert four M3x8 socket cap
screws through the lower frames into the
landing gear frame, do not use threadlock at
this time. Press the spark plug cap over the
spark plug in the engine. Similarly, the M3x8
socket cap screws will not be tightened until
after the upper frames are installed.
Attached to the coil is a black wire, this is
generally not used in helicopters and should
be secured out of the way with a cable tie.
#HW6117B
Landing Gear
Frame
Spark Plug Wire
with isolator,
through the
frames.
M3x8 Socket
Cap Screw x 4
Black coil
engine lead,
not used.
Step 22 Battery Tray
Four M3x20 socket cap screws need to
be installed from the inside and threaded
through the battery tray. After the fuel tank
is installed, there is no access to hold the
head of these bolts. We recommend that
these bolts be bonded in placing using
L262 Red threadlock (JB Weld or Slow
Cyanoacrylate glue can be used as an
alternative) to permanently bond these
bolts in place.
M3x20 Socket
Cap Screw x 4
#HW6112C
Battery Tray

12
The fuel tank isolators are a “U” prole that need to be tted
to the fuel tank openings on the lower front side frames. Start
at the center of one edge and work the isolator into the frame,
seating the corners. Towards the end, continue forcing the rub-
ber material until the ends butt against each other. Note that
the frames are different sizes and some trimming is necessary.
Starting from the left side, slide one of the servo side frames
onto the threaded studs on the battery tray, followed by two
M3x10x8 spacers and nally the Left (with smaller fuel tank
opening) front lower frame. Secure using one M3 locknut at
the rearmost stud, do not overtighten as it could loosen the bolt
on the battery tray.
M3x10x8 Short
Frame Spacers x 2
Battery Tray
Assembly
#HW6112
Servo Side
Frame
#HI6138
Fuel Tank
Isolator
#HW6115B
Front Lower
Frame
(Left)
M3 Locknut
Step 24 Vertical Frame
Align the front frame holes to the vertical frame
(ange goes rearward) and the upper holes of the
vertical frame to the battery tray. Insert two M3x8
socket cap screws from the front lower frame through
the vertical frame and secure using two M3 locknuts.
Insert two M3x8 button head cap screws (for fan
shroud clearance) from the vertical frame side and
secure using two M3 locknuts (locknuts need to be
held with pliers) from under the battery tray.
Step 23 Servo & Front Lower Frame - Left Side
#HW6112B
Vertical Frame
(ange rearward)
M3x8 Socket
Cap Screws x 2
M3
Locknut x 2
M3x10 Button
Head Screw x 2 &
M3 Locknut x 2
#HW6112
Servo Side
Frame
Step 25 Fuel Tank Fittings
J Fitting
#1
“J” Fitting
#2
Straight
Fitting
To top
of tank
#HW6138 Fuel
Tank Set
Press the Neoprene fuel line onto the straight tting before in-
stalling into the tank. After securing the tting into the tank, bend
the paper clip into a “J” to pull out the line to attach the clunk.
Continue to shorten the inside fuel line until the clunk will move
freely front to back and top to bottom.
50mm
20mm
Tank Top
J-Type #1
Tank Side
13mm
15mm
36mm
J #2
Straight
Straight Fit-
ting (1)
“J” Fitting (2)
Tank
Clunk
Neoprene
Fuel Line
#HI6138B
Fuel Fitting Set
M5 Hex
Nut (4)
21x25 at
washer
Assemble the fuel stopper by placing the small brass
tube into the rubber stopper where there is rubber
wall (sealing the fuel system). When connecting the
cap of the stopper make sure the holes DO NOT line
up (further sealing the plug).Tighten the fuel stopper
screw until just prior to compressing the rubber and
insert into tank. Once stopper is in fuel tank nish
tightening the plug screw.

13
Step 26 Right Front Lower Frames
Starting from the right side of the battery tray, slide
the matching servo frame in place rst followed by
two M3x10x8 spacers. Install the fuel tank with the
opening on the left side (the tank only ts one way)
and slide the front lower side frame over the exposed
threaded studs. Insert two M3x8 socket cap screws
through the front side frame and secure with two M3
locknuts on the inside ange of the vertical frame.
Install one M3 locknut on the rearmost stud at the
back of the battery tray, the front stud remains empty
at this time.
M3x10x8 Short
Frame Spacers x 2
#HW6115B Front
Lower Frame (Right)
M3 Locknut
M3x8 Socket
Cap Screws x 2
M3 Locknut
x 2
#HI6138A Fuel
Tank Spacer &
M3x8 Socket
Cap Screw
Step 27 Fuel Tank Spacer
As you will notice the fuel tank will oat between the
front lower side frames. Install the M3x10x17 fuel
tank spacer on the right side frame into the center
hole with one M3x8 socket cap screw using L242
Blue threadlock.
Step 28 Front Frame Assembly
Slide the front frame assembly over the landing gear frame and insert four M3x8
socket cap screws through the lower frames into the landing gear frame, do not use
threadlock at this time. Install one M4x10 socket cap screw and M4 at washer into
the slot in the frame, threaded into the side mounts on the engine crankcase. Do not
used threadlock until after the upper frames are installed.
M4x10 Socket
Cap Screws x
2 & M4 Flat
Washer x 2
M3x8 Socket
Cap Screws x 4
Do not threadlock the frame bolts
until the upper frames are installed
as it is critical to have the clutch
and clutch bell assembly align
perfectly. To accomplish the
frames can be shifted within the
limits of the fasteners.

14
Step 29 Clutch Bell & Short Bearing Block
Apply a small amount of L262 Red threadlock to the top edge of the
clutchbell and press in place using a thin walled automotive socket that puts
pressure only on the inside race of the ball bearing. Pressing from the outside race will damage the bearing which is not
covered by warranty. Finally, re-install the pinion being careful not to cross the threads using L242 Blue threadlock.
#HW6013HD
Clutch Bell As-
sembly 15T
Pre-Assembled
As the 15T pinion has a larger diameter than the top sur-
face of the clutchbell, it must be removed before the clutch
bearing is changed or installed. The pinion has a standard
right hand thread, if available use strap-wrenches, grip the
outside of the pinion and the clutch bell rmly and turn
anti-clockwise. The bearing must be installed into the
bearing block before it is installed onto the clutchbell.
Clean the inside race of the ball bearing and the surface
that where the clutchbell will be installed.
Step 30 Clutch Shaft & Lower Long
Bearing Block
Clean the top of the pinion gear and the inside surfaces of both the
upper and lower bearings inside the clutch shaft bearing block us-
ing alcohol. Apply a small amount of L262 Red threadlock to the
top edge of the clutch gear where it will contact the bearing. Press
the bearing block in place, rmly seating the bearing against the
top of the pinion gear. Insert two M3x12 socket cap screws from
below to attach the long bearing block to the short block. Do not
use threadlock until the gear mesh has been set.
#HW6045HD Lower
Long Bearing Block
(ange down)
M3x12 Socket
Cap Screws x 2
#HW6007
Clutch Shaft
Bearing Block
Step 31 Upper Canopy Mount
Looking carefully at the upper frames, the longer canopy mount is in-
stalled on the same side as the counter sunk hole above the main gear.
Install one M3x8 button head screw from the inside of the frame using
L242 Blue threadlock. Repeat for both upper frames.
M3x10 Button
Head Screw
#HW6125A
Long Up-
per Canopy
Mount
#HW6110A
Upper Side
Frame
(Right)
Gas SE only
Step 32
Upper Main Shaft Bear-
ing Block - Gas SE
M3x8 Socket
Cap Screw x 2
Install the upper main shaft bearing block into the upper
holes in the left side of the upper frame using two M3x8
socket cap screws. Do not use threadlock at this time,
until after the main shaft is installed.
#HW6042A
Triple Bearing
Block
#HW6045HD
Lower Short Bear-
ing Block

15
M3x8 Socket Cap
Screws x 4 & M3
Flat Washers x 4
26mm Thread-
ed Hex Spacer
#HW6110A Upper
Side Frame (Left)
#HW6042 Main
Shaft Bearing Block
#HW6125A Long
Canopy Mount
& M3x8 Button
Head Screw
Step 33 Upper Side Frame Assembly
Install the upper main shaft bearing block with the bearing facing upwards onto the left upper side frame (notice the counter-
sunk hole) using two M3x8 socket cap screws. Install the clutch bell assembly with bearing blocks using four M3x8 socket
cap screws and four M3 at washers. Install one M3x8 socket cap screw only into the forward most hole in the lower bearing
block and install the 26mm hex spacer in the front of the upper frames, secured using one M3x8 socket cap screw. Do not
use any threadlock on bearing blocks or frame spacers until the gear mesh is set.
M3x8 Socket
Cap Screws x 2
(No threadlock!)
Step 34 Elevator Servo
CCPM (cyclic collective pitch mixing) requires that the three servos that drive the
swashplate be the same model and more importantly the same speed and torque
rating. Digital and analog servos will y the Predator with ease as long as the
minimum torque rating selected is 70oz/in, rated at 4.8 volts.
Install the four rubber gromments
that are supplied with the servo
onto the servo mounts and insert
the brass eyelets so that the at
washer side of the eyelet is in-
stalled against the side frame. For
the elevator servo the eyelets are
installed from the top of the servo.
#HI3205 Servo
Mount Tabs x 2
M2.3x10 Phillips
Servo Screws x 4
Look at the upper side frame, the remaining right side will have the
slots to install the elevator servo. Having previously installed the
rubber gromments and eyelets (see on the right), install the eleva-
tor servo with its output shaft to the rear from the inside (outside
has the countersunk hole above the main gear) of the side frame,
and secure using four M2.3x10 Phillips servo screws
and two servo mount tabs. Continue tightening the
screws until tight, then back off
1/4 turn.
Servo Grommets & Eyelets
#HW6110A Up-
per Side Frame
(Right)
Servo installed
from inside the
frame.
M3x8 Socket
Cap Screws x 2
(No threadlock!)
Temporarily insert
an available M3x8
Socket Cap Screw
here without thread-
lock until the gear
mesh has been set.

16
Step 35 Upper Frame Assembly
#HW6110A Up-
per Side Frames
(Left & Right)
Start by installing the elevator bell crank
assembly, note that the left side ball bear-
ing is ush with the pivot axle. On the
right side frame, the axle extends outward
from the frame to attach the elevator arm.
Install four M3x8 socket cap screws into
the upper main shaft bearing block, front
hex spacer and forewardmost lower bear-
ing block. Install four M3x8 socket cap
screws into the clutchbell blocks with M3
at washers. Do not use any threadlock at
this time, these need to be loose until the
main shaft is installed and after the gear
mesh has been set.
#HI6032 Rear
CCPM Lever
M3x8 Socket
Cap Screws x 4
M3x8 Socket Cap
Screws x 4 & M3
Flat Washers x 4
(No threadlock!)
#HI6031
CCPM Cy-
clic Bell-
crank Set
26mm Threaded
Spacer
#CNLR1014
Short Ball x 2
#CNLR1020
Medium Ball x 4
#CNBB37
M3x7 Ball Bear-
ing x 4
M3x30 Socket
Cap Screw x 2
Stepped
Spacer x 2
Step 36 Front CCPM Bellcranks
Starting on the right side, insert one M3x30 socket cap screw through the right bellcrank (look at the left photo carefully)
on the side with the molded elevator plastic arm. Slide one stepped spacer with the step towards the ball bearing and posi-
tion the 26mm threaded spacer between the upper side frames in the rearmost hole (120
0
CCPM setup) and secure the right
bellcrank assembly. Assemble the left side bellcrank in the same way, do not apply the threadlock until after the gear mesh
has been set and tighten into the left side of the upper frames.
Right Side
Bellcrank
The technique to remove the two M3x30 socket cap
screws without damaging the 26mm spacer is to
slowly loosen each screw 1/8 turn at a time, chang-
ing from side to side to evenly unload the threaded
spacer. If you notice one side spinning the spacer,
tighten the opposite side again and repeat.
R
L
R
L
(No threadlock!)

17
Step 37 Rear CCPM Arm
Align and press the rear ccpm arm
onto the exposed axle with the arm
pointing to the bottom of the upper
side frames. This is a tight t, light
tapping with a plastic hammer will
help here. Once the arm is seated,
install the M3x10 button head
screw to secure it in place.
M3x10 Button
Head Screw
#CNLR1014
Short Steel Ball
Step 38 Constant Drive Gear Assembly
M3x6 Flat Head
Screws x 4
M3x6 Flat Head
Screws x 4
#HI6058M Auto-
hub - Inner Gear
CT Drive
#HI6058B Ma-
chined Inner Gear
70T - CT Drive
#HI6058N Auto-
hub - Outer Gear
CT Drive
#HI6058H
Machined Main
Gear 88T - CT
Drive
1
2
3
4
1
2
3
4
1
2
3
4
1
2
3
4
Gas SE only
#HI6064A
Autohub - Inner
Gear Sprague
CT Drive
#HI6064B
Autohub - Outer
Gear Sprague CT
Drive
#HI6064D
M15x18x0.20
Sprague
Shim
The constant drive autorotation unit simply slides apart, pull the inner hub assembly up and out from the outer hub. Install
the inner tail gear by aligning the four countersunk holes in the top of the inner gear with the auto hub inserted from below
using four M3x6 at head screws and L242 Blue threadlock. Tighten the bolts in numbered order. Assemble the main gear
in the same fashion with the main gear installed on top of the autohub, notice there is an alignment groove. Gas SE kits use
an M15x18x0.20 shim between the inner and outer hubs.

18
Step 40 Main Gear Pin
Before the main gear assembly can be installed this spacer must be positioned
in the recess of the lower bearing block assembly, it will simply self align in the
block. Slide the main shaft through the upper bearing block, the constant drive main gear assembly, the spacer and nally
through the lower bearing block assembly. Look carefully through the two open M4 threaded holes in the top hub and align
with the hole in the main shaft. Insert and press the M3x15 steel pin through the hub and roughly center it in the main shaft.
Using a permanent marker, mark both holes that will lock the pin in place. Insert the M4x4 set screws in each side and tighten
them equally, using L242 Blue threadlock. These do not need to be torqued down.
#HW6001 M3x15 Steel Pin
& M4x4 Set Screws x 2
Do not remove
the two set screws
that are already
installed in the top
auto hub, these are
factory installed.
Step 41 Bottom Collar
Inspect the bottom collar, make sure that the reduced step
diameter is towards the ball bearing. Slide the bottom
collar against the bearing and insert two M3x6 at head
cap screws using L242 Blue threadlock.
#HW6054 Bottom Collar &
M3x6 Flat Head Screws x 2
Step 42 Bottom Collar - Gas SE
Slide the at side of the thrust bearing spacer against the bear-
ing, followed by the larger ID race, apply grease to the ball race
and and nally the smaller ID race. Slide the bottom collar with
the at side towards the thrust bearing and insert two M3x6 at
head cap screws using L242 Blue threadlock.
#HW6054 Bottom Collar &
M3x6 Flat Head Screws x 2
#HW6045B Thrust
Bearing Spacer
Offset step
away from
thrust bearing.
Gas SE only
Now that the main shaft is installed, remove the
four screws that secure the upper main shaft bear-
ing block and the forwardmost lower bearing block
screw and one at a time and apply L242 Blue
threadlock and tighten in place.
#HW6054
M10x14x3.5 Spacer
Mark the set screws that
secure the pin.
Step 39 Auto Hub Spacer
thick race
(lower)
smaller ID
thin
race
(upper)
larger ID
#CNBB1018T
Main Shaft
Thrust Bearing

19
Step 43 Mast Stopper
Start one M2.6x8 socket cap screw into
the mast stopper. Slide the mast stopper
onto the main shaft, ensure the raised
lip is towards the bearing. Pull up on the
main shaft to remove any vertical play,
press the mast stopper down and tighten
in place using L242 Blue threadlock.
#HW6053 Main Shaft
#HW6054 Mast Stop-
per & M2.6x8 Socket
Cap Screw
Step 44 Mast Stopper & Upper Thrust Bearing - Gas SE
If not already done, remove and apply L242 Blue
threadlock to the upper main shaft bearing block
screws and the forwardmost screw on the lower bear-
ing block. Tighten in place.
The Gas SE includes the triple upper bearing block.
Slide the at side of the thrust bearing spacer against
the bearing, followed by the larger ID race, apply
grease to the ball race and and nally the smaller ID
race. Start the M2.6x8 socket cap screw into the mast
stopper. Slide the mast stopper onto the main shaft,
ensure the raised lip is towards the bearing. Pull up
on the main shaft to remove any vertical play, press
the mast stopper down and tighten in place using
L242 Blue threadlock.
#HW6054 Mast Stop-
per & M2.6x8 Socket
Cap Screw
#CNBB1018T Main Shaft
Thrust Bearing
thick
race
(upper)
smaller ID
thin race
(lower)
larger ID
Gas SE only
#HW6045B Thrust Bearing Spacer
Step 45 Starting Shaft and Hex Coupler
The gas kits include the regular starting shaft and hex coupler as in all the Predator kits to align the clutch to the clutchbell.
Clean both the starting shaft and the inside race of the bearing inside the clutchbell and the inside race of the top starting
shaft bearing. Apply a small amount of L262 Red threadlock positioned just above where the bottom clutchbell bearing
will sit on the starting shaft. Slide the starting shaft up through the bearing blocks. Apply a small amount of L242 Blue
threadlock to the top of the starting shaft and slide the hex coupler in place
aligning the at spot with one of the holes. Apply L242 Blue threadlock
to the the two M4x4 set screws and tighten in place.
The hex starting system has been successfully used with
the Z231H engine but signicant wear on the hex coupler is
common. Regular replacement of the hex coupler is normal
and is not covered by warranty. The pull start should be
used for the rst start of the day. Afterwards using a heavy
duty electric starter is possible.
The hex starting is not recommended for the
Z260H engine as damage can occur to your start-
ing equipment and helicopter components.
If not already
done, remove
and apply L242
Blue threadlock
x 4 and tighten
in place.
#HW6005 Start-
ing Shaft
#HW6002 Hex
Coupler & M4x4 Set
Screws x 2

20
Step 46 Main Gear & Clutchbell Gear Mesh
M3x12 Socket
Cap Screws x 2
Loosen the eight M3x8 socket cap screws
that hold the clutchbell assembly and the
two M3x12 socket cap screws between the
upper and lower bearing block assemblies.
Cut a strip of regular copy paper 12mm x
50mm and thread between the main gear
and the clutchbell gear. Press the clutch bell
towards the main gear and tighten up the
eight bolts. Proper gear mesh is achieved
when the paper strip will pass between the
gears without ripping or damaging the paper
strip, but no looser.
M3x8
Socket Cap
Screws x 8
& M3 Flat
Washers x 8
One at a time, remove each of the M3x8 and M3x12 socket cap screws, apply L242 Blue
threadlock and tighten in place. After completion, you should still be able to thread the paper
strip through the gears. If not, repeat this procedure.
8mm Gas Frame
Spacers x 10
14mm Servo
Frame Spacers
X Frame x 2
17mm Rear Frame
Spacers x 4
26mm Threaded
Spacers x 2
26mm
Threaded
Hex Spacer
22mm Threaded
Hex Spacer
Step 47 Frame Spacers
Ensure that the correct
spacers are used in the
correct locations when
assembling the upper and
lower frame assemblies.
#HW6127B Gas Frame Spacer Set
Step 48 Clutch & Clutchbell Alignment
Over the next few steps the upper and lower frames will
be joined. The frames have the necessary slots to allow for
precise alignment between the clutch and the clutchbell.
The goal is to have the clutch sit parallel and centered in
the clutchbell. It is best to sight the bottom edge of the
clutch with the aluminum clutchbell in both fore-aft and
left-right directions to ensure remains parallel when all
the fasteners have been tightened. It may be necessary to
further loosen the frame fasteners.
Parallel
Rear frame
spacers are
stacked.
Now that the gear mesh has been set, go back and remove all the
upper frame screws one screw at a time, apply L242 Blue thread-
lock and tighten in place. These include the M3x8 frame screws,
M3x30 bellcrank screws and the front hex spacer screws.
/