Page is loading ...

1007313-2-B
Installation Guide
K-3326
Stainless Steel Sinks
Français, Page 6
Español, Página 10
K-3328
K-3374
K-3375
1007313-2-B

1007313-2-B
2
Kohler Co.
Tools and Materials
Pencil and
Marker
Measuring Tape
Sealant
Assorted
Screwdrivers
Thank You For Choosing Kohler Company
We appreciate your commitment to Kohler quality. Please take a few
minutes to review this manual before you start installation. If you
encounter any installation or performance problems, please don’t
hesitate to contact us. Our phone numbers and website are listed on
the back cover. Thanks again for choosing Kohler Company.
Before You Begin
- Refer to the Homeowners Guide to determine all necessary
components for your installation.
- This sink is not intended for undercounter installation.
- Remove the sink from i ts carton and inspect for damage.
- Install this sink directly to the cabinet. Do not install to the
countertop.
- Observe all local plumbing and building codes.

1007313-2-B
3
Kohler Co.
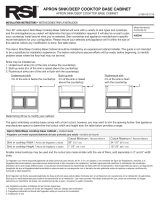
Sink
Bracket Assembly
Bottom Bracket
Cabinet
Cabinet
Wall
Sink Groove
5” (12.7cm)
12” (30.5cm)
5” (12.7cm)
Finished Wall
Bracket
Countertop
Front of Cabinet
Countertop
TOP VIEW
1. Mark the Bracket Locations
CAUTION: Risk of personal injury or product damage. Large sinks
are very heavy. Get help lifting the sink.
- Position the sink directly on the cabinet. Verify the cabinet size and
sink fit - the side edges of the sink should line up with the edges of
the cabinet.
- Assemble the brackets with the screws provided. Thread the screws
only halfway into each bracket.
- Hang two bracket assemblies from each of the side and back sink
grooves, and position them as shown. Make sure the bottom of the
sink rim touches the top of the cabinet.
- Hold the bottom bracket sections against the 3/4” (2cm) thick cabinet
walls, and mark the hole locations.
- Remove and disassemble the brackets.
- Remove the sink from the cabinet.

1007313-2-B
4
Kohler Co.
Screws
Bottom
Bracket
Cabinet
Wall
Sealant
2. Install the Bottom Brackets
- Line up the bottom bracket sections with the marks on the cabinet
walls (minimum 3/4” (2 cm) thick), and secure to the walls with
wood screws.
- Securely tighten the screws, but do not overtighten.
- Install the faucet and strainers at this time according to the
manufacturer’s instructions.
3. Apply the Sealant
- Clean all residue from the top rim of the countertop.
- Apply a generous bead of silicone or latex sealant to the bottom of
the rim of the sink.

1007313-2-B
5
Kohler Co.
Trap
Top Brack-
et
Sink Groove
Bottom Bracket
4. Install the Top Brackets
- Set the sink on the cabinet so the edges line up with the cabinet sides
and back.
- Hang the top bracket sections from the side and back grooves of the
sink, and position them over the bottom bracket sections.
- Loosely assemble the bracket sections with the screws.
- Make sure the sink has not moved out of position. Carefully thread
the screws to tighten the brackets and secure the sink in place. Do
not overtighten.
5. Connect the Supplies
- Connect the strainers to the trap and drain assemblies. Follow the
strainer manufacturer’s instructions.
- Connect the faucet supply lines and complete the faucet installation.
Be sure to follow all instructions packed with the faucet.
- Inspect for leaks.
6. Clean Up
- Do not use abrasives on this product, as they will scratch and ruin
the surface finish.
- Remove stubborn stains, paint, or tar with turpentine or paint
thinner.
/