Page is loading ...

Thank You For Choosing Sterling
We appreciate your commitment to Sterling value. Please take a few
minutes to review this manual before you start installation. If you
encounter any installation or performance problems, please don’t
hesitate to contact us. Our phone numbers are listed on the back cover.
Thanks again for choosing Sterling.
Tools and Materials
Before You Begin
WARNING: Risk of personal injury. Metal surfaces are sharp
and can cause severe cuts. Use gloves and handle the sink
edges carefully.
Observe all local plumbing codes.
Shut off the hot and cold water supplies.
Unpack the new sink and carefully inspect for damage.
Verify that all included materials are present.
Included Materials
•
(1) Stainless Steel Sink
•
(1) Installation Guide
Return the sink to its carton until it is time to install it.
Illustrations shown may not represent your actual product.
Pipe
Wrench
Safety
Glasses
Keyhole/Compass Saw
or Sabre Saw
Tape Measure
Plumbers
Putty
Putty
Knife
Drill
Pencil
Sealant
Ratchet with Deep
Socket or 5/16" Nut
Driver with Hollow Shaft
1014305-2-F 2 Sterling

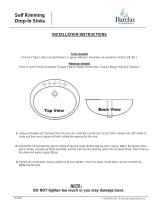
1. Prepare the Countertop
For existing installations, carefully lift the old sink out of the
countertop. Compare the existing cut-out to the required cut-out
size. If needed, enlarge the cut-out hole according to the
directions for new installations.
NOTE: The front edge of the sink should be at least 1/2″ (1.3 cm)
from the countertop edge.
For new installations, carefully place the sink upside down on the
countertop in the desired position. Be careful not to damage the
sink finish. Make sure the sink will not interfere with the cabinet.
Trace the sink outline on the countertop. Do not cut along this
line.
Draw a line 1/4″ (6 mm) inside the sink outline.
Before cutting, measure the cut-out line you just drew and
compare it to the overall sink dimensions. The cut-out line should
be approximately 1/2″ (1.3 cm) smaller than the overall sink
dimensions.
Drill a pilot hole inside the cutting line. Using a jigsaw or keyhole
saw, cut along the inside line to cut out the opening in the
countertop.
Sink
Countertop
Sink
Outline
1/4"
(6 mm)
Pilot Hole
Sterling 3 1014305-2-F

2. Install the Faucet Fitting
Install the faucet and drain fitting according to the manufacturer’s
instructions. If you are reusing fittings from an old sink, use
plumbers putty under the faucet base and top flange of the
strainer.
Install the mounting clips on the sink edge in the locations shown
above.
3. Attach the Sink
WARNING: Risk of personal injury. Metal surfaces are sharp
and can cause severe cuts. Use gloves and handle the sink
edges carefully.
Apply a bead of silicone or latex sealant around the edge of the
sink.
Set the sink into the cut-out and position squarely.
Loosen the mounting clip nuts and move the metal legs into
position. Push each metal leg against the bottom of the
countertop. Tighten the nuts evenly, tightening the middle clips
first and then the corners until the rim is sealed.
CAUTION: Risk of property damage. Do not overtighten. It is
only necessary to draw the rim down firmly to the countertop.
Reposition fasteners as required to compensate for an uneven
countertop.
Countertop
Sealant
Back View Of
Mounting Clip
Sink Edge
Apply a bead of sealant to the lip of the
sink and set it in the opening.
Loosen the leg nuts and slide the
metal leg tight to the countertop prior
to tightening the nuts.
Cut-Out
Metal Leg
Mounting Clip
Nut
1014305-2-F 4 Sterling

Attach the Sink (cont.)
Immediately wipe away any excess sealant with a damp cloth,
and fill any gaps as needed.
4. Finish the Installation
Connect the drain and faucet supply fittings.
Turn on the water supply and check for leaks.
Clean up with a non-abrasive cleaner.
Care and Cleaning Instructions
Clean stainless steel once a week. Always apply stainless steel
cleaner/polish with a non-abrasive cloth or sponge, working with, not
across, the grain. Cleaners containing chloride are not recommended. If
used, rinse the surface immediately to prevent corrosion. Avoid using
ordinary steel wool because particles may lodge in the surface of your
sink and give it a rusty appearance.
If the surface becomes excessively dirty, use a general purpose cleaner
such as: Fantastik
®
All Purpose, Clorox Clean-Up
®
, Mr. Clean
®
Top
Job, Lysol
®
Anti-bacterial Kitchen Cleaner, Easy-Off
®
Kitchen Clean,
409
®
All Purpose Cleaner, or Spic and Span.
Warranty-Stainless Steel Sinks
Kitchen ExclusivesTM/Specialty ExclusivesTM-LIFETIME LIMITED
WARRANTY
Kitchen Classics
TM/Specialty BasicsTM-25 YEAR LIMITED WARRANTY
Kitchen Basics
TM/Specialty BasicsTM-5 YEAR LIMITED WARRANTY
Based on classification specified above, Sterling Plumbing, a division of
Kohler Co., (Sterling) sinks are warranted to be free of manufacturing
defects within the time of the specified model’s limited warranty from
date of sale.
Sterling will, at its election, repair, rectify or replace a fixture when
Sterling’s inspection discloses any such defects occurring in normal
usage within the time periods of coverage stated above. Sterling is not
responsible for installation cost where replacement is indicated.
Damages due to improper handling, installation or maintenance are
not considered manufacturing defects and are not covered by this
warranty. This warranty is valid for the original purchaser only.
To obtain warranty service, contact Sterling, either through your
Sterling 5 1014305-2-F

Warranty-Stainless Steel Sinks (cont.)
plumbing contractor, home center, wholesaler or dealer, or by writing
Sterling Plumbing, Consumer Services, 444 highland Drive, Kohler,
Wisconsin 53044, 1-888-783-7546.
To the extent permitted by law, all implied warranties including that
of merchantability and fitness of particular purpose are hereby
disclaimed. Sterling disclaims any liability for special, incidental, or
consequential damages. Some states/provinces do not allow
limitations on how long an implied warranty lasts, or the exclusion or
limitation of incidental or consequential damages, so this limitation
and exclusion may not apply to you. This warranty gives you specific
legal rights. You may have other rights which vary from state/province
to state/province.
This is our exclusive written warranty.
1014305-2-F 6 Sterling

USA: 1-888-STERLING
México: 001-877-680-1310
SterlingPlumbing.com
©2004 Sterling Plumbing
1014305-2-F
/