Kohler K-3156-NA Installation guide

Type
Installation guide
Installation Guide
Stainless Steel Trough Sinks
M product numbers are for Mexico (i.e. K-12345M)
Los números de productos seguidos de
M corresponden a México (Ej.
K-12345M)
Français, page “Français-1”
Español, página“ Español-1”
K-3179 K-3187
K-3188 K-3189
1022023-2-B
Thank You For Choosing Kohler Company
We appreciate your commitment to Kohler quality. Please take a few
minutes to review this manual before you start installation. If you
encounter any installation or performance problems, please don’t
hesitate to contact us. Our phone numbers and website are listed on
the back cover. Thanks again for choosing Kohler Company.
Tools and Materials
Before You Begin
Refer to the Homeowners Guide to determine all necessary
components for your installation.
The Kohler K-5806 or K-5807 Kit is appropriate for use with this
undercounter installation.
Observe all local plumbing and building codes.
Inspect the drain and supply tubing. Replace if necessary.
For multiple sink installations, a minimum distance of 2-3/16
(5.6 cm) is required between the sinks. Any required support
should be determined by the countertop supplier.
All information in these instructions is based on the latest product
information available at the time of publication. Kohler Co.
reserves the right to make changes at any time without notice.
Pencil and
Marker
Measuring
Tape
Drill
Putty Knife
Scissors
Keyhole/Compass
or Saber Saw
Safety
Glasses
Sealant
1022023-2-B 2 Kohler Co.
1. Preparation
NOTE: You may require different, more specialized tools to install
this sink to countertop materials other than wood or wood
composites.
NOTE: For multiple bowl installations of single basin sinks, a
minimum distance of 2-3/16 (5.6 cm) is required between bowls.
Any required support should be determined by the countertop
supplier.
Cut along the inside of the template line where indicated for the
countertop opening.
Position the template on the countertop. Check for adequate
clearance between the sink, faucet, backsplash and cabinet.
Trace around the template on the countertop with a pencil.
Centerlines are provided to help align the opening.
Locate the faucet hole centerlines on the countertop. Faucet
centerline clearance from the top of the cut-out must be 2-3/8 (6
cm) minimum.
2-3/8" (6 cm)
Min.
Cutting Line
Faucet Centerline
Template
Kohler Co. 3 1022023-2-B
2. Complete the Installation
CAUTION: Risk of product damage. Do not cut, drill, or sand the
countertop while it is positioned over the fixture.
Cut out the opening by carefully following the pencil line traced
from the template.
For laminate-type countertops, make sure all exposed
non-laminated surfaces located near the cut-out area are finished
and sealed to prevent damage from water absorption.
Drill the required faucet holes and install the faucet to the
countertop according to the manufacturer’s instructions.
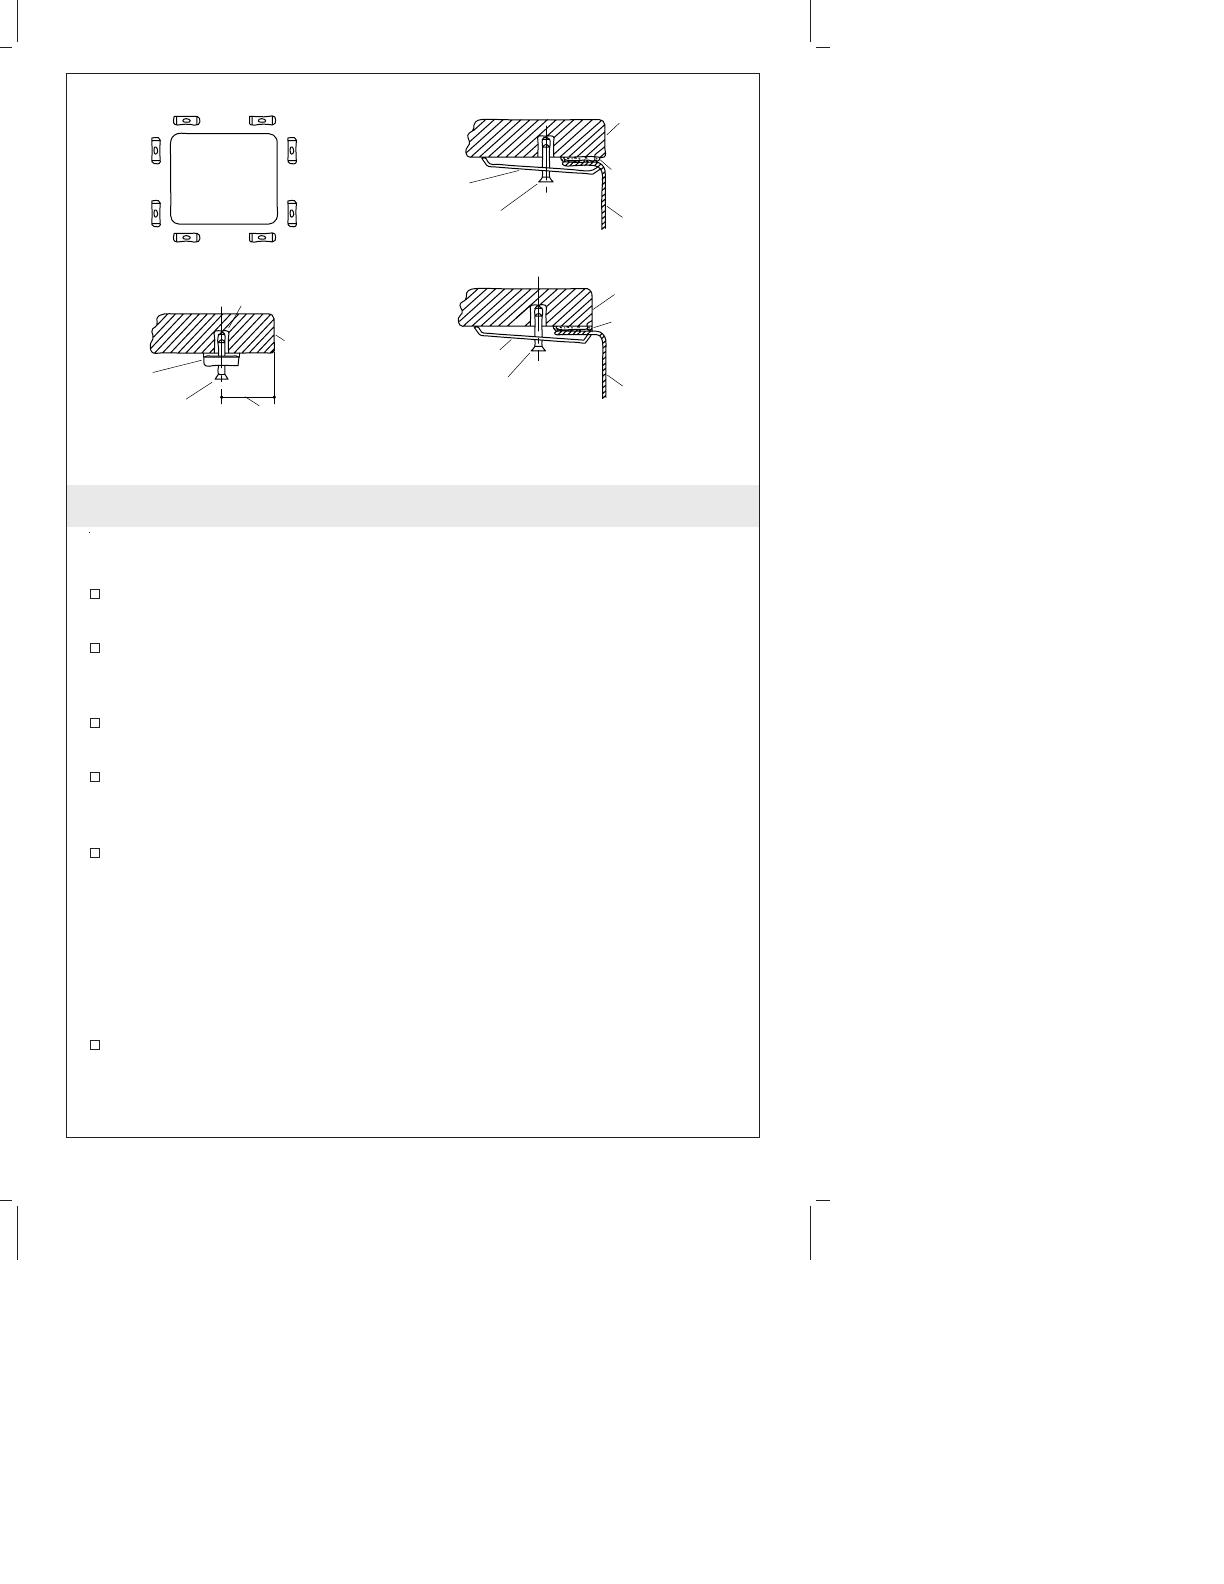
Equally space the required number of mounting brackets and
locate the mounting holes on the underside of the countertop
(find model number below for required number of brackets).
The type of fastener is dependent upon the countertop material
and should be recommended by a countertop supplier.
K-3179: Requires 10 mounting brackets.
K-3187: Requires 16 mounting brackets.
K-3188: Requires 20 mounting brackets.
K-3189: Requires 28 mounting brackets.
Turn the clamps parallel to the opening to allow for easy
installation of the sink.
Countertop Opening - Bottom View
1-3/8" (3.5 cm)
Insert (Not Furnished)
Single Basin Mounting
Double Basin Mounting
Countertop
Sink
Countertop
Sink
Edge
Countertop
Opening
Mounting
Bracket
Mounting
Bracket
Mounting
Bracket
Fastener
(Not Furnished)
Fastener
(Not Furnished)
Sealant
(Not Furnished)
Sealant
(Not Furnished)
Fastener
(Not Furnished)
1022023-2-B 4 Kohler Co.
Complete the Installation (cont.)
Clean all residue from the top of the sink rim. Clean the
underside of the countertop around the cut-out area, making sure
the surface is smooth and free of defects.
Apply a generous bead of silicone or latex sealant to the rim of
the sink, near the inside edge.
Position and align the sink with the opening in the countertop.
Rotate the mounting brackets over the sink rim and tighten until
snug.
Check the alignment of the sink with the cut-out and tighten the
fasteners.
Optional: From inside the sink basin, apply a bead of
high-quality sealant where the sink rim meets the underside of
the countertop.
Immediately wipe away any excess sealant, and fill any voids as
needed.
Allow the sealant to cure for at least 30 minutes before
proceeding.
Install the garbage disposal, if desired. Follow the manufacturer’s
instructions.
Connect and tighten the trap to the strainer, and complete the
water supply connections to the faucet according to the
instructions packed with the faucet.
Run water into the sink and check for leaks.
Clean up with a non-abrasive cleaner.
Kohler Co. 5 1022023-2-B
  • Page 1 1
  • Page 2 2
  • Page 3 3
  • Page 4 4
  • Page 5 5
  • Page 6 6
  • Page 7 7
  • Page 8 8
  • Page 9 9
  • Page 10 10
  • Page 11 11
  • Page 12 12
  • Page 13 13
  • Page 14 14
  • Page 15 15
  • Page 16 16

Kohler K-3156-NA Installation guide

Type
Installation guide

Ask a question and I''ll find the answer in the document

Finding information in a document is now easier with AI